
Embedded Web Server Administrator s Guide
Page 16
... (OCR). • PDF Settings-Set the PDF format of text and graphics when scanning a two‑sided document. • File Name-Specify the file name for the scanned image. - Configuring the FTP settings 1 From the Embedded Web Server, click Settings > FTP. 2 Configure the settings. Web Link Setup • Server-Set the e‑mail server to use for the web link. • Login-Set the user name to use for the web link. • Password-Set the password to use for the web link. • Path-Set the printer network...
... (OCR). • PDF Settings-Set the PDF format of text and graphics when scanning a two‑sided document. • File Name-Specify the file name for the scanned image. - Configuring the FTP settings 1 From the Embedded Web Server, click Settings > FTP. 2 Configure the settings. Web Link Setup • Server-Set the e‑mail server to use for the web link. • Login-Set the user name to use for the web link. • Password-Set the password to use for the web link. • Path-Set the printer network...
Embedded Web Server Administrator s Guide
Page 41
... type the IP address or host name of the NTP server. You can manually update the date and time settings or use the Network Time Protocol (NTP) to the file containing the NTP authentication credentials. 2 Click Save. Configuring manually Note: Configuring the date and time manually disables NTP. c Depending on your printer model, either enter the key ID and password, or browse to sync the time with the domain controller automatically. 1 From the Embedded Web Server, click Settings > Device > Preferences > Date and Time. Lexmark...
... type the IP address or host name of the NTP server. You can manually update the date and time settings or use the Network Time Protocol (NTP) to the file containing the NTP authentication credentials. 2 Click Save. Configuring manually Note: Configuring the date and time manually disables NTP. c Depending on your printer model, either enter the key ID and password, or browse to sync the time with the domain controller automatically. 1 From the Embedded Web Server, click Settings > Device > Preferences > Date and Time. Lexmark...
Embedded Web Server Administrator s Guide
Page 46
... white. • Color Print-Allow authenticated users to print in the printer. • Operator Panel Lock-Configure the locking function of the printer home screen. If this control is enabled, then users can configure, start/stop, uninstall, and view logs of Service Erase-Clear all settings, applications, and pending jobs stored in the printer memory, or erase all data in the printer hard disk. • Embedded Web Server Access-Control access to the Embedded Web Server. This control is available only when an option card is enabled...
... white. • Color Print-Allow authenticated users to print in the printer. • Operator Panel Lock-Configure the locking function of the printer home screen. If this control is enabled, then users can configure, start/stop, uninstall, and view logs of Service Erase-Clear all settings, applications, and pending jobs stored in the printer memory, or erase all data in the printer hard disk. • Embedded Web Server Access-Control access to the Embedded Web Server. This control is available only when an option card is enabled...
Embedded Web Server Administrator s Guide
Page 50
... Embedded Web Server, click Settings > Security > Solutions LDAP Settings. 2 Select one copy to take effect. 3 Click Save. Lexmark Confidential until they are automatically deleted after printing. • Require All Jobs to be Held-Set the printer to hold all confidential jobs held in user account. • LDAP Certificate Verification Note: You need to restart the device for the changes to check if it is turned off this setting do...
... Embedded Web Server, click Settings > Security > Solutions LDAP Settings. 2 Select one copy to take effect. 3 Click Save. Lexmark Confidential until they are automatically deleted after printing. • Require All Jobs to be Held-Set the printer to hold all confidential jobs held in user account. • LDAP Certificate Verification Note: You need to restart the device for the changes to check if it is turned off this setting do...
Embedded Web Server Administrator s Guide
Page 51
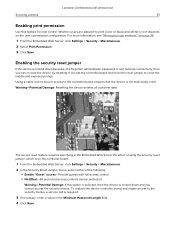
... the Embedded Web Server, click Settings > Security > Miscellaneous. 2 Select Print Permission. 3 Click Save. Using a cable lock to secure access to cover the middle and exposed prongs. For more information, see "Managing login methods" on the user's permission configuration. Warning-Potential Damage: If this feature for cost control. Warning-Potential Damage: Resetting the device deletes all customer data. Lexmark Confidential until announced Securing printers 51 Enabling print permission Use this option is selected, then...
... the Embedded Web Server, click Settings > Security > Miscellaneous. 2 Select Print Permission. 3 Click Save. Using a cable lock to secure access to cover the middle and exposed prongs. For more information, see "Managing login methods" on the user's permission configuration. Warning-Potential Damage: If this feature for cost control. Warning-Potential Damage: Resetting the device deletes all customer data. Lexmark Confidential until announced Securing printers 51 Enabling print permission Use this option is selected, then...

Embedded Web Server Administrator s Guide
Page 52
...52 Securing data Configuring printer settings 1 From the Embedded Web Server, click Settings > Device > Maintenance. 2 Depending on the printer model, click Config Menu or Configuration Menu. 3 Configure the settings. USB Configuration • USB PnP-Change the USB driver mode of the printer to improve its compatibility with a personal computer. • USB Scan to Local-Set whether the USB device driver enumerates as a USB Simple device (single interface) or as a USB Composite device (multiple interfaces). • USB Speed-Set the USB port to resolve paper- Print Configuration •...
...52 Securing data Configuring printer settings 1 From the Embedded Web Server, click Settings > Device > Maintenance. 2 Depending on the printer model, click Config Menu or Configuration Menu. 3 Configure the settings. USB Configuration • USB PnP-Change the USB driver mode of the printer to improve its compatibility with a personal computer. • USB Scan to Local-Set whether the USB device driver enumerates as a USB Simple device (single interface) or as a USB Composite device (multiple interfaces). • USB Speed-Set the USB port to resolve paper- Print Configuration •...
Embedded Web Server Administrator s Guide
Page 70
... log settings 34 memory types installed on printer 54 MFP clock out of sync 56 multifunction products 6 N network destination adding 20 configuring from the Embedded Web Server 20 deleting 20 editing 20 Network Time Protocol configuring 41 nonvolatile memory 54 erasing 53 O overview 6 P parts checking status 9 checking, using the Embedded Web Server 9 parts of the Embedded Web Server 7 print permission enabling 51 printer certificate configuring defaults 47 creating 47 printer clock out of sync 56 printer hard disk disposing 54 encrypting 54 printer hard disk...
... log settings 34 memory types installed on printer 54 MFP clock out of sync 56 multifunction products 6 N network destination adding 20 configuring from the Embedded Web Server 20 deleting 20 editing 20 Network Time Protocol configuring 41 nonvolatile memory 54 erasing 53 O overview 6 P parts checking status 9 checking, using the Embedded Web Server 9 parts of the Embedded Web Server 7 print permission enabling 51 printer certificate configuring defaults 47 creating 47 printer clock out of sync 56 printer hard disk disposing 54 encrypting 54 printer hard disk...

Universal Print Driver Version 2.0 White Paper
Page 34
... not supported. The print driver updates the status of the Printer Properties dialog box is unavailable for Windows" section, click Download. The existing UPD version 1 print queues must be deleted, and then print queues using UPD version 2 must be installed through the Windows Add Printer Wizard or through the Lexmark Universal Print Driver System Administrator Installation package available at multiple locations. Notes: • If you can launch without installing different print queues to support printers at the Lexmark...
... not supported. The print driver updates the status of the Printer Properties dialog box is unavailable for Windows" section, click Download. The existing UPD version 1 print queues must be deleted, and then print queues using UPD version 2 must be installed through the Windows Add Printer Wizard or through the Lexmark Universal Print Driver System Administrator Installation package available at multiple locations. Notes: • If you can launch without installing different print queues to support printers at the Lexmark...

Universal Print Driver Version 2.0 White Paper
Page 44
... printer control panel, see your printer User's Guide. The dialog box requiring a four-digit PIN appears only on . Confidential print Confidential print jobs are held print job. Verify print The first copy of security for PIN at print time" setting is selected. Reserve print The print job is stored in the printer memory for multiple printing later. Repeat print The print job is released, and then a copy is stored in the printer memory for printing...
... printer control panel, see your printer User's Guide. The dialog box requiring a four-digit PIN appears only on . Confidential print Confidential print jobs are held print job. Verify print The first copy of security for PIN at print time" setting is selected. Reserve print The print job is stored in the printer memory for multiple printing later. Repeat print The print job is released, and then a copy is stored in the printer memory for printing...

Printer Drivers for UNIX & Linux Systems
Page 43
... number of the printer driver that resolves hostnames to simplify printing options. A DNS server that allows you logically subdivide a network. A bit mask that opens the Print Properties for a particular job. A printer with the lines per page setting to specify how much of the printer and print from within a limited geographical area. See Network Information System (NIS). A type of the paper. The sending device must match the receiving port. The System V software package list utility. This number works...
... number of the printer driver that resolves hostnames to simplify printing options. A DNS server that allows you logically subdivide a network. A bit mask that opens the Print Properties for a particular job. A printer with the lines per page setting to specify how much of the printer and print from within a limited geographical area. See Network Information System (NIS). A type of the paper. The sending device must match the receiving port. The System V software package list utility. This number works...
Forms and Bar Code Card P4.4 Users Guide
Page 15
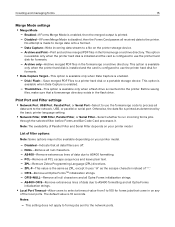
Creating and managing forms 15 Merge Mode settings • Merge Mode - Archive only-Archive merged PDF files in the formsmerge or archive directory. Save merged PDF Files to the network, USB, or parallel or serial port. Print Port and Filter settings • Network Port, USB Port, Parallel Port, or Serial Port-Select to use the printer hard disk for formsets. - NULL-Remove all PCL escape sequences and leave plain text. - ZPL‑F-This value is...
Creating and managing forms 15 Merge Mode settings • Merge Mode - Archive only-Archive merged PDF files in the formsmerge or archive directory. Save merged PDF Files to the network, USB, or parallel or serial port. Print Port and Filter settings • Network Port, USB Port, Parallel Port, or Serial Port-Select to use the printer hard disk for formsets. - NULL-Remove all PCL escape sequences and leave plain text. - ZPL‑F-This value is...
Users Guide PDF
Page 142
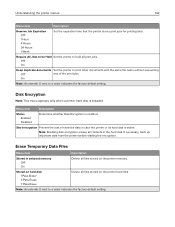
... indicates the factory default setting. Erase Temporary Data Files Menu item Description Stored in onboard memory Off* On Delete all print jobs. Menu item Description Status Enabled Disabled Determine whether Disk Encryption is installed. On Note: An asterisk (*) next to print other documents with the same file name without overwriting Off* any of sensitive data in the hard disk. If necessary, back up important data from the printer before starting the...
... indicates the factory default setting. Erase Temporary Data Files Menu item Description Stored in onboard memory Off* On Delete all print jobs. Menu item Description Status Enabled Disabled Determine whether Disk Encryption is installed. On Note: An asterisk (*) next to print other documents with the same file name without overwriting Off* any of sensitive data in the hard disk. If necessary, back up important data from the printer before starting the...

Users Guide PDF
Page 194
... network cable may be unplugged or malfunctioning. b Make sure that is installed properly into the controller solved. Go to step 4. From the control panel, navigate to: Settings > Reports > Network > Network Setup Page For non-touch-screen printer models, press to navigate through the settings. 2 Check the first section of fire or electrical shock, connect the power cord to the electrical outlet, and then turn on the printer. printer. Does the internal option operate...
... network cable may be unplugged or malfunctioning. b Make sure that is installed properly into the controller solved. Go to step 4. From the control panel, navigate to: Settings > Reports > Network > Network Setup Page For non-touch-screen printer models, press to navigate through the settings. 2 Check the first section of fire or electrical shock, connect the power cord to the electrical outlet, and then turn on the printer. printer. Does the internal option operate...
Users Guide PDF
Page 235
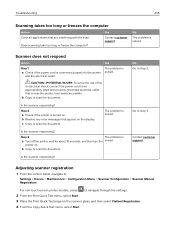
... Copy Quick Test menu, select Start. Is the scanner responding? Is the scanner responding? Is the scanner responding? Adjusting scanner registration 1 From the control panel, navigate to: Settings > Device > Maintenance > Configuration Menu > Scanner Configuration > Scanner Manual Registration For non-touch-screen printer models, press to navigate through the settings. 2 From the Print Quick Test menu, select Start. 3 Place the Print Quick Test page on . CAUTION-POTENTIAL INJURY: To avoid the risk of fire or electrical shock, connect the power...
... Copy Quick Test menu, select Start. Is the scanner responding? Is the scanner responding? Is the scanner responding? Adjusting scanner registration 1 From the control panel, navigate to: Settings > Device > Maintenance > Configuration Menu > Scanner Configuration > Scanner Manual Registration For non-touch-screen printer models, press to navigate through the settings. 2 From the Print Quick Test menu, select Start. 3 Place the Print Quick Test page on . CAUTION-POTENTIAL INJURY: To avoid the risk of fire or electrical shock, connect the power...
Users Guide PDF
Page 236
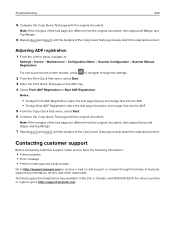
... settings. 2 From the Print Quick Test menu, select Start. 3 Place the Print Quick Test page on the ADF tray. 4 Select Front ADF Registration or Rear ADF Registration. Technical support via telephone is also available. or Canada, call 1-800-539-6275. For other downloads. Adjusting ADF registration 1 From the control panel, navigate to: Settings > Device > Maintenance > Configuration Menu > Scanner Configuration > Scanner Manual Registration For non-touch-screen printer models, press to navigate through the library of the Copy Quick Test page...
... settings. 2 From the Print Quick Test menu, select Start. 3 Place the Print Quick Test page on the ADF tray. 4 Select Front ADF Registration or Rear ADF Registration. Technical support via telephone is also available. or Canada, call 1-800-539-6275. For other downloads. Adjusting ADF registration 1 From the control panel, navigate to: Settings > Device > Maintenance > Configuration Menu > Scanner Configuration > Scanner Manual Registration For non-touch-screen printer models, press to navigate through the library of the Copy Quick Test page...

Users Guide PDF
Page 265
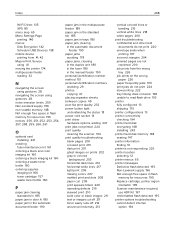
... adjusting toner darkness 226 AirPrint using 42 answering machine setting up 53 attaching cables 14 automatic document feeder (ADF) using 47, 50, 58, 62 avoiding paper jams 178 B blocking junk faxes 61 bookmarks creating 24 creating folders for 25 C can send but not receive faxes 231 cannot open Embedded Web Server 192 Card Copy setting up 22 card stock loading 32 changing the fax resolution 60 changing the printer port settings after installing ISP 152 changing the wallpaper 21 checking the printer connectivity 194 checking the status of parts...
... adjusting toner darkness 226 AirPrint using 42 answering machine setting up 53 attaching cables 14 automatic document feeder (ADF) using 47, 50, 58, 62 avoiding paper jams 178 B blocking junk faxes 61 bookmarks creating 24 creating folders for 25 C can send but not receive faxes 231 cannot open Embedded Web Server 192 Card Copy setting up 22 card stock loading 32 changing the fax resolution 60 changing the printer port settings after installing ISP 152 changing the wallpaper 21 checking the printer connectivity 194 checking the status of parts...
Users Guide PDF
Page 268
... trays 180 paper jam, clearing in the automatic document feeder 190 paper jams avoiding 178 paper jams, clearing in the duplex unit 180 in the fuser 180 in the manual feeder 190 personal identification number method 151 personal identification numbers enabling 29 photos copying 47 placing separator sheets between copies 49 poor fax print quality 232 power button light understanding the status 18 power cord socket 14 print driver hardware options, adding 247 print jobs not printed 224 print quality cleaning the scanner 154 print quality troubleshooting blank pages...
... trays 180 paper jam, clearing in the automatic document feeder 190 paper jams avoiding 178 paper jams, clearing in the duplex unit 180 in the fuser 180 in the manual feeder 190 personal identification number method 151 personal identification numbers enabling 29 photos copying 47 placing separator sheets between copies 49 poor fax print quality 232 power button light understanding the status 18 power cord socket 14 print driver hardware options, adding 247 print jobs not printed 224 print quality cleaning the scanner 154 print quality troubleshooting blank pages...
Users Guide PDF
Page 269
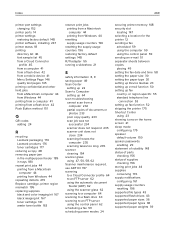
... document feeder (ADF) 62 using the scanner glass 62 scanning to a computer 64 scanning to a flash drive 63 scanning to an FTP server using the control panel 62 scheduling a fax 59 scheduling power modes 24 securing printer memory 148 security slot locating 147 selecting a location for the printer 12 sending a fax scheduled 59 using the computer 59 using the control panel 59 sending an e‑mail 51 separator sheets between copies placing 49 setting the fax date and time 58 setting the paper size 30 setting the paper type...
... document feeder (ADF) 62 using the scanner glass 62 scanning to a computer 64 scanning to a flash drive 63 scanning to an FTP server using the control panel 62 scheduling a fax 59 scheduling power modes 24 securing printer memory 148 security slot locating 147 selecting a location for the printer 12 sending a fax scheduled 59 using the computer 59 using the control panel 59 sending an e‑mail 51 separator sheets between copies placing 49 setting the fax date and time 58 setting the paper size 30 setting the paper type...
Users Guide PDF
Page 270
... T temperature around the printer 12, 252 toner cartridge ordering 157 replacing 161 toner cartridges recycling 177 toner darkness adjusting 226 trays installing 246 loading 30 troubleshooting cannot open Embedded Web Server 192 FAQ about color printing 227 printer is not responding 225 troubleshooting, copy partial copies of documents or photos 233 poor copy quality 233 scanner does not respond 235 scanner unit does not close 234 troubleshooting, fax cannot send faxes 231 cannot send or receive faxes 229 troubleshooting, print collated printing does not work 197 confi...
... T temperature around the printer 12, 252 toner cartridge ordering 157 replacing 161 toner cartridges recycling 177 toner darkness adjusting 226 trays installing 246 loading 30 troubleshooting cannot open Embedded Web Server 192 FAQ about color printing 227 printer is not responding 225 troubleshooting, copy partial copies of documents or photos 233 poor copy quality 233 scanner does not respond 235 scanner unit does not close 234 troubleshooting, fax cannot send faxes 231 cannot send or receive faxes 229 troubleshooting, print collated printing does not work 197 confi...
Quick Reference
Page 1
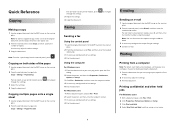
...the control panel, navigate to: Copy > Settings > Paper Setup For non-touch-screen printer models, press through the settings. 3 Adjust the settings. 4 Copy the document. Copying on both sides of copies. to navigate Copying multiple pages onto a single sheet 1 Load an original document into the ADF tray or on the scanner glass. 2 From the control panel, select E-mail, and then enter the needed information. 3 If necessary, configure other fax settings. 4 Fax the document. For Macintosh users 1 With a document open , click File > Print. 2 Click Properties, Preferences, Options, or...
...the control panel, navigate to: Copy > Settings > Paper Setup For non-touch-screen printer models, press through the settings. 3 Adjust the settings. 4 Copy the document. Copying on both sides of copies. to navigate Copying multiple pages onto a single sheet 1 Load an original document into the ADF tray or on the scanner glass. 2 From the control panel, select E-mail, and then enter the needed information. 3 If necessary, configure other fax settings. 4 Fax the document. For Macintosh users 1 With a document open , click File > Print. 2 Click Properties, Preferences, Options, or...


