Print Defects Guide
Page 1
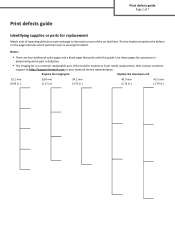
Replace the imaging kit Replace the developer unit 25.1 mm (0.99 in.) 29.8 mm (1.17 in.) 94.2 mm (3.70 in.) 43.9 mm (1.72 in.) 45.5 mm (1.79 in determining which particular part is a customer replaceable part. If the transfer module or fuser needs replacement, then contact customer support at http://support.lexmark.com or...
Replace the imaging kit Replace the developer unit 25.1 mm (0.99 in.) 29.8 mm (1.17 in.) 94.2 mm (3.70 in.) 43.9 mm (1.72 in.) 45.5 mm (1.79 in determining which particular part is a customer replaceable part. If the transfer module or fuser needs replacement, then contact customer support at http://support.lexmark.com or...
Supplies Guide
Page 2
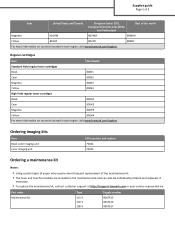
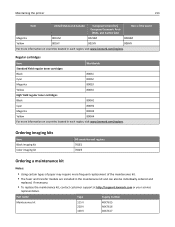
... be individually ordered and replaced, if necessary. • To replace the maintenance kit, contact customer support at http://support.lexmark.com or your service representative. Ordering imaging kits Item Black color imaging unit Color imaging unit All countries and regions 700Z1 700Z5 Ordering a maintenance kit Notes: • Using certain types of paper may require more frequent replacement...
... be individually ordered and replaced, if necessary. • To replace the maintenance kit, contact customer support at http://support.lexmark.com or your service representative. Ordering imaging kits Item Black color imaging unit Color imaging unit All countries and regions 700Z1 700Z5 Ordering a maintenance kit Notes: • Using certain types of paper may require more frequent replacement...
User's Guide
Page 122
... Invalid Region OK Non‑genuine Lexmark Cartridge Black or Color Imaging Kit Nearly Low Low Very Low Replace Missing Defective Missing or Unresponsive Unsupported OK Non‑genuine Lexmark Imaging Kit Waste Toner Bottle Near Full Replace Missing OK Maintenance Kit Nearly Low Low Very Low Replace ...OK 122 To Show the status of the maintenance kit. Show the status of the black or color imaging kit. Show the status of the...
... Invalid Region OK Non‑genuine Lexmark Cartridge Black or Color Imaging Kit Nearly Low Low Very Low Replace Missing Defective Missing or Unresponsive Unsupported OK Non‑genuine Lexmark Imaging Kit Waste Toner Bottle Near Full Replace Missing OK Maintenance Kit Nearly Low Low Very Low Replace ...OK 122 To Show the status of the maintenance kit. Show the status of the black or color imaging kit. Show the status of the...
User's Guide
Page 213
Ordering imaging kits Item Black imaging kit Color imaging kit All countries and regions 700Z1 700Z5 Ordering a maintenance kit Notes: • Using certain types of paper may require more frequent replacement of... the world European Economic Area (EEA), and Switzerland Magenta 801HM 802HM 808HM Yellow 801HY 802HY 808HY For more information on countries located in each region, visit www.lexmark...
Ordering imaging kits Item Black imaging kit Color imaging kit All countries and regions 700Z1 700Z5 Ordering a maintenance kit Notes: • Using certain types of paper may require more frequent replacement of... the world European Economic Area (EEA), and Switzerland Magenta 801HM 802HM 808HM Yellow 801HY 802HY 808HY For more information on countries located in each region, visit www.lexmark...
User's Guide
Page 218
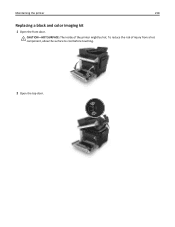
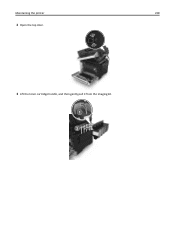
CAUTION-HOT SURFACE: The inside of injury from a hot component, allow the surface to cool before touching. 2 Open the top door. To reduce the risk of the printer might be hot. Maintaining the printer 218 Replacing a black and color imaging kit 1 Open the front door.
CAUTION-HOT SURFACE: The inside of injury from a hot component, allow the surface to cool before touching. 2 Open the top door. To reduce the risk of the printer might be hot. Maintaining the printer 218 Replacing a black and color imaging kit 1 Open the front door.

User's Guide
Page 219
Maintaining the printer 219 3 Remove the toner cartridges by lifting the handles, and then gently pulling them away from the imaging kit. 4 Remove the right side cover. 5 Press the green levers on each side of the waste toner bottle, and then remove the waste toner bottle.
Maintaining the printer 219 3 Remove the toner cartridges by lifting the handles, and then gently pulling them away from the imaging kit. 4 Remove the right side cover. 5 Press the green levers on each side of the waste toner bottle, and then remove the waste toner bottle.
User's Guide
Page 220
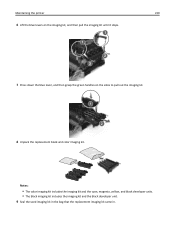
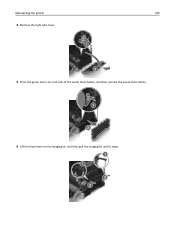
Maintaining the printer 220 6 Lift the blue levers on the imaging kit, and then pull the imaging kit until it stops. 7 Press down the blue lever, and then grasp the green handles on the sides to pull out the imaging kit. 8 Unpack the replacement black and color imaging kit. Notes: • The color imaging kit includes the imaging kit and the cyan, magenta, yellow, and black developer units. • The black imaging kit includes the imaging kit and the black developer unit. 9 Seal the used imaging kit in the bag that the replacement imaging kit came in.
Maintaining the printer 220 6 Lift the blue levers on the imaging kit, and then pull the imaging kit until it stops. 7 Press down the blue lever, and then grasp the green handles on the sides to pull out the imaging kit. 8 Unpack the replacement black and color imaging kit. Notes: • The color imaging kit includes the imaging kit and the cyan, magenta, yellow, and black developer units. • The black imaging kit includes the imaging kit and the black developer unit. 9 Seal the used imaging kit in the bag that the replacement imaging kit came in.

User's Guide
Page 221
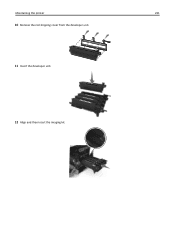
Dispose only the black developer unit. 10 Gently shake the yellow, cyan, magenta, and black developer units side‑to‑side. 11 Remove the red packing strip and the attached fabric from the developer units. Note: When replacing the black imaging kit, save the cyan, magenta, and yellow developer units. Maintaining the printer 221 For more information, see "Recycling Lexmark products" on page 203.
Dispose only the black developer unit. 10 Gently shake the yellow, cyan, magenta, and black developer units side‑to‑side. 11 Remove the red packing strip and the attached fabric from the developer units. Note: When replacing the black imaging kit, save the cyan, magenta, and yellow developer units. Maintaining the printer 221 For more information, see "Recycling Lexmark products" on page 203.
User's Guide
Page 222
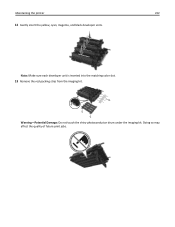
Doing so may affect the quality of future print jobs. Warning-Potential Damage: Do not touch the shiny photoconductor drum under the imaging kit. Maintaining the printer 222 12 Gently insert the yellow, cyan, magenta, and black developer units. Note: Make sure each developer unit is inserted into the matching color slot. 13 Remove the red packing strip from the imaging kit.
Doing so may affect the quality of future print jobs. Warning-Potential Damage: Do not touch the shiny photoconductor drum under the imaging kit. Maintaining the printer 222 12 Gently insert the yellow, cyan, magenta, and black developer units. Note: Make sure each developer unit is inserted into the matching color slot. 13 Remove the red packing strip from the imaging kit.
User's Guide
Page 223
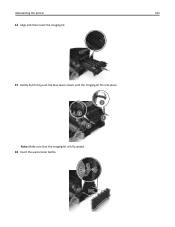
Maintaining the printer 223 14 Align and then insert the imaging kit. 15 Gently but firmly push the blue levers down until the imaging kit fits into place. Note: Make sure that the imaging kit is fully seated. 16 Insert the waste toner bottle.
Maintaining the printer 223 14 Align and then insert the imaging kit. 15 Gently but firmly push the blue levers down until the imaging kit fits into place. Note: Make sure that the imaging kit is fully seated. 16 Insert the waste toner bottle.

User's Guide
Page 226
Maintaining the printer 226 2 Remove the toner cartridge by lifting the handle, and then gently pulling it away from the imaging kit. 3 Unpack the new toner cartridge, and then remove its packaging. 4 Align the new toner cartridge, and then press the cartridge down until it fits into place.
Maintaining the printer 226 2 Remove the toner cartridge by lifting the handle, and then gently pulling it away from the imaging kit. 3 Unpack the new toner cartridge, and then remove its packaging. 4 Align the new toner cartridge, and then press the cartridge down until it fits into place.
User's Guide
Page 228
Maintaining the printer 228 2 Open the top door. 3 Lift the toner cartridge handle, and then gently pull it from the imaging kit.
Maintaining the printer 228 2 Open the top door. 3 Lift the toner cartridge handle, and then gently pull it from the imaging kit.
User's Guide
Page 229
Maintaining the printer 229 4 Remove the right side cover. 5 Press the green levers on each side of the waste toner bottle, and then remove the waste toner bottle. 6 Lift the blue levers on the imaging kit, and then pull the imaging kit until it stops.
Maintaining the printer 229 4 Remove the right side cover. 5 Press the green levers on each side of the waste toner bottle, and then remove the waste toner bottle. 6 Lift the blue levers on the imaging kit, and then pull the imaging kit until it stops.

User's Guide
Page 230
Doing so could damage the imaging kit. 8 Remove the used developer unit. 9 Gently shake the replacement developer unit side‑to pull out the imaging kit. Warning-Potential Damage: Do not touch the underside of the imaging kit. Maintaining the printer 230 7 Press down the blue lever, and then grasp the green handles on the sides to ‑side before removing it from its packaging.
Doing so could damage the imaging kit. 8 Remove the used developer unit. 9 Gently shake the replacement developer unit side‑to pull out the imaging kit. Warning-Potential Damage: Do not touch the underside of the imaging kit. Maintaining the printer 230 7 Press down the blue lever, and then grasp the green handles on the sides to ‑side before removing it from its packaging.
User's Guide
Page 231
Maintaining the printer 231 10 Remove the red shipping cover from the developer unit. 11 Insert the developer unit. 12 Align and then insert the imaging kit.
Maintaining the printer 231 10 Remove the red shipping cover from the developer unit. 11 Insert the developer unit. 12 Align and then insert the imaging kit.

User's Guide
Page 232
Maintaining the printer 232 13 Gently but firmly push the blue levers down until the imaging kit fits into place. Note: Make sure that the imaging kit is fully seated. 14 Replace the waste toner bottle. 15 Insert the right side cover.
Maintaining the printer 232 13 Gently but firmly push the blue levers down until the imaging kit fits into place. Note: Make sure that the imaging kit is fully seated. 14 Replace the waste toner bottle. 15 Insert the right side cover.
User's Guide
Page 236
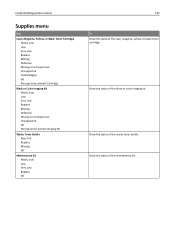
... appears as four sets of the supply when supply notification is available for all supplies occurs. Notes: • You can select alerts for toner cartridges, imaging kit, maintenance kit, and waste toner bottle. • All alerts can determine how you want to view. Not all alerts can be replaced to be set for...
... appears as four sets of the supply when supply notification is available for all supplies occurs. Notes: • You can select alerts for toner cartridges, imaging kit, maintenance kit, and waste toner bottle. • All alerts can determine how you want to view. Not all alerts can be replaced to be set for...
User's Guide
Page 262
... remove the third-party supply or part from your Lexmark printer or its imaging components. Replace the cartridge. For more information, see the "Replacing supplies" section of the User's Guide. • Remove the unresponsive imaging kit, and then reinstall it . Replace the imaging kit. Troubleshooting 262 Non-Lexmark [color] [supply type], see the "Ordering supplies" section of...
... remove the third-party supply or part from your Lexmark printer or its imaging components. Replace the cartridge. For more information, see the "Replacing supplies" section of the User's Guide. • Remove the unresponsive imaging kit, and then reinstall it . Replace the imaging kit. Troubleshooting 262 Non-Lexmark [color] [supply type], see the "Ordering supplies" section of...
User's Guide
Page 263
....lexmark.com. For more information, see the "Ordering supplies" section of the world 9 Invalid Notes: • The x and y values represent .xy in the error code that came with the supply. x indicates the value of the printer. x and y can be a black imaging kit, or a black and color imaging kit.... of the printer region. For non‑touch‑screen printer models, press to clear the message and continue printing. Replace [type] imaging kit, 0 estimated pages remain [84.xy] Note: The type can have a replacement cartridge, then see the instruction sheet that appears on...
....lexmark.com. For more information, see the "Ordering supplies" section of the world 9 Invalid Notes: • The x and y values represent .xy in the error code that came with the supply. x indicates the value of the printer. x and y can be a black imaging kit, or a black and color imaging kit.... of the printer region. For non‑touch‑screen printer models, press to clear the message and continue printing. Replace [type] imaging kit, 0 estimated pages remain [84.xy] Note: The type can have a replacement cartridge, then see the instruction sheet that appears on...
User's Guide
Page 264
... the same settings from the previous scan job. Note: If you do not have a replacement imaging kit, then see the "Ordering supplies" section of the User's Guide or visit www.lexmark.com. Troubleshooting 264 Replace the indicated imaging kit to clear the message and continue printing. Remove defective disk [61] Remove and replace the defective...
... the same settings from the previous scan job. Note: If you do not have a replacement imaging kit, then see the "Ordering supplies" section of the User's Guide or visit www.lexmark.com. Troubleshooting 264 Replace the indicated imaging kit to clear the message and continue printing. Remove defective disk [61] Remove and replace the defective...


