
User Guide
Page 3
......31 Connecting the printer to a wireless network using Wi‑Fi Protected Setup (WPS 31 Changing port settings after installing an internal solutions port 32 Setting up serial printing (Windows only)...32 Cleaning the printer...33 Ordering supplies...33 Checking the status of parts and supplies ...33 Using genuine Lexmark parts and supplies ...33 Ordering toner cartridges ...34 Ordering imaging unit or imaging kit ...34 Ordering a waste toner bottle...34 Ordering a fuser maintenance kit ...34 Ordering a transfer module ...34 Replacing parts and supplies...35 Replacing the imaging unit...
......31 Connecting the printer to a wireless network using Wi‑Fi Protected Setup (WPS 31 Changing port settings after installing an internal solutions port 32 Setting up serial printing (Windows only)...32 Cleaning the printer...33 Ordering supplies...33 Checking the status of parts and supplies ...33 Using genuine Lexmark parts and supplies ...33 Ordering toner cartridges ...34 Ordering imaging unit or imaging kit ...34 Ordering a waste toner bottle...34 Ordering a fuser maintenance kit ...34 Ordering a transfer module ...34 Replacing parts and supplies...35 Replacing the imaging unit...

User Guide
Page 4
...jam locations...59 Paper jam in trays...60 Paper jam in the multipurpose feeder...61 Paper jam in the standard bin...61 Paper jam in door A...62 Troubleshooting 66 Network connection problems...66 Hardware options problems...68 Paper feed problems...70 Printing problems...73 Color quality problems...91 Contacting customer support...94 Upgrading and migrating 95 Hardware...95 Available internal options...95 Installing a memory card ...95 Installing an internal solutions port...97 Installing an optional card ...102 Installing a printer hard disk ...104 Installing optional trays ...108 Software...
...jam locations...59 Paper jam in trays...60 Paper jam in the multipurpose feeder...61 Paper jam in the standard bin...61 Paper jam in door A...62 Troubleshooting 66 Network connection problems...66 Hardware options problems...68 Paper feed problems...70 Printing problems...73 Color quality problems...91 Contacting customer support...94 Upgrading and migrating 95 Hardware...95 Available internal options...95 Installing a memory card ...95 Installing an internal solutions port...97 Installing an optional card ...102 Installing a printer hard disk ...104 Installing optional trays ...108 Software...

User Guide
Page 9
... setup instructions: • Connecting the printer • Installing the printer software Additional setup and instructions for using the printer: • Selecting and storing paper and specialty media • Loading paper • Configuring printer settings • Viewing and printing documents and photos • Setting up and using the printer software • Configuring the printer on a network • Caring for ? Information Center-Authoritative online resource for Microsoft® Windows® or Macintosh operating systems-Open a printer software...
... setup instructions: • Connecting the printer • Installing the printer software Additional setup and instructions for using the printer: • Selecting and storing paper and specialty media • Loading paper • Configuring printer settings • Viewing and printing documents and photos • Setting up and using the printer software • Configuring the printer on a network • Caring for ? Information Center-Authoritative online resource for Microsoft® Windows® or Macintosh operating systems-Open a printer software...

User Guide
Page 14
... customization settings, administrative setup, and active embedded solutions. The printer is off or in an input field. 4 Power button • Turn on or turn off the printer. Note: To turn off the printer, press and hold the power button for five seconds. • Set the printer to Sleep or Hibernate mode. • Wake the printer from Sleep or Hibernate mode. 5 Stop or Cancel button Stop the current job. 6 Indicator light Check the status of the printer. 7 Volume buttons Adjust...
... customization settings, administrative setup, and active embedded solutions. The printer is off or in an input field. 4 Power button • Turn on or turn off the printer. Note: To turn off the printer, press and hold the power button for five seconds. • Set the printer to Sleep or Hibernate mode. • Wake the printer from Sleep or Hibernate mode. 5 Stop or Cancel button Stop the current job. 6 Indicator light Check the status of the printer. 7 Volume buttons Adjust...

User Guide
Page 16
... about the printer 16 Menus list Device Print Preferences Layout Notifications Setup Group Lists Quality Alert Types Job Accounting Anti‑Spam Logic Description Image Suppressing Duplicate Alerts XPS Power Management PDF Information Sent to Lexmark HTML Accessibility PostScript Restore Factory Defaults PCL Maintenance PPDS Remote Operator Panel Visible Home Screen Icons Site Map Update Firmware About This Printer Paper Network/Ports USB Drive Tray Configuration Network Overview Flash Drive Print Media Configuration Wireless Bin Confi...
... about the printer 16 Menus list Device Print Preferences Layout Notifications Setup Group Lists Quality Alert Types Job Accounting Anti‑Spam Logic Description Image Suppressing Duplicate Alerts XPS Power Management PDF Information Sent to Lexmark HTML Accessibility PostScript Restore Factory Defaults PCL Maintenance PPDS Remote Operator Panel Visible Home Screen Icons Site Map Update Firmware About This Printer Paper Network/Ports USB Drive Tray Configuration Network Overview Flash Drive Print Media Configuration Wireless Bin Confi...
User Guide
Page 18
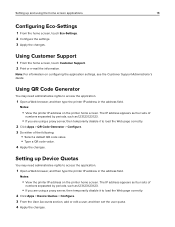
... of numbers separated by periods, such as 123.123.123.123. • If you are using a proxy server, then temporarily disable it to load the Web page correctly. 2 Click Apps > Device Quotas > Configure. 3 From the User Accounts section, add or edit a user, and then set the user quota. 4 Apply the changes. The IP address appears as four sets of the following: • Select a default QR code...
... of numbers separated by periods, such as 123.123.123.123. • If you are using a proxy server, then temporarily disable it to load the Web page correctly. 2 Click Apps > Device Quotas > Configure. 3 From the User Accounts section, add or edit a user, and then set the user quota. 4 Apply the changes. The IP address appears as four sets of the following: • Select a default QR code...
User Guide
Page 27
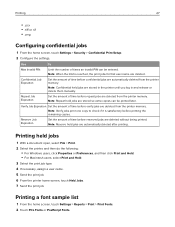
...fidential jobs are stored so extra copies can be printed later. Printing held jobs are automatically deleted from the printer memory. Repeat Job Expiration Set the amount of times an invalid PIN can be entered. Use To Max Invalid PIN Limit the number of time before reserved jobs are deleted from the printer memory. Printing a font sample list 1 From the home screen, touch Settings > Reports > Print > Print Fonts. 2 Touch PCL Fonts or PostScript Fonts. Note...
...fidential jobs are stored so extra copies can be printed later. Printing held jobs are automatically deleted from the printer memory. Repeat Job Expiration Set the amount of times an invalid PIN can be entered. Use To Max Invalid PIN Limit the number of time before reserved jobs are deleted from the printer memory. Printing a font sample list 1 From the home screen, touch Settings > Reports > Print > Print Fonts. 2 Touch PCL Fonts or PostScript Fonts. Note...

User Guide
Page 30
... the hard disk to physically destroy each hard disk where data is stored. This lets the printer retain buffered user data from complex print jobs, as well as form data, and font data. Some printers have a printer hard disk installed. Both types are completely erased is to break component parts and render them unreadable • Milling-Physically shreds the hard disk into small metal bits Note: Most data can store device and network settings, and user data. Type of...
... the hard disk to physically destroy each hard disk where data is stored. This lets the printer retain buffered user data from complex print jobs, as well as form data, and font data. Some printers have a printer hard disk installed. Both types are completely erased is to break component parts and render them unreadable • Milling-Physically shreds the hard disk into small metal bits Note: Most data can store device and network settings, and user data. Type of...

User Guide
Page 31
... the display. Networking Connecting the printer to a wireless network using Wi‑Fi Protected Setup (WPS) Before you are using a proxy server, then temporarily disable it to load the Web page correctly. 4 Access the WPS settings. Using the personal identification number (PIN) method 1 From the control panel, navigate to: Settings > Network/Ports > Wireless > Wi‑Fi Protected Setup > Start PIN Method 2 Copy the eight‑digit WPS PIN. 3 Open a Web browser, and then type the IP address of numbers...
... the display. Networking Connecting the printer to a wireless network using Wi‑Fi Protected Setup (WPS) Before you are using a proxy server, then temporarily disable it to load the Web page correctly. 4 Access the WPS settings. Using the personal identification number (PIN) method 1 From the control panel, navigate to: Settings > Network/Ports > Wireless > Wi‑Fi Protected Setup > Start PIN Method 2 Copy the eight‑digit WPS PIN. 3 Open a Web browser, and then type the IP address of numbers...

User Guide
Page 32
...; Serial printing reduces printing speed. • Make sure that the serial cable is connected to the serial port on your printer. 3 Open the printer properties, and then select the COM port from the Ethernet network. Setting up serial printing (Windows only) 1 Set the parameters in the address field. 3 Apply the changes. a From the control panel, navigate to the menu for the serial port settings, and then adjust the settings, if necessary. b Locate the menu for the port settings. Maintaining the printer 32 Changing port settings after installing...
...; Serial printing reduces printing speed. • Make sure that the serial cable is connected to the serial port on your printer. 3 Open the printer properties, and then select the COM port from the Ethernet network. Setting up serial printing (Windows only) 1 Set the parameters in the address field. 3 Apply the changes. a From the control panel, navigate to the menu for the serial port settings, and then adjust the settings, if necessary. b Locate the menu for the port settings. Maintaining the printer 32 Changing port settings after installing...

User Guide
Page 56
Conserving supplies • Print on a single sheet of paper. • Use the preview feature to see how the document looks like before sending a print job. • The Embedded Web Server is disabled when the printer is the default setting in hibernate mode. Note: Two-sided printing is in the print driver. • Print multiple pages on both sides of the document to check its content and format for recycling: 1 Go to www.lexmark.com/recycle...
Conserving supplies • Print on a single sheet of paper. • Use the preview feature to see how the document looks like before sending a print job. • The Embedded Web Server is disabled when the printer is the default setting in hibernate mode. Note: Two-sided printing is in the print driver. • Print multiple pages on both sides of the document to check its content and format for recycling: 1 Go to www.lexmark.com/recycle...
User Guide
Page 68
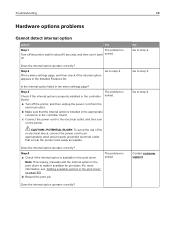
... Installed Features list. For more information, see "Adding available options in the print driver to the electrical outlet, and then turn it back solved. The problem is solved. No Go to step 4. on page 109. b Make sure that is properly installed in the controller board. Contact customer support. Step 4 a Check if the internal option is installed in the appropriate connector in the controller board. b Resend the print job. c Connect the power...
... Installed Features list. For more information, see "Adding available options in the print driver to the electrical outlet, and then turn it back solved. The problem is solved. No Go to step 4. on page 109. b Make sure that is properly installed in the controller board. Contact customer support. Step 4 a Check if the internal option is installed in the appropriate connector in the controller board. b Resend the print job. c Connect the power...

User Guide
Page 73
... solved. b Print the documents. No Go to step 3. Are the documents printed? Step 3 The problem is Recovery. The problem is a From the control panel, check if the documents appear in the solved. Go to step 4. No Contact customer support. b Send the job individually. b From the Print and Hold section, select Keep duplicate documents. Troubleshooting 73 Jammed pages are not listed, then print the documents using the Print and Hold options.
... solved. b Print the documents. No Go to step 3. Are the documents printed? Step 3 The problem is Recovery. The problem is a From the control panel, check if the documents appear in the solved. Go to step 4. No Contact customer support. b Send the job individually. b From the Print and Hold section, select Keep duplicate documents. Troubleshooting 73 Jammed pages are not listed, then print the documents using the Print and Hold options.

User Guide
Page 77
... the printer still printing blank or white pages? Go to step 2. job. b Resend the print job. Go to step 3. b Resend the print job. Note: You can also change the settings on your operating system, reduce the toner darkness from the Printing Preferences or Print dialog. Dark print Action Step 1 a From the Quality menu on the control panel, select Color Adjust. Warning-Potential Damage: Do not expose the imaging unit or imaging kit to direct light for more...
... the printer still printing blank or white pages? Go to step 2. job. b Resend the print job. Go to step 3. b Resend the print job. Note: You can also change the settings on your operating system, reduce the toner darkness from the Printing Preferences or Print dialog. Dark print Action Step 1 a From the Quality menu on the control panel, select Color Adjust. Warning-Potential Damage: Do not expose the imaging unit or imaging kit to direct light for more...

User Guide
Page 93
... of cyan, magenta, yellow, and black toner used (Auto, Off, or Manual) • The type of the Embedded Web Server. To apply a different color conversion table manually, see the software program Help topics. From the printer Quality menu, nine types of Color Samples sets are also available from the Color Samples page of object being printed (text, graphics, or images). The observed color of the Color Samples pages. Manual color correction may not be an exact...
... of cyan, magenta, yellow, and black toner used (Auto, Off, or Manual) • The type of the Embedded Web Server. To apply a different color conversion table manually, see the software program Help topics. From the printer Quality menu, nine types of Color Samples sets are also available from the Color Samples page of object being printed (text, graphics, or images). The observed color of the Color Samples pages. Manual color correction may not be an exact...
User Guide
Page 109
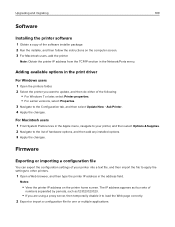
... users, add the printer. Adding available options in the Network/Ports menu. Note: Obtain the printer IP address from the TCP/IP section in the print driver For Windows users 1 Open the printers folder. 2 Select the printer you are using a proxy server, then temporarily disable it to the list of hardware options, and then add any installed options. 3 Apply the changes. Upgrading and migrating 109 Software Installing the printer software 1 Obtain a copy of the software installer package. 2 Run the installer, and then follow the instructions...
... users, add the printer. Adding available options in the Network/Ports menu. Note: Obtain the printer IP address from the TCP/IP section in the print driver For Windows users 1 Open the printers folder. 2 Select the printer you are using a proxy server, then temporarily disable it to the list of hardware options, and then add any installed options. 3 Apply the changes. Upgrading and migrating 109 Software Installing the printer software 1 Obtain a copy of the software installer package. 2 Run the installer, and then follow the instructions...

User Guide
Page 115
... toner darkness 91 attaching cables 12 available internal options 95 avoiding paper jams 58 B blank pages 76 brightness of printer display adjusting 56 C canceling a print job from the computer 28 from the printer control panel 28 cannot open Embedded Web Server 66 card stock loading 22 changing port settings internal solutions port 32 checking the printer connectivity 67 checking the status of parts and supplies 33 cleaning exterior of the printer 33 interior of the printer 33 cleaning the printer 33 Color Correction manual 92 Color Correction Content 92 color quality, troubleshooting print...
... toner darkness 91 attaching cables 12 available internal options 95 avoiding paper jams 58 B blank pages 76 brightness of printer display adjusting 56 C canceling a print job from the computer 28 from the printer control panel 28 cannot open Embedded Web Server 66 card stock loading 22 changing port settings internal solutions port 32 checking the printer connectivity 67 checking the status of parts and supplies 33 cleaning exterior of the printer 33 interior of the printer 33 cleaning the printer 33 Color Correction manual 92 Color Correction Content 92 color quality, troubleshooting print...
User Guide
Page 116
... multipurpose feeder 61 trays 60 paper jams avoiding 58 paper jams, clearing in the duplex unit 62 in the fuser 62 paper size setting 20 paper type setting 20 parallel interface card troubleshooting 69 parts status checking 33 personal identification number method 31 pick roller replacing 47 port settings configuring 32 power button light printer status 14 power cord socket 12 print driver hardware options, adding 109 print job canceling from the computer 28 canceling from the printer control panel 28 print quality replacing imaging kit 39 print quality troubleshooting blank pages...
... multipurpose feeder 61 trays 60 paper jams avoiding 58 paper jams, clearing in the duplex unit 62 in the fuser 62 paper size setting 20 paper type setting 20 parallel interface card troubleshooting 69 parts status checking 33 personal identification number method 31 pick roller replacing 47 port settings configuring 32 power button light printer status 14 power cord socket 12 print driver hardware options, adding 109 print job canceling from the computer 28 canceling from the printer control panel 28 print quality replacing imaging kit 39 print quality troubleshooting blank pages...
User Guide
Page 117
... 44 replacing toner cartridge 43 reserve print jobs printing from a Macintosh computer 27 printing from Windows 27 resetting the fuser page count 55 resetting the maintenance counter 55 resetting the transfer module page count 55 restoring factory default settings 29 S safety information 6, 7, 8 selecting a location for the printer 10 separator bracket replacing 49 serial interface card troubleshooting 69 serial printing setting up 32 setting hibernate mode 56 setting sleep mode 56 setting the paper size 20 setting the paper type 20 setting the Universal paper size 20 setting up Device Quotas...
... 44 replacing toner cartridge 43 reserve print jobs printing from a Macintosh computer 27 printing from Windows 27 resetting the fuser page count 55 resetting the maintenance counter 55 resetting the transfer module page count 55 restoring factory default settings 29 S safety information 6, 7, 8 selecting a location for the printer 10 separator bracket replacing 49 serial interface card troubleshooting 69 serial printing setting up 32 setting hibernate mode 56 setting sleep mode 56 setting the paper size 20 setting the paper type 20 setting the Universal paper size 20 setting up Device Quotas...
User Guide
Page 118
... drive troubleshooting, print 67 understanding the status of the power button and indicator light 14 uneven print density 88 Universal paper size setting 20 unlinking trays 23 updating firmware flash file 110 USB cable 12 USB port 12 enabling 67 using genuine Lexmark parts 33 genuine Lexmark supplies 33 using Customer Support 18 using Google Drive 19 using QR Code Generator 18 using the control panel 13 using the home screen 14 V verify print jobs 27 printing from a Macintosh computer 27 printing from Windows 27 vertical dark lines...
... drive troubleshooting, print 67 understanding the status of the power button and indicator light 14 uneven print density 88 Universal paper size setting 20 unlinking trays 23 updating firmware flash file 110 USB cable 12 USB port 12 enabling 67 using genuine Lexmark parts 33 genuine Lexmark supplies 33 using Customer Support 18 using Google Drive 19 using QR Code Generator 18 using the control panel 13 using the home screen 14 V verify print jobs 27 printing from a Macintosh computer 27 printing from Windows 27 vertical dark lines...


