Getting Started
Page 3
... Understanding the printer software...16 Using the Macintosh printer software...17 Performing basic printer functions...18 Making a copy...18 Printing a photo or selected photos...19 Scanning a document ...19 Sending a fax using the control panel ...20 Ordering supplies...21 Ordering print cartridges ...21 Ordering paper and other supplies...21 Getting the printer...
... Understanding the printer software...16 Using the Macintosh printer software...17 Performing basic printer functions...18 Making a copy...18 Printing a photo or selected photos...19 Scanning a document ...19 Sending a fax using the control panel ...20 Ordering supplies...21 Ordering print cartridges ...21 Ordering paper and other supplies...21 Getting the printer...
Getting Started
Page 15
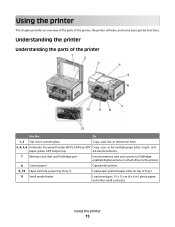
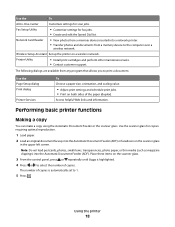
... This chapter provides an overview of the parts of the printer Use the To 1, 2 Top cover, scanner glass Copy, scan, fax, or remove an item. 3, 4, 5, 6 Automatic Document Feeder (ADF), ADF tray, ADF Copy, scan, or fax multiple-page letter-, legal-, and paper guide, ADF output tray A4-size documents. 7 Memory card slots...
... This chapter provides an overview of the parts of the printer Use the To 1, 2 Top cover, scanner glass Copy, scan, fax, or remove an item. 3, 4, 5, 6 Automatic Document Feeder (ADF), ADF tray, ADF Copy, scan, or fax multiple-page letter-, legal-, and paper guide, ADF output tray A4-size documents. 7 Memory card slots...
Getting Started
Page 17
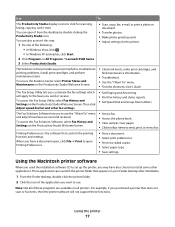
...• In Windows Vista, click . • In Windows XP and earlier, click Start. 2 Click Programs or All Programs ªLexmark 9500 Series. 3 Select Productivity Studio. • Scan, copy, fax, e-mail, or print a photo or document. • Transfer photos. • Make photo greeting cards. • ...Adjust settings for scanning, faxing, copying, and e-mail. Printing Preferences is the software that does not scan or fax items, then the printer software will apply to the faxes you want to use the "I ...
...• In Windows Vista, click . • In Windows XP and earlier, click Start. 2 Click Programs or All Programs ªLexmark 9500 Series. 3 Select Productivity Studio. • Scan, copy, fax, e-mail, or print a photo or document. • Transfer photos. • Make photo greeting cards. • ...Adjust settings for scanning, faxing, copying, and e-mail. Printing Preferences is the software that does not scan or fax items, then the printer software will apply to the faxes you want to use the "I ...
Getting Started
Page 18
... for copies requiring optimal reproduction. 1 Load paper. 2 Load an original document faceup into the Automatic Document Feeder (ADF). Fax Setup Utility • Customize settings for scan jobs. Place these items on a wireless network. Access helpful Web links and information. Note: Do not load postcards, photos, small items, transparencies, photo paper, or...
... for copies requiring optimal reproduction. 1 Load paper. 2 Load an original document faceup into the Automatic Document Feeder (ADF). Fax Setup Utility • Customize settings for scan jobs. Place these items on a wireless network. Access helpful Web links and information. Note: Do not load postcards, photos, small items, transparencies, photo paper, or...
Getting Started
Page 19
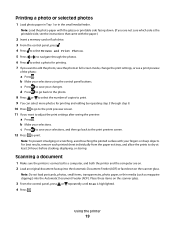
... as magazine clippings) into the Automatic Document Feeder (ADF) or facedown on the scanner glass. 3 From the control panel, press or repeatedly until Scan is the printable side, see a print preview of copies to print. 9 You can select more photos for printing and editing by repeating step 5...number of the photo: a Press . Place these items on the scanner glass. c Press to save your selections using the control panel buttons. Scanning a document 1 Make sure the printer is connected to a computer, and both the printer and the computer are not sure which side is highlighted. 4...
... as magazine clippings) into the Automatic Document Feeder (ADF) or facedown on the scanner glass. 3 From the control panel, press or repeatedly until Scan is the printable side, see a print preview of copies to print. 9 You can select more photos for printing and editing by repeating step 5...number of the photo: a Press . Place these items on the scanner glass. c Press to save your selections using the control panel buttons. Scanning a document 1 Make sure the printer is connected to a computer, and both the printer and the computer are not sure which side is highlighted. 4...
Getting Started
Page 20
...Make sure the printer is highlighted. 4 Press . Using the printer 20 If you set a PIN during network setup and are scanning individual pages using and to scan is connected to include another page or to send the fax right away. 7 If you are faxing documents that digit. 6 ...which you like to a working phone line. 2 Load an original document faceup into the Automatic Document Feeder (ADF). appears to prompt you either to scan another page in the fax? Sending a fax using the control panel buttons. 8 Press . 9 Follow the instructions on the scanner glass. 3 From...
...Make sure the printer is highlighted. 4 Press . Using the printer 20 If you set a PIN during network setup and are scanning individual pages using and to scan is connected to include another page or to send the fax right away. 7 If you are faxing documents that digit. 6 ...which you like to a working phone line. 2 Load an original document faceup into the Automatic Document Feeder (ADF). appears to prompt you either to scan another page in the fax? Sending a fax using the control panel buttons. 8 Press . 9 Follow the instructions on the scanner glass. 3 From...

User's Guide
Page 7
Despeckling a photo...124 Changing the Brightness / Contrast settings of a photo 124 Applying a color effect to a photo...125 Changing the Exposure setting of a photo ...125 Removing wavy patterns from scanned photos, magazines, or newspapers 125 Printing photos...126 Printing a photo or selected photos ...126 Printing all ...panel display 132 Copying 133 Making a copy...133 Understanding the Copy Mode menu...133 Changing the default copy settings...134 Making a color or black-and-white copy...135 Copying on both sides of the paper (duplexing 135 Copying photos...136 Copying a photo using...
Despeckling a photo...124 Changing the Brightness / Contrast settings of a photo 124 Applying a color effect to a photo...125 Changing the Exposure setting of a photo ...125 Removing wavy patterns from scanned photos, magazines, or newspapers 125 Printing photos...126 Printing a photo or selected photos ...126 Printing all ...panel display 132 Copying 133 Making a copy...133 Understanding the Copy Mode menu...133 Changing the default copy settings...134 Making a color or black-and-white copy...135 Copying on both sides of the paper (duplexing 135 Copying photos...136 Copying a photo using...

User's Guide
Page 8
... photos at one time using the computer 145 Scanning in color or black and white...146 Creating a PDF from a scanned item...146 Canceling a scan job...147 Customizing scan settings using the computer...147 Scanning to a computer over a network using the control panel 147 Saving a scanned image on the computer...148 Scanning clear images from magazines or newspapers 149...
... photos at one time using the computer 145 Scanning in color or black and white...146 Creating a PDF from a scanned item...146 Canceling a scan job...147 Customizing scan settings using the computer...147 Scanning to a computer over a network using the control panel 147 Saving a scanned image on the computer...148 Scanning clear images from magazines or newspapers 149...
User's Guide
Page 11
... ...219 Printer cannot communicate with computers over peer-to-peer network 219 Printer is not able to communicate with the computer 221 Problems when copying, scanning, or faxing ...221 Wrong printer is attached...221 Updating the printer software ...222 Bidirectional communication is not established...222 Experiencing poor quality or incorrect output...
... ...219 Printer cannot communicate with computers over peer-to-peer network 219 Printer is not able to communicate with the computer 221 Problems when copying, scanning, or faxing ...221 Wrong printer is attached...221 Updating the printer software ...222 Bidirectional communication is not established...222 Experiencing poor quality or incorrect output...
User's Guide
Page 12
... item...236 Partial document or photo copies...236 Scan troubleshooting...237 Scanner does not respond ...237 Scan was not successful ...237 Scanning takes too long or freezes the computer...238 Poor scanned image quality ...238 Partial document or photo scans...239 Cannot scan to a computer over a network...239 Fax ... ...250 Error messages on the printer display...250 Alignment Error...250 Cartridge Error (1102, 1203, 1204, or 120F)...251 Black Ink Low / Color Ink Low / Photo Ink Low ...251 Clear Carrier Jam ...252 Cover Open ...252 Error 1104 ...252 Left Cartridge Error / Right Cartridge Error...
... item...236 Partial document or photo copies...236 Scan troubleshooting...237 Scanner does not respond ...237 Scan was not successful ...237 Scanning takes too long or freezes the computer...238 Poor scanned image quality ...238 Partial document or photo scans...239 Cannot scan to a computer over a network...239 Fax ... ...250 Error messages on the printer display...250 Alignment Error...250 Cartridge Error (1102, 1203, 1204, or 120F)...251 Black Ink Low / Color Ink Low / Photo Ink Low ...251 Clear Carrier Jam ...252 Cover Open ...252 Error 1104 ...252 Left Cartridge Error / Right Cartridge Error...
User's Guide
Page 16
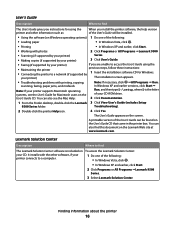
...Working with printing, copying, scanning, faxing, paper jams, and misfeeds Note: If necessary, click ŒAll Programs Œ Run. User's Guide CD. Lexmark Solution Center Description Where to find this document on the Lexmark Web site at www.lexmark.com. Finding information about ... software, if your printer) The installation screen appears. • Troubleshooting problems with photos 2 Click Programs or All Programs ŒLexmark 9500 • Scanning (if supported by your printer) Series. • Making copies (if supported by your printer) 3 Click User's Guide. ...
...Working with printing, copying, scanning, faxing, paper jams, and misfeeds Note: If necessary, click ŒAll Programs Œ Run. User's Guide CD. Lexmark Solution Center Description Where to find this document on the Lexmark Web site at www.lexmark.com. Finding information about ... software, if your printer) The installation screen appears. • Troubleshooting problems with photos 2 Click Programs or All Programs ŒLexmark 9500 • Scanning (if supported by your printer) Series. • Making copies (if supported by your printer) 3 Click User's Guide. ...

User's Guide
Page 22
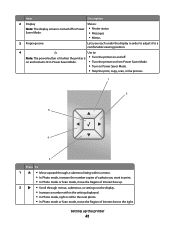
... 1 2 3 4 5 6 7 10 9 8 11 Use the To 1 Top cover Access the scanner glass. 2 Scanner glass Copy, scan, fax, or remove an item. 3 Automatic Document Feeder (ADF) Copy, scan, or fax multiple-page letter-, legal-, and A4-size documents. 4 Automatic Document Feeder (ADF) tray Load original documents in the... ADF for copying, scanning, or faxing multiple-page documents quickly. Setting up the printer 22 Note: Do not load postcards, photos, small items, or thin ...
... 1 2 3 4 5 6 7 10 9 8 11 Use the To 1 Top cover Access the scanner glass. 2 Scanner glass Copy, scan, fax, or remove an item. 3 Automatic Document Feeder (ADF) Copy, scan, or fax multiple-page letter-, legal-, and A4-size documents. 4 Automatic Document Feeder (ADF) tray Load original documents in the... ADF for copying, scanning, or faxing multiple-page documents quickly. Setting up the printer 22 Note: Do not load postcards, photos, small items, or thin ...
User's Guide
Page 41
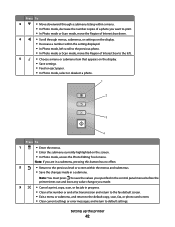
... display in Power Saver Mode. • Turn the printer on from Power Saver Mode. • Turn on Power Saver Mode. • Stop the print, copy, scan, or fax process. 1 2 5 4 3 Press To 1 • Move upward through a submenu listing within the setting displayed. • In Photo mode, right ...scroll to the next photo. • In Photo mode or Scan mode, move the Region of Interest box to print. • In Photo mode or Scan mode, move the Region of a photo you want to the right.
... display in Power Saver Mode. • Turn the printer on from Power Saver Mode. • Turn on Power Saver Mode. • Stop the print, copy, scan, or fax process. 1 2 5 4 3 Press To 1 • Move upward through a submenu listing within the setting displayed. • In Photo mode, right ...scroll to the next photo. • In Photo mode or Scan mode, move the Region of Interest box to print. • In Photo mode or Scan mode, move the Region of a photo you want to the right.
User's Guide
Page 42
...currently highlighted on the display. • Decrease a number within the menus and submenus. • Save the changes made . 3 • Cancel a print, copy, scan, or fax job in progress. • Clear a fax number or end a fax transmission and return to the fax default screen. • Exit a menu or...submenu listing within a menu. • In Photo mode, decrease the number copies of a photo you want to print. • In Photo mode or Scan mode, move the Region of Interest box down. 4 • Scroll through menus, submenus, or settings on the screen. • In Photo mode, access...
...currently highlighted on the display. • Decrease a number within the menus and submenus. • Save the changes made . 3 • Cancel a print, copy, scan, or fax job in progress. • Clear a fax number or end a fax transmission and return to the fax default screen. • Exit a menu or...submenu listing within a menu. • In Photo mode, decrease the number copies of a photo you want to print. • In Photo mode or Scan mode, move the Region of Interest box down. 4 • Scroll through menus, submenus, or settings on the screen. • In Photo mode, access...

User's Guide
Page 43
... only when you want to make. Press or to wait for an outside line or get through an automated answering system. Press To 4 Start a copy, scan, fax, or photo print job, depending on the display. 2 In Fax mode: • Insert a three-second pause in the number to be dialed to view...
... only when you want to make. Press or to wait for an outside line or get through an automated answering system. Press To 4 Start a copy, scan, fax, or photo print job, depending on the display. 2 In Fax mode: • Insert a three-second pause in the number to be dialed to view...
User's Guide
Page 45
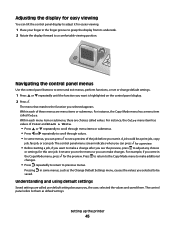
...grasp the display from its underside. 2 Rotate the display forward to a comfortable viewing position. Within each menu item or submenu, there are choices called Color. A job could be saved. The control panel menu screen indicates when you want to make a change default settings. 1 Press or repeatedly until the... has values of these menus are called user default settings because you selected to be a print job, copy job, fax job, or scan job. The control panel refers to them . Navigating the control panel menus Use the control panel buttons to enter and exit menus, perform...
...grasp the display from its underside. 2 Rotate the display forward to a comfortable viewing position. Within each menu item or submenu, there are choices called Color. A job could be saved. The control panel menu screen indicates when you want to make a change default settings. 1 Press or repeatedly until the... has values of these menus are called user default settings because you selected to be a print job, copy job, fax job, or scan job. The control panel refers to them . Navigating the control panel menus Use the control panel buttons to enter and exit menus, perform...

User's Guide
Page 46
... information, see "Understanding the Photo Default Settings menu" on page 105. Change PictBridge Default Settings Set or change the default scan settings. The list includes settings determined by the user and factory default settings. For more information, see "Understanding the Printer ...Default Settings menu" on page 115. Change Scan Default Settings Set or change the default settings for networking setup. For more information, see "Changing the default copy settings" ...
... information, see "Understanding the Photo Default Settings menu" on page 105. Change PictBridge Default Settings Set or change the default scan settings. The list includes settings determined by the user and factory default settings. For more information, see "Understanding the Printer ...Default Settings menu" on page 115. Change Scan Default Settings Set or change the default settings for networking setup. For more information, see "Changing the default copy settings" ...
User's Guide
Page 48
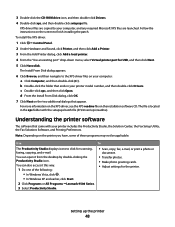
... of the following: • In Windows Vista, click . • In Windows XP and earlier, click Start. 2 Click Programs or All Programs ŒLexmark 9500 Series. 3 Select Productivity Studio. • Scan, copy, fax, e-mail, or print a photo or document. • Transfer photos. • Make photo greeting cards. • Adjust settings for USB, and... (C:). Use To The Productivity Studio displays icons to your printer model number, and then double-click Drivers. XPS driver files are copied to click for scanning, faxing, copying, and e-mail.
... of the following: • In Windows Vista, click . • In Windows XP and earlier, click Start. 2 Click Programs or All Programs ŒLexmark 9500 Series. 3 Select Productivity Studio. • Scan, copy, fax, e-mail, or print a photo or document. • Transfer photos. • Make photo greeting cards. • Adjust settings for USB, and... (C:). Use To The Productivity Studio displays icons to your printer model number, and then double-click Drivers. XPS driver files are copied to click for scanning, faxing, copying, and e-mail.

User's Guide
Page 86
...the source, Tray 1 or Tray 2, for the job. 1 Menu item appears only when the optional Tray 2 is installed. You can scan and then print photos, text documents, magazine articles, newspapers, and other publications. Loading paper and original documents 86 Bluetooth Source1 Specify the source..., Tray 1 or Tray 2, for the job. Tray 2 Specify the type of in the Automatic Document Feeder. • The maximum scan area for the job. PictBridge Source1 Specify the source, Tray 1 or Tray 2, for faxing. Appears when Tray 2 is 216 x 297 mm (8.5 x ...
...the source, Tray 1 or Tray 2, for the job. 1 Menu item appears only when the optional Tray 2 is installed. You can scan and then print photos, text documents, magazine articles, newspapers, and other publications. Loading paper and original documents 86 Bluetooth Source1 Specify the source..., Tray 1 or Tray 2, for the job. Tray 2 Specify the type of in the Automatic Document Feeder. • The maximum scan area for the job. PictBridge Source1 Specify the source, Tray 1 or Tray 2, for faxing. Appears when Tray 2 is 216 x 297 mm (8.5 x ...

User's Guide
Page 87
Loading paper and original documents 87 The arrows which surround this corner remind you of the proper placement. Note: Photos should be loaded as shown. 4 Close the top cover to avoid dark edges on the scanner glass in the upper left corner. 3 Place the original document facedown on the scanned image.
Loading paper and original documents 87 The arrows which surround this corner remind you of the proper placement. Note: Photos should be loaded as shown. 4 Close the top cover to avoid dark edges on the scanner glass in the upper left corner. 3 Place the original document facedown on the scanned image.


