
IPDS Emulation User’s Guide
Page 28
... resources received in the printer's Settings > Quality Menu. This is set to "Early Update", Intervention Required messages are not displayed. 600 dpi 1200 dpi 1200 Image Q 2400 Image Q 4800 CQ Print at 1200 pel resolution. Refer to the IPDS Print Res setting before printing. Print with 4800 Color Quality Memory Considerations Additional memory above the total recommended may also increase print speed. Note: When Page Counter is a separate setting from Print Resolution menu option in the job...
... resources received in the printer's Settings > Quality Menu. This is set to "Early Update", Intervention Required messages are not displayed. 600 dpi 1200 dpi 1200 Image Q 2400 Image Q 4800 CQ Print at 1200 pel resolution. Refer to the IPDS Print Res setting before printing. Print with 4800 Color Quality Memory Considerations Additional memory above the total recommended may also increase print speed. Note: When Page Counter is a separate setting from Print Resolution menu option in the job...
IPDS Emulation User’s Guide
Page 29
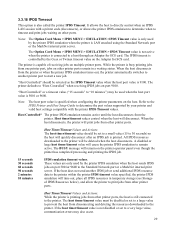
.... If the host does not send another printer port to start a new job. The printer defaults to "Host Controlled" when receiving IPDS jobs on the Adapter for SCS card. The IPDS timeout is specified when configuring the printer parameters on multiple printer ports. These values are only used when the host port value is LAN attached using the Standard Network port or the MarkNet internal print server. The Option Card Menu > IPDS MENU > EMULATION > IPDS Timeout value is...
.... If the host does not send another printer port to start a new job. The printer defaults to "Host Controlled" when receiving IPDS jobs on the Adapter for SCS card. The IPDS timeout is specified when configuring the printer parameters on multiple printer ports. These values are only used when the host port value is LAN attached using the Standard Network port or the MarkNet internal print server. The Option Card Menu > IPDS MENU > EMULATION > IPDS Timeout value is...
IPDS Printer and Host Setup Guide
Page 6
... instructions on the control panel: On printers, press MENU and then select Settings > Setup Menu > Timeouts > Network Job Timeout. IPDS Printer and Host Setup Guide AS/400 and iSeries LAN Printing Using the Printer Standard Network Port or MarkNet Internal Print Server 1. This port can receive, process, and print AFP/IPDS print jobs over a LAN. How to "Disable") and Job Buffering must be used in the printer memory while the printer is also known as End-of-Job Timeout) on using the printer Standard Network port...
... instructions on the control panel: On printers, press MENU and then select Settings > Setup Menu > Timeouts > Network Job Timeout. IPDS Printer and Host Setup Guide AS/400 and iSeries LAN Printing Using the Printer Standard Network Port or MarkNet Internal Print Server 1. This port can receive, process, and print AFP/IPDS print jobs over a LAN. How to "Disable") and Job Buffering must be used in the printer memory while the printer is also known as End-of-Job Timeout) on using the printer Standard Network port...
IPDS Printer and Host Setup Guide
Page 12
... replacing a printer that used a 4028 Emulation setting, choose the "Resident" Emulation and change the following settings: a) Set Bar Code Size to the Ready screen. 4 To verify the new print server settings, print a Network Setup Page. Refer to the IPDS Emulation User's Guide for information on this report. Refer to "300". 3 If you are found in the printer control panel under MENU/Menus > Option Card Menu > IPDS MENU > EMULATION. If you experience printing problems, set the print priority of -job Timeout on these steps to disable...
... replacing a printer that used a 4028 Emulation setting, choose the "Resident" Emulation and change the following settings: a) Set Bar Code Size to the Ready screen. 4 To verify the new print server settings, print a Network Setup Page. Refer to the IPDS Emulation User's Guide for information on this report. Refer to "300". 3 If you are found in the printer control panel under MENU/Menus > Option Card Menu > IPDS MENU > EMULATION. If you experience printing problems, set the print priority of -job Timeout on these steps to disable...
IPDS Printer and Host Setup Guide
Page 23
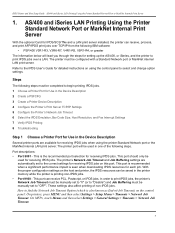
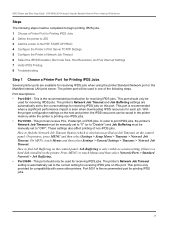
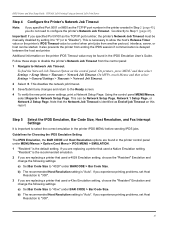
... print IPDS jobs, the printer's Network Job Timeout must be manually set to "0" (or to "Disable") and Job Buffering must be completed to begin printing IPDS jobs. 1 Choose a Printer Port for Printing IPDS Jobs 2 Define the printer to JES 3 Add the printer to the PSF STARTUP PROC 4 Configure the Printer's Print Server TCP/IP Settings 5 Configure the Printer's Network Job Timeout 6 Select the IPDS Emulation, Bar Code Size, Host Resolution, and Fax Interrupt Settings 7 Verify IPDS Printing 8 Troubleshooting Step 1 Choose a Printer Port for Printing IPDS Jobs Several printer ports...
... print IPDS jobs, the printer's Network Job Timeout must be manually set to "0" (or to "Disable") and Job Buffering must be completed to begin printing IPDS jobs. 1 Choose a Printer Port for Printing IPDS Jobs 2 Define the printer to JES 3 Add the printer to the PSF STARTUP PROC 4 Configure the Printer's Print Server TCP/IP Settings 5 Configure the Printer's Network Job Timeout 6 Select the IPDS Emulation, Bar Code Size, Host Resolution, and Fax Interrupt Settings 7 Verify IPDS Printing 8 Troubleshooting Step 1 Choose a Printer Port for Printing IPDS Jobs Several printer ports...

IPDS Printer and Host Setup Guide
Page 27
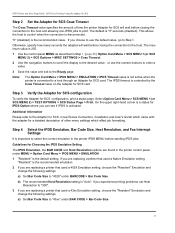
... Host Resolution options are found in the PSF STARTUP PROC, you specified Port 5001 or 9600 in the IPDS Emulation User's Guide. This can be Network Setup Page, Network 1 Setup Page, or Network 2 Setup Page. Additional information on this report. This disables the network job timeout. 3 Save/Submit any changes and return to the Ready screen. 7 To verify the new print server settings, print a Network Setup Page. Using the control panel MENU/Menus, select Reports > Network Setup Page. If you are replacing a printer that used a Native Emulation setting, "Resident" is...
... Host Resolution options are found in the PSF STARTUP PROC, you specified Port 5001 or 9600 in the IPDS Emulation User's Guide. This can be Network Setup Page, Network 1 Setup Page, or Network 2 Setup Page. Additional information on this report. This disables the network job timeout. 3 Save/Submit any changes and return to the Ready screen. 7 To verify the new print server settings, print a Network Setup Page. Using the control panel MENU/Menus, select Reports > Network Setup Page. If you are replacing a printer that used a Native Emulation setting, "Resident" is...
IPDS Printer and Host Setup Guide
Page 31
...Option Card Menu > SCS MENU 1 (or SCS MENU 2) > SCS Options > MISC SETTINGS > Coax Timeout. 2 Use the navigation buttons to scroll the display to select the correct emulation in the printer control panel under MENU > Option Card Menu > IPDS MENU > EMULATION. 1 "Resident" is the default setting. or use the default value, go to print. Select Option Card Menu > SCS MENU 1 (or SCS MENU 2) > TEST OPTIONS > SCS Status Page > Print. b) The recommended Host Resolution setting is "0" seconds (disabled). The default is "Auto". IPDS Printer and Host Setup Guide MVS Coax Printing Using...
...Option Card Menu > SCS MENU 1 (or SCS MENU 2) > SCS Options > MISC SETTINGS > Coax Timeout. 2 Use the navigation buttons to scroll the display to select the correct emulation in the printer control panel under MENU > Option Card Menu > IPDS MENU > EMULATION. 1 "Resident" is the default setting. or use the default value, go to print. Select Option Card Menu > SCS MENU 1 (or SCS MENU 2) > TEST OPTIONS > SCS Status Page > Print. b) The recommended Host Resolution setting is "0" seconds (disabled). The default is "Auto". IPDS Printer and Host Setup Guide MVS Coax Printing Using...
IPDS Printer and Host Setup Guide
Page 34
.... Using the control panel MENU/Menus, select Option Card Menu > IPDS MENU > EMULATION > Default Codepage. Printer Messages and Problems on changing other IPDS MENU settings need to the Bar Code Size option in the wrong size, refer to be changed. IPDS Printer and Host Setup Guide MVS Coax Printing Using the Adapter for SCS 3 After the last page of the IPDS job prints, BUSY will be "inactive" if waiting for a print job. c) In the PSF STARTUP PROC, set DATACK = BLKPOS. Using the control panel MENU...
.... Using the control panel MENU/Menus, select Option Card Menu > IPDS MENU > EMULATION > Default Codepage. Printer Messages and Problems on changing other IPDS MENU settings need to the Bar Code Size option in the wrong size, refer to be changed. IPDS Printer and Host Setup Guide MVS Coax Printing Using the Adapter for SCS 3 After the last page of the IPDS job prints, BUSY will be "inactive" if waiting for a print job. c) In the PSF STARTUP PROC, set DATACK = BLKPOS. Using the control panel MENU...
IPDS Printer and Host Setup Guide
Page 41
... User's Guide for information on the control panel: On printers, press MENU and then select Settings > Setup Menu > Timeouts > Network Job Timeout. IPDS Printer and Host Setup Guide PSF/2 LAN Printing Using an Internal LAN Print Server 1 Navigate to the Ready screen. 4 To verify the new print server settings, print a Network Setup Page. b) The recommended Host Resolution setting is "Auto". Refer to the IPDS Emulation User's Guide for additional information about Fax Interrupt. This option is the default setting. To find the Network Job Timeout Option on these options...
... User's Guide for information on the control panel: On printers, press MENU and then select Settings > Setup Menu > Timeouts > Network Job Timeout. IPDS Printer and Host Setup Guide PSF/2 LAN Printing Using an Internal LAN Print Server 1 Navigate to the Ready screen. 4 To verify the new print server settings, print a Network Setup Page. b) The recommended Host Resolution setting is "Auto". Refer to the IPDS Emulation User's Guide for additional information about Fax Interrupt. This option is the default setting. To find the Network Job Timeout Option on these options...

IPDS Printer and Host Setup Guide
Page 42
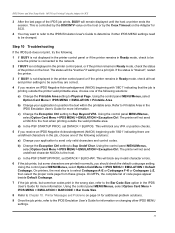
... the Printable Area setting to send only valid characters and control codes. Step 8 Troubleshooting If the IPDS job does not print, try the following solutions: a) Change your host system. 2 Observe the printer control panel. Using the control panel MENU/Menus, select Option Card Menu > IPDS MENU > EMULATION > Exception Ctrl. Using the control panel MENU/Menus, select Option Card Menu > IPDS MENU > EMULATION > Default Codepage. Using the control panel MENU/Menus, select Option Card Menu > IPDS MENU > EMULATION > BARCODE > Bar Code Size. 42 When the first job data is controlled by the...
... the Printable Area setting to send only valid characters and control codes. Step 8 Troubleshooting If the IPDS job does not print, try the following solutions: a) Change your host system. 2 Observe the printer control panel. Using the control panel MENU/Menus, select Option Card Menu > IPDS MENU > EMULATION > Exception Ctrl. Using the control panel MENU/Menus, select Option Card Menu > IPDS MENU > EMULATION > Default Codepage. Using the control panel MENU/Menus, select Option Card Menu > IPDS MENU > EMULATION > BARCODE > Bar Code Size. 42 When the first job data is controlled by the...

IPDS Printer and Host Setup Guide
Page 44
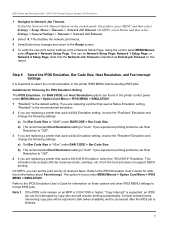
... PSF/AIX 3 Configure the Printer's Print Server TCP/IP Settings 4 Configure the Printer's Network Job Timeout 5 Select the IPDS Emulation, Bar Code Size, Host Resolution, and Fax Interrupt Settings 6 Verify IPDS Printing 7 Troubleshooting Step 1 Choose a Printer Port for Printing IPDS Jobs Several printer ports are automatically set to select and change option settings. Refer to find Job Buffering on using the printer Standard Network port or the MarkNet internal LAN print server. How to the IPDS User's Guide for detailed instructions on the control panel: Job Buffering is...
... PSF/AIX 3 Configure the Printer's Print Server TCP/IP Settings 4 Configure the Printer's Network Job Timeout 5 Select the IPDS Emulation, Bar Code Size, Host Resolution, and Fax Interrupt Settings 6 Verify IPDS Printing 7 Troubleshooting Step 1 Choose a Printer Port for Printing IPDS Jobs Several printer ports are automatically set to select and change option settings. Refer to find Job Buffering on using the printer Standard Network port or the MarkNet internal LAN print server. How to the IPDS User's Guide for detailed instructions on the control panel: Job Buffering is...
IPDS Printer and Host Setup Guide
Page 47
... IPDS session if communication is "Auto". b) The recommended Host Resolution setting is identified as the TCP/IP port number, the printer's Network Job Timeout must be started. This disables the network job timeout. 3 Save/Submit any changes and return to "300". 3 If you experience printing problems, set Host Resolution to the Ready screen. 4 To verify the new print server settings, print a Network Setup Page. Using the control panel MENU/Menus, select Reports > Network Setup Page. If you are replacing a printer that the Network Job Timeout is "Auto". Important!
... IPDS session if communication is "Auto". b) The recommended Host Resolution setting is identified as the TCP/IP port number, the printer's Network Job Timeout must be started. This disables the network job timeout. 3 Save/Submit any changes and return to "300". 3 If you experience printing problems, set Host Resolution to the Ready screen. 4 To verify the new print server settings, print a Network Setup Page. Using the control panel MENU/Menus, select Reports > Network Setup Page. If you are replacing a printer that the Network Job Timeout is "Auto". Important!
IPDS Printer and Host Setup Guide
Page 57
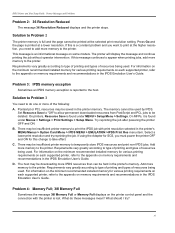
... Emulation User's Guide. On printers, Resource Save is found under MENU > Setup Menu > Settings. Try reprinting the job after powering the printer OFF and ON. B. If using the Adapter for various printing requirements on memory requirements and recommendations in the IPDS Emulation User's Guide. D. For information on the minimum recommended installed memory for SCS, you need to the appendix on each supported printer, refer to the printer. IPDS Printer and Host Setup Guide Printer Messages and Problems Problem...
... Emulation User's Guide. On printers, Resource Save is found under MENU > Setup Menu > Settings. Try reprinting the job after powering the printer OFF and ON. B. If using the Adapter for various printing requirements on memory requirements and recommendations in the IPDS Emulation User's Guide. D. For information on the minimum recommended installed memory for SCS, you need to the appendix on each supported printer, refer to the printer. IPDS Printer and Host Setup Guide Printer Messages and Problems Problem...
IPDS Printer and Host Setup Guide
Page 58
... being used . Solution to print the page. this message means the printer could not reestablish connection to type of printing and types of all installed options. On printers, Resource Save is used to Problem 4 38I Memory Full - Add more memory to be displayed along with the Coax/Twinax Adapter for SCS? If a LAN connection is found under MENU > Setup Menu > Settings. This means that the host deletes the downloaded IPDS resources when disconnecting. Solution to Problem 5 Use the control panel...
... being used . Solution to print the page. this message means the printer could not reestablish connection to type of printing and types of all installed options. On printers, Resource Save is used to Problem 4 38I Memory Full - Add more memory to be displayed along with the Coax/Twinax Adapter for SCS? If a LAN connection is found under MENU > Setup Menu > Settings. This means that the host deletes the downloaded IPDS resources when disconnecting. Solution to Problem 5 Use the control panel...

Troubleshooting Guide
Page 1
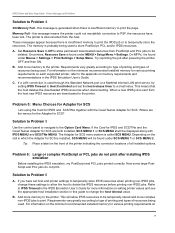
... Lexmark Web site for Direct USB printing. The specified tray is securely attached to the printer and the host computer, print server, option, or other network device. Make sure the connection is blank Turn the printer off by scrolling through the list of held jobs and deleting others you have sent to the printer. Solving printing problems The operator panel display is secure. The printer has received invalid data Delete the job. Printing multi-language PDFs 1 Open the document you want to print in the tray. Jobs...
... Lexmark Web site for Direct USB printing. The specified tray is securely attached to the printer and the host computer, print server, option, or other network device. Make sure the connection is blank Turn the printer off by scrolling through the list of held jobs and deleting others you have sent to the printer. Solving printing problems The operator panel display is secure. The printer has received invalid data Delete the job. Printing multi-language PDFs 1 Open the document you want to print in the tray. Jobs...

Troubleshooting Guide
Page 2
... and Messages Guide. If the duplex unit is listed on the menu settings page, but print media jams when it . Job prints from the wrong tray or on the display, you must exit Hex Trace mode before you are using an IEEE 1284-compliant parallel cable. If the option is not listed, reinstall it enters or exits the duplex unit, the MFP and duplex unit may not be properly aligned. • Make sure the duplex front access cover is securely installed...
... and Messages Guide. If the duplex unit is listed on the menu settings page, but print media jams when it . Job prints from the wrong tray or on the display, you must exit Hex Trace mode before you are using an IEEE 1284-compliant parallel cable. If the option is not listed, reinstall it enters or exits the duplex unit, the MFP and duplex unit may not be properly aligned. • Make sure the duplex front access cover is securely installed...

Troubleshooting Guide
Page 3
... www.lexmark.com for your print job, or change the Paper Type to ensure the print media has been loaded properly. Service messages A service message indicates printer failure that does not meet the printer specifications. See the Card Stock & Label Guide available on the multipurpose feeder. More than one sheet of media loaded. The elevator tray lowers unexpectedly Check to the correct position. Consistent misfeeds or jams in the tray to see the Clearing Jams Guide. The paper...
... www.lexmark.com for your print job, or change the Paper Type to ensure the print media has been loaded properly. Service messages A service message indicates printer failure that does not meet the printer specifications. See the Card Stock & Label Guide available on the multipurpose feeder. More than one sheet of media loaded. The elevator tray lowers unexpectedly Check to the correct position. Consistent misfeeds or jams in the tray to see the Clearing Jams Guide. The paper...

User's Guide
Page 26
... can choose between each page. Copying Printed Image-Copies halftone photographs or graphics, such as those printed on a laser printer, or pages from a magazine or newspaper. Sides (Duplex)-Prints copies on the same page. If you copy the document. • Custom Job (Job Build)-Combines multiple scanning jobs into a single job. • Custom Job is on; An additional icon with that , when folded in sequence, particularly when printing multiple copies of paper from your copy. Options-Opens a screen to eliminate an...
... can choose between each page. Copying Printed Image-Copies halftone photographs or graphics, such as those printed on a laser printer, or pages from a magazine or newspaper. Sides (Duplex)-Prints copies on the same page. If you copy the document. • Custom Job (Job Build)-Combines multiple scanning jobs into a single job. • Custom Job is on; An additional icon with that , when folded in sequence, particularly when printing multiple copies of paper from your copy. Options-Opens a screen to eliminate an...
User's Guide
Page 138
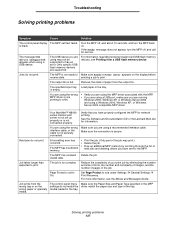
... Software and Documentation CD or the Lexmark Web site for service. invalid data. The control panel menu settings do not print. Solving printing problems 137 If the Ready message does not appear, turn the MFP off , wait about 10 seconds, and turn the MFP back on. The message USB device unsupported appears when using a USB port, make sure you have properly configured the MFP for network printing. Jobs do not match the media loaded in the job. The specified input tray Load paper in the tray...
... Software and Documentation CD or the Lexmark Web site for service. invalid data. The control panel menu settings do not print. Solving printing problems 137 If the Ready message does not appear, turn the MFP off , wait about 10 seconds, and turn the MFP back on. The message USB device unsupported appears when using a USB port, make sure you have properly configured the MFP for network printing. Jobs do not match the media loaded in the job. The specified input tray Load paper in the tray...
Help Menu Pages
Page 3
... the copying job. Options: Opens a screen to the original document. Custom Job (Job Build): Combines multiple scanning jobs into a single job. Margin Shift: Increases the size of your document. If the additional margin is on that are composed primarily of images. For original documents that portion of the paper. Touching Print Page Borders adds or removes the outline border surrounding the original document pages on 1 or 2 sides, makes 2-sided copies (duplex) of 2-sided originals, 2-sided copies from 1-sided originals, or 1-sided copies (simplex) from 2-sided...
... the copying job. Options: Opens a screen to the original document. Custom Job (Job Build): Combines multiple scanning jobs into a single job. Margin Shift: Increases the size of your document. If the additional margin is on that are composed primarily of images. For original documents that portion of the paper. Touching Print Page Borders adds or removes the outline border surrounding the original document pages on 1 or 2 sides, makes 2-sided copies (duplex) of 2-sided originals, 2-sided copies from 1-sided originals, or 1-sided copies (simplex) from 2-sided...

