User's Guide
Page 3
... a new network Internal Solutions Port 65 Setting up serial printing...67 Minimizing your printer's environmental impact 69 Saving paper and toner...69 Using recycled paper...69 Conserving supplies...69 Saving energy...70 Using Eco-Mode ...70 Adjusting Power Saver...71 Adjusting the ...brightness of the display ...72 Setting the standard exit bin light...72 Recycling...73 Recycling Lexmark products...73 Recycling Lexmark packaging...73 Returning Lexmark cartridges for reuse or recycling...74 Reducing printer noise...74 Loading paper and specialty media 76 Setting the ...
... a new network Internal Solutions Port 65 Setting up serial printing...67 Minimizing your printer's environmental impact 69 Saving paper and toner...69 Using recycled paper...69 Conserving supplies...69 Saving energy...70 Using Eco-Mode ...70 Adjusting Power Saver...71 Adjusting the ...brightness of the display ...72 Setting the standard exit bin light...72 Recycling...73 Recycling Lexmark products...73 Recycling Lexmark packaging...73 Returning Lexmark cartridges for reuse or recycling...74 Reducing printer noise...74 Loading paper and specialty media 76 Setting the ...
User's Guide
Page 9
......234 Checking the status of supplies from the printer control panel 234 Checking the status of supplies from a network computer 234 Ordering supplies...235 Ordering toner cartridges...235 Ordering a photoconductor kit ...235 Ordering ADF replacement parts...236 Moving the printer to another location...236 Shipping the printer...237 Administrative support 238...
......234 Checking the status of supplies from the printer control panel 234 Checking the status of supplies from a network computer 234 Ordering supplies...235 Ordering toner cartridges...235 Ordering a photoconductor kit ...235 Ordering ADF replacement parts...236 Moving the printer to another location...236 Shipping the printer...237 Administrative support 238...

User's Guide
Page 11
... held job(s 260 Unsupported disk ...260 Unsupported USB device, please remove ...260 Unsupported USB hub, please remove...260 USB/USB ...260 30 Invalid refill, change toner cartridge...260 31 Replace defective cartridge ...260 32 Cartridge part number unsupported by device ...260 34 Short paper ...260 35 Insufficient memory to support Resource...
... held job(s 260 Unsupported disk ...260 Unsupported USB device, please remove ...260 Unsupported USB hub, please remove...260 USB/USB ...260 30 Invalid refill, change toner cartridge...260 31 Replace defective cartridge ...260 32 Cartridge part number unsupported by device ...260 34 Short paper ...260 35 Insufficient memory to support Resource...

User's Guide
Page 13
... black or white streaks...287 Print is too light ...287 Print is too dark...288 Streaked vertical lines ...289 Toner fog or background shading appears on the page 290 Toner rubs off...290 Toner specks...291 Transparency print quality is poor...291 Embedded Web Server does not open...291 Check the network connections...
... black or white streaks...287 Print is too light ...287 Print is too dark...288 Streaked vertical lines ...289 Toner fog or background shading appears on the page 290 Toner rubs off...290 Toner specks...291 Transparency print quality is poor...291 Embedded Web Server does not open...291 Check the network connections...

User's Guide
Page 25
... hard buttons). Display item Description 5 Status message bar • Shows the current printer status such as Ready or Busy. • Shows printer conditions such as Toner Low. • Shows intervention messages to give instructions on what you should do so the printer can continue processing, such as Close door. 6 Status/Supplies...
... hard buttons). Display item Description 5 Status message bar • Shows the current printer status such as Ready or Busy. • Shows printer conditions such as Toner Low. • Shows intervention messages to give instructions on what you should do so the printer can continue processing, such as Close door. 6 Status/Supplies...

User's Guide
Page 69
This chapter outlines the settings and tasks that work well with the environment in laser printers. Saving paper and toner Using recycled paper As an environmentally conscious company, Lexmark supports the use of recycled office paper produced specifically for a printed document, a copy, or an...information on recycled papers that may be able to reduce your printer's impact even further. Minimizing your printer's environmental impact Lexmark is committed to environmental sustainability and is continually improving its printers to 16 consecutive pages of a multiple-page document onto one...
This chapter outlines the settings and tasks that work well with the environment in laser printers. Saving paper and toner Using recycled paper As an environmentally conscious company, Lexmark supports the use of recycled office paper produced specifically for a printed document, a copy, or an...information on recycled papers that may be able to reduce your printer's impact even further. Minimizing your printer's environmental impact Lexmark is committed to environmental sustainability and is continually improving its printers to 16 consecutive pages of a multiple-page document onto one...

User's Guide
Page 74
...follow the instructions that the cartridge came with your printer or cartridge and use the contact information provided. Facilities may not exist in Lexmark packaging is printed. • Fans run at www.epsrecycling.org/pages/intcon.html. 2 Select your country or region from landfills ...You may notice a reduction in . Use factory default settings. To return Lexmark cartridges for the multiple settings that change when you can also: 1 Visit our Web site at www.lexmark.com/recycle. 2 From the Toner Cartridges section, select your country from the list. 3 Follow the instructions on...
...follow the instructions that the cartridge came with your printer or cartridge and use the contact information provided. Facilities may not exist in Lexmark packaging is printed. • Fans run at www.epsrecycling.org/pages/intcon.html. 2 Select your country or region from landfills ...You may notice a reduction in . Use factory default settings. To return Lexmark cartridges for the multiple settings that change when you can also: 1 Visit our Web site at www.lexmark.com/recycle. 2 From the Toner Cartridges section, select your country from the list. 3 Follow the instructions on...

User's Guide
Page 89
...for paper to high temperatures. Condition paper before printing by storing it in its original wrapper until it is exposed to curl at www.lexmark.com/publications. Paper and specialty media guidelines 89 Paper characteristics The following paper characteristics affect print quality and reliability. Paper lighter than 182... paper. Grain direction Grain refers to it . Always use 75 g/m2 (20 lb bond) grain long paper. Grain is too rough, then toner cannot fuse to the alignment of the paper fibers in .), we recommend 90 g/m2 (24 lb) or heavier paper. Paper and specialty media ...
...for paper to high temperatures. Condition paper before printing by storing it in its original wrapper until it is exposed to curl at www.lexmark.com/publications. Paper and specialty media guidelines 89 Paper characteristics The following paper characteristics affect print quality and reliability. Paper lighter than 182... paper. Grain direction Grain refers to it . Always use 75 g/m2 (20 lb bond) grain long paper. Grain is too rough, then toner cannot fuse to the alignment of the paper fibers in .), we recommend 90 g/m2 (24 lb) or heavier paper. Paper and specialty media ...

User's Guide
Page 91
...8226; Suitable sheet-to work very well in the direction of feed Recycled paper, paper of friction (0.4-0.6) • Sufficient bending resistance in laser printers, despite surface texture. no reason to discourage the use of today's recycled office papers, but generally the following property guidelines apply ... Suitable smoothness (100-200 Sheffield units, or 140-350 Bendtsen units, European) Note: Some much smoother papers (such as premium 24 lb laser papers, 50-90 Sheffield units) and much rougher papers (such as premium cotton papers, 200-300 Sheffield units) have been engineered to -...
...8226; Suitable sheet-to work very well in the direction of feed Recycled paper, paper of friction (0.4-0.6) • Sufficient bending resistance in laser printers, despite surface texture. no reason to discourage the use of today's recycled office papers, but generally the following property guidelines apply ... Suitable smoothness (100-200 Sheffield units, or 140-350 Bendtsen units, European) Note: Some much smoother papers (such as premium 24 lb laser papers, 50-90 Sheffield units) and much rougher papers (such as premium cotton papers, 200-300 Sheffield units) have been engineered to -...
User's Guide
Page 186
Understanding printer menus 186 Menu item Displayed Information Left side Right side Custom Text Cartridge levels on status screen On Off Black Toner When to Display Display Do not display Message to Display Default Alternate Default Message Alternate Message Displayed Information (continued) Paper Jam Load Paper Service Errors ...
Understanding printer menus 186 Menu item Displayed Information Left side Right side Custom Text Cartridge levels on status screen On Off Black Toner When to Display Display Do not display Message to Display Default Alternate Default Message Alternate Message Displayed Information (continued) Paper Jam Load Paper Service Errors ...

User's Guide
Page 188
... sound when the printer requires operator intervention Available selections for each alarm type are: Off Single Notes: • Single is the factory default setting for Toner Alarm. Sets an alarm to USB Note: On is selected, the Allow Custom Job Scans setting can be stored on the Embedded Web Server. If...
... sound when the printer requires operator intervention Available selections for each alarm type are: Off Single Notes: • Single is the factory default setting for Toner Alarm. Sets an alarm to USB Note: On is selected, the Allow Custom Job Scans setting can be stored on the Embedded Web Server. If...

User's Guide
Page 201
Specifies a paper source. Allows a fax to be held until toner or supplies are received Note: 33600 is the factory default setting. Scales an incoming fax job so it fits the size of received faxes to ... answering an incoming fax job Note: 3 is the factory default setting. Fax Receive Settings Menu item Enable Fax Receive On Off Fax Job Waiting None Toner Toner and Supplies Rings to Answer 1-25 Auto Reduction On Off Paper Source Auto Tray Multi-Purpose Feeder Separator Sheets None After job Before job Separator...
Specifies a paper source. Allows a fax to be held until toner or supplies are received Note: 33600 is the factory default setting. Scales an incoming fax job so it fits the size of received faxes to ... answering an incoming fax job Note: 3 is the factory default setting. Fax Receive Settings Menu item Enable Fax Receive On Off Fax Job Waiting None Toner Toner and Supplies Rings to Answer 1-25 Auto Reduction On Off Paper Source Auto Tray Multi-Purpose Feeder Separator Sheets None After job Before job Separator...

User's Guide
Page 222
... Menu item Print Resolution 300 dpi 600 dpi 1200 dpi 1200 Image Q 2400 Image Q Pixel Boost Off Fonts Horizontally Vertically Both Directions Toner Darkness 1-10 Enhance Fine Lines On Off Gray Correction Auto Off Brightness -6 to text. • Horizontally darkens horizontal lines of text ... Enhances the printed quality of printed output Note: Auto is the factory default setting. • A negative value will lighten them and conserve toner. Lightens or darkens the printed output Notes: • 8 is the factory default setting. The printer driver default is the factory default setting....
... Menu item Print Resolution 300 dpi 600 dpi 1200 dpi 1200 Image Q 2400 Image Q Pixel Boost Off Fonts Horizontally Vertically Both Directions Toner Darkness 1-10 Enhance Fine Lines On Off Gray Correction Auto Off Brightness -6 to text. • Horizontally darkens horizontal lines of text ... Enhances the printed quality of printed output Note: Auto is the factory default setting. • A negative value will lighten them and conserve toner. Lightens or darkens the printed output Notes: • 8 is the factory default setting. The printer driver default is the factory default setting....
User's Guide
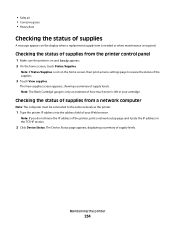
Page 234
... appears on the display when a replacement supply item is needed or when maintenance is required. The Device Status page appears, displaying a summary of how much toner is only an estimate of supply levels. Maintaining the printer 234 Note: The Black Cartridge gauge is left in the TCP/IP section. 2 Click Device...
... appears on the display when a replacement supply item is needed or when maintenance is required. The Device Status page appears, displaying a summary of how much toner is only an estimate of supply levels. Maintaining the printer 234 Note: The Black Cartridge gauge is left in the TCP/IP section. 2 Click Device...
User's Guide
Page 235
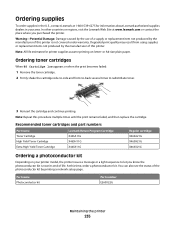
... the use of this procedure multiple times until the print remains faded, and then replace the cartridge. Recommended toner cartridges and part numbers Part name Toner Cartridge High Yield Toner Cartridge Extra High Yield Toner Cartridge Lexmark Return Program Cartridge X463A11G X463H11G X463X11G Regular cartridge X463A21G X463H21G X463X21G Ordering a photoconductor kit Depending on letter- You...
... the use of this procedure multiple times until the print remains faded, and then replace the cartridge. Recommended toner cartridges and part numbers Part name Toner Cartridge High Yield Toner Cartridge Extra High Yield Toner Cartridge Lexmark Return Program Cartridge X463A11G X463H11G X463X11G Regular cartridge X463A21G X463H21G X463X21G Ordering a photoconductor kit Depending on letter- You...
User's Guide
Page 238
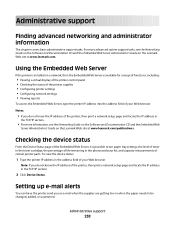
... advanced system support tasks, see the Networking Guide on the Software and Documentation CD and the Embedded Web Server Administrator's Guide on the Lexmark Web site at www.lexmark.com. To view the device status: 1 Type the printer IP address in the TCP/IP section. 2 Click Device Status. Note: If you... an e-mail when the supplies are getting low or when the paper needs to see paper tray settings, the level of toner in the toner cartridge, the...
... advanced system support tasks, see the Networking Guide on the Software and Documentation CD and the Embedded Web Server Administrator's Guide on the Lexmark Web site at www.lexmark.com. To view the device status: 1 Type the printer IP address in the TCP/IP section. 2 Click Device Status. Note: If you... an e-mail when the supplies are getting low or when the paper needs to see paper tray settings, the level of toner in the toner cartridge, the...
User's Guide
Page 240
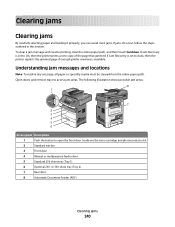
Inside are the toner cartridge and photoconductor kit. 2 Standard exit bin 3 Front door 4 Manual or multipurpose feeder door 5 Standard 250-sheet tray (Tray 1) 6 Optional 250- Understanding jam messages and ...
Inside are the toner cartridge and photoconductor kit. 2 Standard exit bin 3 Front door 4 Manual or multipurpose feeder door 5 Standard 250-sheet tray (Tray 1) 6 Optional 250- Understanding jam messages and ...
User's Guide
Page 242
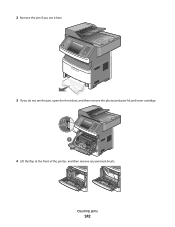
2 Remove the jam if you see it here. 3 If you do not see the jam, open the front door, and then remove the photoconductor kit and toner cartridge. 4 Lift the flap at the front of the printer, and then remove any jammed sheets. Clearing jams 242
2 Remove the jam if you see it here. 3 If you do not see the jam, open the front door, and then remove the photoconductor kit and toner cartridge. 4 Lift the flap at the front of the printer, and then remove any jammed sheets. Clearing jams 242
User's Guide
Page 243
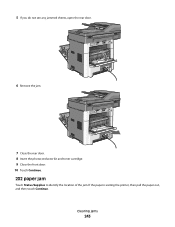
5 If you do not see any jammed sheets, open the rear door. 6 Remove the jam. 7 Close the rear door. 8 Insert the photoconductor kit and toner cartridge. 9 Close the front door. 10 Touch Continue. 202 paper jam Touch Status/Supplies to identify the location of the jam. Clearing jams 243 If the paper is exiting the printer, then pull the paper out, and then touch Continue.
5 If you do not see any jammed sheets, open the rear door. 6 Remove the jam. 7 Close the rear door. 8 Insert the photoconductor kit and toner cartridge. 9 Close the front door. 10 Touch Continue. 202 paper jam Touch Status/Supplies to identify the location of the jam. Clearing jams 243 If the paper is exiting the printer, then pull the paper out, and then touch Continue.
User's Guide
Page 249
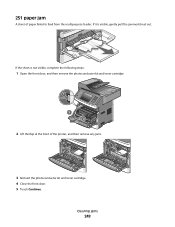
Clearing jams 249 If it is not visible, complete the following steps: 1 Open the front door, and then remove the photoconductor kit and toner cartridge. 2 Lift the flap at the front of paper failed to feed from the multipurpose feeder. If the sheet is visible, gently pull the jammed sheet out. 251 paper jam A sheet of the printer, and then remove any jams. 3 Reinsert the photoconductor kit and toner cartridge. 4 Close the front door. 5 Touch Continue.
Clearing jams 249 If it is not visible, complete the following steps: 1 Open the front door, and then remove the photoconductor kit and toner cartridge. 2 Lift the flap at the front of paper failed to feed from the multipurpose feeder. If the sheet is visible, gently pull the jammed sheet out. 251 paper jam A sheet of the printer, and then remove any jams. 3 Reinsert the photoconductor kit and toner cartridge. 4 Close the front door. 5 Touch Continue.

