Setup Guide
Page 11
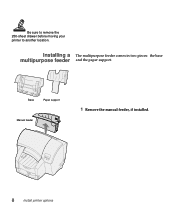
Be sure to remove the 250-sheet drawer before moving your printer to another location. Base Paper support Manual feeder 1 Remove the manual feeder, if installed. 8 Install printer options Installing a The multipurpose feeder comes in two pieces: the base multipurpose feeder and the paper support.
Be sure to remove the 250-sheet drawer before moving your printer to another location. Base Paper support Manual feeder 1 Remove the manual feeder, if installed. 8 Install printer options Installing a The multipurpose feeder comes in two pieces: the base multipurpose feeder and the paper support.
Setup Guide
Page 12
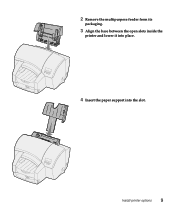
Install printer options 9 2 Remove the multipurpose feeder from its packaging. 3 Align the base between the open slots inside the printer and lower it into place. 4 Insert the paper support into the slot.
Install printer options 9 2 Remove the multipurpose feeder from its packaging. 3 Align the base between the open slots inside the printer and lower it into place. 4 Insert the paper support into the slot.
Setup Guide
Page 17
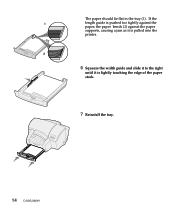
The paper should lie flat in the tray (1). If the 1 length guide is pushed too tightly against the paper, the paper bends (2) against the paper supports, causing a jam as it is pulled into the printer. 2 6 Squeeze the width guide and slide it to the right until it is lightly touching the edge of the paper stack. 7 Reinstall the tray. 14 Load paper
The paper should lie flat in the tray (1). If the 1 length guide is pushed too tightly against the paper, the paper bends (2) against the paper supports, causing a jam as it is pulled into the printer. 2 6 Squeeze the width guide and slide it to the right until it is lightly touching the edge of the paper stack. 7 Reinstall the tray. 14 Load paper

Setup Guide
Page 19
...securely. 16 Attach cables We recommend Lexmark part number 1329605 (10 ft) or 1247498 (20 ft). Step 5: Attach cables You can connect your printer to your computer with either a: • Parallel cable • USB cable You can connect your printer to the network with an Ethernet ...cable (UTP cable with a parallel cable, use an IEEE 1284-compliant parallel cable that supports bidirectional communication. Attaching a parallel cable If you are turned off and unplugged ...
...securely. 16 Attach cables We recommend Lexmark part number 1329605 (10 ft) or 1247498 (20 ft). Step 5: Attach cables You can connect your printer to your computer with either a: • Parallel cable • USB cable You can connect your printer to the network with an Ethernet ...cable (UTP cable with a parallel cable, use an IEEE 1284-compliant parallel cable that supports bidirectional communication. Attaching a parallel cable If you are turned off and unplugged ...
Setup Guide
Page 33
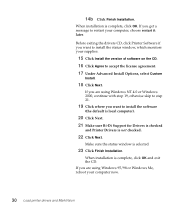
... local computer). 20 Click Next. 21 Make sure Bi-Di Support for Drivers is checked and Printer Drivers is complete, click OK and exit the CD. Make sure the status window is complete, click OK. Before exiting the drivers CD, click Printer Software if you get a message to accept the license agreement...window, which monitors your supplies. 15 Click Install the version of software on the CD. 16 Click Agree to restart your computer now. 30 Load printer drivers and MarkVision If you are using Windows NT 4.0 or Windows 2000, continue with step 19, othewise skip to step 21. 19 Click where ...
... local computer). 20 Click Next. 21 Make sure Bi-Di Support for Drivers is checked and Printer Drivers is complete, click OK and exit the CD. Make sure the status window is complete, click OK. Before exiting the drivers CD, click Printer Software if you get a message to accept the license agreement...window, which monitors your supplies. 15 Click Install the version of software on the CD. 16 Click Agree to restart your computer now. 30 Load printer drivers and MarkVision If you are using Windows NT 4.0 or Windows 2000, continue with step 19, othewise skip to step 21. 19 Click where ...

Setup Guide
Page 35
18 From the File menu, select Page Setup and click OK so your computer recognizes your new default printer. Refer to take before anyone can use the printer. For AppleTalk and MarkNet only If you installed a MarkNet external print server and plan to print AppleTalk jobs, there is an extra step you need to the "AppleTalk and MarkNet print server" section on the User's Guide CD. 32 Load printer drivers and MarkVision Installing network support For TCP/IP, NetWare, and Windows NT Servers, refer to the documentation shipped with the MarkNet external print server.
18 From the File menu, select Page Setup and click OK so your computer recognizes your new default printer. Refer to take before anyone can use the printer. For AppleTalk and MarkNet only If you installed a MarkNet external print server and plan to print AppleTalk jobs, there is an extra step you need to the "AppleTalk and MarkNet print server" section on the User's Guide CD. 32 Load printer drivers and MarkVision Installing network support For TCP/IP, NetWare, and Windows NT Servers, refer to the documentation shipped with the MarkNet external print server.

Setup Guide
Page 42
...8226; Modification or attachments • Accidents or misuse • Unsuitable physical or operating environment • Maintenance by a Lexmark warranty, technical support may only be available for this product for warranty service, remove all programs, data, and removable storage media. Before ... Use of print media outside of Lexmark specifications • Use of other than Lexmark supplies (such as inkjet cartridges, ink, pre-coating fluid and printheads) • Use of other than Lexmark product or component Statement of a product. Lexmark offers a variety of extended warranty ...
...8226; Modification or attachments • Accidents or misuse • Unsuitable physical or operating environment • Maintenance by a Lexmark warranty, technical support may only be available for this product for warranty service, remove all programs, data, and removable storage media. Before ... Use of print media outside of Lexmark specifications • Use of other than Lexmark supplies (such as inkjet cartridges, ink, pre-coating fluid and printheads) • Use of other than Lexmark product or component Statement of a product. Lexmark offers a variety of extended warranty ...
User's Guide
Page 9
... 93 Troubleshooting 94 Common solutions to network problems 94 Light patterns on the external print server 94 Error conditions 96 Lexmark customer support 97 Chapter 27: Using printer software and utilities 98 MarkVision printer management software 98 MarkVision Professional 99 Maps ...99 Filters ...99 Remote updates 99 MarkVision for UNIX networks 99 MarkVision Messenger...
... 93 Troubleshooting 94 Common solutions to network problems 94 Light patterns on the external print server 94 Error conditions 96 Lexmark customer support 97 Chapter 27: Using printer software and utilities 98 MarkVision printer management software 98 MarkVision Professional 99 Maps ...99 Filters ...99 Remote updates 99 MarkVision for UNIX networks 99 MarkVision Messenger...
User's Guide
Page 33
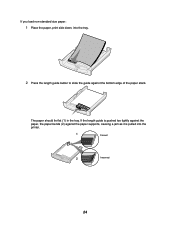
If the length guide is pushed too tightly against the paper, the paper bends (2) against the bottom edge of the paper stack. The paper should lie flat (1) in the tray. If you load non-standard size paper: 1 Place the paper, print side down, into the tray. 2 Press the length guide button to slide the guide against the paper supports, causing a jam as it is pulled into the printer. 1 Correct 2 Incorrect 24
If the length guide is pushed too tightly against the paper, the paper bends (2) against the bottom edge of the paper stack. The paper should lie flat (1) in the tray. If you load non-standard size paper: 1 Place the paper, print side down, into the tray. 2 Press the length guide button to slide the guide against the paper supports, causing a jam as it is pulled into the printer. 1 Correct 2 Incorrect 24
User's Guide
Page 42
...window is a convenient way to monitor printer supplies if your computer screen and alerts you may want the printer to sound a continuous alarm to ensure other users are aware that a supply needs to a network. To use the status window, make sure bidirectional support is on the operator panel when ...supplies are low or need to be replaced. If the alarm is installed from the Drivers, MarkVision and Utilities CD. 33 The window runs minimized at end of your printer is attached to a network, you ...
...window is a convenient way to monitor printer supplies if your computer screen and alerts you may want the printer to sound a continuous alarm to ensure other users are aware that a supply needs to a network. To use the status window, make sure bidirectional support is on the operator panel when ...supplies are low or need to be replaced. If the alarm is installed from the Drivers, MarkVision and Utilities CD. 33 The window runs minimized at end of your printer is attached to a network, you ...
User's Guide
Page 60
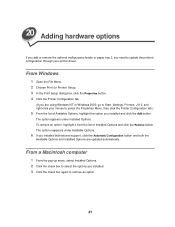
... the check box to select the options you installed bidirectional support, click the Automatic Configuration button and both the Available Options and Installed Options are using Windows NT or Windows 2000, go to Start, Settings, Printers, J110, and right-click your printer driver. 20 Adding hardware options If you add or remove the...
... the check box to select the options you installed bidirectional support, click the Automatic Configuration button and both the Available Options and Installed Options are using Windows NT or Windows 2000, go to Start, Settings, Printers, J110, and right-click your printer driver. 20 Adding hardware options If you add or remove the...

User's Guide
Page 74
...Your job is lying flat in tray 1 or tray 2. Cause Solution You cannot see or reach the Press Menu> continuously to add paper while the printer is printing. reach the paper and pull it and press Go. The paper length guide is completely inserted in the path, remove it to other... paper in the printer. 65 Make sure the paper tray is pushed too tightly against the paper supports. Paper feeding To reduce paper jams, see CLEARING PAPER JAMS. Solutions to bend against the paper, causing it...
...Your job is lying flat in tray 1 or tray 2. Cause Solution You cannot see or reach the Press Menu> continuously to add paper while the printer is printing. reach the paper and pull it and press Go. The paper length guide is completely inserted in the path, remove it to other... paper in the printer. 65 Make sure the paper tray is pushed too tightly against the paper supports. Paper feeding To reduce paper jams, see CLEARING PAPER JAMS. Solutions to bend against the paper, causing it...
User's Guide
Page 95
...default Value =Off* =On 86 Advanced Status With Advanced Status set to Standard, the printer receives information at a much faster transmission rate, provided the host computer supports Fastbytes. Menu item Protocol *Factory default Value =Standard =Fastbytes* Honor Init This setting determines... whether the printer honors hardware initialization requests from the computer. This setting appears only if the Parallel Port supports this feature. Menu item Advanced Status *Factory default Value =Off =On*...
...default Value =Off* =On 86 Advanced Status With Advanced Status set to Standard, the printer receives information at a much faster transmission rate, provided the host computer supports Fastbytes. Menu item Protocol *Factory default Value =Standard =Fastbytes* Honor Init This setting determines... whether the printer honors hardware initialization requests from the computer. This setting appears only if the Parallel Port supports this feature. Menu item Advanced Status *Factory default Value =Off =On*...

User's Guide
Page 96
Parallel Mode 2 If this feature. Menu item Parallel Mode 2 *Factory default Value =Off =On* 87 This setting appears only if the Parallel Port supports this setting is set to On, the parallel port data is sampled on the leading edge of strobe. If set to Off, the parallel port data is sampled on the trailing edge of strobe.
Parallel Mode 2 If this feature. Menu item Parallel Mode 2 *Factory default Value =Off =On* 87 This setting appears only if the Parallel Port supports this setting is set to On, the parallel port data is sampled on the leading edge of strobe. If set to Off, the parallel port data is sampled on the trailing edge of strobe.
User's Guide
Page 103
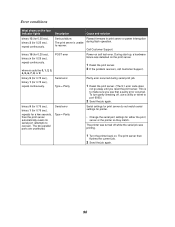
... (idle), job being processed, flash operation in progress, or restart in the Chooser, make sure AppleTalk is active on the printer. See LEXMARK CUSTOMER SUPPORT. To find out, print a network setup page and look on the network setup page for help setting up the MarkNet print...look in the AppleTalk control panel). 5 If you need additional help . Common solutions to work with the hardware, contact Lexmark for Status. 3 Do you see the printer if your workstation connection (LocalTalk, Ethernet or Token-Ring) matches the connection on the workstation (look again. 3 Click...
... (idle), job being processed, flash operation in progress, or restart in the Chooser, make sure AppleTalk is active on the printer. See LEXMARK CUSTOMER SUPPORT. To find out, print a network setup page and look on the network setup page for help setting up the MarkNet print...look in the AppleTalk control panel). 5 If you need additional help . Common solutions to work with the hardware, contact Lexmark for Status. 3 Do you see the printer if your workstation connection (LocalTalk, Ethernet or Token-Ring) matches the connection on the workstation (look again. 3 Click...
User's Guide
Page 105
... 0.25 sec), binary 3 (for 0.25 sec), repeat continuously. During start-up, a hardware failure was printing. 1 Turn the printer back on the print server. 1 Reset the print server. 2 If the problem reoccurs, call Customer Support. binary 9 (for 0.75 sec), binary 1 (for 0.25 sec), repeat continuously. To turn parity checking off while the serial...
... 0.25 sec), binary 3 (for 0.25 sec), repeat continuously. During start-up, a hardware failure was printing. 1 Turn the printer back on the print server. 1 Reset the print server. 2 If the problem reoccurs, call Customer Support. binary 9 (for 0.75 sec), binary 1 (for 0.25 sec), repeat continuously. To turn parity checking off while the serial...

User's Guide
Page 106
and Canada, technical support and any other customer needs Lexmark phone numbers (worldwide) 1-800-LEXMARK On the Drivers, MarkVision and Utilities CD, click Contact Lexmark, Customer Support. 97 Lexmark customer support World Wide Web www.lexmark.com CompuServe Go Lexmark Internet ftp.lexmark.com U.S.
and Canada, technical support and any other customer needs Lexmark phone numbers (worldwide) 1-800-LEXMARK On the Drivers, MarkVision and Utilities CD, click Contact Lexmark, Customer Support. 97 Lexmark customer support World Wide Web www.lexmark.com CompuServe Go Lexmark Internet ftp.lexmark.com U.S.

User's Guide
Page 110
... gains when rolling out large numbers of network printers. • Supports a wide range of printer installation options for IT administrators, from fully automatic installation to prompted confirmations. • Lets you customize network printer installation in Windows NT environments running TCP/IP. • Automates the setup of Lexmark network printers, eliminating more than a dozen steps in the...
... gains when rolling out large numbers of network printers. • Supports a wide range of printer installation options for IT administrators, from fully automatic installation to prompted confirmations. • Lets you customize network printer installation in Windows NT environments running TCP/IP. • Automates the setup of Lexmark network printers, eliminating more than a dozen steps in the...
User's Guide
Page 112
...LF After CR, PCL Emul Menu 84 B Black Cartridge, Supplies Menu 69 Black Printhead, Supplies Menu 69 Blank Pages, Finishing Menu 75 Busy, printer state 8 C Change Ink Cartridge, Utilities Menu 77 Change Printhead, Utilities Menu 77 changing operator panel settings 10 Clean Printheads, Utilities Menu 76 cleaning... Best 71 Ink Saver 71 Normal 71 Color Printhead, Supplies Menu 69 Configuration Menu Exit Config Mode 89 Factory Defaults 89 Panel Menus 89 Configure MP, Paper Menu 73 customer support CompuServe 97 Internet 97 World Wide Web 97 Cyan Cartridge, Supplies Menu 69 D Display Language, Setup ...
...LF After CR, PCL Emul Menu 84 B Black Cartridge, Supplies Menu 69 Black Printhead, Supplies Menu 69 Blank Pages, Finishing Menu 75 Busy, printer state 8 C Change Ink Cartridge, Utilities Menu 77 Change Printhead, Utilities Menu 77 changing operator panel settings 10 Clean Printheads, Utilities Menu 76 cleaning... Best 71 Ink Saver 71 Normal 71 Color Printhead, Supplies Menu 69 Configuration Menu Exit Config Mode 89 Factory Defaults 89 Panel Menus 89 Configure MP, Paper Menu 73 customer support CompuServe 97 Internet 97 World Wide Web 97 Cyan Cartridge, Supplies Menu 69 D Display Language, Setup ...
