
Setup Guide
Page 2
... about this product or make these changes will be incorporated in the products or the programs described may use or distribute any time. Any reference to meet strict global safety standards with the use of Lexmark International, Inc., registered in the United States and/or other countries, contact your product is installed, you must remove the fax phone line cable first from the wall...
... about this product or make these changes will be incorporated in the products or the programs described may use or distribute any time. Any reference to meet strict global safety standards with the use of Lexmark International, Inc., registered in the United States and/or other countries, contact your product is installed, you must remove the fax phone line cable first from the wall...
Setup Guide
Page 3
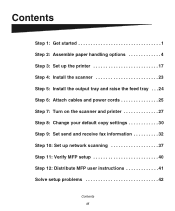
Contents Step 1: Get started 1 Step 2: Assemble paper handling options 4 Step 3: Set up the printer 17 Step 4: Install the scanner 23 Step 5: Install the output tray and raise the feed tray . . . 24 Step 6: Attach cables and power cords 25 Step 7: Turn on the scanner and printer 27 Step 8: Change your default copy settings 30 Step 9: Set send and receive fax information 32 Step 10: Set up network scanning 37 Step 11: Verify MFP setup 40 Step 12: Distribute MFP user instructions 41 Solve setup problems 42 Contents iii
Contents Step 1: Get started 1 Step 2: Assemble paper handling options 4 Step 3: Set up the printer 17 Step 4: Install the scanner 23 Step 5: Install the output tray and raise the feed tray . . . 24 Step 6: Attach cables and power cords 25 Step 7: Turn on the scanner and printer 27 Step 8: Change your default copy settings 30 Step 9: Set send and receive fax information 32 Step 10: Set up network scanning 37 Step 11: Verify MFP setup 40 Step 12: Distribute MFP user instructions 41 Solve setup problems 42 Contents iii
Setup Guide
Page 5
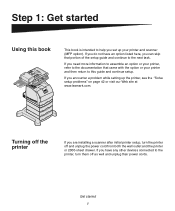
... the printer, turn the printer off as well and unplug their power cords. If you set up the printer, see the "Solve setup problems" on page 42 or visit our Web site at www.lexmark.com. Get started Using this guide and continue setup. Turning off the printer If you can skip that came with the option or your printer and scanner (MFP option). If you do not have any other devices connected to...
... the printer, turn the printer off as well and unplug their power cords. If you set up the printer, see the "Solve setup problems" on page 42 or visit our Web site at www.lexmark.com. Get started Using this guide and continue setup. Turning off the printer If you can skip that came with the option or your printer and scanner (MFP option). If you do not have any other devices connected to...
Setup Guide
Page 6
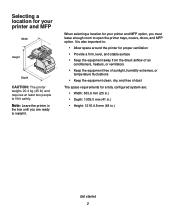
...a location for your printer and MFP option, you are : • Width: 633.6 mm (25 in.) • Depth: 1039.0 mm (41 in.) • Height: 1216.4.8 mm (48 in the box until you must leave enough room to install it safely. Note: Leave the printer in .) Get started ... airflow of air conditioners, heaters, or ventilators • Keep the equipment free of sunlight, humidity extremes, or temperature fluctuations • Keep the equipment clean, dry, and free of dust The space requirements for a fully configured system are ready to open the printer trays, covers, doors, and MFP option.
...a location for your printer and MFP option, you are : • Width: 633.6 mm (25 in.) • Depth: 1039.0 mm (41 in.) • Height: 1216.4.8 mm (48 in the box until you must leave enough room to install it safely. Note: Leave the printer in .) Get started ... airflow of air conditioners, heaters, or ventilators • Keep the equipment free of sunlight, humidity extremes, or temperature fluctuations • Keep the equipment clean, dry, and free of dust The space requirements for a fully configured system are ready to open the printer trays, covers, doors, and MFP option.
Setup Guide
Page 13
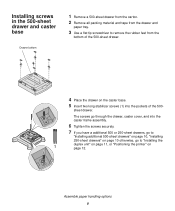
...paper handling options 9 The screws go to "Installing additional 500-sheet drawers" on page 10, "Installing 250-sheet drawers" on page 12. sheet drawer. Installing screws in the 500-sheet drawer and caster base Drawer bottom 1 Remove a 500-sheet drawer from the carton. 2 Remove all packing material and tape from the drawer and paper tray. 3 Use a flat tip screwdriver to remove...have a additional 500 or 250-sheet drawers, go to "Installing the duplex unit" on page 11, or "Positioning the printer" on page 10 otherwise, go through the drawer, caster cover, and into the pockets of the ...
...paper handling options 9 The screws go to "Installing additional 500-sheet drawers" on page 10, "Installing 250-sheet drawers" on page 12. sheet drawer. Installing screws in the 500-sheet drawer and caster base Drawer bottom 1 Remove a 500-sheet drawer from the carton. 2 Remove all packing material and tape from the drawer and paper tray. 3 Use a flat tip screwdriver to remove...have a additional 500 or 250-sheet drawers, go to "Installing the duplex unit" on page 11, or "Positioning the printer" on page 10 otherwise, go through the drawer, caster cover, and into the pockets of the ...
Setup Guide
Page 16
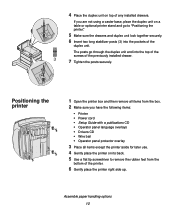
... the duplex unit. 4 Place the duplex unit on top of the printer. 6 Gently place the printer right side up. Assemble paper handling options 12 The posts go to remove the rubber feet from the bottom of any installed drawers. If you have the following items: • Printer • Power cord • Setup Guide with a publications CD • Operator panel language overlays • Drivers CD • Wire bail • Operator panel...
... the duplex unit. 4 Place the duplex unit on top of the printer. 6 Gently place the printer right side up. Assemble paper handling options 12 The posts go to remove the rubber feet from the bottom of any installed drawers. If you have the following items: • Printer • Power cord • Setup Guide with a publications CD • Operator panel language overlays • Drivers CD • Wire bail • Operator panel...
Setup Guide
Page 29
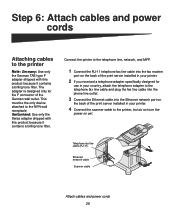
... 6: Attach cables and power cords Attaching cables to the printer Note: Germany: Use only the German TAE type F adapter shipped with this product because it contains a billing tone filter. The adapter is designed only for use in your printer. 4 Connect the scanner cable to the printer, but do not turn the power on the back of the print server installed in your printer. 2 If you received a telephone adapter specifically designed...
... 6: Attach cables and power cords Attaching cables to the printer Note: Germany: Use only the German TAE type F adapter shipped with this product because it contains a billing tone filter. The adapter is designed only for use in your printer. 4 Connect the scanner cable to the printer, but do not turn the power on the back of the print server installed in your printer. 2 If you received a telephone adapter specifically designed...
Setup Guide
Page 32
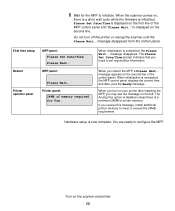
.... MFP panel: Printer operator panel Please Wait... When you turn off the printer or unplug the scanner until the Please Wait... If you may see the message on the second line of the MFP control panel and "Please Wait..." is displayed on , there is a short wait cycle while the firmware is displayed on the scanner and printer 28 Do not turn on your printer after installing the MFP, you receive this message, install additional printer memory to configure...
.... MFP panel: Printer operator panel Please Wait... When you turn off the printer or unplug the scanner until the Please Wait... If you may see the message on the second line of the MFP control panel and "Please Wait..." is displayed on , there is a short wait cycle while the firmware is displayed on the scanner and printer 28 Do not turn on your printer after installing the MFP, you receive this message, install additional printer memory to configure...
Setup Guide
Page 34
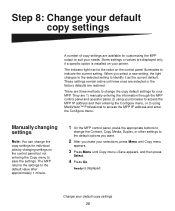
... to indicate the current setting. They are displayed only if a specific option is displayed. The MFP returns the settings to the default value after approximately 1 minute. 1 On the MFP control panel, press the appropriate buttons to change the copy settings for individual jobs by changing settings on the control panel illuminates to access the MFP IP address and enter the Configure menu. When you make your printer. Some settings or values are 1) manually entering the information through the MFP control panel and operator panel, 2) using your default copy settings 30
... to indicate the current setting. They are displayed only if a specific option is displayed. The MFP returns the settings to the default value after approximately 1 minute. 1 On the MFP control panel, press the appropriate buttons to change the copy settings for individual jobs by changing settings on the control panel illuminates to access the MFP IP address and enter the Configure menu. When you make your printer. Some settings or values are 1) manually entering the information through the MFP control panel and operator panel, 2) using your default copy settings 30
Setup Guide
Page 35
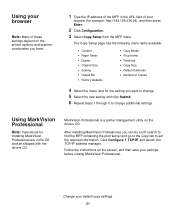
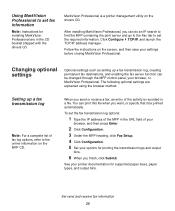
... settings. MarkVision Professional is a printer management utility on the screen, and then save your settings before closing MarkVision Professional. Follow the instructions on the drivers CD. Click Configure TCP/IP, and launch the TCP/IP address manager. After installing MarkVision Professional, you can do an IP search to find the MFP containing the print server and go to the Copy tab to change . 5 Select the new setting...
... settings. MarkVision Professional is a printer management utility on the screen, and then save your settings before closing MarkVision Professional. Follow the instructions on the drivers CD. Click Configure TCP/IP, and launch the TCP/IP address manager. After installing MarkVision Professional, you can do an IP search to find the MFP containing the print server and go to the Copy tab to change . 5 Select the new setting...
Setup Guide
Page 36
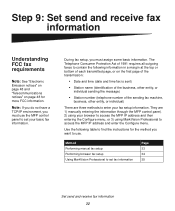
... the top or bottom of the sending fax machine, business, other entity, or individual) There are 1) manually entering the information through the MFP control panel, 2) using your browser to access the MFP IP address and then entering the Configure menu, or 3) using MarkVision Professional to access the MFP IP address and enter the Configure menu. They are three methods to set your fax setup information. Method Performing manual fax setup Performing browser fax setup Using MarkVision Professional to enter your basic fax information.
... the top or bottom of the sending fax machine, business, other entity, or individual) There are 1) manually entering the information through the MFP control panel, 2) using your browser to access the MFP IP address and then entering the Configure menu, or 3) using MarkVision Professional to access the MFP IP address and enter the Configure menu. They are three methods to set your fax setup information. Method Performing manual fax setup Performing browser fax setup Using MarkVision Professional to enter your basic fax information.
Setup Guide
Page 38
... configure the MFP to route faxes received through the fax modem port on the print server (with modem) to Answer, and so on your printer. 1 Type the IP address of the MFP in the URL field of receive fax options, refer to get the correct time. Set send and receive fax information 34 This sets the required information. 7 Set your options for Fax storage, Output bin, Rings to an output bin on . For a complete list of your network administrator...
... configure the MFP to route faxes received through the fax modem port on the print server (with modem) to Answer, and so on your printer. 1 Type the IP address of the MFP in the URL field of receive fax options, refer to get the correct time. Set send and receive fax information 34 This sets the required information. 7 Set your options for Fax storage, Output bin, Rings to an output bin on . For a complete list of your network administrator...
Setup Guide
Page 39
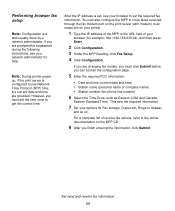
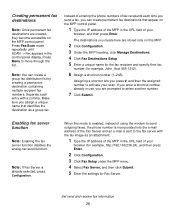
... options for supported paper sizes, paper types, and output bins. The following optional settings are in the URL field of your browser, and then press Enter. 2 Click Configuration. 3 Under the MFP heading, click Fax Setup. 4 Click Configuration. 5 Set your printer documentation for printing the transmission logs and output bins. 6 When you finish, click Submit. Set send and receive fax information 35 Follow the instructions on the drivers CD. Setting up a fax transmission log, creating permanent fax destinations, and enabling the fax server function...
... options for supported paper sizes, paper types, and output bins. The following optional settings are in the URL field of your browser, and then press Enter. 2 Click Configuration. 3 Under the MFP heading, click Fax Setup. 4 Click Configuration. 5 Set your printer documentation for printing the transmission logs and output bins. 6 When you finish, click Submit. Set send and receive fax information 35 Follow the instructions on the drivers CD. Setting up a fax transmission log, creating permanent fax destinations, and enabling the fax server function...
Setup Guide
Page 40
... another number. 7 Click Submit. Press Menu to activate your scan. Note: You can create permanent fax destinations that identifies the destination as an attachment. 1 Type the IP address of the MFP in the URL field of your browser, and then press Enter. Enabling fax server function Note: Enabling the fax server function disables the analog fax send function. When this MFP. 2 Click Configuration. 3 Under the MFP heading, click Manage Destinations. 4 Click Fax Destinations Setup. 5 Enter a unique...
... another number. 7 Click Submit. Press Menu to activate your scan. Note: You can create permanent fax destinations that identifies the destination as an attachment. 1 Type the IP address of the MFP in the URL field of your browser, and then press Enter. Enabling fax server function Note: Enabling the fax server function disables the analog fax send function. When this MFP. 2 Click Configuration. 3 Under the MFP heading, click Manage Destinations. 4 Click Fax Destinations Setup. 5 Enter a unique...
Setup Guide
Page 41
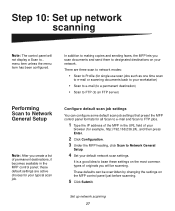
... your default network scan settings. These defaults can configure some default scan job settings that preset the MFP control panel formats for example, http://192.168.236.24), and then press Enter. 2 Click Configuration. 3 Under the MFP heading, click Scan to ... In addition to making copies and sending faxes, the MFP lets you will not display a Scan to Network General Setup. 4 Set your browser (for all Scan to e-mail and Scan to FTP jobs. 1 Type the IP address of the MFP in the MFP control panel;
... your default network scan settings. These defaults can configure some default scan job settings that preset the MFP control panel formats for example, http://192.168.236.24), and then press Enter. 2 Click Configuration. 3 Under the MFP heading, click Scan to ... In addition to making copies and sending faxes, the MFP lets you will not display a Scan to Network General Setup. 4 Set your browser (for all Scan to e-mail and Scan to FTP jobs. 1 Type the IP address of the MFP in the MFP control panel;
Setup Guide
Page 44
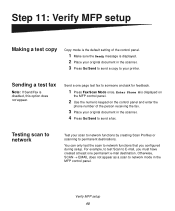
... network functions that you must have created at least one page test fax to someone and ask for feedback. 1 Press Fax/Scan Mode once. Step 11: Verify MFP setup Making a test copy Copy mode is the default setting of the control panel. 1 Make sure the Ready message is displayed on the MFP control panel. 2 Use the numeric keypad on the control panel and enter the phone number of the person receiving the fax. 3 Place your original document in the scanner. 4 Press Go/Send to send a fax. Sending a test fax Note: If Send/Fax...
... network functions that you must have created at least one page test fax to someone and ask for feedback. 1 Press Fax/Scan Mode once. Step 11: Verify MFP setup Making a test copy Copy mode is the default setting of the control panel. 1 Make sure the Ready message is displayed on the MFP control panel. 2 Use the numeric keypad on the control panel and enter the phone number of the person receiving the fax. 3 Place your original document in the scanner. 4 Press Go/Send to send a fax. Sending a test fax Note: If Send/Fax...

Setup Guide
Page 45
... users. • Copy the PDF containing the user instructions and store it in the Pubs directory on your MFP. Save the URL and send the link to unlock the control panel. Click View Documentation Use MFP More MFP Configuration. Distribute MFP user instructions 41 The PDF is stored in a convenient common location on the MFP CD. • Browse the Lexmark™ Web site (www.lexmark.com) and access the information there. Limiting MFP use MFP Job Accounting can be configured...
... users. • Copy the PDF containing the user instructions and store it in the Pubs directory on your MFP. Save the URL and send the link to unlock the control panel. Click View Documentation Use MFP More MFP Configuration. Distribute MFP user instructions 41 The PDF is stored in a convenient common location on the MFP CD. • Browse the Lexmark™ Web site (www.lexmark.com) and access the information there. Limiting MFP use MFP Job Accounting can be configured...
Setup Guide
Page 46
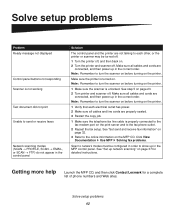
... MFP CD, and then click Contact Lexmark for detailed instructions. Solve setup problems Problem Ready message not displayed Control panel buttons not responding Scanner is not working Test document did not print Unable to send or receive faxes Network scanning modes (SCAN → PROFILE, SCAN → EMAIL, or SCAN → FTP) do not appear in the control panel Solution The control panel and the printer are not talking to each electrical outlet has power. 2 Make sure all cables and line cords are properly seated. 3 Restart the copy job. 1 Make...
... MFP CD, and then click Contact Lexmark for detailed instructions. Solve setup problems Problem Ready message not displayed Control panel buttons not responding Scanner is not working Test document did not print Unable to send or receive faxes Network scanning modes (SCAN → PROFILE, SCAN → EMAIL, or SCAN → FTP) do not appear in the control panel Solution The control panel and the printer are not talking to each electrical outlet has power. 2 Make sure all cables and line cords are properly seated. 3 Restart the copy job. 1 Make...
Setup Guide
Page 51
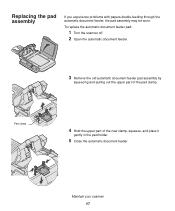
Replacing the pad assembly If you experience problems with papers double-feeding through the automatic document feeder, the pad assembly may be worn. Pad clamp 4 Hold the upper part of the pad clamp. Maintain your scanner 47 To replace the automatic document feeder pad: 1 Turn the scanner off. 2 Open the automatic document feeder. 3 Remove the old automatic document feeder pad assembly by squeezing and pulling out the upper part of the new clamp, squeeze, and place it gently in the pad holder. 5 Close the automatic document feeder.
Replacing the pad assembly If you experience problems with papers double-feeding through the automatic document feeder, the pad assembly may be worn. Pad clamp 4 Hold the upper part of the pad clamp. Maintain your scanner 47 To replace the automatic document feeder pad: 1 Turn the scanner off. 2 Open the automatic document feeder. 3 Remove the old automatic document feeder pad assembly by squeezing and pulling out the upper part of the new clamp, squeeze, and place it gently in the pad holder. 5 Close the automatic document feeder.
Setup Guide
Page 53
... Canada Terminal Equipment Technical Specifications. The equipment must also be used on the first page of the transmission: • Date and time the fax is located on the approved terminal equipment labeling. Refer to send a fax unless the following information is permissible to be aware that compliance with this equipment, users should coordinate repairs to the telephone network, the telephone company will...
... Canada Terminal Equipment Technical Specifications. The equipment must also be used on the first page of the transmission: • Date and time the fax is located on the approved terminal equipment labeling. Refer to send a fax unless the following information is permissible to be aware that compliance with this equipment, users should coordinate repairs to the telephone network, the telephone company will...


