Setup Guide
Page 7
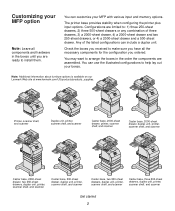
... to arrange the boxes in the boxes until you ordered. Note: Additional information about furniture options is available on our Lexmark Web site at www.lexmark.com/US/products/products_supplies. Customizing your MFP option Note: Leave all the necessary components for the configuration you are ready to install them. You can customize your...
... to arrange the boxes in the boxes until you ordered. Note: Additional information about furniture options is available on our Lexmark Web site at www.lexmark.com/US/products/products_supplies. Customizing your MFP option Note: Leave all the necessary components for the configuration you are ready to install them. You can customize your...
Setup Guide
Page 17
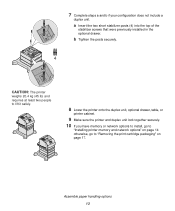
... onto the duplex unit, optional drawer, table, or printer cabinet. 9 Make sure the printer and duplex unit lock together securely. 10 If you have memory or network options to install, go to "Installing printer memory and network options" on page 14 otherwise, go to "Removing the print cartridge packaging" on page 17.
... onto the duplex unit, optional drawer, table, or printer cabinet. 9 Make sure the printer and duplex unit lock together securely. 10 If you have memory or network options to install, go to "Installing printer memory and network options" on page 14 otherwise, go to "Removing the print cartridge packaging" on page 17.
Setup Guide
Page 18
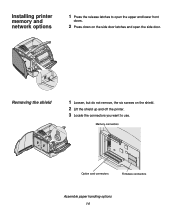
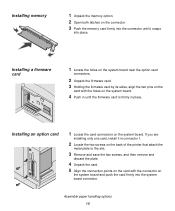
Installing printer memory and network options 1 Press the release latches to use. Memory connectors Option card connectors Firmware connectors Assemble paper handling options 14 Removing the shield 1 Loosen, but do not remove, the six screws on the side door latches and open the upper and lower front doors. 2 Press down on the shield. 2 Lift the shield up and off the printer. 3 Locate the connectors you want to open the side door.
Installing printer memory and network options 1 Press the release latches to use. Memory connectors Option card connectors Firmware connectors Assemble paper handling options 14 Removing the shield 1 Loosen, but do not remove, the six screws on the side door latches and open the upper and lower front doors. 2 Press down on the shield. 2 Lift the shield up and off the printer. 3 Locate the connectors you want to open the side door.
Setup Guide
Page 19
.... 2 Open both latches on the connector. 3 Push the memory card firmly into the connector until the firmware card is firmly in place. If you are installing only one card, install it in connector 1. 2 Locate ...
.... 2 Open both latches on the connector. 3 Push the memory card firmly into the connector until the firmware card is firmly in place. If you are installing only one card, install it in connector 1. 2 Locate ...
Setup Guide
Page 32
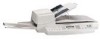
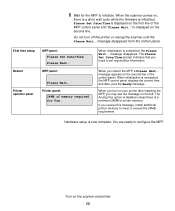
...Fax option is disabled unless there is now complete. You are ready to initialize. Printer panel: 24MB of printer memory. Turn on your printer after installing the MFP, you restart the MFP, a Please Wait... When you turn off the printer or unplug the scanner until the Please Wait... First ...time setup Restart MFP panel: Please Set Date/Time Please Wait... When you may see the message on the second line. Hardware setup is a minimum 24MB of memory required for the MFP to configure the MFP. Do not turn on the scanner and printer 28...
...Fax option is disabled unless there is now complete. You are ready to initialize. Printer panel: 24MB of printer memory. Turn on your printer after installing the MFP, you restart the MFP, a Please Wait... When you turn off the printer or unplug the scanner until the Please Wait... First ...time setup Restart MFP panel: Please Set Date/Time Please Wait... When you may see the message on the second line. Hardware setup is a minimum 24MB of memory required for the MFP to configure the MFP. Do not turn on the scanner and printer 28...


