User's Guide
Page 10
...personnel to lift it safely. If you looking for? Click to view the appropriate support site. Clean, dry, and free of the ASHRAE 62 standard. • Provide a flat, sturdy, and stable surface. • Keep the printer: - It is located in the room meets the ... Web site-support.lexmark.com Note: Select your region, and then select your operating system. Selecting a location for the printer, leave enough room to open trays, covers, and doors. Away from direct sunlight, humidity extremes, or temperature fluctuations - Support telephone numbers and hours of air conditioners, ...
...personnel to lift it safely. If you looking for? Click to view the appropriate support site. Clean, dry, and free of the ASHRAE 62 standard. • Provide a flat, sturdy, and stable surface. • Keep the printer: - It is located in the room meets the ... Web site-support.lexmark.com Note: Select your region, and then select your operating system. Selecting a location for the printer, leave enough room to open trays, covers, and doors. Away from direct sunlight, humidity extremes, or temperature fluctuations - Support telephone numbers and hours of air conditioners, ...
User's Guide
Page 12
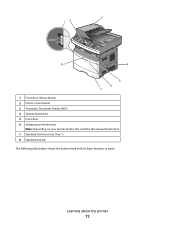
3 12 8 4 5 6 7 1 Front door release button 2 Printer control panel 3 Automatic Document Feeder (ADF) 4 System board door 5 Front door 6 Multipurpose feeder door Note: Depending on your printer model, this could be the manual feeder door. 7 Standard 250-sheet tray (Tray 1) 8 Standard exit bin The following illustration shows the printer back with its basic features or parts: Learning about the printer 12
3 12 8 4 5 6 7 1 Front door release button 2 Printer control panel 3 Automatic Document Feeder (ADF) 4 System board door 5 Front door 6 Multipurpose feeder door Note: Depending on your printer model, this could be the manual feeder door. 7 Standard 250-sheet tray (Tray 1) 8 Standard exit bin The following illustration shows the printer back with its basic features or parts: Learning about the printer 12

User's Guide
Page 41
...support for a prompt to increase the setting, and then press . Avoiding jams The following hints can help you avoid jams: Paper tray recommendations • Make sure the paper lies flat in firmly after loading paper. Note: Select Portrait Height to adjust the paper height ...then press . Loading paper and specialty media 41 Submitting Changes appears, followed by the Universal Setup menu. Instructions to printing, or wait for standard features such as duplex printing and printing multiple pages on and Ready appears. 2 From the printer control panel, press . Specify a unit ...
...support for a prompt to increase the setting, and then press . Avoiding jams The following hints can help you avoid jams: Paper tray recommendations • Make sure the paper lies flat in firmly after loading paper. Note: Select Portrait Height to adjust the paper height ...then press . Loading paper and specialty media 41 Submitting Changes appears, followed by the Universal Setup menu. Instructions to printing, or wait for standard features such as duplex printing and printing multiple pages on and Ready appears. 2 From the printer control panel, press . Specify a unit ...
User's Guide
Page 43
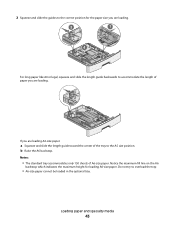
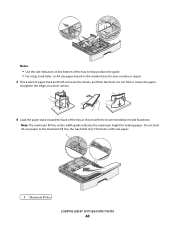
... loading A6-size paper. Do not try to the A5 size position. Notes: • The standard tray accommodates only 150 sheets of the tray to overload the tray. • A6-size paper cannot be loaded in the optional tray. If you are loading A6-size paper: a Squeeze and slide the length guide toward the center...
... loading A6-size paper. Do not try to the A5 size position. Notes: • The standard tray accommodates only 150 sheets of the tray to overload the tray. • A6-size paper cannot be loaded in the optional tray. If you are loading A6-size paper: a Squeeze and slide the length guide toward the center...
User's Guide
Page 44
... only 150 sheets of the tray as shown with the recommended print side facedown. Note: The maximum fill line on the width ... and then fan them. Do not fold or crease the paper. Notes: • Use the size indicators on the bottom of the tray to the maximum fill line; or A4-size paper based on a level surface. 4 Load the paper stack toward the back of A6-...size paper. 1 1 Maximum fill line Loading paper and specialty media 44 Straighten the edges on the standard size for loading paper. Do not load A6-size paper to help position the guide. • For setup, load letter-
... only 150 sheets of the tray as shown with the recommended print side facedown. Note: The maximum fill line on the width ... and then fan them. Do not fold or crease the paper. Notes: • Use the size indicators on the bottom of the tray to the maximum fill line; or A4-size paper based on a level surface. 4 Load the paper stack toward the back of A6-...size paper. 1 1 Maximum fill line Loading paper and specialty media 44 Straighten the edges on the standard size for loading paper. Do not load A6-size paper to help position the guide. • For setup, load letter-

User's Guide
Page 57
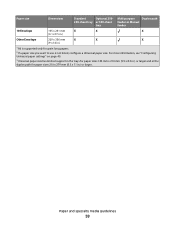
...-sheet tray 550-sheet tray feeder Manual feeder Duplex path X Bond Letterhead Preprinted Colored Paper Card stock X X X Glossy paper X X X X X Paper labels1 X Transparencies X Envelopes X X X (smooth)2 1 Single-sided paper labels designed for occasional use. For information on standard and ...8226; Plain • Light • Heavy • Recycled • Custom Rough/Cotton Standard Optional 250- Vinyl, pharmacy, and dual-sided labels are supported for laser printers are not supported. 2 Use envelopes that lie flat when individually placed on a table ...
...-sheet tray 550-sheet tray feeder Manual feeder Duplex path X Bond Letterhead Preprinted Colored Paper Card stock X X X Glossy paper X X X X X Paper labels1 X Transparencies X Envelopes X X X (smooth)2 1 Single-sided paper labels designed for occasional use. For information on standard and ...8226; Plain • Light • Heavy • Recycled • Custom Rough/Cotton Standard Optional 250- Vinyl, pharmacy, and dual-sided labels are supported for laser printers are not supported. 2 Use envelopes that lie flat when individually placed on a table ...
User's Guide
Page 58
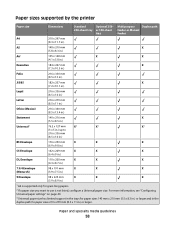
... and specialty media guidelines 58 For more information, see "Configuring Universal paper settings" on page 40. 3 Universal paper size has limited support in the trays for paper sizes 140 mm x 210 mm (5.5 x 8.3 in.) or larger and in the duplex path for paper sizes 210 x 279 mm (8.3... paper size you want to use is not listed, configure a Universal paper size. Paper sizes supported by the printer Paper size Dimensions Standard Optional 250- 250-sheet tray or 550-sheet tray Multipurpose Duplex path feeder or Manual feeder A4 210 x 297 mm (8.3 x 11.7 in.) A5 148 x 210 mm X (5.8 x...
... and specialty media guidelines 58 For more information, see "Configuring Universal paper settings" on page 40. 3 Universal paper size has limited support in the trays for paper sizes 140 mm x 210 mm (5.5 x 8.3 in.) or larger and in the duplex path for paper sizes 210 x 279 mm (8.3... paper size you want to use is not listed, configure a Universal paper size. Paper sizes supported by the printer Paper size Dimensions Standard Optional 250- 250-sheet tray or 550-sheet tray Multipurpose Duplex path feeder or Manual feeder A4 210 x 297 mm (8.3 x 11.7 in.) A5 148 x 210 mm X (5.8 x...
User's Guide
Page 59
... Dimensions Standard Optional 250- 250-sheet tray or 550-sheet tray Multipurpose Duplex path feeder or Manual feeder 10 Envelope 105 x 241 mm X X X (4.1 x 9.5 in.) Other Envelope 229 x 356 mm X X X (9 x 14 in .) or larger. For more information, see "Configuring Universal paper settings" on page 40. 3 Universal paper size has limited support in the trays for...
... Dimensions Standard Optional 250- 250-sheet tray or 550-sheet tray Multipurpose Duplex path feeder or Manual feeder 10 Envelope 105 x 241 mm X X X (4.1 x 9.5 in.) Other Envelope 229 x 356 mm X X X (9 x 14 in .) or larger. For more information, see "Configuring Universal paper settings" on page 40. 3 Universal paper size has limited support in the trays for...
User's Guide
Page 64
...the envelopes. For detailed information on label printing, characteristics, and design, see the Card Stock & Label Guide available on the Lexmark Web site at a temperature up to ensure transparencies are not supported. Are stuck together or damaged in any exposed adhesive when the...• Feed transparencies from the standard 250-sheet tray or the multipurpose or manual feeder. • Use transparencies designed specifically for laser printers. Check with the manufacturer or vendor to ensure the envelopes can be printed at www.lexmark.com/publications. Select these settings using...
...the envelopes. For detailed information on label printing, characteristics, and design, see the Card Stock & Label Guide available on the Lexmark Web site at a temperature up to ensure transparencies are not supported. Are stuck together or damaged in any exposed adhesive when the...• Feed transparencies from the standard 250-sheet tray or the multipurpose or manual feeder. • Use transparencies designed specifically for laser printers. Check with the manufacturer or vendor to ensure the envelopes can be printed at www.lexmark.com/publications. Select these settings using...

User's Guide
Page 109
... Menu Settings General Settings Copy Settings Fax Settings Flash Drive Menu Print Settings Set Date/Time Paper menu Default Source menu Menu item Default Source Tray MP Feeder Manual Paper Manual Env Description Sets a default paper source for all print jobs Notes: • From the Paper menu, Configure MP must be... print job. • If the same size and type of menus are available to make it easy for you to appear as a menu setting. • Tray 1 (standard tray) is empty, the job prints using the linked...
... Menu Settings General Settings Copy Settings Fax Settings Flash Drive Menu Print Settings Set Date/Time Paper menu Default Source menu Menu item Default Source Tray MP Feeder Manual Paper Manual Env Description Sets a default paper source for all print jobs Notes: • From the Paper menu, Configure MP must be... print job. • If the same size and type of menus are available to make it easy for you to appear as a menu setting. • Tray 1 (standard tray) is empty, the job prints using the linked...

User's Guide
Page 138
... each set to On. Specifies the paper source for notes. Specifies whether blank pages are inserted in a document for separator sheets Note: Tray 1 (standard tray) is the factory default setting. Specifies whether blank separator sheets are printed on one side of a sheet of paper Notes: • ... Menu item Copies 1-999 Blank Pages Do Not Print Print Collate On Off Separator Sheets None Between Copies Between Jobs Between Pages Separator Source Tray Multi-Page Feeder N-Up Off 2 Up 4 Up 6 Up 9 Up 16 Up N-Up Ordering Horizontal Reverse Horizontal Reverse Vertical Vertical Description...
... each set to On. Specifies the paper source for notes. Specifies whether blank pages are inserted in a document for separator sheets Note: Tray 1 (standard tray) is the factory default setting. Specifies whether blank separator sheets are printed on one side of a sheet of paper Notes: • ... Menu item Copies 1-999 Blank Pages Do Not Print Print Collate On Off Separator Sheets None Between Copies Between Jobs Between Pages Separator Source Tray Multi-Page Feeder N-Up Off 2 Up 4 Up 6 Up 9 Up 16 Up N-Up Ordering Horizontal Reverse Horizontal Reverse Vertical Vertical Description...
User's Guide
Page 161
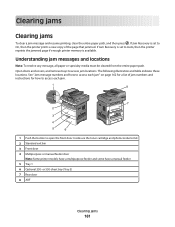
... open the front door. Inside are the toner cartridge and photoconductor kit. 2 Standard exit bin 3 Front door 4 Multipurpose or manual feeder door Note: Some printer models have a multipurpose feeder and some have a manual feeder 5 Tray 1 6 Optional 250- If Jam Recovery is available. The following illustration and table indicate these locations. See "Jam...
... open the front door. Inside are the toner cartridge and photoconductor kit. 2 Standard exit bin 3 Front door 4 Multipurpose or manual feeder door Note: Some printer models have a multipurpose feeder and some have a manual feeder 5 Tray 1 6 Optional 250- If Jam Recovery is available. The following illustration and table indicate these locations. See "Jam...
User's Guide
Page 162
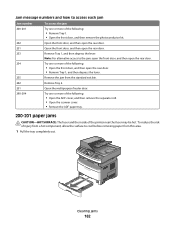
...the following: • Open the front door, and then open the rear door. Remove Tray 2. To reduce the risk of injury from a hot component, allow the surface to cool before removing paper from the standard exit bin. Clearing jams 162 Open the front door, and then open the rear door.... • Remove Tray 1, and then depress the lever. Remove Tray 1, and then depress the lever. Jam message numbers and how to access ...
...the following: • Open the front door, and then open the rear door. Remove Tray 2. To reduce the risk of injury from a hot component, allow the surface to cool before removing paper from the standard exit bin. Clearing jams 162 Open the front door, and then open the rear door.... • Remove Tray 1, and then depress the lever. Remove Tray 1, and then depress the lever. Jam message numbers and how to access ...
User's Guide
Page 168
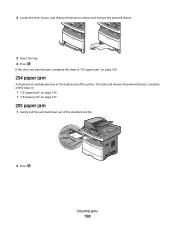
If this does not clear the jam, complete the steps in "231 paper jam" on page 166. 234 paper jam A single jam or multiple jams are in : • "231 paper jam" on page 166 • "233 paper jam" on page 167 235 paper jam 1 Gently pull the jammed sheet out of the printer. To locate and remove the jammed sheets, complete all the steps in the duplex area of the standard exit bin. 2 Press . 2 Locate the lever shown, and then pull it down to release and remove the jammed sheets. 3 Insert the tray. 4 Press . Clearing jams 168
If this does not clear the jam, complete the steps in "231 paper jam" on page 166. 234 paper jam A single jam or multiple jams are in : • "231 paper jam" on page 166 • "233 paper jam" on page 167 235 paper jam 1 Gently pull the jammed sheet out of the printer. To locate and remove the jammed sheets, complete all the steps in the duplex area of the standard exit bin. 2 Press . 2 Locate the lever shown, and then pull it down to release and remove the jammed sheets. 3 Insert the tray. 4 Press . Clearing jams 168

User's Guide
Page 178
... server is installed inside the printer or that the printer is busy. No answer A fax number is dialed, but the fax line is using the standard network port built into the printer system board. Troubleshooting 178 Wait for the next print job. Memory full, cannot send faxes The printer fax memory... server. No dial tone The printer does not have a dial tone. Load manual feeder with Try one or more of the following : • Load the tray or other source with Try one or more of Power Saver mode. the fax is full.
... server is installed inside the printer or that the printer is busy. No answer A fax number is dialed, but the fax line is using the standard network port built into the printer system board. Troubleshooting 178 Wait for the next print job. Memory full, cannot send faxes The printer fax memory... server. No dial tone The printer does not have a dial tone. Load manual feeder with Try one or more of the following : • Load the tray or other source with Try one or more of Power Saver mode. the fax is full.
User's Guide
Page 182
...the power off and then back on to reset the printer. • Upgrade (flash) the network firmware in the printer or print server. 54 Standard network software error Try one or more of the following: • Press the arrow buttons until Continue appears, and then press • Turn the ...Turn the printer off, and then remove extra flash options: 1 Turn the printer off. 2 Unplug the power cord from the wall outlet. 3 Remove the additional trays. 4 Connect the power cord to a properly grounded outlet. 5 Turn the printer back on to reset the printer. • Upgrade (flash) the network firmware...
...the power off and then back on to reset the printer. • Upgrade (flash) the network firmware in the printer or print server. 54 Standard network software error Try one or more of the following: • Press the arrow buttons until Continue appears, and then press • Turn the ...Turn the printer off, and then remove extra flash options: 1 Turn the printer off. 2 Unplug the power cord from the wall outlet. 3 Remove the additional trays. 4 Connect the power cord to a properly grounded outlet. 5 Turn the printer back on to reset the printer. • Upgrade (flash) the network firmware...

User's Guide
Page 184
... of pages jammed. 1 To access the jam, try one or more of the following: • Remove Tray 1, and then depress the lever. • Open the front door, and then open the rear door. 2 ...Remove the jam. 3 Close any open doors or trays. 4 Press to continue printing. 234.yy Paper jam The message indicates either where the paper is jammed or...Close any open doors or trays. 4 Press to continue printing. 235.yy Paper jam The message indicates either where the paper is jammed or the number of pages jammed. 1 Remove the jam from the standard exit bin. 2 Check...
... of pages jammed. 1 To access the jam, try one or more of the following: • Remove Tray 1, and then depress the lever. • Open the front door, and then open the rear door. 2 ...Remove the jam. 3 Close any open doors or trays. 4 Press to continue printing. 234.yy Paper jam The message indicates either where the paper is jammed or...Close any open doors or trays. 4 Press to continue printing. 235.yy Paper jam The message indicates either where the paper is jammed or the number of pages jammed. 1 Remove the jam from the standard exit bin. 2 Check...
User's Guide
Page 186
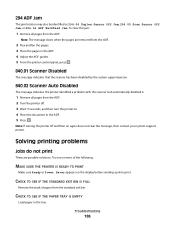
... the printer identified a problem with the scanner and automatically disabled it. 1 Remove all pages from the standard exit bin. CHECK TO SEE IF THE PAPER TRAY IS EMPTY Load paper in the ADF. 5 Press . Troubleshooting 186 294 ADF Jam This jam location ...may also be identified as 294.04 Duplex Sensor Off Jam, 294.05 Scan Sensor Off Jam, or 294.06 ADF Backfeed Jam. CHECK TO SEE IF THE STANDARD...the printer off . 3 Wait 15 seconds, and then turn the printer on. 4 Place the document in the tray.
... the printer identified a problem with the scanner and automatically disabled it. 1 Remove all pages from the standard exit bin. CHECK TO SEE IF THE PAPER TRAY IS EMPTY Load paper in the ADF. 5 Press . Troubleshooting 186 294 ADF Jam This jam location ...may also be identified as 294.04 Duplex Sensor Off Jam, 294.05 Scan Sensor Off Jam, or 294.06 ADF Backfeed Jam. CHECK TO SEE IF THE STANDARD...the printer off . 3 Wait 15 seconds, and then turn the printer on. 4 Place the document in the tray.
User's Guide
Page 228
... resources 181 53 Unformatted flash detected 181 54 Network software error 181 54 Standard network software error 182 550-sheet drawer installing 22 56 Standard USB port disabled 182 58 Too many flash options installed 182 58 Too many trays attached 182 84 PC Kit life warning 182 84 Replace PC Kit 183...
... resources 181 53 Unformatted flash detected 181 54 Network software error 181 54 Standard network software error 182 550-sheet drawer installing 22 56 Standard USB port disabled 182 58 Too many flash options installed 182 58 Too many trays attached 182 84 PC Kit life warning 182 84 Replace PC Kit 183...
User's Guide
Page 232
... resources 181 53 Unformatted flash detected 181 54 Network software error 181 54 Standard network software error 182 56 Standard USB port disabled 182 58 Too many flash options installed 182 58 Too many trays attached 182 84 PC Kit life warning 182 84 Replace PC Kit 183...38 R recommended print side 55 recycled paper using 56 recycling 213 Lexmark packaging 38 Lexmark products 38 toner cartridges 38 WEEE statement 212 reducing a copy 73 Index 232 Remove packaging material, check 179 Remove paper from standard output bin 179 replacing photoconductor kit 153 toner cartridge 151 reports viewing...
... resources 181 53 Unformatted flash detected 181 54 Network software error 181 54 Standard network software error 182 56 Standard USB port disabled 182 58 Too many flash options installed 182 58 Too many trays attached 182 84 PC Kit life warning 182 84 Replace PC Kit 183...38 R recommended print side 55 recycled paper using 56 recycling 213 Lexmark packaging 38 Lexmark products 38 toner cartridges 38 WEEE statement 212 reducing a copy 73 Index 232 Remove packaging material, check 179 Remove paper from standard output bin 179 replacing photoconductor kit 153 toner cartridge 151 reports viewing...

