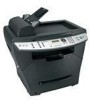
Clearing Jams Guide
Page 1
Avoid contact with the fuser area to remove the print cartridge assembly. 5 Close the front cover. Lexmark™ X342 Clearing Jams Guide Avoiding jams The ...Flex, fan, and straighten print media before you have loaded. Clearing Jams 200/201 Paper Jam CAUTION: The fuser area is hot. Avoid contact with print media, try feeding one sheet at a time through the multipurpose feeder....sure the recommended print side is loaded in the trays are not placed too tightly against the stack of the MFP, and open the front cover. 1 4 Reinsert the print cartridge assembly. 2 2 Pull on the left...
Avoid contact with the fuser area to remove the print cartridge assembly. 5 Close the front cover. Lexmark™ X342 Clearing Jams Guide Avoiding jams The ...Flex, fan, and straighten print media before you have loaded. Clearing Jams 200/201 Paper Jam CAUTION: The fuser area is hot. Avoid contact with print media, try feeding one sheet at a time through the multipurpose feeder....sure the recommended print side is loaded in the trays are not placed too tightly against the stack of the MFP, and open the front cover. 1 4 Reinsert the print cartridge assembly. 2 2 Pull on the left...
User's Guide
Page 68
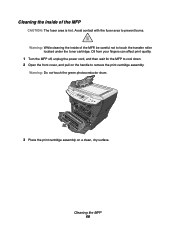
... drum. 3 Place the print cartridge assembly on the handle to prevent burns. Cleaning the inside of the MFP CAUTION: The fuser area is hot. Warning: While cleaning the inside of the MFP, be careful not to touch the transfer roller located under the toner cartridge. Oil from your fingers can ...affect print quality. 1 Turn the MFP off, unplug the power cord, and then wait for the MFP to cool down. 2 Open the front cover, and pull on a clean, dry surface. Cleaning the MFP 68 Avoid contact with the fuser area to remove the print cartridge assembly.
... drum. 3 Place the print cartridge assembly on the handle to prevent burns. Cleaning the inside of the MFP CAUTION: The fuser area is hot. Warning: While cleaning the inside of the MFP, be careful not to touch the transfer roller located under the toner cartridge. Oil from your fingers can ...affect print quality. 1 Turn the MFP off, unplug the power cord, and then wait for the MFP to cool down. 2 Open the front cover, and pull on a clean, dry surface. Cleaning the MFP 68 Avoid contact with the fuser area to remove the print cartridge assembly.
User's Guide
Page 77
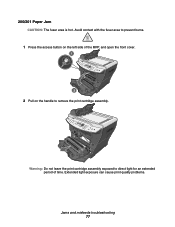
Avoid contact with the fuser area to prevent burns. 1 Press the access button on the left side of the MFP, and open the front cover. 1 2 2 Pull on the handle to direct light for an extended period of time. Extended light exposure can cause print quality problems. Jams and misfeeds troubleshooting 77 Warning: Do not leave the print cartridge assembly exposed to remove the print cartridge assembly. 200/201 Paper Jam CAUTION: The fuser area is hot.
Avoid contact with the fuser area to prevent burns. 1 Press the access button on the left side of the MFP, and open the front cover. 1 2 2 Pull on the handle to direct light for an extended period of time. Extended light exposure can cause print quality problems. Jams and misfeeds troubleshooting 77 Warning: Do not leave the print cartridge assembly exposed to remove the print cartridge assembly. 200/201 Paper Jam CAUTION: The fuser area is hot.
User's Guide
Page 80
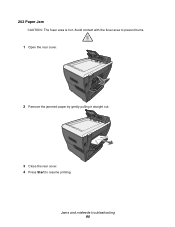
202 Paper Jam CAUTION: The fuser area is hot. Jams and misfeeds troubleshooting 80 Avoid contact with the fuser area to prevent burns. 1 Open the rear cover. 2 Remove the jammed paper by gently pulling it straight out. 3 Close the rear cover. 4 Press Start to resume printing.
202 Paper Jam CAUTION: The fuser area is hot. Jams and misfeeds troubleshooting 80 Avoid contact with the fuser area to prevent burns. 1 Open the rear cover. 2 Remove the jammed paper by gently pulling it straight out. 3 Close the rear cover. 4 Press Start to resume printing.


