

User's Guide
Page 2
...parts may not always be obvious. Operating system notice All features and functions are operating system-dependent. The safety features of specific Lexmark components. CAUTION-POTENTIAL INJURY: When closing the scanner unit, make any electrical or cabling connections, such as the power supply cord ...If your hands out from underneath the scanner unit. CAUTION-SHOCK HAZARD: Do not use the fax feature during a lightning storm. Lexmark is near the product and easily accessible. Important safety information Use only the power supply and power supply cord provided with this product...
...parts may not always be obvious. Operating system notice All features and functions are operating system-dependent. The safety features of specific Lexmark components. CAUTION-POTENTIAL INJURY: When closing the scanner unit, make any electrical or cabling connections, such as the power supply cord ...If your hands out from underneath the scanner unit. CAUTION-SHOCK HAZARD: Do not use the fax feature during a lightning storm. Lexmark is near the product and easily accessible. Important safety information Use only the power supply and power supply cord provided with this product...
User's Guide
Page 5
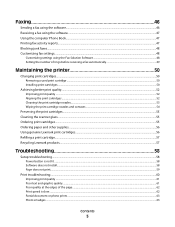
...rings before receiving a fax automatically 49 Maintaining the printer 50 Changing print cartridges...50 Removing a used print cartridge ...50 Installing print cartridges...50 Achieving better print quality...52 Improving print quality ...52 Aligning the print cartridges ...52 Cleaning the print ...Ordering paper and other supplies...56 Using genuine Lexmark print cartridges...56 Refilling a print cartridge...57 Recycling Lexmark products...57 Troubleshooting 58 Setup troubleshooting...58 Power button is not lit ...58 Software does not install...58 Page does not print...59 Print troubleshooting...
...rings before receiving a fax automatically 49 Maintaining the printer 50 Changing print cartridges...50 Removing a used print cartridge ...50 Installing print cartridges...50 Achieving better print quality...52 Improving print quality ...52 Aligning the print cartridges ...52 Cleaning the print ...Ordering paper and other supplies...56 Using genuine Lexmark print cartridges...56 Refilling a print cartridge...57 Recycling Lexmark products...57 Troubleshooting 58 Setup troubleshooting...58 Power button is not lit ...58 Software does not install...58 Page does not print...59 Print troubleshooting...
User's Guide
Page 8
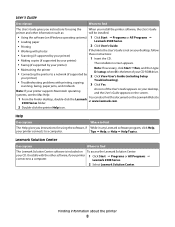
... Help, your printer connects to a computer. Finding information about the printer 8 It installs with the other information such as: will be installed. • Using the software (on Windows operating systems) 1 Click Start Œ Programs or All Programs Œ • Loading paper Lexmark 2500 Series. • Printing 2 Click User's Guide. • Working with printing, copying...
... Help, your printer connects to a computer. Finding information about the printer 8 It installs with the other information such as: will be installed. • Using the software (on Windows operating systems) 1 Click Start Œ Programs or All Programs Œ • Loading paper Lexmark 2500 Series. • Printing 2 Click User's Guide. • Working with printing, copying...
User's Guide
Page 11
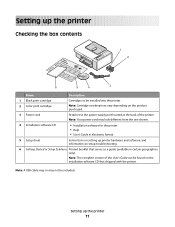
...at the back of the printer. Note: A USB cable may or may look different from the one shown. 4 Installation software CD • Installation software for the printer • Help • User's Guide in certain geographies only). Setting up printer hardware and ... box contents 1 2 ?? ? 6 5 4 3 Name Description 1 Black print cartridge Cartridges to be installed into the printer. 2 Color print cartridge Note: Cartridge combinations vary depending on the installation software CD that serves as a guide (available in electronic format 5 Setup sheet Instructions on setting up the...
...at the back of the printer. Note: A USB cable may or may look different from the one shown. 4 Installation software CD • Installation software for the printer • Help • User's Guide in certain geographies only). Setting up printer hardware and ... box contents 1 2 ?? ? 6 5 4 3 Name Description 1 Black print cartridge Cartridges to be installed into the printer. 2 Color print cartridge Note: Cartridge combinations vary depending on the installation software CD that serves as a guide (available in electronic format 5 Setup sheet Instructions on setting up the...
User's Guide
Page 13
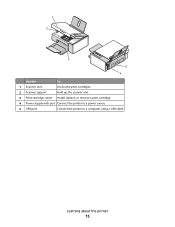
1 2 3 5 4 Use the To 1 Scanner unit Access the print cartridges. 2 Scanner support Hold up the scanner unit. 3 Print cartridge carrier Install, replace, or remove a print cartridge. 4 Power supply with port Connect the printer to a power source. 5 USB port Connect the printer to a computer using a USB cable. Learning about the printer 13
1 2 3 5 4 Use the To 1 Scanner unit Access the print cartridges. 2 Scanner support Hold up the scanner unit. 3 Print cartridge carrier Install, replace, or remove a print cartridge. 4 Power supply with port Connect the printer to a power source. 5 USB port Connect the printer to a computer using a USB cable. Learning about the printer 13
User's Guide
Page 17
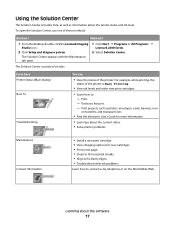
...of these methods: Method 1 Method 2 1 From the desktop, double-click the Lexmark Imaging Studio icon. 2 Click Setup and diagnose printer. 1 Click Start Œ Programs or All Programs Œ Lexmark 2500 Series. 2 Select Solution Center. The Solution Center consists of six tabs: From...electronic User's Guide for more information. • Learn tips about the current status. • Solve printer problems. Maintenance Contact Information • Install a new print cartridge. • View shopping options for new cartridges. • Print a test page. • Clean to fix horizontal ...
...of these methods: Method 1 Method 2 1 From the desktop, double-click the Lexmark Imaging Studio icon. 2 Click Setup and diagnose printer. 1 Click Start Œ Programs or All Programs Œ Lexmark 2500 Series. 2 Select Solution Center. The Solution Center consists of six tabs: From...electronic User's Guide for more information. • Learn tips about the current status. • Solve printer problems. Maintenance Contact Information • Install a new print cartridge. • View shopping options for new cartridges. • Print a test page. • Clean to fix horizontal ...

User's Guide
Page 50
Maintaining the printer 50 Installing print cartridges 1 If you are installing new print cartridges, remove the sticker and tape from the back and bottom of the cartridges. Maintaining the printer Changing print cartridges Removing a used print ...
Maintaining the printer 50 Installing print cartridges 1 If you are installing new print cartridges, remove the sticker and tape from the back and bottom of the cartridges. Maintaining the printer Changing print cartridges Removing a used print ...
User's Guide
Page 52
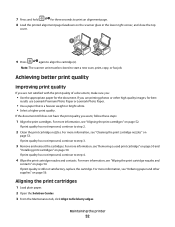
...print quality has not improved, continue to align the cartridge(s). For more information, see "Removing a used print cartridge" on page 50 and "Installing print cartridges" on page 54. For more information, see "Wiping the print cartridge nozzles and contacts" on page 50. For more information, see... "Ordering paper and other high quality images, for best results use Lexmark Premium Photo Paper or Lexmark Photo Paper. • Use a paper that is still not satisfactory, replace the cartridge. If you are not satisfied with...
...print quality has not improved, continue to align the cartridge(s). For more information, see "Removing a used print cartridge" on page 50 and "Installing print cartridges" on page 54. For more information, see "Wiping the print cartridge nozzles and contacts" on page 50. For more information, see... "Ordering paper and other high quality images, for best results use Lexmark Premium Photo Paper or Lexmark Photo Paper. • Use a paper that is still not satisfactory, replace the cartridge. If you are not satisfied with...
User's Guide
Page 55
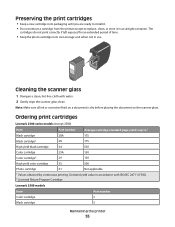
...new cartridge in its own storage unit when not in an airtight container. Ordering print cartridges Lexmark 2500 series models (except 2580) Item Black cartridge Black cartridge2 High yield black cartridge Color cartridge Color cartridge2 Part number 28A 28 34 29A 29 Average cartridge standard page yield is dry before ... correctly if left exposed for an extended period of time. • Keep the photo cartridge in its packaging until you are ready to install it. • Do not remove a cartridge from the printer except to replace, clean, or store it in use. Declared yield value...
...new cartridge in its own storage unit when not in an airtight container. Ordering print cartridges Lexmark 2500 series models (except 2580) Item Black cartridge Black cartridge2 High yield black cartridge Color cartridge Color cartridge2 Part number 28A 28 34 29A 29 Average cartridge standard page yield is dry before ... correctly if left exposed for an extended period of time. • Keep the photo cartridge in its packaging until you are ready to install it. • Do not remove a cartridge from the printer except to replace, clean, or store it in use. Declared yield value...
User's Guide
Page 58
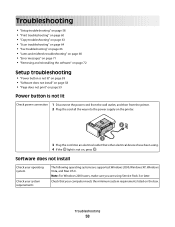
... supported: Windows 2000, Windows XP, Windows Vista, and Mac OS X. Check that other electrical devices have been using Service Pack 3 or later. Software does not install Check your operating system Check your system requirements The following operating systems are using . 4 If the light is not lit Check power connection 1 Disconnect the... 71 • "Removing and reinstalling the software" on page 72 Setup troubleshooting • "Power button is not lit" on page 58 • "Software does not install" on page 58 • "Page does not print" on page 59 Power button is not on the box.
... supported: Windows 2000, Windows XP, Windows Vista, and Mac OS X. Check that other electrical devices have been using Service Pack 3 or later. Software does not install Check your operating system Check your system requirements The following operating systems are using . 4 If the light is not lit Check power connection 1 Disconnect the... 71 • "Removing and reinstalling the software" on page 72 Setup troubleshooting • "Power button is not lit" on page 58 • "Software does not install" on page 58 • "Page does not print" on page 59 Power button is not on the box.
User's Guide
Page 59
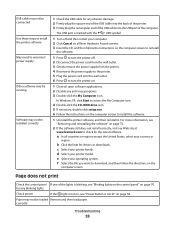
... If one of the lights is blinking, see "Removing and reinstalling the software" on page 72. 2 If the software still does not install correctly, visit our Web site at www.lexmark.com to check for the latest software. The USB port is marked with the USB symbol. 1 Turn off . 2 Disconnect the power...loaded Remove and then load paper. USB cable may not be connected Use these steps to install the printer software May need to reconnect power supply Other software may be running Software may not be installed correctly 1 Check the USB cable for any blinking lights Check power If the light is not...
... If one of the lights is blinking, see "Removing and reinstalling the software" on page 72. 2 If the software still does not install correctly, visit our Web site at www.lexmark.com to check for the latest software. The USB port is marked with the USB symbol. 1 Turn off . 2 Disconnect the power...loaded Remove and then load paper. USB cable may not be connected Use these steps to install the printer software May need to reconnect power supply Other software may be running Software may not be installed correctly 1 Check the USB cable for any blinking lights Check power If the light is not...
User's Guide
Page 60
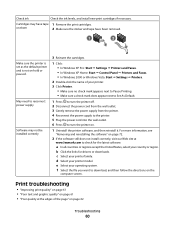
... • "Improving print quality" on page 61 • "Poor text and graphic quality" on page 61 • "Poor quality at www.lexmark.com to download, and then follow the directions on the computer screen. on page 62 Troubleshooting 60 c Select your printer model. For more information,... 5 Plug the power cord into the wall outlet. 6 Press to turn the printer on hold or paused. d Select your printer family. Cartridges may not be installed correctly 3 Reinsert the cartridges. 1 Click: • In Windows XP Pro: Start Œ Settings Œ Printers and Faxes. • In Windows XP Home...
... • "Improving print quality" on page 61 • "Poor text and graphic quality" on page 61 • "Poor quality at www.lexmark.com to download, and then follow the directions on the computer screen. on page 62 Troubleshooting 60 c Select your printer model. For more information,... 5 Plug the power cord into the wall outlet. 6 Press to turn the printer on hold or paused. d Select your printer family. Cartridges may not be installed correctly 3 Reinsert the cartridges. 1 Click: • In Windows XP Pro: Start Œ Settings Œ Printers and Faxes. • In Windows XP Home...

User's Guide
Page 61
...Improving print quality Check paper • Use the appropriate paper for best results use Lexmark Premium Photo Paper or Lexmark Photo Paper. • Use a paper that is a heavier weight or bright ... graphic quality • Blank pages • Dark print • Faded print • Incorrect colors • Light and dark bands in print • Skewed lines • Smudges •... nozzles and contacts. For more information, see "Removing a used print cartridge" on page 50 and "Installing print cartridges" on page 56. If print quality has not improved, continue to step 2. 2 Clean the...
...Improving print quality Check paper • Use the appropriate paper for best results use Lexmark Premium Photo Paper or Lexmark Photo Paper. • Use a paper that is a heavier weight or bright ... graphic quality • Blank pages • Dark print • Faded print • Incorrect colors • Light and dark bands in print • Skewed lines • Smudges •... nozzles and contacts. For more information, see "Removing a used print cartridge" on page 50 and "Installing print cartridges" on page 56. If print quality has not improved, continue to step 2. 2 Clean the...

User's Guide
Page 62
...in.) for letter size paper - 3.37 mm (0.133 in.) for best results use . installed correctly Poor quality at the edges of graphics and images in use Lexmark Premium Photo Paper or Lexmark Photo Paper. Print speed is slow Maximize computer processing speed Add memory Close all paper sizes...not in the document. Consider purchasing more information, see "Software may take up to 15 minutes to dry: • Documents with color variations. Check paper condition Use only new, unwrinkled paper. Troubleshooting 62 Use a different brand of Each paper brand accepts ink differently ...
...in.) for letter size paper - 3.37 mm (0.133 in.) for best results use . installed correctly Poor quality at the edges of graphics and images in use Lexmark Premium Photo Paper or Lexmark Photo Paper. Print speed is slow Maximize computer processing speed Add memory Close all paper sizes...not in the document. Consider purchasing more information, see "Software may take up to 15 minutes to dry: • Documents with color variations. Check paper condition Use only new, unwrinkled paper. Troubleshooting 62 Use a different brand of Each paper brand accepts ink differently ...
User's Guide
Page 63
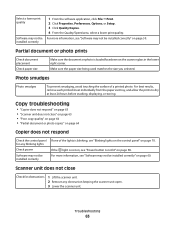
... not respond Check the control panel for obstructions 1 Lift the scanner unit. 2 Remove any blinking lights Check power Software may not be installed correctly" on page 58. Photo smudges Photo smudges To prevent smudging, avoid touching the surface of the lights is not lit" on page... 59. If the light is not on, see "Power button is blinking, see "Software may not be installed correctly 1 From the software application, click File ΠPrint. 2 Click Properties, Preferences, Options, or Setup. 3 Click Quality/Copies. 4 From the Quality/...
... not respond Check the control panel for obstructions 1 Lift the scanner unit. 2 Remove any blinking lights Check power Software may not be installed correctly" on page 58. Photo smudges Photo smudges To prevent smudging, avoid touching the surface of the lights is not lit" on page... 59. If the light is not on, see "Power button is blinking, see "Software may not be installed correctly 1 From the software application, click File ΠPrint. 2 Click Properties, Preferences, Options, or Setup. 3 Click Quality/Copies. 4 From the Quality/...

User's Guide
Page 64
... is dirty, gently wipe it with a clean, lint-free cloth dampened with water. panel for any blinking lights Check ink Check the ink levels, and install a new print cartridge if necessary. Poor copy quality • Blank pages • Checkerboard pattern • Distorted graphics or pictures • Missing characters • Faded print...
... is dirty, gently wipe it with a clean, lint-free cloth dampened with water. panel for any blinking lights Check ink Check the ink levels, and install a new print cartridge if necessary. Poor copy quality • Blank pages • Checkerboard pattern • Distorted graphics or pictures • Missing characters • Faded print...
User's Guide
Page 65
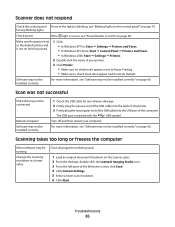
... is not lit" on page 58. Troubleshooting 65 Scan was not successful USB cable may not be connected Reboot computer Software may not be installed correctly 1 Check the USB cable for any obvious damage. 2 Firmly plug the square end of the USB cable into the back of the..." on page 60. Software may not be installed correctly For more information, see "Blinking lights on the control panel" on the scanner glass. 2 From the desktop, double-click the Lexmark Imaging Studio icon. 3 From the left pane of the Welcome screen, click Scan. 4 Click Custom Settings. 5 Select a lower scan ...
... is not lit" on page 58. Troubleshooting 65 Scan was not successful USB cable may not be connected Reboot computer Software may not be installed correctly 1 Check the USB cable for any obvious damage. 2 Firmly plug the square end of the USB cable into the back of the..." on page 60. Software may not be installed correctly For more information, see "Blinking lights on the control panel" on the scanner glass. 2 From the desktop, double-click the Lexmark Imaging Studio icon. 3 From the left pane of the Welcome screen, click Scan. 4 Click Custom Settings. 5 Select a lower scan ...
User's Guide
Page 67
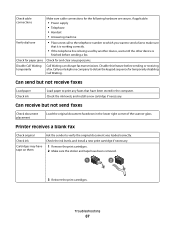
... the sticker and tape have been stored in the lower right corner of the scanner glass. Check ink Check the ink levels, and install a new print cartridge if necessary. Can send but not send faxes Check document placement Load the original document facedown in the computer. ... 2 3 Reinsert the print cartridges. Troubleshooting 67 Check for paper jams Check for temporarily disabling Call Waiting. Check the ink levels, and install a new cartridge if necessary. Can receive but not receive faxes Load paper Check ink Load paper to obtain the keypad sequence for and clear...
... the sticker and tape have been stored in the lower right corner of the scanner glass. Check ink Check the ink levels, and install a new print cartridge if necessary. Can send but not send faxes Check document placement Load the original document facedown in the computer. ... 2 3 Reinsert the print cartridges. Troubleshooting 67 Check for paper jams Check for temporarily disabling Call Waiting. Check the ink levels, and install a new cartridge if necessary. Can receive but not receive faxes Load paper Check ink Load paper to obtain the keypad sequence for and clear...
User's Guide
Page 68
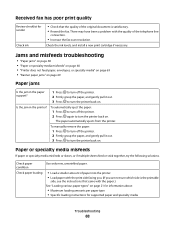
Check the ink levels, and install a new print cartridge if necessary. Paper or specialty media misfeeds If paper or specialty media misfeeds or skews, or if multiple sheets feed or stick ...
Check the ink levels, and install a new print cartridge if necessary. Paper or specialty media misfeeds If paper or specialty media misfeeds or skews, or if multiple sheets feed or stick ...
User's Guide
Page 70
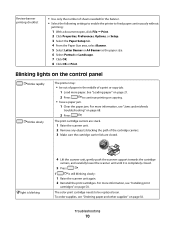
... paper size. 6 Select Portrait or Landscape. 7 Click OK. 8 Click OK or Print. Troubleshooting 70 The color print cartridge needs to continue printing or copying. • have a paper jam. 1 Clear the paper jam. For more information, see "Installing print cartridges" on page 50. light is blinking 4 Lift the scanner unit, gently push the...
... paper size. 6 Select Portrait or Landscape. 7 Click OK. 8 Click OK or Print. Troubleshooting 70 The color print cartridge needs to continue printing or copying. • have a paper jam. 1 Clear the paper jam. For more information, see "Installing print cartridges" on page 50. light is blinking 4 Lift the scanner unit, gently push the...


