
User's Guide (3.6 MB)
Page 8
1 Chapter Introduction Overview 1-1 About This Guide 1-2 Main Features 1-3 Printer Components 1-4 2 Chapter Setting up Your Printer Overview 2-1 Unpacking Your Printer 2-2 Connecting the Printer Cable 2-4 Connecting the Power Cord 2-7 Loading Paper into the Input Tray 2-8 Installing the Print Cartridges 2-10 Testing the Printer 2-16 Installing the Printer Software 2-17 Uninstalling the Lexmark Software 2-25 vi Introduction vi
1 Chapter Introduction Overview 1-1 About This Guide 1-2 Main Features 1-3 Printer Components 1-4 2 Chapter Setting up Your Printer Overview 2-1 Unpacking Your Printer 2-2 Connecting the Printer Cable 2-4 Connecting the Power Cord 2-7 Loading Paper into the Input Tray 2-8 Installing the Print Cartridges 2-10 Testing the Printer 2-16 Installing the Printer Software 2-17 Uninstalling the Lexmark Software 2-25 vi Introduction vi
User's Guide (3.6 MB)
Page 11
8 Chapter Maintaining Your Printer Overview 8-1 Replacing the Print Cartridges 8-2 Aligning the Print Cartridges 8-3 Cleaning Your Printer 8-4 Printing the Help List 8-6 Restoring the Menu to the Default Settings .......... 8-7 Adjust Shading 8-7 9 Chapter Troubleshooting Overview 9-1 Clearing Paper Jams 9-2 Error Messages 9-5 General Printing Problems 9-7 Print Quality Problems 9-9 Scanning Problems 9-11 OCR Problems 9-14 ix Introduction ix
8 Chapter Maintaining Your Printer Overview 8-1 Replacing the Print Cartridges 8-2 Aligning the Print Cartridges 8-3 Cleaning Your Printer 8-4 Printing the Help List 8-6 Restoring the Menu to the Default Settings .......... 8-7 Adjust Shading 8-7 9 Chapter Troubleshooting Overview 9-1 Clearing Paper Jams 9-2 Error Messages 9-5 General Printing Problems 9-7 Print Quality Problems 9-9 Scanning Problems 9-11 OCR Problems 9-14 ix Introduction ix
User's Guide (3.6 MB)
Page 16
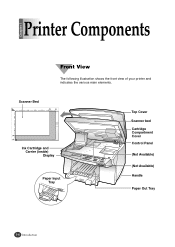
Chapter 1 Printer Components Front View The following illustration shows the front view of your printer and indicates the various main elements. Scanner Bed Ink Cartridge and Carrier (inside) Display Paper Input Tray Top Cover Scanner bed Cartridge Compartment Cover Control Panel (Not Available) (Not Available) Handle Paper Out Tray 1-4 Introduction
Chapter 1 Printer Components Front View The following illustration shows the front view of your printer and indicates the various main elements. Scanner Bed Ink Cartridge and Carrier (inside) Display Paper Input Tray Top Cover Scanner bed Cartridge Compartment Cover Control Panel (Not Available) (Not Available) Handle Paper Out Tray 1-4 Introduction

User's Guide (3.6 MB)
Page 19
2 Chapter Setting Up Your Printer Overview This chapter provides step-by-step information on setting up your printer. Unpacking Your Printer Connecting the Printer Cable Connecting the Power Cord Loading Paper into the Input Tray Installing the Print Cartridge Testing the Printer Installing the Printer Software Setting Up Your Printer 2-1
2 Chapter Setting Up Your Printer Overview This chapter provides step-by-step information on setting up your printer. Unpacking Your Printer Connecting the Printer Cable Connecting the Power Cord Loading Paper into the Input Tray Installing the Print Cartridge Testing the Printer Installing the Printer Software Setting Up Your Printer 2-1
User's Guide (3.6 MB)
Page 20
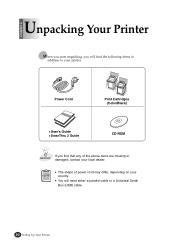
Power Cord Print Cartridges (Color/Black) G User's Guide G SmarThru 2 Guide CD-ROM If you will need either a parallel cable or a Universal Serial Bus (USB) cable. 2-2 Setting Up Your Printer Chapter 2 Unpacking Your Printer When you start unpacking, you find the following items in addition to your printer. G You will find that any of power cord may differ, depending on your local dealer. G The shape of the above items are missing or damaged, contact your country.
Power Cord Print Cartridges (Color/Black) G User's Guide G SmarThru 2 Guide CD-ROM If you will need either a parallel cable or a Universal Serial Bus (USB) cable. 2-2 Setting Up Your Printer Chapter 2 Unpacking Your Printer When you start unpacking, you find the following items in addition to your printer. G You will find that any of power cord may differ, depending on your local dealer. G The shape of the above items are missing or damaged, contact your country.
User's Guide (3.6 MB)
Page 28
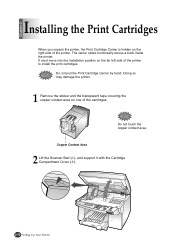
... Area 2 Lift the Scanner Bed (➀), and support it with the Cartridge Compartment Cover (➁). 2-10 Setting Up Your Printer Do not pull the Print Cartridge Carrier by hand. Doing so may damage the printer. 1 Remove the sticker and the transparent tape covering the copper contact area...on the right side of the printer. The carrier slides horizontally across a track inside the printer. Do not touch the copper contact area. Chapter 2 Installing the Print Cartridges When you unpack the printer, the Print Cartridge Carrier is hidden on one of the cartridges. It must move into the...
... Area 2 Lift the Scanner Bed (➀), and support it with the Cartridge Compartment Cover (➁). 2-10 Setting Up Your Printer Do not pull the Print Cartridge Carrier by hand. Doing so may damage the printer. 1 Remove the sticker and the transparent tape covering the copper contact area...on the right side of the printer. The carrier slides horizontally across a track inside the printer. Do not touch the copper contact area. Chapter 2 Installing the Print Cartridges When you unpack the printer, the Print Cartridge Carrier is hidden on one of the cartridges. It must move into the...
User's Guide (3.6 MB)
Page 29
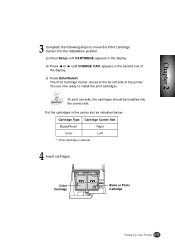
.... a) Press Setup until CHANGE CAR. Color Cartridge Black or Photo Cartridge Setting Up Your Printer 2-11 appears in the second row of the printer. Put the cartridges in the display. To print correctly, the cartridges should be installed into the installation position. The Print Cartridge Carrier moves to install the print cartridges. b) Press ➛¤or ❿¤...
.... a) Press Setup until CHANGE CAR. Color Cartridge Black or Photo Cartridge Setting Up Your Printer 2-11 appears in the second row of the printer. Put the cartridges in the display. To print correctly, the cartridges should be installed into the installation position. The Print Cartridge Carrier moves to install the print cartridges. b) Press ➛¤or ❿¤...

User's Guide (3.6 MB)
Page 30
PUSH BACK 6 Close the Cartridge Compartment Cover. 7 Close the Printer Top Cover. 8 Press ➛¤or ❿¤until it snaps securely into place. Continued Installing the Print Cartridge 5 Push back on the cartridge until BOTH appears in the second row of time. 2-12 Setting up Your Printer You should hear a clicking sound. The display will timeout if there is no activity for a period of the display.
PUSH BACK 6 Close the Cartridge Compartment Cover. 7 Close the Printer Top Cover. 8 Press ➛¤or ❿¤until it snaps securely into place. Continued Installing the Print Cartridge 5 Push back on the cartridge until BOTH appears in the second row of time. 2-12 Setting up Your Printer You should hear a clicking sound. The display will timeout if there is no activity for a period of the display.

User's Guide (3.6 MB)
Page 31
... BLACK for a used color cartridge. 11 Press Enter/Select. LEFT CARTRIDGE? RIGHT CARTRIDGE? OLD COLOR for a used photo cartridge. 13 Press Enter/Select. NEW PHOTO for a used black cartridge. OLD PHOTO for a new photo cartridge. PRINTING III Setting up Your Printer 2-13 appears in the display. If you have installed in your machine, a test page with one or...
... BLACK for a used color cartridge. 11 Press Enter/Select. LEFT CARTRIDGE? RIGHT CARTRIDGE? OLD COLOR for a used photo cartridge. 13 Press Enter/Select. NEW PHOTO for a used black cartridge. OLD PHOTO for a new photo cartridge. PRINTING III Setting up Your Printer 2-13 appears in the display. If you have installed in your machine, a test page with one or...

User's Guide (3.6 MB)
Page 32
Once the cartridge alignment test page has printed, the display looks like this: ALIGN CARTRIDGE ❿15 [00-30] A The current alignment value appears in the second row. 2-14 Setting up Your Printer Each pattern has a letter above it (A, B, C, D, E, and F for black/color, A, B, C and D for color/photo cartridge). Continued Installing the Print Cartridge 14 The following illustrations are examples of the alignment test patterns.
Once the cartridge alignment test page has printed, the display looks like this: ALIGN CARTRIDGE ❿15 [00-30] A The current alignment value appears in the second row. 2-14 Setting up Your Printer Each pattern has a letter above it (A, B, C, D, E, and F for black/color, A, B, C and D for color/photo cartridge). Continued Installing the Print Cartridge 14 The following illustrations are examples of the alignment test patterns.
User's Guide (3.6 MB)
Page 33
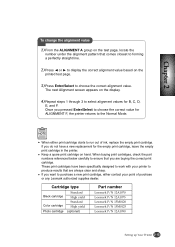
... a new replacement for the empty print cartridge, leave the empty print cartridge in the printer. Cartridge type Black cartridge Color cartridge Photo cartridge Standard High yield Standard High yield (optional) Part number Lexmark P/N 12A1970 Lexmark P/N 12A1975 Lexmark P/N 15M0120 Lexmark P/N 15M0125 Lexmark P/N 12A1990 Setting up Your Printer 2-15 If you are always clear and sharp. Chapter 2 To change the alignment value 1) From the ALIGNMENT...
... a new replacement for the empty print cartridge, leave the empty print cartridge in the printer. Cartridge type Black cartridge Color cartridge Photo cartridge Standard High yield Standard High yield (optional) Part number Lexmark P/N 12A1970 Lexmark P/N 12A1975 Lexmark P/N 15M0120 Lexmark P/N 15M0125 Lexmark P/N 12A1990 Setting up Your Printer 2-15 If you are always clear and sharp. Chapter 2 To change the alignment value 1) From the ALIGNMENT...

User's Guide (3.6 MB)
Page 34
The message PRINTING appears in the second row of ❿PRINT SELF TEST the display. 3 Press Enter/Select. PRINTING III 2-16 Setting up Your Printer Chapter 2 Testing the Printer Each time you install a new print cartridge, run the Self Test to check if the print cartridge is installed properly. 1 Press Setup until MAINTENANCE [MAINTENANCE] appears in the display. ❿HELP LIST 2 Press ➛¤or ❿¤until PRINT SELF [MAINTENANCE] TEST appears in the display.
The message PRINTING appears in the second row of ❿PRINT SELF TEST the display. 3 Press Enter/Select. PRINTING III 2-16 Setting up Your Printer Chapter 2 Testing the Printer Each time you install a new print cartridge, run the Self Test to check if the print cartridge is installed properly. 1 Press Setup until MAINTENANCE [MAINTENANCE] appears in the display. ❿HELP LIST 2 Press ➛¤or ❿¤until PRINT SELF [MAINTENANCE] TEST appears in the display.

User's Guide (3.6 MB)
Page 46
...the previous item in the second row of the display. Chapter 3 Control Panel Buttons The Control Panel has many buttons which are used to change printer settings. G Press and hold each button for COPY PAGE, press ❿¤to scroll forward, or ➛¤to the Normal Mode. 3-2... Control Panel The setup menu includes the following buttons and their functions. Press Stop/Restore to return to scroll backward. Look for the following items: G CARTRIDGE G PAPER SIZE G PAPER TYPE G MAINTENANCE G Press ❿¤to move to the next item in the menus, or press ➛¤to...
...the previous item in the second row of the display. Chapter 3 Control Panel Buttons The Control Panel has many buttons which are used to change printer settings. G Press and hold each button for COPY PAGE, press ❿¤to scroll forward, or ➛¤to the Normal Mode. 3-2... Control Panel The setup menu includes the following buttons and their functions. Press Stop/Restore to return to scroll backward. Look for the following items: G CARTRIDGE G PAPER SIZE G PAPER TYPE G MAINTENANCE G Press ❿¤to move to the next item in the menus, or press ➛¤to...

User's Guide (3.6 MB)
Page 58
... button again to cancel the current print job. These items provide specific details about the status of ink remaining in each cartridge. Continued Printing a Document About Printer Control Program Window When the Lexmark Z82 Control Program on LPT1 window appears, click the appropriate tab for the options. Click to print a test page. Click to...
... button again to cancel the current print job. These items provide specific details about the status of ink remaining in each cartridge. Continued Printing a Document About Printer Control Program Window When the Lexmark Z82 Control Program on LPT1 window appears, click the appropriate tab for the options. Click to print a test page. Click to...
User's Guide (3.6 MB)
Page 77
This chapter provides information about maintaining your printer in order to maintain optimum print capabilities. Replacing Print Cartridge Aligning Print Cartridge Cleaning Your Printer Cleaning the Print Cartridge Contacts Printing the Help List Restoring the Menu to the Default Setting Adjust Shading Maintaining Your Printer 8-1 8 Chapter Maintaining Your Printer Overview You will need to replace and clean print cartridges in your printer.
This chapter provides information about maintaining your printer in order to maintain optimum print capabilities. Replacing Print Cartridge Aligning Print Cartridge Cleaning Your Printer Cleaning the Print Cartridge Contacts Printing the Help List Restoring the Menu to the Default Setting Adjust Shading Maintaining Your Printer 8-1 8 Chapter Maintaining Your Printer Overview You will need to replace and clean print cartridges in your printer.
User's Guide (3.6 MB)
Page 78
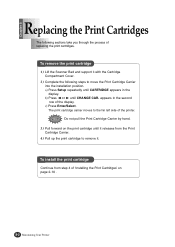
... take you through the process of the display. Chapter 8 Replacing the Print Cartridges The following steps to move the Print Cartridge Carrier into the installation position. Do not pull the Print Cartridge Carrier by hand. 3) Pull forward on page 2-10 . 8-2 Maintaining Your Printer b) Press ➛¤or ❿¤until it releases from step...
... take you through the process of the display. Chapter 8 Replacing the Print Cartridges The following steps to move the Print Cartridge Carrier into the installation position. Do not pull the Print Cartridge Carrier by hand. 3) Pull forward on page 2-10 . 8-2 Maintaining Your Printer b) Press ➛¤or ❿¤until it releases from step...

User's Guide (3.6 MB)
Page 79
...until ALIGN CAR. Chapter 8 Maintaining Your Printer 8-3 ALIGN CARTRIDGE ❿13 [00-30] A 5 Continue with 'To change the alignment value' on page 2-15. PRINTING The printer automatically prints an alignment test page. appears in the display. [CARTRIDGE] ❿CHANGE CAR. 2 Press &#...Select button. Once the cartridge alignment test page has printed the display looks like the one at left. If you should align the print cartridges. Chapter 8 Aligning the Print Cartridges For optimal printing you replace print cartridges, your printer automatically prints an alignment ...
...until ALIGN CAR. Chapter 8 Maintaining Your Printer 8-3 ALIGN CARTRIDGE ❿13 [00-30] A 5 Continue with 'To change the alignment value' on page 2-15. PRINTING The printer automatically prints an alignment test page. appears in the display. [CARTRIDGE] ❿CHANGE CAR. 2 Press &#...Select button. Once the cartridge alignment test page has printed the display looks like the one at left. If you should align the print cartridges. Chapter 8 Aligning the Print Cartridges For optimal printing you replace print cartridges, your printer automatically prints an alignment ...

User's Guide (3.6 MB)
Page 80
... the printheads cleaning test page. G When characters are clogged. To clean the printheads Run CLEAN CAR. Chapter 8 Cleaning Your Printer The following sections take you through the process of the display. [CARTRIDGE] ❿CLEAN CAR. 3) Press the Enter/Select button. PRINTING III 4) If the printheads cleaning test page still contains broken lines...
... the printheads cleaning test page. G When characters are clogged. To clean the printheads Run CLEAN CAR. Chapter 8 Cleaning Your Printer The following sections take you through the process of the display. [CARTRIDGE] ❿CLEAN CAR. 3) Press the Enter/Select button. PRINTING III 4) If the printheads cleaning test page still contains broken lines...
User's Guide (3.6 MB)
Page 81
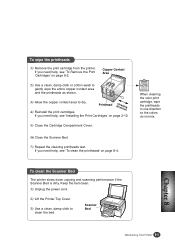
... page 8-2. Keep the bed clean. 1) Unplug the power cord. 2) Lift the Printer Top Cover. 3) Use a clean, damp cloth to dry. 4) Reinstall the print cartridges. To clean the Scanner Bed The printer slows down copying and scanning performance if the Scanner Bed is dirty. To wipe the... printheads 1) Remove the print cartridge from the printer. When cleaning the color print cartridge, wipe the printheads in one direction ...
... page 8-2. Keep the bed clean. 1) Unplug the power cord. 2) Lift the Printer Top Cover. 3) Use a clean, damp cloth to dry. 4) Reinstall the print cartridges. To clean the Scanner Bed The printer slows down copying and scanning performance if the Scanner Bed is dirty. To wipe the... printheads 1) Remove the print cartridge from the printer. When cleaning the color print cartridge, wipe the printheads in one direction ...

User's Guide (3.6 MB)
Page 89
... printing a job received from your PC. EMPTY The Black and Color cartridges are not installed or improperly installed in the Input Tray. Chapter 9 Chapter 9 Error Messages The following table explains the various messages that the printer cannot print the multi-same images on a single page. DOCUMENT IS BIG .... Message CHECK PAPER THEN PRESS STOP Meaning and Required Action Press the Stop/Restore button after loading the paper in the Print Cartridge Carrier. The printer ran out of paper in POSTER COPY. CANCEL COLLATE ? To continue collating, press Stop/Restore. MEMORY FULL...
... printing a job received from your PC. EMPTY The Black and Color cartridges are not installed or improperly installed in the Input Tray. Chapter 9 Chapter 9 Error Messages The following table explains the various messages that the printer cannot print the multi-same images on a single page. DOCUMENT IS BIG .... Message CHECK PAPER THEN PRESS STOP Meaning and Required Action Press the Stop/Restore button after loading the paper in the Print Cartridge Carrier. The printer ran out of paper in POSTER COPY. CANCEL COLLATE ? To continue collating, press Stop/Restore. MEMORY FULL...


