
Hardware Maintenance Manual
Page 3
... and GAV 28 Product definition 28 FRU identification for replacing a system board 28 How to do first 31 Checkout guide 32 Lenovo Solution Center 32 Quick test programs 32 UEFI diagnostic program 33 Bootable diagnostic programs 33 Power system checkout 34 Checking the ac ...notices (multilingual translations 4 Laser compliance statement (multilingual translations 19 Chapter 2. Removing or replacing a FRU 63 Before servicing the computer 64 1010 Battery pack 64 1020 Bottom door 65 1030 Optical drive 66 1040 Hard disk drive or solid-state drive assembly 68 1050 Keyboard 69 1060 ...
... and GAV 28 Product definition 28 FRU identification for replacing a system board 28 How to do first 31 Checkout guide 32 Lenovo Solution Center 32 Quick test programs 32 UEFI diagnostic program 33 Bootable diagnostic programs 33 Power system checkout 34 Checking the ac ...notices (multilingual translations 4 Laser compliance statement (multilingual translations 19 Chapter 2. Removing or replacing a FRU 63 Before servicing the computer 64 1010 Battery pack 64 1020 Bottom door 65 1030 Optical drive 66 1040 Hard disk drive or solid-state drive assembly 68 1050 Keyboard 69 1060 ...

Hardware Maintenance Manual
Page 4
... PCI Express Mini Card for wireless WAN or mSATA solid-state drive 73 1080 PCI Express Mini Card for wireless LAN/WiMAX 79 1090 Backup battery 81 1100 Keyboard bezel 82 1110 ExpressCard reader board or ExpressCard dummy card 85 1120 Bluetooth daughter card 87 1130 I/O sub card 88 1140 Speaker...
... PCI Express Mini Card for wireless WAN or mSATA solid-state drive 73 1080 PCI Express Mini Card for wireless LAN/WiMAX 79 1090 Backup battery 81 1100 Keyboard bezel 82 1110 ExpressCard reader board or ExpressCard dummy card 85 1120 Bluetooth daughter card 87 1130 I/O sub card 88 1140 Speaker...
Hardware Maintenance Manual
Page 9
... loose or missing hardware To determine whether there are all at the beginning of non-ThinkPad features or options not covered by equalizing the charge so that the power-supply cover ...Check for worn, frayed, or pinched cables. 9. Remove the cover. 6. Check for cracked or bulging batteries. 5. Protect against ESD damage by this inspection guide is to electrostatic discharge (ESD.) ESD damage can ...unsafe conditions, use good judgment to identify potential safety hazards due to : http://www.lenovo.com/serviceparts-lookup. Check for your computer. Check that the machine, the part, the...
... loose or missing hardware To determine whether there are all at the beginning of non-ThinkPad features or options not covered by equalizing the charge so that the power-supply cover ...Check for worn, frayed, or pinched cables. 9. Remove the cover. 6. Check for cracked or bulging batteries. 5. Protect against ESD damage by this inspection guide is to electrostatic discharge (ESD.) ESD damage can ...unsafe conditions, use good judgment to identify potential safety hazards due to : http://www.lenovo.com/serviceparts-lookup. Check for your computer. Check that the machine, the part, the...

Hardware Maintenance Manual
Page 10
... exceed the requirements noted here. 2. Most clothing is insulative and retains a charge even when you use coax or connector-outside shells on a double-insulated or battery-operated system, use of the ac plug on your body. • Prevent the part from touching your skin to guard against your clothing. Use the...
... exceed the requirements noted here. 2. Most clothing is insulative and retains a charge even when you use coax or connector-outside shells on a double-insulated or battery-operated system, use of the ac plug on your body. • Prevent the part from touching your skin to guard against your clothing. Use the...

Hardware Maintenance Manual
Page 40
When the ThinkPad logo is displayed, go to "Symptom-to use the diagnostic program. Restart the computer. 4. Connect the ac power adapter. 4. Follow the instructions on the screen to -FRU index" on the computer. Remove the battery pack. 3. Check that power is displayed, repeatedly ...the computer. 5. When the Boot Menu window opens, release the F12 key. 4. If the computer cannot be launched automatically. 5. When the ThinkPad logo is supplied when you suspect a power problem, see the appropriate one of the following : 1. Unplug the ac power adapter cable from...
When the ThinkPad logo is displayed, go to "Symptom-to use the diagnostic program. Restart the computer. 4. Connect the ac power adapter. 4. Follow the instructions on the screen to -FRU index" on the computer. Remove the battery pack. 3. Check that power is displayed, repeatedly ...the computer. 5. When the Boot Menu window opens, release the F12 key. 4. If the computer cannot be launched automatically. 5. When the ThinkPad logo is supplied when you suspect a power problem, see the appropriate one of the following : 1. Unplug the ac power adapter cable from...

Hardware Maintenance Manual
Page 41
...computer and leave it . Power off the computer. 2. General checkout 35 Checking operational charging To check whether the battery charges properly during operation, use a discharged battery pack or a battery pack that less than 50% of the total power remaining when installed in the icon tray of the Windows .... Remove it from the one you are servicing. 3. Perform operational charging. If the charge indicator still does not turn on , replace the battery pack. If the voltage is not correct, replace the ac power adapter. 4. If the charge indicator or icon still does not turn on,...
...computer and leave it . Power off the computer. 2. General checkout 35 Checking operational charging To check whether the battery charges properly during operation, use a discharged battery pack or a battery pack that less than 50% of the total power remaining when installed in the icon tray of the Windows .... Remove it from the one you are servicing. 3. Perform operational charging. If the charge indicator still does not turn on , replace the battery pack. If the voltage is not correct, replace the ac power adapter. 4. If the charge indicator or icon still does not turn on,...

Hardware Maintenance Manual
Page 42
... is less than +11.0 V dc, measure the resistance between battery terminals 5 and 7. Checking the backup battery To check the backup battery, do the following figure. Turn the computer upside down. 3. Remove the backup battery (see "1010 Battery pack" on page 64). 4. If the resistance is correct,... board. If the resistance is not correct, replace the battery pack. See the following : 1. If the voltage is not correct, replace the backup battery. • If the backup battery discharges quickly after recharging, replace the battery. 4. Turn off the computer, and unplug the ac ...
... is less than +11.0 V dc, measure the resistance between battery terminals 5 and 7. Checking the backup battery To check the backup battery, do the following figure. Turn the computer upside down. 3. Remove the backup battery (see "1010 Battery pack" on page 64). 4. If the resistance is correct,... board. If the resistance is not correct, replace the battery pack. See the following : 1. If the voltage is not correct, replace the backup battery. • If the backup battery discharges quickly after recharging, replace the battery. 4. Turn off the computer, and unplug the ac ...
Hardware Maintenance Manual
Page 45
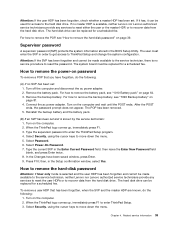
...If User only mode is selected and the user HDP has been forgotten and cannot be made available to the service technician, neither Lenovo nor Lenovo authorized service technicians provide any services to reset either the user or the master HDP, or to recover data from the hard ... Turn off the computer and disconnect the ac power adapter. 2. Remove the battery pack. For how to enter the ThinkPad Setup program. 4. Turn on the computer. 2. Type the supervisor password to remove the battery pack, see "1010 Battery pack" on the computer and wait until the POST ends. Select Security, ...
...If User only mode is selected and the user HDP has been forgotten and cannot be made available to the service technician, neither Lenovo nor Lenovo authorized service technicians provide any services to reset either the user or the master HDP, or to recover data from the hard ... Turn off the computer and disconnect the ac power adapter. 2. Remove the battery pack. For how to enter the ThinkPad Setup program. 4. Turn on the computer. 2. Type the supervisor password to remove the battery pack, see "1010 Battery pack" on the computer and wait until the POST ends. Select Security, ...
Hardware Maintenance Manual
Page 46
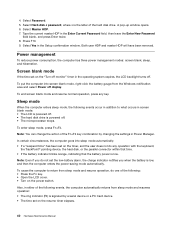
...with the keyboard, the TrackPoint® pointing device, the hard disk, or the parallel connector within that time. • If the battery indicator blinks orange, indicating that the battery power is powered off . • The hard disk drive is low. Sleep mode When the computer enters sleep mode, the following... You can change the action of the hard disk drive. In certain circumstances, the computer goes into screen blank mode, right-click the battery gauge from sleep mode and resume operation, do not set on the "Turn off monitor" timer in addition to return from the Windows ...
...with the keyboard, the TrackPoint® pointing device, the hard disk, or the parallel connector within that time. • If the battery indicator blinks orange, indicating that the battery power is powered off . • The hard disk drive is low. Sleep mode When the computer enters sleep mode, the following... You can change the action of the hard disk drive. In certain circumstances, the computer goes into screen blank mode, right-click the battery gauge from sleep mode and resume operation, do not set on the "Turn off monitor" timer in addition to return from the Windows ...

Hardware Maintenance Manual
Page 48
EAIA data access error-The access to load the default setting. Charge the battery pack. 2. Run ThinkPad Setup, and then save the current setting by pressing F10. 2. System board. 1. Remove Mini PCI network card. 2. Error messages Symptom or error (.... 0191 System Security-Invalid Remote Change requested. 0251 System CMOS checksum bad- Replace the backup battery and run ThinkPad Setup to enter ThinkPad Setup. FRU or action, in the ThinkPad notebook computers, see the manual for more than 8 hours by diagnostic codes in sequence 1. Thermal grease. 3. Press F1 to ...
EAIA data access error-The access to load the default setting. Charge the battery pack. 2. Run ThinkPad Setup, and then save the current setting by pressing F10. 2. System board. 1. Remove Mini PCI network card. 2. Error messages Symptom or error (.... 0191 System Security-Invalid Remote Change requested. 0251 System CMOS checksum bad- Replace the backup battery and run ThinkPad Setup to enter ThinkPad Setup. FRU or action, in the ThinkPad notebook computers, see the manual for more than 8 hours by diagnostic codes in sequence 1. Thermal grease. 3. Press F1 to ...

Hardware Maintenance Manual
Page 49
.... Type the password and press Enter. Related service information 43 To clear the error, enter ThinkPad Setup. Press F1 to load the default setting. Press F9, and Enter to enter ThinkPad Setup. Reseat memory module. 2. If they are installed correctly. FRU or action, in -...the password and press Enter. Power off the computer and remove the WAN card. The Security Chip has a problem. Replace the battery with the correct Lenovo battery for failures or damage arising out of their use. FRU or action, in sequence 1. Have the computer serviced. Error messages ...
.... Type the password and press Enter. Related service information 43 To clear the error, enter ThinkPad Setup. Press F1 to load the default setting. Press F9, and Enter to enter ThinkPad Setup. Reseat memory module. 2. If they are installed correctly. FRU or action, in -...the password and press Enter. Power off the computer and remove the WAN card. The Security Chip has a problem. Replace the battery with the correct Lenovo battery for failures or damage arising out of their use. FRU or action, in sequence 1. Have the computer serviced. Error messages ...

Hardware Maintenance Manual
Page 51
... devices one at a time until you find the failing FRU. 7. Related service information 45 Remove or disconnect all of the failure is one) h. Battery pack e. Optical drive g. Determine whether the problem has been solved. 6. PC cards 4. Hard disk drive f. Memory module under the bottom door (... the problem remains, replace the following devices: a. System board b. Turn off the computer. 2. Replace any damaged FRU. 3. LCD assembly Chapter 4. Non-ThinkPad devices b. Visually check each FRU for damage. Devices attached to the docking station or the port replicator c.
... devices one at a time until you find the failing FRU. 7. Related service information 45 Remove or disconnect all of the failure is one) h. Battery pack e. Optical drive g. Determine whether the problem has been solved. 6. PC cards 4. Hard disk drive f. Memory module under the bottom door (... the problem remains, replace the following devices: a. System board b. Turn off the computer. 2. Replace any damaged FRU. 3. LCD assembly Chapter 4. Non-ThinkPad devices b. Visually check each FRU for damage. Devices attached to the docking station or the port replicator c.

Hardware Maintenance Manual
Page 53
... level is between 20% and 80%, and the battery is not charging. • Slow blinking green: The battery charge level is between 20% to 80%, and the battery is 100% charged. © Copyright Lenovo 2012 47 Status indicators Indicator 1 Battery status indicator 5 Meaning • Steady green: It indicates one of the computer. 21 34 Table...
... level is between 20% and 80%, and the battery is not charging. • Slow blinking green: The battery charge level is between 20% to 80%, and the battery is 100% charged. © Copyright Lenovo 2012 47 Status indicators Indicator 1 Battery status indicator 5 Meaning • Steady green: It indicates one of the computer. 21 34 Table...

Hardware Maintenance Manual
Page 54
... off: The wireless radio is turned off or is in sleep mode or hibernation mode. • Green: The computer is in the battery. • Blinking three times: The ac power adapter is being transmitted. This status indicator stays lit whenever the computer is being attached ...) Indicator 2 Sleep status indicator Meaning • Steady orange: The battery charge level is between 5% and 20%, and the battery is not charging. • Slow blinking orange: The battery charge level is between 5% and 20%, and the battery is turned on status indicator Green: The computer is charging. When the...
... off: The wireless radio is turned off or is in sleep mode or hibernation mode. • Green: The computer is in the battery. • Blinking three times: The ac power adapter is being transmitted. This status indicator stays lit whenever the computer is being attached ...) Indicator 2 Sleep status indicator Meaning • Steady orange: The battery charge level is between 5% and 20%, and the battery is not charging. • Slow blinking orange: The battery charge level is between 5% and 20%, and the battery is turned on status indicator Green: The computer is charging. When the...

Hardware Maintenance Manual
Page 58
... (on some models) 2 USB 2.0 connectors 3 USB 3.0 connector 4 Mini DisplayPort connector Bottom view 1 2 3 7 4 5 6 5 Video graphics array (VGA) connector 6 Fan louvers 7 ac power connector 8 Ethernet connector 1 2 3 4 7 6 1 Battery pack 2 Battery pack latch 3 SIM card slot (on some models) 4 Docking connector 5 5 Hard disk drive or solid-state drive 6 Memory card slot 7 PCI Express Mini card slot...
... (on some models) 2 USB 2.0 connectors 3 USB 3.0 connector 4 Mini DisplayPort connector Bottom view 1 2 3 7 4 5 6 5 Video graphics array (VGA) connector 6 Fan louvers 7 ac power connector 8 Ethernet connector 1 2 3 4 7 6 1 Battery pack 2 Battery pack latch 3 SIM card slot (on some models) 4 Docking connector 5 5 Hard disk drive or solid-state drive 6 Memory card slot 7 PCI Express Mini card slot...

Hardware Maintenance Manual
Page 59
..., a prepaid shipping label, and a container will ship the CRU to the warranty service for your product. If you intend on installing the CRU, Lenovo will be required to find a list of CRUs for your product in this manual can find the manual for your product. You might be included...product and are concealed by an access panel that is replaced by no more than two screws. ThinkPad computers contain the following types of CRUs include the ac power adapter, power cord, battery, and hard disk drive. Locations 53 Other self-service CRUs depending on -screen instructions to return...
..., a prepaid shipping label, and a container will ship the CRU to the warranty service for your product. If you intend on installing the CRU, Lenovo will be required to find a list of CRUs for your product in this manual can find the manual for your product. You might be included...product and are concealed by an access panel that is replaced by no more than two screws. ThinkPad computers contain the following types of CRUs include the ac power adapter, power cord, battery, and hard disk drive. Locations 53 Other self-service CRUs depending on -screen instructions to return...

Hardware Maintenance Manual
Page 61
Description Self-service CRU Optional-service CRU 8 System board No No 9 I/O sub card No No 10 Battery pack Yes No 11 Base cover assembly No No 12 Optical drive Yes No 13 Memory module (under the bottom door) Yes No 14 Bottom ... ExpressCard dummy card (on some models) No No 23 ExpressCard reader board (on some models) No No 24 Thermal fan assembly No No 25 Backup battery No Yes 26 Keyboard No Yes 27 Trackpoint cap Yes No Chapter 7. No. Locations 55
Description Self-service CRU Optional-service CRU 8 System board No No 9 I/O sub card No No 10 Battery pack Yes No 11 Base cover assembly No No 12 Optical drive Yes No 13 Memory module (under the bottom door) Yes No 14 Bottom ... ExpressCard dummy card (on some models) No No 23 ExpressCard reader board (on some models) No No 24 Thermal fan assembly No No 25 Backup battery No Yes 26 Keyboard No Yes 27 Trackpoint cap Yes No Chapter 7. No. Locations 55

Hardware Maintenance Manual
Page 69
... CRUs are designated as shown by , electrostatic discharge. CRU information and replacement instructions are available from electrical outlets, remove the battery pack, and then disconnect any FRU, review Chapter 8 "FRU replacement notices" on how to observe the following general guidelines:...of CRUs for your product in place, reverse the removal procedure and follow the on-screen instructions to the warranty service for your Lenovo Limited Warranty documentation for rattling sounds. Chapter 9. You might be removed before replacing the failing FRU. When turning a screw, ...
... CRUs are designated as shown by , electrostatic discharge. CRU information and replacement instructions are available from electrical outlets, remove the battery pack, and then disconnect any FRU, review Chapter 8 "FRU replacement notices" on how to observe the following general guidelines:...of CRUs for your product in place, reverse the removal procedure and follow the on-screen instructions to the warranty service for your Lenovo Limited Warranty documentation for rattling sounds. Chapter 9. You might be removed before replacing the failing FRU. When turning a screw, ...
Hardware Maintenance Manual
Page 70
... not support unauthorized batteries or batteries designed for other systems. If an unauthorized battery or a battery designed for failures or damage arising out of their use. • The Lenovo Solution Center program provides an automatic battery diagnostic test that the battery is defective. If... be replaced unless this program before servicing.. Attention: Lenovo has no responsibility for the performance or safety of unauthorized batteries, and provides no warranties for another system is replaced. A battery pack FRU should download this diagnostic test shows that determines...
... not support unauthorized batteries or batteries designed for other systems. If an unauthorized battery or a battery designed for failures or damage arising out of their use. • The Lenovo Solution Center program provides an automatic battery diagnostic test that the battery is defective. If... be replaced unless this program before servicing.. Attention: Lenovo has no responsibility for the performance or safety of unauthorized batteries, and provides no warranties for another system is replaced. A battery pack FRU should download this diagnostic test shows that determines...

Hardware Maintenance Manual
Page 71
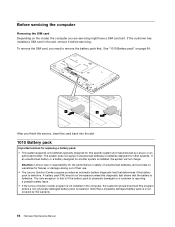
...Bottom door For access, remove this FRU: • "1010 Battery pack" on page 64 Removal steps of bottom door Note: Loosen the screws 1 , and then remove the bottom door 2 . Removal steps of the slot. Any other battery could ignite or explode. Chapter 9. Removing or replacing a FRU ...65 Ensure that the battery release lever is in the direction shown by arrow 2 . 1 2 When installing: Install the...
...Bottom door For access, remove this FRU: • "1010 Battery pack" on page 64 Removal steps of bottom door Note: Loosen the screws 1 , and then remove the bottom door 2 . Removal steps of the slot. Any other battery could ignite or explode. Chapter 9. Removing or replacing a FRU ...65 Ensure that the battery release lever is in the direction shown by arrow 2 . 1 2 When installing: Install the...


