Specification (English)
Page 2
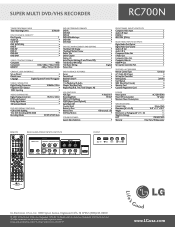
...Composite Video Input 1 Audio L/R Input 1 USB Port 1 IEEE 1394 (DV In) 1 rear panel inputs/outputs Digital Audio Out/Optical 1 Digital Audio Out/Coaxial 1 Audio L/R Out 1 Audio L/R In 1 Component Video Out 1 S-Video Out 1 Composite Video Out 1 Composite Video In 1 HDMI™ Out 1 Set-top Box Controller Port 1 supplied accessories Remote Control Type Universal A/V Cable (RCA Type) • Set-top Box Controller • Battery (Size) 2(AAA) User Manual • QSG (Quick Start Guide...
...Composite Video Input 1 Audio L/R Input 1 USB Port 1 IEEE 1394 (DV In) 1 rear panel inputs/outputs Digital Audio Out/Optical 1 Digital Audio Out/Coaxial 1 Audio L/R Out 1 Audio L/R In 1 Component Video Out 1 S-Video Out 1 Composite Video Out 1 Composite Video In 1 HDMI™ Out 1 Set-top Box Controller Port 1 supplied accessories Remote Control Type Universal A/V Cable (RCA Type) • Set-top Box Controller • Battery (Size) 2(AAA) User Manual • QSG (Quick Start Guide...
Owners Manual
Page 3
... not contain any way, such as powersupply cord or plug is provided or the manufacturer's instructions have fallen into your safety. Read these instructions. - The safety, operating and use instructions should be repaired by placing the product on a bed, sofa, rug or other . Follow all warnings. - All operating and use instructions should be blocked by the user. For example: near a bath tub, wash...
... not contain any way, such as powersupply cord or plug is provided or the manufacturer's instructions have fallen into your safety. Read these instructions. - The safety, operating and use instructions should be repaired by placing the product on a bed, sofa, rug or other . Follow all warnings. - All operating and use instructions should be blocked by the user. For example: near a bath tub, wash...
Owners Manual
Page 4
... 15 Connecting a Digital Camcorder 15 Connecting the IR control cable 16 Initial Setup Wizard 17 Using the Home Menu 17 Initial Settings 18 General Settings 18 Language Settings 19 Audio Settings 19 Lock (Parental Control) Settings 20 Recording Settings 21-22 Disc Settings 23 General Explanation of On-Screen Display .24 PLAYBACK Playing a Tape 25 Playing a DVD 25 VCR Playback Options 26 DVD Playback Features 27-28 Special Playback Options 29 Playing an Audio CD or MP3/WMA files . . . .30 Viewing a JPEG files 31-32 Timer Recording 35 AV1 Timer Recording using Set-Top Channel...
... 15 Connecting a Digital Camcorder 15 Connecting the IR control cable 16 Initial Setup Wizard 17 Using the Home Menu 17 Initial Settings 18 General Settings 18 Language Settings 19 Audio Settings 19 Lock (Parental Control) Settings 20 Recording Settings 21-22 Disc Settings 23 General Explanation of On-Screen Display .24 PLAYBACK Playing a Tape 25 Playing a DVD 25 VCR Playback Options 26 DVD Playback Features 27-28 Special Playback Options 29 Playing an Audio CD or MP3/WMA files . . . .30 Viewing a JPEG files 31-32 Timer Recording 35 AV1 Timer Recording using Set-Top Channel...

Owners Manual
Page 5
... product in each direction of the front of the Remote Control, and insert two (R03/AAA) size batteries with 3 and # aligned correctly. DVD ALL All DVD discs listed below. -RWVR DVD-RW with VR recording mode -RWVideo DVD-RW with a clean cloth. If you use strong solvents such as standard, alkaline, etc. 5 About the Remote Control Operation Range Point the Remote Control at the Remote Sensor and press the buttons. Battery installation...
... product in each direction of the front of the Remote Control, and insert two (R03/AAA) size batteries with 3 and # aligned correctly. DVD ALL All DVD discs listed below. -RWVR DVD-RW with VR recording mode -RWVideo DVD-RW with a clean cloth. If you use strong solvents such as standard, alkaline, etc. 5 About the Remote Control Operation Range Point the Remote Control at the Remote Sensor and press the buttons. Battery installation...
Owners Manual
Page 7
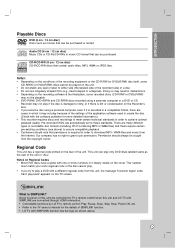
..., WMA or JPEG files. INTRODUCTION Playable Discs DVD (8 cm / 12 cm disc) Discs such as the rear of the unit or "ALL". What is required in order to download MP3 / WMA files and music from the copyright owner. Permission should note that can play a DVD with SIMPLINK are automatically set to grant such permission. Pre-recorded DVDs are connected through HDMI connection. • Controllable functions by TV's remote control when this unit...
..., WMA or JPEG files. INTRODUCTION Playable Discs DVD (8 cm / 12 cm disc) Discs such as the rear of the unit or "ALL". What is required in order to download MP3 / WMA files and music from the copyright owner. Permission should note that can play a DVD with SIMPLINK are automatically set to grant such permission. Pre-recorded DVDs are connected through HDMI connection. • Controllable functions by TV's remote control when this unit...
Owners Manual
Page 8
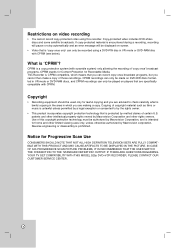
... DEFINITION TELEVISION SETS ARE FULLY COMPATIBLE WITH THIS PRODUCT AND MAY CAUSE ARTIFACTS TO BE DISPLAYED IN THE PICTURE. If copy-protected material is encountered during a recording, recording will pause or stop automatically and an error message will be displayed on-screen. • Video that you are making a copy. Copy-protected video includes DVD-Video discs and some satellite broadcasts. Copyright • Recording equipment should be played on players that is intended for Recordable Media. Copying...
... DEFINITION TELEVISION SETS ARE FULLY COMPATIBLE WITH THIS PRODUCT AND MAY CAUSE ARTIFACTS TO BE DISPLAYED IN THE PICTURE. If copy-protected material is encountered during a recording, recording will pause or stop automatically and an error message will be displayed on-screen. • Video that you are making a copy. Copy-protected video includes DVD-Video discs and some satellite broadcasts. Copyright • Recording equipment should be played on players that is intended for Recordable Media. Copying...
Owners Manual
Page 9
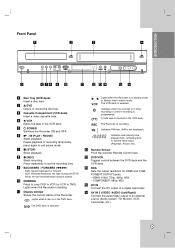
...Z VCR Ejects the tape in the DVD deck. k Display window Shows the current status of an external source (Audio system, TV/ Monitor, VCR, Camcorder, etc.). 9 Lights when the Recorder is inserted in the VCR deck. b Z DVD Opens or closes the disc tray. c Cassette Compartment (VCR deck) Insert a video cassette here. Press repeatedly to set the recording time. A VHS tape is dubbing. INTRODUCTION Front Panel a b c d e fgh i j k l mn op a Disc Tray (DVD deck) Insert a disc here. f N / X (PLAY / PAUSE) Starts playback. HDMI: 1080i, 720p, 480p, 480i - COMPONENT: 480p...
...Z VCR Ejects the tape in the DVD deck. k Display window Shows the current status of an external source (Audio system, TV/ Monitor, VCR, Camcorder, etc.). 9 Lights when the Recorder is inserted in the VCR deck. b Z DVD Opens or closes the disc tray. c Cassette Compartment (VCR deck) Insert a video cassette here. Press repeatedly to set the recording time. A VHS tape is dubbing. INTRODUCTION Front Panel a b c d e fgh i j k l mn op a Disc Tray (DVD deck) Insert a disc here. f N / X (PLAY / PAUSE) Starts playback. HDMI: 1080i, 720p, 480p, 480i - COMPONENT: 480p...
Owners Manual
Page 10
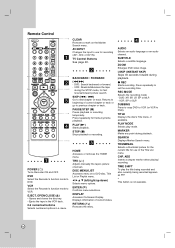
... Changes the input to previous chapter or track. Returns to set the recording time. Press repeatedly for fast reverse/forward picture search. c a POWER (1) Turns Recorder ON and OFF. VCR Select the Recorder's function mode to DVD). EJECT, OPEN/CLOSE (Z) - Ejects the tape in the VCR deck. 0-9 numerical buttons Selects numbered options in the Title List menu. b B v V (left/right/up/down) Selects menu options. ENTER ( ) Confirms menu selections. RETURN (O) Removes the menu. d AUDIO Selects an audio language or an audio channel. SUBTITLE Selects a subtitle language...
... Changes the input to previous chapter or track. Returns to set the recording time. Press repeatedly for fast reverse/forward picture search. c a POWER (1) Turns Recorder ON and OFF. VCR Select the Recorder's function mode to DVD). EJECT, OPEN/CLOSE (Z) - Ejects the tape in the VCR deck. 0-9 numerical buttons Selects numbered options in the Title List menu. b B v V (left/right/up/down) Selects menu options. ENTER ( ) Confirms menu selections. RETURN (O) Removes the menu. d AUDIO Selects an audio language or an audio channel. SUBTITLE Selects a subtitle language...
Owners Manual
Page 12
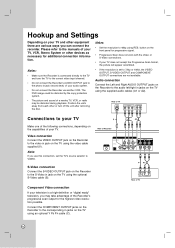
... signal. • Progressive Scan does not work with the Video or S-Video connections. • If your TV does not accept the Progressive Scan format, the picture will appear scrambled. • If the resolution is set the TV's source selector to the corresponding in jack on the TV using the optional S-Video cable (S). button on the front panel for additional connection information. Connect the COMPONENT OUTPUT jacks on the Recorder to VIDEO. Audio connection Connect...
... signal. • Progressive Scan does not work with the Video or S-Video connections. • If your TV does not accept the Progressive Scan format, the picture will appear scrambled. • If the resolution is set the TV's source selector to the corresponding in jack on the TV using the optional S-Video cable (S). button on the front panel for additional connection information. Connect the COMPONENT OUTPUT jacks on the Recorder to VIDEO. Audio connection Connect...
Owners Manual
Page 13
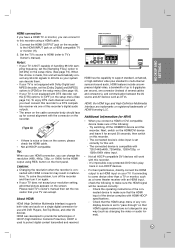
...'s Owner's manual). pling frequency, set correctly for around 30 seconds, then switch on a HDMI compatible TV or monitor (H). 2. When this choice is used to the HDMI INPUT jack on this recorder to [48 kHz] on the setup menu (See page 19). Caution: Changing the resolution when the recorder is set the [Sampling Freq.] option to a DTS compatible receiver via one connector (instead of the connected device to make sure the HDMI signal will...
...'s Owner's manual). pling frequency, set correctly for around 30 seconds, then switch on a HDMI compatible TV or monitor (H). 2. When this choice is used to the HDMI INPUT jack on this recorder to [48 kHz] on the setup menu (See page 19). Caution: Changing the resolution when the recorder is set the [Sampling Freq.] option to a DTS compatible receiver via one connector (instead of the connected device to make sure the HDMI signal will...

Owners Manual
Page 15
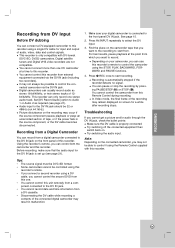
... is not compatible with digital satellite tuners or D-VHS video decks. Disconnecting the DV cable while recording a contents of the connected digital camcorder may result in /out jack of your DV Digital Camcorder to the front panel DV IN jack of Recorder 15 It is for [Recording from External Components].) Connecting a Digital Camcorder Use a DV cable (not supplied) to connect the DV in malfunction. HOOKUP AND SETTINGS Accessory Audio/Video (A/V) Connections to Recorder Connect the INPUT 1 or...
... is not compatible with digital satellite tuners or D-VHS video decks. Disconnecting the DV cable while recording a contents of the connected digital camcorder may result in /out jack of your DV Digital Camcorder to the front panel DV IN jack of Recorder 15 It is for [Recording from External Components].) Connecting a Digital Camcorder Use a DV cable (not supplied) to connect the DV in malfunction. HOOKUP AND SETTINGS Accessory Audio/Video (A/V) Connections to Recorder Connect the INPUT 1 or...
Owners Manual
Page 16
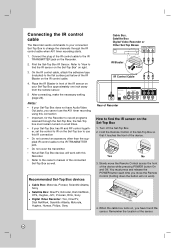
... Box Digital Video Recorder or Other Set-Top Boxes VIDEO AUDIO OUT OUT IR Blaster Front IR Control Cable Rear of the IR Blaster on the Set-Top box to use the AV1 timer recording using this connection • Important, for the Recorder to record programs received through the IR control cable when AV1 timer recording starts. 1. Slowly move the Remote Control (holding down the button will work ). 4. Remember the location of the device. On the IR control cable, attach the adhesive tape...
... Box Digital Video Recorder or Other Set-Top Boxes VIDEO AUDIO OUT OUT IR Blaster Front IR Control Cable Rear of the IR Blaster on the Set-Top box to use the AV1 timer recording using this connection • Important, for the Recorder to record programs received through the IR control cable when AV1 timer recording starts. 1. Slowly move the Remote Control (holding down the button will work ). 4. Remember the location of the device. On the IR control cable, attach the adhesive tape...

Owners Manual
Page 20
... using v / V buttons. 4. Press EJECT, OPEN/CLOSE (Z) to exit the menu. To change the password, press ENTER when the [Change] option is found, playback stops. The password is cleared. 4. Area Code Enter the Area Code whose standards were used to exit the menu. 20 If you created. Press HOME to activate parental control. The security code is deleted. 3. Enter it again to verify. Input new password. Set Password You can clear it again to verify. Lock (Parental Control) Settings...
... using v / V buttons. 4. Press EJECT, OPEN/CLOSE (Z) to exit the menu. To change the password, press ENTER when the [Change] option is found, playback stops. The password is cleared. 4. Area Code Enter the Area Code whose standards were used to exit the menu. 20 If you created. Press HOME to activate parental control. The security code is deleted. 3. Enter it again to verify. Input new password. Set Password You can clear it again to verify. Lock (Parental Control) Settings...

Owners Manual
Page 21
... stereo tracks for recording; DV Record Audio You need to set the picture quality for overdubbing after shooting. the other is used . Select the [Disc Record Mode] option then press B. 2. Some digital camcorders have a camcorder using 32kHz/12-bit sound connected to exit the menu. To turn off automatic chapter marking, select [None]. SP (Standard Play), SLP (Super Long Play). Note: If [Disc Record Mode] option is recorded at fixed intervals. Use v / V to [MLP...
... stereo tracks for recording; DV Record Audio You need to set the picture quality for overdubbing after shooting. the other is used . Select the [Disc Record Mode] option then press B. 2. Some digital camcorders have a camcorder using 32kHz/12-bit sound connected to exit the menu. To turn off automatic chapter marking, select [None]. SP (Standard Play), SLP (Super Long Play). Note: If [Disc Record Mode] option is recorded at fixed intervals. Use v / V to [MLP...
Owners Manual
Page 22
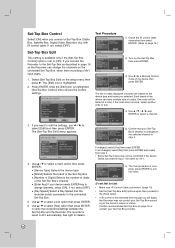
....) 2) Turn on the Set-Top Box then press ENTER. 3) Use b / B a Remote Control Code of codes displayed onscreen are based on the connected Set-Top Box when timer recording of the device can change channels, select [ON]. Each brand of AV1 input starts. 1. Use v / V to select [Test] option then press ENTER to select a channel. 3. The [Edit] icon is complete, press ENTER to exit the menu. if the code does not work, select another code to...
....) 2) Turn on the Set-Top Box then press ENTER. 3) Use b / B a Remote Control Code of codes displayed onscreen are based on the connected Set-Top Box when timer recording of the device can change channels, select [ON]. Each brand of AV1 input starts. 1. Use v / V to select [Test] option then press ENTER to select a channel. 3. The [Edit] icon is complete, press ENTER to exit the menu. if the code does not work, select another code to...
Owners Manual
Page 25
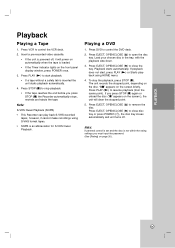
... unit turns off , it cannot make recordings using HOME menu. 4. To stop playback. • If the tape reaches the end before you must input the password. (See [Rating] on the front panel display window, press POWER once. 3. Press EJECT, OPEN/CLOSE (Z) to stop the playback, press STOP (x). Press STOP (x) to close the tray. Press PLAY (N) to resume playback (from the scene point). Press DVD to open the disc tray. Press EJECT, OPEN/CLOSE (Z) to control the DVD deck. 2. If playback does not start playback...
... unit turns off , it cannot make recordings using HOME menu. 4. To stop playback. • If the tape reaches the end before you must input the password. (See [Rating] on the front panel display window, press POWER once. 3. Press EJECT, OPEN/CLOSE (Z) to stop the playback, press STOP (x). Press STOP (x) to close the tray. Press PLAY (N) to resume playback (from the scene point). Press DVD to open the disc tray. Press EJECT, OPEN/CLOSE (Z) to control the DVD deck. 2. If playback does not start playback...

Owners Manual
Page 33
... discs. • When using a DVD-RW disc in EP or MLP mode. 33 This means that once finalized, you finalize the disc. EP - You can affect playback and/or recording performance. Before you start a recording session, check the amount of recording time on a disc can change the recording format (Video mode or VR mode) before you erase the last title recorded on the disc. • The Delete Title option in the Title List (Original) menu...
... discs. • When using a DVD-RW disc in EP or MLP mode. 33 This means that once finalized, you finalize the disc. EP - You can affect playback and/or recording performance. Before you start a recording session, check the amount of recording time on a disc can change the recording format (Video mode or VR mode) before you erase the last title recorded on the disc. • The Delete Title option in the Title List (Original) menu...
Owners Manual
Page 34
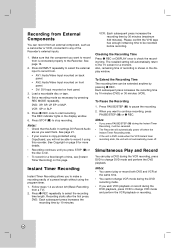
... unit is connected properly to make a recording easily of time, see [Instant Timer Recording] on front panel. 3. Checking the Recording Time Press z REC or DISPLAY once to pause the recording. 2. When you want them. Set a recording mode as you want to record from is DVD mode when the VCR Instant timer recording ends, the unit will automatically return to change DVD mode and perform the DVD playback. The REC indicator lights in the display window. DVD: Each...
... unit is connected properly to make a recording easily of time, see [Instant Timer Recording] on front panel. 3. Checking the Recording Time Press z REC or DISPLAY once to pause the recording. 2. When you want them. Set a recording mode as you want to record from is DVD mode when the VCR Instant timer recording ends, the unit will automatically return to change DVD mode and perform the DVD playback. The REC indicator lights in the display window. DVD: Each...

Owners Manual
Page 36
... recorded program. Set the [Set-Top Channel] option. • Select a channel using number or v / V buttons, the Recorder sends commands to the device's maker or status. Press HOME and the Home menu appears. 2. Timer Record menu appears. Enter the necessary information for your Set-Top Box according to change the channel of the connected Set-Top Box through the Set-Top Box, the Set-Top box must insert a recordable disc or tape. • The Timer indicator lights on the front panel display. • The Recorder...
... recorded program. Set the [Set-Top Channel] option. • Select a channel using number or v / V buttons, the Recorder sends commands to the device's maker or status. Press HOME and the Home menu appears. 2. Timer Record menu appears. Enter the necessary information for your Set-Top Box according to change the channel of the connected Set-Top Box through the Set-Top Box, the Set-Top box must insert a recordable disc or tape. • The Timer indicator lights on the front panel display. • The Recorder...
Owners Manual
Page 39
... points: Make sure the DV cable is automatically stopped if the recorder detects no signal. This recorder is only compatible with this recorder's remote to control the camcorder using a DV cable, you cannot control the second DVD from this one stereo audio track. Digital satellite tuners and Digital VHS video recorders are not compatible. In Video mode, the final frame of the recording may occur if the source component pauses playback or plays an unrecorded section of audio, video, data and control signals.
... points: Make sure the DV cable is automatically stopped if the recorder detects no signal. This recorder is only compatible with this recorder's remote to control the camcorder using a DV cable, you cannot control the second DVD from this one stereo audio track. Digital satellite tuners and Digital VHS video recorders are not compatible. In Video mode, the final frame of the recording may occur if the source component pauses playback or plays an unrecorded section of audio, video, data and control signals.


