User Guide
Page 5
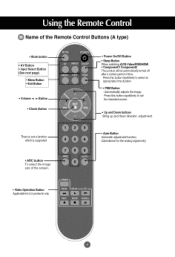
... Button Applicable for LGproducts only @ Auto Button Automatic adjustment function (Operationalfor the analog signal only) • ARC button To select the image size of the Remote Control Buttons (A type) • Mute button • Volume < • Button • Check Button There is not a function which is supported Power On/Off Button Button WChoemn...
... Button Applicable for LGproducts only @ Auto Button Automatic adjustment function (Operationalfor the analog signal only) • ARC button To select the image size of the Remote Control Buttons (A type) • Mute button • Volume < • Button • Check Button There is not a function which is supported Power On/Off Button Button WChoemn...
User Guide
Page 6
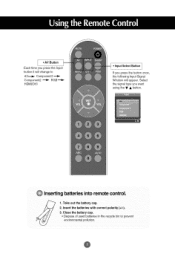
Inserting batteries into remote control. 7 1. Select the signal type you press the button once, the following Input Signal Window will change to prevent environmental pollution. @ • AV Button Each time you press the Input button it will appear. Take out the battery cap. Insert the batteries with correct polarity (+/-). 3. Close the battery cap. • Dispose of used batteries in the recycle bin to AV_ Component1 Component2 _ RGB_ HDMI/DVl • Input Select Button If you want using the • • button.
Inserting batteries into remote control. 7 1. Select the signal type you press the button once, the following Input Signal Window will change to prevent environmental pollution. @ • AV Button Each time you press the Input button it will appear. Take out the battery cap. Insert the batteries with correct polarity (+/-). 3. Close the battery cap. • Dispose of used batteries in the recycle bin to AV_ Component1 Component2 _ RGB_ HDMI/DVl • Input Select Button If you want using the • • button.
User Guide
Page 7
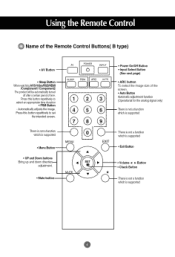
... -4MENU I,. ...... There is not a function which is supported --.O Thereis notafunction __ which is supported -- I ®( -- • ARC button To select the image size of the Remote Control Buttons( B type) -_ • AV Button -- Automaticallyadjusts the image. iF-o-_q _m • Power On/Off Button • Input Select Button (See next page) • Sleep...
... -4MENU I,. ...... There is not a function which is supported --.O Thereis notafunction __ which is supported -- I ®( -- • ARC button To select the image size of the Remote Control Buttons( B type) -_ • AV Button -- Automaticallyadjusts the image. iF-o-_q _m • Power On/Off Button • Input Select Button (See next page) • Sleep...

User Guide
Page 10
* The product image in the user's guide could be different from the actual image. @ Rear View O Power Connector : Connect the power cord Wired Remote Control Port RS-232C Serial Ports RGB, HDMI/DVI Ports PC Sound Jack : Connect the audio cable to the *LINE OUT jack of the PC sound card. AV Ports @
* The product image in the user's guide could be different from the actual image. @ Rear View O Power Connector : Connect the power cord Wired Remote Control Port RS-232C Serial Ports RGB, HDMI/DVI Ports PC Sound Jack : Connect the audio cable to the *LINE OUT jack of the PC sound card. AV Ports @
User Guide
Page 12
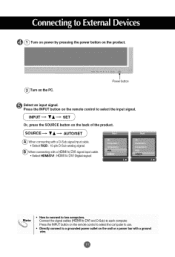
...; Select HDMIiDVI : HDMI to DVl Digital signal. ((_ Note How to connect to two computers, I Press the INPUT button Qnthe iem0te control t0 se!eCt the computer to select the input signal. _ INPUT---* •A i,---,- Press the INPUT button on the remote control to usel • Directly connect t° a grounded power outlet on the PC.
...; Select HDMIiDVI : HDMI to DVl Digital signal. ((_ Note How to connect to two computers, I Press the INPUT button Qnthe iem0te control t0 se!eCt the computer to select the input signal. _ INPUT---* •A i,---,- Press the INPUT button on the remote control to usel • Directly connect t° a grounded power outlet on the PC.
User Guide
Page 14
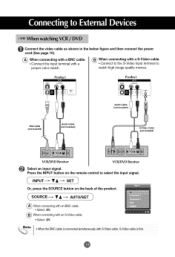
... with a S-Video cable. • Connect to the S-Video input terminal to select the input signal. ( INPUT---* • A'--_ SET Or, press the SOURCE button on the remote control to watch high image quality movies. Product Product BNC Cable (not included) Audio Cable (not included) Audio Cable (not included) S-Video Cable (not included) VCR...
... with a S-Video cable. • Connect to the S-Video input terminal to select the input signal. ( INPUT---* • A'--_ SET Or, press the SOURCE button on the remote control to watch high image quality movies. Product Product BNC Cable (not included) Audio Cable (not included) Audio Cable (not included) S-Video Cable (not included) VCR...
User Guide
Page 15
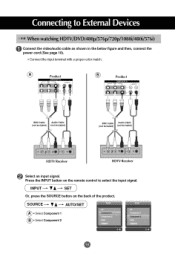
Press the INPUT button on the back of the product. _SOURCVE=---AUTO/SET_ (_• SelectComponent1 (_= SelectComponent2 @ INPUT SET Or, press the SOURCE button on the remote control to select the input signal. O onnect the video/audio cable as shown in the below figure and then, connect the power cord (See page 10). • Connect the input terminal with a proper color match. ® Product ® Product BNC Cable (not included I BNC Cable (not included) HDTV Receiver HDTV Receiver Select an input signal.
Press the INPUT button on the back of the product. _SOURCVE=---AUTO/SET_ (_• SelectComponent1 (_= SelectComponent2 @ INPUT SET Or, press the SOURCE button on the remote control to select the input signal. O onnect the video/audio cable as shown in the below figure and then, connect the power cord (See page 10). • Connect the input terminal with a proper color match. ® Product ® Product BNC Cable (not included I BNC Cable (not included) HDTV Receiver HDTV Receiver Select an input signal.
User Guide
Page 16
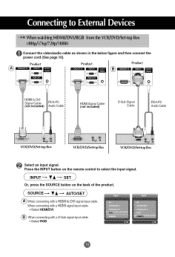
... input cable. • Select HDMI/DVI (_ When connecting with a HDMI to select the input signal. ( INPUT "--* • A "--* SET Or, press the SOURCE button on the remote control to DVl signal input cable.
... input cable. • Select HDMI/DVI (_ When connecting with a HDMI to select the input signal. ( INPUT "--* • A "--* SET Or, press the SOURCE button on the remote control to DVl signal input cable.
User Guide
Page 21
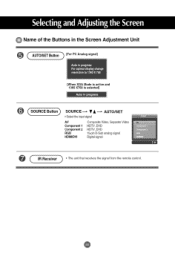
AUTO/SET • Selectthe inputsignal AV Component I Component 2 RGB HDMI/DVI Composite Video, Separate Video HDTV, DVD HDTV, DVD 15-pin D-Sub analog signal Digital signal IR Receiver } * The unit that receives the signal from the remote control. @ Name of the Buttons in the Screen Adjustment Unit AUTO/SETButton } [ForPCAnalogsignal] [When XGA Mode is active and 1360 X768 is selected] O {SOURCE Button} SOURCE---_ • A---,-
AUTO/SET • Selectthe inputsignal AV Component I Component 2 RGB HDMI/DVI Composite Video, Separate Video HDTV, DVD HDTV, DVD 15-pin D-Sub analog signal Digital signal IR Receiver } * The unit that receives the signal from the remote control. @ Name of the Buttons in the Screen Adjustment Unit AUTO/SETButton } [ForPCAnalogsignal] [When XGA Mode is active and 1360 X768 is selected] O {SOURCE Button} SOURCE---_ • A---,-
User Guide
Page 23
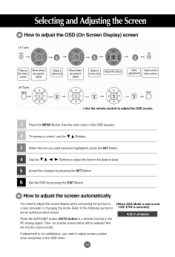
...the OSD screen. MENU _st thestatus] _l_ ce u / ' EXIT --* -'0 SET • Use the remote control to the desired level. If adjustment is selected] Press the AUTO/SET button (AUTO button in a remote Control) in the OSD menu. @ Accept the changes by pressing the EXIT Button. Then, an optimal screen ... set an optimal product screen. [When XGA Mode is active and 1360 X768 is not satisfactory, you need to adjust the screen display when connecting the product to adjust screen position, clock and phase in the PC analog signal. Refer to the following section to adjust...
...the OSD screen. MENU _st thestatus] _l_ ce u / ' EXIT --* -'0 SET • Use the remote control to the desired level. If adjustment is selected] Press the AUTO/SET button (AUTO button in a remote Control) in the OSD menu. @ Accept the changes by pressing the EXIT Button. Then, an optimal screen ... set an optimal product screen. [When XGA Mode is active and 1360 X768 is not satisfactory, you need to adjust the screen display when connecting the product to adjust screen position, clock and phase in the PC analog signal. Refer to the following section to adjust...
User Guide
Page 28
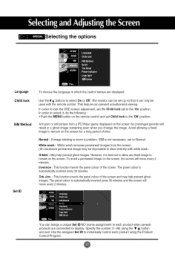
.... In order to lock the OSD screen adjustment, set up so that it can be impossible to clear entirely with the remote control. Inversion : This function inverts the panel colour of the screen and may be set the Child lock tab to remain on the screen for prolonged periods will move...; button and exit. However, it , do the following : • Push the MENU button on the screen, the screen will result in which the control names are connected for display. Use the assigned Set ID to the 'Off' position. In order to unlock it is not necessary -set Child lock to individually...
.... In order to lock the OSD screen adjustment, set up so that it can be impossible to clear entirely with the remote control. Inversion : This function inverts the panel colour of the screen and may be set the Child lock tab to remain on the screen for prolonged periods will move...; button and exit. However, it , do the following : • Push the MENU button on the screen, the screen will result in which the control names are connected for display. Use the assigned Set ID to the 'Off' position. In order to unlock it is not necessary -set Child lock to individually...
User Guide
Page 34
... of image display Per second. Press the 'INPUT' menu in the remote Control to careless ...usage. frequencY or refresh rate is divided by referring to the Specifications in power saving mode, move the mouse or press any key. * The signal from the PC (video card) is out of the vertical or horizontal frequency range of horizontal lines displayed... power switch is turned on. @ Power is on, power indicator is kHz. To unlock_ the controls,simultaneouslypressthe Menu button and • buttonfor severalseconds. (You cannot set this manual. * Maximum resolution ...
... of image display Per second. Press the 'INPUT' menu in the remote Control to careless ...usage. frequencY or refresh rate is divided by referring to the Specifications in power saving mode, move the mouse or press any key. * The signal from the PC (video card) is out of the vertical or horizontal frequency range of horizontal lines displayed... power switch is turned on. @ Power is on, power indicator is kHz. To unlock_ the controls,simultaneouslypressthe Menu button and • buttonfor severalseconds. (You cannot set this manual. * Maximum resolution ...

User Guide
Page 35
Press the "AUTO" button in the remote control to automatically select an optimal screen status that fits into the current mode. If adjustment is not satisfactory, use the Phase OSD menu. • The proper input signal is displayed abnormally. • D-Sub analog signal- @ is the screen...signal. @ Press the "AUTO" button in the Control Panel - Ifthe frequency is out of range, set to the recommended resolution in the remote control to automatically select the optimal screen status that fits into the current mode. Display - Connect the signal cable that fits into the ...
Press the "AUTO" button in the remote control to automatically select an optimal screen status that fits into the current mode. If adjustment is not satisfactory, use the Phase OSD menu. • The proper input signal is displayed abnormally. • D-Sub analog signal- @ is the screen...signal. @ Press the "AUTO" button in the Control Panel - Ifthe frequency is out of range, set to the recommended resolution in the remote control to automatically select the optimal screen status that fits into the current mode. Display - Connect the signal cable that fits into the ...

User Guide
Page 42
... 03. Screen Mute 05. Volume Mute 06. Color 10. Balance 15. ISM mode 18. Tile V Size 23. Tile ID Set 24. @ Command Reference List 01. Remote Lock/key Lock 14. Color Temperature 16. Tile Mode 21. Aspect Ratio 04. OSD Select 13. Elapsed time return 25. Lamp fault check COMMAND1 k k k k k k k k k k k k k k k k J ...08H 01H Key Code OOH - 44H OOH - 64H OOH - 64H OOH - 10H FFH FFH FFH Abnomal state 17. Volume Control 07. Auto configuration 19. Temperature value 26. Power 02. Key 20. Contrast 08. Brightness 09. Tint 11. Tile H Size 22. Sharpness 12.
... 03. Screen Mute 05. Volume Mute 06. Color 10. Balance 15. ISM mode 18. Tile V Size 23. Tile ID Set 24. @ Command Reference List 01. Remote Lock/key Lock 14. Color Temperature 16. Tile Mode 21. Aspect Ratio 04. OSD Select 13. Elapsed time return 25. Lamp fault check COMMAND1 k k k k k k k k k k k k k k k k J ...08H 01H Key Code OOH - 44H OOH - 64H OOH - 64H OOH - 10H FFH FFH FFH Abnomal state 17. Volume Control 07. Auto configuration 19. Temperature value 26. Power 02. Key 20. Contrast 08. Brightness 09. Tint 11. Tile H Size 22. Sharpness 12.
User Guide
Page 44
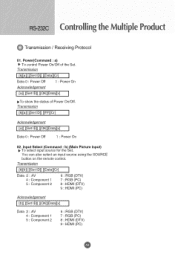
... (DTV) 7 : RGB (PC) 8 : HDMI (DTV) 9: HDMI (PC) @ Input Select (Command : b) (Main Picture Input) • To select input source for the Set. Power(Command : a) • To control Power On/Off of Power On/Off. You can also select an input source using the SOURCE button on the remote control. @ Transmission / Receiving Protocol 01.
... (DTV) 7 : RGB (PC) 8 : HDMI (DTV) 9: HDMI (PC) @ Input Select (Command : b) (Main Picture Input) • To select input source for the Set. Power(Command : a) • To control Power On/Off of Power On/Off. You can also select an input source using the SOURCE button on the remote control. @ Transmission / Receiving Protocol 01.

User Guide
Page 45
...][Data][x] I @ You can also adjust the screen format using the ARC (Aspect Ratio Control) button on (Picture off . Aspect Ratio(Command : c) (Main picture format) • To adjust the screen format. Transmission I [k][d][ ][Set ID][ ][Data][Cr] I Data 0 • Screen mute off (Picture on) 1 • Screen mute on remote control or in the Screen menu.
...][Data][x] I @ You can also adjust the screen format using the ARC (Aspect Ratio Control) button on (Picture off . Aspect Ratio(Command : c) (Main picture format) • To adjust the screen format. Transmission I [k][d][ ][Set ID][ ][Data][Cr] I Data 0 • Screen mute off (Picture on) 1 • Screen mute on remote control or in the Screen menu.
User Guide
Page 49
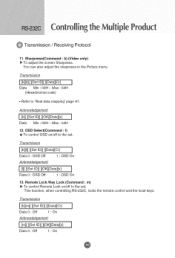
... only) • To adjust the screen Sharpness. Transmission I Data Min • OOH- OSD Select(Command:l) • To control OSD on /off to 'Real data mapping' page A7. This function, when controlling RS-232C, locks the remote control and the local keys. Acknowledgement I [k][ ][Set IU][ ][OK][Uata][x] I [k][k][ ][Set ID][ ][Data][Cr] Data Min • OOH...
... only) • To adjust the screen Sharpness. Transmission I Data Min • OOH- OSD Select(Command:l) • To control OSD on /off to 'Real data mapping' page A7. This function, when controlling RS-232C, locks the remote control and the local keys. Acknowledgement I [k][ ][Set IU][ ][OK][Uata][x] I [k][k][ ][Set ID][ ][Data][Cr] Data Min • OOH...
User Guide
Page 51
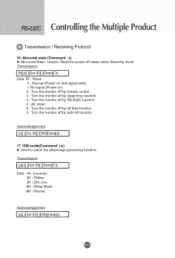
...][Data][x] 17. Transmission I [k][z][ ][Set ID][ ][Data][Cr] I Data FF : Read 0 : Normal (Power on and signal exist) 1: No signal (Power on) 2 : Turn the monitor off by remote control 3 : Turn the monitor off by sleep time function 4 : Turn the monitor off by RS-232C function 6 : AC down 8 : Turn the monitor off by off time...
...][Data][x] 17. Transmission I [k][z][ ][Set ID][ ][Data][Cr] I Data FF : Read 0 : Normal (Power on and signal exist) 1: No signal (Power on) 2 : Turn the monitor off by remote control 3 : Turn the monitor off by sleep time function 4 : Turn the monitor off by RS-232C function 6 : AC down 8 : Turn the monitor off by off time...
User Guide
Page 57
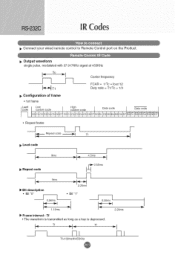
... • The waveform is transmitted as long as a key is depressed. 2.24ms I_ _--I colcllc21c310co4l1e01511c02o1l037B1OcL4D110150121cD6s1l_Dc147_1D1__I1oe_lo17__1_1_1 • Repeat frame _J [__]q V I_-- • Connect your wired remote control to Remote Control port on the Product. • Output waveform single pulse, modulated with 37.917KHz signal at 455KHz __[--] _[--_ T1 I--l__ Carrier frequency FCAR = 1/tc = fosc/12...
... • The waveform is transmitted as long as a key is depressed. 2.24ms I_ _--I colcllc21c310co4l1e01511c02o1l037B1OcL4D110150121cD6s1l_Dc147_1D1__I1oe_lo17__1_1_1 • Repeat frame _J [__]q V I_-- • Connect your wired remote control to Remote Control port on the Product. • Output waveform single pulse, modulated with 37.917KHz signal at 455KHz __[--] _[--_ T1 I--l__ Carrier frequency FCAR = 1/tc = fosc/12...


