
User Guide
Page 3
... is easily accessible after plugging into one end of thunder and lightning, never touch the power cord and signal cable because it is connected to operate. Use a power bar with a grounding terminal designed for a long time, unplug the power cable from the product. - Additionally, do not touch the power cable right after installation. • Main power breaker is the power cord and this breaking device must be located at a location where...
... is easily accessible after plugging into one end of thunder and lightning, never touch the power cord and signal cable because it is connected to operate. Use a power bar with a grounding terminal designed for a long time, unplug the power cable from the product. - Additionally, do not touch the power cable right after installation. • Main power breaker is the power cord and this breaking device must be located at a location where...

User Guide
Page 4
... closely. • Set the appropriate resolution and clock by referring to prevent scratching. Contact with the service center for check, calibration or repair. • When cleaning the brown tube surface, unplug the power cord and scrub with general household waste. Do not clean with soft cloth to the User's Guide...product-packing box. The water can sink into the product, which can cause electric shock or fire. If you look at all times. • Take a comfortable and natural position when working with a product for a long time. • Do not press strongly upon the panel with a...
... closely. • Set the appropriate resolution and clock by referring to prevent scratching. Contact with the service center for check, calibration or repair. • When cleaning the brown tube surface, unplug the power cord and scrub with general household waste. Do not clean with soft cloth to the User's Guide...product-packing box. The water can sink into the product, which can cause electric shock or fire. If you look at all times. • Take a comfortable and natural position when working with a product for a long time. • Do not press strongly upon the panel with a...
User Guide
Page 5
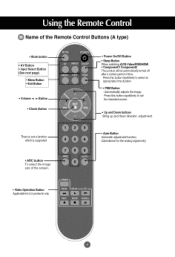
... analog signal only) • ARC button To select the image size of the Remote Control Buttons (A type) • Mute button • Volume < • Button • Check Button There is not a function which is supported Power On/Off Button Button WChoemn pwoantcehnitn1g/CAoVm/Sp-oVnideneto2/RGB/HDMI The productwill be automaticallyturned off after a certain periodof time. Pressthis button repetitivelyto select an appropriatetime duration Button - Pressthis buttonrepetitivelyto set the intended screen. Name of the screen. • Video Operation Button...
... analog signal only) • ARC button To select the image size of the Remote Control Buttons (A type) • Mute button • Volume < • Button • Check Button There is not a function which is supported Power On/Off Button Button WChoemn pwoantcehnitn1g/CAoVm/Sp-oVnideneto2/RGB/HDMI The productwill be automaticallyturned off after a certain periodof time. Pressthis button repetitivelyto select an appropriatetime duration Button - Pressthis buttonrepetitivelyto set the intended screen. Name of the screen. • Video Operation Button...
User Guide
Page 7
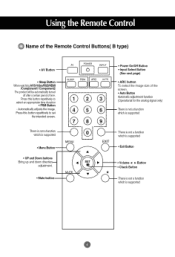
... and down direction._ adjustment. / • Mute button_ MUI -( -- * Volume _ • Button • Check Button There is not a function which is supported -- There is not a function which is supported @ @ Name of the screen. • Auto Button Automatic adjustment function (Operationalfor the analog signal only) ®i ®i -- iF-o-_q _m • Power On/Off Button • Input Select Button (See next page) • Sleep Button WhenwatchinAg V/S-Video/RGB/HDMI _[[_ (_l_ /Component1/Component2...
... and down direction._ adjustment. / • Mute button_ MUI -( -- * Volume _ • Button • Check Button There is not a function which is supported -- There is not a function which is supported @ @ Name of the screen. • Auto Button Automatic adjustment function (Operationalfor the analog signal only) ®i ®i -- iF-o-_q _m • Power On/Off Button • Input Select Button (See next page) • Sleep Button WhenwatchinAg V/S-Video/RGB/HDMI _[[_ (_l_ /Component1/Component2...

User Guide
Page 11
... incompatible adapter s ava abe n the market. (D fferent s gna ng system) Rear side of the product. PC _ Connect the Audio cable, Rear side of the product. O First of the product. @ Connect the power cord. PC Rear side of all, see if the computer, product and the peripherals are turned off. Then, connect the signal input cable. 1_ When connecting with the D-Sub signal input cable. (_) When connecting with the HDMI to DVI signal input cable...
... incompatible adapter s ava abe n the market. (D fferent s gna ng system) Rear side of the product. PC _ Connect the Audio cable, Rear side of the product. O First of the product. @ Connect the power cord. PC Rear side of all, see if the computer, product and the peripherals are turned off. Then, connect the signal input cable. 1_ When connecting with the D-Sub signal input cable. (_) When connecting with the HDMI to DVI signal input cable...
User Guide
Page 12
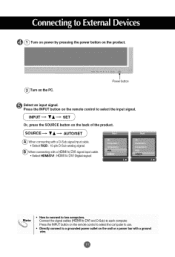
... the SOURCE button on the PC. _(_ Turn on power by pressing the power button on the product. (_Turn on the back of the product. _SOURCE---* • A---* AUTO/SET (_ When connecting with a D-Sub signal input cable. • Select RGB : 15-pin D-Sub analog signal. (_)When connecting with a ground wre, @ f Power button _ Select an input signal. Press the INPUT button on the wall or a power bar with a HDMI to DVl signal input cable. • Select HDMIiDVI : HDMI to DVl Digital signal. ((_ Note...
... the SOURCE button on the PC. _(_ Turn on power by pressing the power button on the product. (_Turn on the back of the product. _SOURCE---* • A---* AUTO/SET (_ When connecting with a D-Sub signal input cable. • Select RGB : 15-pin D-Sub analog signal. (_)When connecting with a ground wre, @ f Power button _ Select an input signal. Press the INPUT button on the wall or a power bar with a HDMI to DVl signal input cable. • Select HDMIiDVI : HDMI to DVl Digital signal. ((_ Note...
User Guide
Page 14
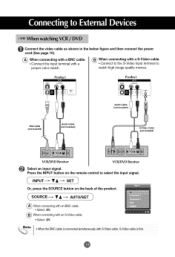
.... Product Product BNC Cable (not included) Audio Cable (not included) Audio Cable (not included) S-Video Cable (not included) VCR/DVD Receiver VCRiDVD Receiver Select an input signal. SOURCE---_ • A---_ AUTO/SET (_) Whenconnecting with a S-Video cable. • Connect to the S-Video input terminal to select the input signal. ( INPUT---* • A'--_ SET Or, press the SOURCE button on the remote control to watch high image quality movies. O Connect the video cable as shown in the below figure and then connect the power cord (See page 10...
.... Product Product BNC Cable (not included) Audio Cable (not included) Audio Cable (not included) S-Video Cable (not included) VCR/DVD Receiver VCRiDVD Receiver Select an input signal. SOURCE---_ • A---_ AUTO/SET (_) Whenconnecting with a S-Video cable. • Connect to the S-Video input terminal to select the input signal. ( INPUT---* • A'--_ SET Or, press the SOURCE button on the remote control to watch high image quality movies. O Connect the video cable as shown in the below figure and then connect the power cord (See page 10...
User Guide
Page 15
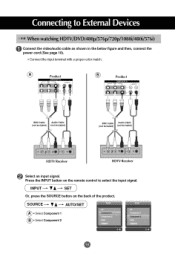
O onnect the video/audio cable as shown in the below figure and then, connect the power cord (See page 10). • Connect the input terminal with a proper color match. ® Product ® Product BNC Cable (not included I BNC Cable (not included) HDTV Receiver HDTV Receiver Select an input signal. Press the INPUT button on the back of the product. _SOURCVE=---AUTO/SET_ (_• SelectComponent1 (_= SelectComponent2 @ INPUT SET Or, press the SOURCE button on the remote control to select the input signal.
O onnect the video/audio cable as shown in the below figure and then, connect the power cord (See page 10). • Connect the input terminal with a proper color match. ® Product ® Product BNC Cable (not included I BNC Cable (not included) HDTV Receiver HDTV Receiver Select an input signal. Press the INPUT button on the back of the product. _SOURCVE=---AUTO/SET_ (_• SelectComponent1 (_= SelectComponent2 @ INPUT SET Or, press the SOURCE button on the remote control to select the input signal.
User Guide
Page 16
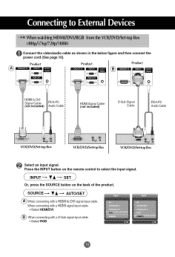
... signal input cable. Product Product Product @_ HDMI to select the input signal. ( INPUT "--* • A "--* SET Or, press the SOURCE button on the remote control to DVl Signal Cable (not included) :{CA-PC Audio Cable HDMI Signal Cable (not included) D-Sub Signal Cable RCA-PC Audio Cable VCRiDVD/Set-top Box VCR/DVD/Set-top Box VCR/DVD/Set-top Box _ Select an input signal. Press the INPUT button on the back of the product. O ® Connect the video/audio cable as shown in the below figure and then connect the power cord...
... signal input cable. Product Product Product @_ HDMI to select the input signal. ( INPUT "--* • A "--* SET Or, press the SOURCE button on the remote control to DVl Signal Cable (not included) :{CA-PC Audio Cable HDMI Signal Cable (not included) D-Sub Signal Cable RCA-PC Audio Cable VCRiDVD/Set-top Box VCR/DVD/Set-top Box VCR/DVD/Set-top Box _ Select an input signal. Press the INPUT button on the back of the product. O ® Connect the video/audio cable as shown in the below figure and then connect the power cord...
User Guide
Page 19
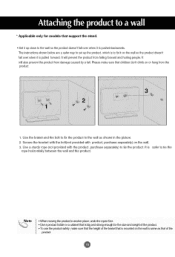
...hurting people. The instructions shown below are a safer way to set up close to tie the rope horizontaliy between the wall and the product, Note ''When movingthe producttoanoherplacel Undothe ropesfirsL ,,use a productholderor a Cabinetthat isbigand strong enoughfor the size and weight Ofthe pioducL ....... ...Use the braket and the bolt to fix the product to the wall as that support the stand. • Set it up the product, which is to fix it on thewa!l issame as shown in the picture, 2, Secure the bracket with the bolt(not provided with product, purchase separately) on the wall, 3, Use...
...hurting people. The instructions shown below are a safer way to set up close to tie the rope horizontaliy between the wall and the product, Note ''When movingthe producttoanoherplacel Undothe ropesfirsL ,,use a productholderor a Cabinetthat isbigand strong enoughfor the size and weight Ofthe pioducL ....... ...Use the braket and the bolt to fix the product to the wall as that support the stand. • Set it up the product, which is to fix it on thewa!l issame as shown in the picture, 2, Secure the bracket with the bolt(not provided with product, purchase separately) on the wall, 3, Use...
User Guide
Page 23
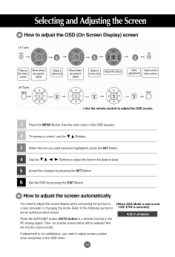
...; 4 I_ Buttons to adjust the item to set an optimal product screen. [When XGA Mode is active and 1360 X768 is not satisfactory, you need to adjust the screen display when connecting the product to adjust screen position, clock and phase in the PC analog signal. If adjustment is selected] Press the AUTO/SET button (AUTO button in a remote Control) in the OSD menu. @ How to adjust the OSD screen. i l i:iiii_ To access a control, use the ,,Buttons. When the...
...; 4 I_ Buttons to adjust the item to set an optimal product screen. [When XGA Mode is active and 1360 X768 is not satisfactory, you need to adjust the screen display when connecting the product to adjust screen position, clock and phase in the PC analog signal. If adjustment is selected] Press the AUTO/SET button (AUTO button in a remote Control) in the OSD menu. @ How to adjust the OSD screen. i l i:iiii_ To access a control, use the ,,Buttons. When the...

User Guide
Page 26
... To adjust uneven sound volumes across all channels or signals automatically to use the user-defined audio settings. To use your external hi-fi stereo system, turn off the internal speakers of the set. ((_ Note I when connected to balance sound from the left and right speakers. Speaker You can not be selectedautomaticallydependingon the video typethat you want to use this function to your compute_ and the 'SSM' setting in the audio menu is Flat...
... To adjust uneven sound volumes across all channels or signals automatically to use the user-defined audio settings. To use your external hi-fi stereo system, turn off the internal speakers of the set. ((_ Note I when connected to balance sound from the left and right speakers. Speaker You can not be selectedautomaticallydependingon the video typethat you want to use this function to your compute_ and the 'SSM' setting in the audio menu is Flat...

User Guide
Page 27
... use • • button to set must be in standby mode for the On time to work, i When On time is Operated, input Screen is tume d on the clock is incorrect, reset the clock manually. 1) Press the MENU button and then use • • button to select the TIME menu. 2) Press the • button and then use • • button to select the Clock menu. 3) Press the • button and then use • • button to set...
... use • • button to set must be in standby mode for the On time to work, i When On time is Operated, input Screen is tume d on the clock is incorrect, reset the clock manually. 1) Press the MENU button and then use • • button to select the TIME menu. 2) Press the • button and then use • • button to select the Clock menu. 3) Press the • button and then use • • button to set...
User Guide
Page 28
... remote control. The panel colour is not necessary -set up so that it , do the following : • Push the MENU button on the screen for a long period of time. In order to lock the OSD screen adjustment, set Child lock to the 'On' position. Normal : If image sticking is never a problem, ISM is automatically inverted every 30 minutes. White wash : White wash removes permanent images from a PC/Video game displayed...
... remote control. The panel colour is not necessary -set up so that it , do the following : • Push the MENU button on the screen for a long period of time. In order to lock the OSD screen adjustment, set Child lock to the 'On' position. Normal : If image sticking is never a problem, ISM is automatically inverted every 30 minutes. White wash : White wash removes permanent images from a PC/Video game displayed...

User Guide
Page 29
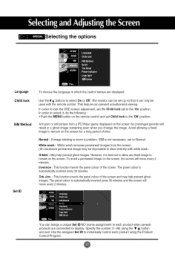
... settings will be displayed with various other products. - Selecting the options • To use this function - Must be in a function that can be connected to RS-232C or RGB Out Tile mode It is also available as well as configuration of the current product to set location. * Only after pressing the SET button the adjustments made to view screen. • Tile Mode Tile mode...
... settings will be displayed with various other products. - Selecting the options • To use this function - Must be in a function that can be connected to RS-232C or RGB Out Tile mode It is also available as well as configuration of the current product to set location. * Only after pressing the SET button the adjustments made to view screen. • Tile Mode Tile mode...
User Guide
Page 34
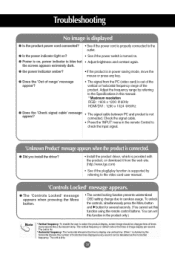
... by referring to the Specifications in the remote Control to display one vertical line. g msthe product power cord connected? • See if the power cord is properly connected to careless usage. Adjust the frequency range by the horizontal interval, the number of the product. Check the signal cable. To unlock_ the controls,simultaneouslypressthe Menu button and • buttonfor severalseconds. (You cannot set this manual. * Maximum resolution RGB : 1600 x 1200 @60Hz...
... by referring to the Specifications in the remote Control to display one vertical line. g msthe product power cord connected? • See if the power cord is properly connected to careless usage. Adjust the frequency range by the horizontal interval, the number of the product. Check the signal cable. To unlock_ the controls,simultaneouslypressthe Menu button and • buttonfor severalseconds. (You cannot set this manual. * Maximum resolution RGB : 1600 x 1200 @60Hz...

User Guide
Page 35
... into the current mode. Press the "AUTO" button in the remote control to the recommended resolution in the Control Panel - If adjustment is not satisfactory, use the Position OSD menu. • See if the video card resolution and frequency are supported by the product. Setting menu. • D-Sub analog signal- Connect the signal cable that fits into the current mode. Display - Press the "AUTO" button in the remote control to automatically select an optimal screen status that fits...
... into the current mode. Press the "AUTO" button in the remote control to the recommended resolution in the Control Panel - If adjustment is not satisfactory, use the Position OSD menu. • See if the video card resolution and frequency are supported by the product. Setting menu. • D-Sub analog signal- Connect the signal cable that fits into the current mode. Display - Press the "AUTO" button in the remote control to automatically select an optimal screen status that fits...

User Guide
Page 36
Display- O Do bmackspots appear on the screen? • Several pixels (red, green, white or black color) may appear on the screen, which can be attributable to more than 24 bits (true color) Select Control Panel - O No sound? • See if the audio cable is connected properly. • Adjust the volume. • See if the sound is unstable or monoo • Check the connection status of the signal cable. colored. Color Table menu in Windows. @ Screen color is set properly...
Display- O Do bmackspots appear on the screen? • Several pixels (red, green, white or black color) may appear on the screen, which can be attributable to more than 24 bits (true color) Select Control Panel - O No sound? • See if the audio cable is connected properly. • Adjust the volume. • See if the sound is unstable or monoo • Check the connection status of the signal cable. colored. Color Table menu in Windows. @ Screen color is set properly...
User Guide
Page 37
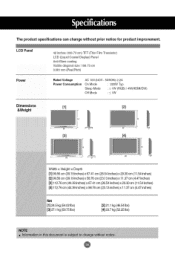
Sleep Mode : _ LCD Panel 42 inches (106.73 cm) TFT (Thin FilmTransistor) LCD (Liquid Crystal Display)Panel Anti-Glare coating Visiblediagonalsize: 106.73cm 0.681mm (PixelPitch) Power Rated Voltage Power Consumption AC 100-240V- 50/60Hz 2.2A On Mode : 220WTyp. The product specifications can change without prior notice for product improvement.
Sleep Mode : _ LCD Panel 42 inches (106.73 cm) TFT (Thin FilmTransistor) LCD (Liquid Crystal Display)Panel Anti-Glare coating Visiblediagonalsize: 106.73cm 0.681mm (PixelPitch) Power Rated Voltage Power Consumption AC 100-240V- 50/60Hz 2.2A On Mode : 220WTyp. The product specifications can change without prior notice for product improvement.

User Guide
Page 41
... can turn the product on/off, select an input source or adjust the OSD menu from your PC. RS-232C Cable (not included) PC monitor 1 monitor 2 monitor 3 monitor 4 @ Communication Parameter • Baud Rate : 9600bps (UART) • Data Length : 8bits • Parity Bit : None • Stop Bit : 1bit • Flow Control : None • Communication Code : ASCII code @ Use this method to connect several products at a time by connecting...
... can turn the product on/off, select an input source or adjust the OSD menu from your PC. RS-232C Cable (not included) PC monitor 1 monitor 2 monitor 3 monitor 4 @ Communication Parameter • Baud Rate : 9600bps (UART) • Data Length : 8bits • Parity Bit : None • Stop Bit : 1bit • Flow Control : None • Communication Code : ASCII code @ Use this method to connect several products at a time by connecting...


