
Owner's Manual (English)
Page 8
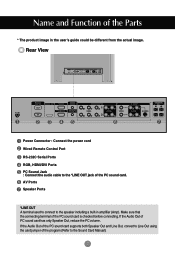
... has only Speaker Out, reduce the PC volume. AV Ports Speaker Ports *LINE OUT A terminal used to connect to the speaker including a built-in the user's guide could be different from the actual image. If the Audio Out of the PC sound card is checked before connecting. If the Audio Out... of the PC sound card supports both Speaker Out and Line Out, convert to the Sound Card Manual). 7 Rear View AV IN/OUT Power Connector : Connect the power cord Wired Remote Control Port RS-232C Serial Ports RGB, HDMI/DVI Ports PC Sound...
... has only Speaker Out, reduce the PC volume. AV Ports Speaker Ports *LINE OUT A terminal used to connect to the speaker including a built-in the user's guide could be different from the actual image. If the Audio Out of the PC sound card is checked before connecting. If the Audio Out... of the PC sound card supports both Speaker Out and Line Out, convert to the Sound Card Manual). 7 Rear View AV IN/OUT Power Connector : Connect the power cord Wired Remote Control Port RS-232C Serial Ports RGB, HDMI/DVI Ports PC Sound...

Owner's Manual (English)
Page 21
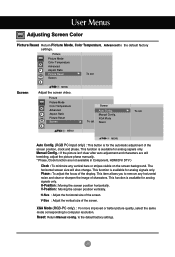
Then optimal screen settings will be selected that fit into the current mode. User Menus How to adjust the OSD (On Screen Display) screen Pops up the menu screen Move where you want to adjust Select a menu icon Move where you want becomes highlighted, press the SET Button. 4 ... the MENU Button, then the main menu of the OSD appears. 2 To access a control, use the Buttons. 3 When the icon you can adjust the screen manually. [When XGA Mode is active and 1360 X768 is selected] 20 How to the desired level. 5 Accept the changes by pressing the SET Button. 6 Exit...
Then optimal screen settings will be selected that fit into the current mode. User Menus How to adjust the OSD (On Screen Display) screen Pops up the menu screen Move where you want to adjust Select a menu icon Move where you want becomes highlighted, press the SET Button. 4 ... the MENU Button, then the main menu of the OSD appears. 2 To access a control, use the Buttons. 3 When the icon you can adjust the screen manually. [When XGA Mode is active and 1360 X768 is selected] 20 How to the desired level. 5 Accept the changes by pressing the SET Button. 6 Exit...
Owner's Manual (English)
Page 26
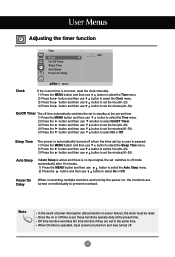
...still trembling, adjust the picture phase manually. * Phase, Clock function are not available in Component, HDMI/DVI DTV.) Clock : To minimize any horizontal noise and clear or sharpen the image of the screen. H-Size : Adjust the horizontal size of the display. to computer resolution. XGA Mode ...(RGB-PC only). : For more improved or better picture quality, select the same mode corresponding to the default factory settings. 25 User Menus Adjusting Screen Color Picture Reset Return Picture Mode, Color Temperature, Advanced to remove any vertical bars or stripes visible on the screen...
...still trembling, adjust the picture phase manually. * Phase, Clock function are not available in Component, HDMI/DVI DTV.) Clock : To minimize any horizontal noise and clear or sharpen the image of the screen. H-Size : Adjust the horizontal size of the display. to computer resolution. XGA Mode ...(RGB-PC only). : For more improved or better picture quality, select the same mode corresponding to the default factory settings. 25 User Menus Adjusting Screen Color Picture Reset Return Picture Mode, Color Temperature, Advanced to remove any vertical bars or stripes visible on the screen...
Owner's Manual (English)
Page 28
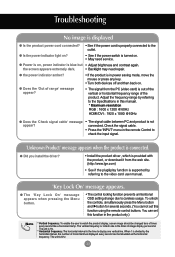
Sleep Time The power is automatically turned off when the time set by a user is passed. 1) Press the MENU button and then use button to select the ... button to select the Auto Sleep menu. 2) Press the button and then use button to set the minutes(00~59). User Menus Adjusting the timer function Time Clock On/Off Timer Sleep Time Auto Sleep Power On Delay _ _ : _ _... AM MENU Clock If the current time is incorrect, reset the clock manually. 1) Press the MENU button and then use button to select the Time menu. 2) Press the button and then use button...
Sleep Time The power is automatically turned off when the time set by a user is passed. 1) Press the MENU button and then use button to select the ... button to select the Auto Sleep menu. 2) Press the button and then use button to set the minutes(00~59). User Menus Adjusting the timer function Time Clock On/Off Timer Sleep Time Auto Sleep Power On Delay _ _ : _ _... AM MENU Clock If the current time is incorrect, reset the clock manually. 1) Press the MENU button and then use button to select the Time menu. 2) Press the button and then use button...
Owner's Manual (English)
Page 34
...to display one vertical line. The unit is Hz. * Horizontal frequency: The horizontal interval is the time to check the input signal. 'Unknown Product' message appears when the product is connected. G the power indicator amber? Adjust the frequency range by referring to the video card user manual....://www.lge.com) • See if the plug&play function is supported by the horizontal interval, the number of horizontal lines displayed every second can set this function in this manual. * Maximum resolution RGB : 1600 x 1200 @60Hz HDMI/DVI : 1920 x 1080 @60Hz G Does the 'Check signal ...
...to display one vertical line. The unit is Hz. * Horizontal frequency: The horizontal interval is the time to check the input signal. 'Unknown Product' message appears when the product is connected. G the power indicator amber? Adjust the frequency range by referring to the video card user manual....://www.lge.com) • See if the plug&play function is supported by the horizontal interval, the number of horizontal lines displayed every second can set this function in this manual. * Maximum resolution RGB : 1600 x 1200 @60Hz HDMI/DVI : 1920 x 1080 @60Hz G Does the 'Check signal ...

