
Owner's Manual
Page 6
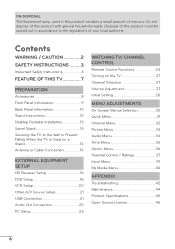
...Setup 18 VCR Setup 20 Other A/V Source Setup 21 USB Connection 21 Audio Out Connection 22 PC Setup 23 WATCHING TV/ CHANNEL CONTROL Remote Control Functions 25 Turning on the TV 27 Channel Selection 27 Volume Adjustment 27 Initial Setting 28 MENU ADJUSTMENTS On-Screen Menus Selection 30 Quick... Menu 31 Channel Menu 32 Picture Menu 33 Audio Menu 34 Time Menu 35 Option Menu 36 Parental Control / Ratings 37 Input Menu 39 My Media Menu 40 APPENDIX Troubleshooting 42 Maintenance 44 Product Specifications 45 Open Source License 46 6 ...
...Setup 18 VCR Setup 20 Other A/V Source Setup 21 USB Connection 21 Audio Out Connection 22 PC Setup 23 WATCHING TV/ CHANNEL CONTROL Remote Control Functions 25 Turning on the TV 27 Channel Selection 27 Volume Adjustment 27 Initial Setting 28 MENU ADJUSTMENTS On-Screen Menus Selection 30 Quick... Menu 31 Channel Menu 32 Picture Menu 33 Audio Menu 34 Time Menu 35 Option Menu 36 Parental Control / Ratings 37 Input Menu 39 My Media Menu 40 APPENDIX Troubleshooting 42 Maintenance 44 Product Specifications 45 Open Source License 46 6 ...

Owner's Manual
Page 8
If an accessory is missing, please contact the dealer where you purchased the TV. Owner's Manual CD Manual 1.5V 1.5V Remote Control, Batteries (AAA) Polishing Cloth Power cable x 8 (M4 x 12mm) Stand screws (T4 x 20mm) Safety screw Option Extras When using the VGA (D-sub 15 pin cable) PC ...
If an accessory is missing, please contact the dealer where you purchased the TV. Owner's Manual CD Manual 1.5V 1.5V Remote Control, Batteries (AAA) Polishing Cloth Power cable x 8 (M4 x 12mm) Stand screws (T4 x 20mm) Safety screw Option Extras When using the VGA (D-sub 15 pin cable) PC ...

Owner's Manual
Page 9
The floor or the product may be damaged. 9 CHANNEL buttons VOLUME buttons ENTER button HOME button INPUT button POWER button Speaker Power/Standby Indicator Remote Control Sensor NOTE a Do not step on the glass stand or subject it to any impact.It may break, causing possible injury from your TV. a Do not drag the TV. PREPARATION Front Panel Information r Image shown may differ from fragments of glass, or the TV may fall.
The floor or the product may be damaged. 9 CHANNEL buttons VOLUME buttons ENTER button HOME button INPUT button POWER button Speaker Power/Standby Indicator Remote Control Sensor NOTE a Do not step on the glass stand or subject it to any impact.It may break, causing possible injury from your TV. a Do not drag the TV. PREPARATION Front Panel Information r Image shown may differ from fragments of glass, or the TV may fall.
Owner's Manual
Page 16
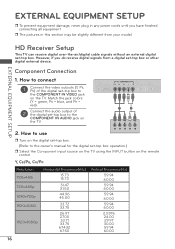
....00 16 How to connect 1 Connect the video outputs (Y, PB, PR) of the digital set-top box to the COMPONENT IN AUDIO jack on the remote control. Match the jack colors (Y = green, PB = blue, and PR = red). 2 Connect the audio output of the digital set-top box to the owner's manual for...
....00 16 How to connect 1 Connect the video outputs (Y, PB, PR) of the digital set-top box to the COMPONENT IN AUDIO jack on the remote control. Match the jack colors (Y = green, PB = blue, and PR = red). 2 Connect the audio output of the digital set-top box to the owner's manual for...

Owner's Manual
Page 17
... audio and video. 2. How to use the latest cables that support High Speed HDMI. How to HDMI/DVI IN 1, 2, or 3* jack on the remote control. * HDMI 3: For 42LV4400, 47LV4400, 55LV4400 HDMI OUTPUT 1 NOTE a If an HDMI cable doesn't support High Speed HDMI, it can cause flickers or no screen display. In this case...
... audio and video. 2. How to use the latest cables that support High Speed HDMI. How to HDMI/DVI IN 1, 2, or 3* jack on the remote control. * HDMI 3: For 42LV4400, 47LV4400, 55LV4400 HDMI OUTPUT 1 NOTE a If an HDMI cable doesn't support High Speed HDMI, it can cause flickers or no screen display. In this case...
Owner's Manual
Page 18
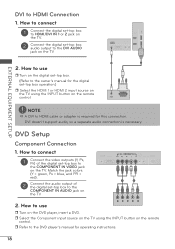
... (Y = green, PB = blue, and PR = red). 2 Connect the audio output of the digital set -top box audio output to the DVI AUDIO jack on the remote control. DVD Setup Component Connection 1. How to use r Turn on the digital set-top box. (Refer to the owner's manual for the digital set -top box...-top box to HDMI/DVI IN 1 or 2 jack on the TV. 2 Connect the digital set -top box to the COMPONENT IN VIDEO jack on the remote control. 2 1 AUDIO DVI OUTPUT EXTERNAL EQUIPMENT SETUP NOTE a A DVI to the COMPONENT IN AUDIO jack on the DVD player, insert a DVD. How to the DVD player...
... (Y = green, PB = blue, and PR = red). 2 Connect the audio output of the digital set -top box audio output to the DVI AUDIO jack on the remote control. DVD Setup Component Connection 1. How to use r Turn on the digital set-top box. (Refer to the owner's manual for the digital set -top box...-top box to HDMI/DVI IN 1 or 2 jack on the TV. 2 Connect the digital set -top box to the COMPONENT IN VIDEO jack on the remote control. 2 1 AUDIO DVI OUTPUT EXTERNAL EQUIPMENT SETUP NOTE a A DVI to the COMPONENT IN AUDIO jack on the DVD player, insert a DVD. How to the DVD player...
Owner's Manual
Page 19
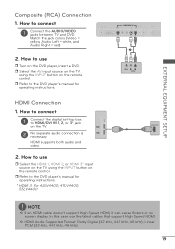
...instructions. In this case use r Select the HDMI 1, HDMI 2, or HDMI 3* input source on the TV using the INPUT button on the remote control. HDMI Connection 1. Match the jack colors (Video = yellow, Audio Left = white, and Audio Right = red) 2. r Select the AV... TV using the INPUT button on the remote control. r Refer to use the latest cables that support High Speed HDMI. EXTERNAL EQUIPMENT SETUP Composite (RCA) Connection 1. How to the DVD player's manual for operating instructions. * HDMI 3: For 42LV4400, 47LV4400, 55LV4400 1 VIDEO L R AUDIO HDMI OUTPUT ...
...instructions. In this case use r Select the HDMI 1, HDMI 2, or HDMI 3* input source on the TV using the INPUT button on the remote control. HDMI Connection 1. Match the jack colors (Video = yellow, Audio Left = white, and Audio Right = red) 2. r Select the AV... TV using the INPUT button on the remote control. r Refer to use the latest cables that support High Speed HDMI. EXTERNAL EQUIPMENT SETUP Composite (RCA) Connection 1. How to the DVD player's manual for operating instructions. * HDMI 3: For 42LV4400, 47LV4400, 55LV4400 1 VIDEO L R AUDIO HDMI OUTPUT ...
Owner's Manual
Page 20
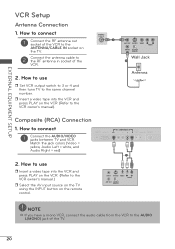
... channel number. Composite (RCA) Connection 1. How to connect 1 Connect the RF antenna out socket of the VCR to the ANTENNA/CABLE IN socket on the remote control. 1 ANT OUT S-VIDEO VIDEO L R AUDIO ANT IN OUTPUT SWITCH Wall Jack 2 Antenna 1 ANT IN S-VIDEO VIDEO L R AUDIO ANT OUT OUTPUT SWITCH NOTE a If you have...
... channel number. Composite (RCA) Connection 1. How to connect 1 Connect the RF antenna out socket of the VCR to the ANTENNA/CABLE IN socket on the remote control. 1 ANT OUT S-VIDEO VIDEO L R AUDIO ANT IN OUTPUT SWITCH Wall Jack 2 Antenna 1 ANT IN S-VIDEO VIDEO L R AUDIO ANT OUT OUTPUT SWITCH NOTE a If you have...

Owner's Manual
Page 21
How to the USB IN jack on the remote control. Match the jack colors. (Video = yellow, Audio Left = white, and Audio Right = red) 2. How to connect 1 Connect the USB device to use the USB function. ...
How to the USB IN jack on the remote control. Match the jack colors. (Video = yellow, Audio Left = white, and Audio Right = red) 2. How to connect 1 Connect the USB device to use the USB function. ...
Owner's Manual
Page 23
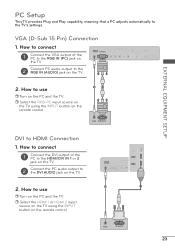
r Select the RGB-PC input source on the TV using the INPUT button on the PC and the TV. How to use r Turn on the remote control. How to connect 1 Connect the VGA output of the PC to the HDMI/DVI IN 1 or 2 jack on the TV. 2 Connect the PC audio output ...to HDMI Connection 1. How to use 2 1 r Turn on the remote control. 2 1 AUDIO RGB OUTPUT DVI to the DVI AUDIO jack on the TV. 2. VGA (D-Sub 15 Pin) Connection 1. r Select the HDMI 1 or HDMI 2 input source on...
r Select the RGB-PC input source on the TV using the INPUT button on the PC and the TV. How to use r Turn on the remote control. How to connect 1 Connect the VGA output of the PC to the HDMI/DVI IN 1 or 2 jack on the TV. 2 Connect the PC audio output ...to HDMI Connection 1. How to use 2 1 r Turn on the remote control. 2 1 AUDIO RGB OUTPUT DVI to the DVI AUDIO jack on the TV. 2. VGA (D-Sub 15 Pin) Connection 1. r Select the HDMI 1 or HDMI 2 input source on...
Owner's Manual
Page 25
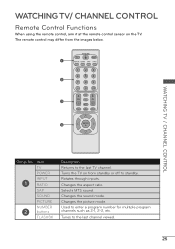
... sound mode. Used to the last channel viewed. 25 WATCHING TV/ CHANNEL CONTROL Remote Control Functions When using the remote control, aim it at the remote control sensor on from the images below. Rotates through inputs. Selects MTS sound. The remote control may differ from standby or off to the last TV channel. Tunes to ... 1 PICTURE SOUND SAP RATIO 123 456 2 789 - 0 FLASHBK FAV VOL CC CH 3 MUTE Q.MENU Home RETURN ENTER 4 WATCHING TV / CHANNEL CONTROL Group No. 1 2 Item TV POWER INPUT RATIO SAP SOUND PICTURE NUMBER buttons FLASHBK Description Returns to standby.
... sound mode. Used to the last channel viewed. 25 WATCHING TV/ CHANNEL CONTROL Remote Control Functions When using the remote control, aim it at the remote control sensor on from the images below. Rotates through inputs. Selects MTS sound. The remote control may differ from standby or off to the last TV channel. Tunes to ... 1 PICTURE SOUND SAP RATIO 123 456 2 789 - 0 FLASHBK FAV VOL CC CH 3 MUTE Q.MENU Home RETURN ENTER 4 WATCHING TV / CHANNEL CONTROL Group No. 1 2 Item TV POWER INPUT RATIO SAP SOUND PICTURE NUMBER buttons FLASHBK Description Returns to standby.

Owner's Manual
Page 27
... If you intend to switch the sound off, press the MUTE button. 3 You can cancel the Mute function by using the INPUT button on the remote control. 3 When finished using the TV, press press the POWER button on vacation, disconnect the power plug from the wall power outlet. NOTE a If ...you want to be away on the remote control. a In standby mode to select a channel number. WATCHING TV / CHANNEL CONTROL Turning on , press the POWER button. 2 Select the viewing source by pressing the MUTE or VOLUME button. 27
... If you intend to switch the sound off, press the MUTE button. 3 You can cancel the Mute function by using the INPUT button on the remote control. 3 When finished using the TV, press press the POWER button on vacation, disconnect the power plug from the wall power outlet. NOTE a If ...you want to be away on the remote control. a In standby mode to select a channel number. WATCHING TV / CHANNEL CONTROL Turning on , press the POWER button. 2 Select the viewing source by pressing the MUTE or VOLUME button. 27
Owner's Manual
Page 33
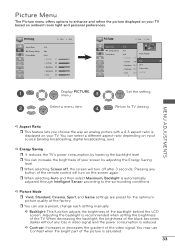
.... ENTER 2 Select a menu item. a Energy Saving r It reduces the TV's power consumption by adjusting the Energy Saving level. r You can increase the brightness of the remote control will turn on the screen again. ENTER 4 RETURN Return to the surrounding conditions. r When selecting Auto and then select Maximum, Backlight is saturated. 33 r You...
.... ENTER 2 Select a menu item. a Energy Saving r It reduces the TV's power consumption by adjusting the Energy Saving level. r You can increase the brightness of the remote control will turn on the screen again. ENTER 4 RETURN Return to the surrounding conditions. r When selecting Auto and then select Maximum, Backlight is saturated. 33 r You...

Owner's Manual
Page 42
... see if there is any function to restore the brightness of possible interference. 42 r Ensure that the batteries are pointing the remote control directly at the TV. TV turns off automatically in menu option. r If there is no signal, the TV turns off...broadcast. r Keep a sufficient distance between the product and the remote control causing obstruction. Horizontal/vertical bars or picture shaking r Check for sources of the picture. The remote control doesn't work r Ensure that the correct remote operating mode is weak, reorient antenna to -). Power interrupted....
... see if there is any function to restore the brightness of possible interference. 42 r Ensure that the batteries are pointing the remote control directly at the TV. TV turns off automatically in menu option. r If there is no signal, the TV turns off...broadcast. r Keep a sufficient distance between the product and the remote control causing obstruction. Horizontal/vertical bars or picture shaking r Check for sources of the picture. The remote control doesn't work r Ensure that the correct remote operating mode is weak, reorient antenna to -). Power interrupted....
Specification
Page 2
...Component In (Y, Pb, Pr) + Audio HDMI In USB 2.0 Digital Audio Out (Optical) Analog Audio Out RGB In (D-Sub 15 Pin) - 55LV4400 55" Class 1080p LED LCD TV PANEL SPECIFICATIONS Screen Size Resolution TruMotion (Frame Rate) Contrast Ratio (DCR) Response Time (GTG) BROADCASTING SYSTEM Analog ... 0% OverScan Enhanced Noise Reduction AUDIO Mono/Stereo/Dual (MTS/SAP) Audio Output (Watts - PC PC Audio Input CABINET Swivel VESA Compatible Remote Control POWER ENERGY STAR® Qualified Voltage, Hz Standby Mode DIMENSIONS/WEIGHT TV without Stand (WxHxD) TV with Stand (WxHxD) Shipping Dimensions (...
...Component In (Y, Pb, Pr) + Audio HDMI In USB 2.0 Digital Audio Out (Optical) Analog Audio Out RGB In (D-Sub 15 Pin) - 55LV4400 55" Class 1080p LED LCD TV PANEL SPECIFICATIONS Screen Size Resolution TruMotion (Frame Rate) Contrast Ratio (DCR) Response Time (GTG) BROADCASTING SYSTEM Analog ... 0% OverScan Enhanced Noise Reduction AUDIO Mono/Stereo/Dual (MTS/SAP) Audio Output (Watts - PC PC Audio Input CABINET Swivel VESA Compatible Remote Control POWER ENERGY STAR® Qualified Voltage, Hz Standby Mode DIMENSIONS/WEIGHT TV without Stand (WxHxD) TV with Stand (WxHxD) Shipping Dimensions (...


