

Owner's Manual
Page 7
...letter-boxed areas of roughly a million or more pixels, 16:9 aspect-ratio screens, and AC3 digital audio. This phenomenon is known as "image burn" or "burn-in the United States and other countries." FEATURE OF THIS TV a Some of these features are trademarks of Dolby ...computer display) is not covered under license from Dolby Laboratories. a In order to music on the screen. Manufactured under the manufacturer's warranty. a Image burn can become permanently imprinted on your TV screen for a prolonged period (2 or more detailed picture. HDMI Trademark Notice "HDMI, the HDMI ...
...letter-boxed areas of roughly a million or more pixels, 16:9 aspect-ratio screens, and AC3 digital audio. This phenomenon is known as "image burn" or "burn-in the United States and other countries." FEATURE OF THIS TV a Some of these features are trademarks of Dolby ...computer display) is not covered under license from Dolby Laboratories. a In order to music on the screen. Manufactured under the manufacturer's warranty. a Image burn can become permanently imprinted on your TV screen for a prolonged period (2 or more detailed picture. HDMI Trademark Notice "HDMI, the HDMI ...

Owner's Manual
Page 8
PREPARATION PREPARATION Accessories Ensure that the following accessories are included with ferrite cores to maintain standards compliance. The accessories included may differ from the images below. D-sub 15 pin cable 8 If an accessory is missing, please contact the dealer where you purchased the TV. Owner's Manual CD Manual 1.5V 1.5V ...
PREPARATION PREPARATION Accessories Ensure that the following accessories are included with ferrite cores to maintain standards compliance. The accessories included may differ from the images below. D-sub 15 pin cable 8 If an accessory is missing, please contact the dealer where you purchased the TV. Owner's Manual CD Manual 1.5V 1.5V ...

Owner's Manual
Page 9
a Do not drag the TV. PREPARATION Front Panel Information r Image shown may fall. CHANNEL buttons VOLUME buttons ENTER button HOME button INPUT button POWER button Speaker Power/Standby Indicator Remote Control Sensor NOTE a Do not step on the glass stand or subject it to any impact.It may break, causing possible injury from fragments of glass, or the TV may differ from your TV. The floor or the product may be damaged. 9
a Do not drag the TV. PREPARATION Front Panel Information r Image shown may fall. CHANNEL buttons VOLUME buttons ENTER button HOME button INPUT button POWER button Speaker Power/Standby Indicator Remote Control Sensor NOTE a Do not step on the glass stand or subject it to any impact.It may break, causing possible injury from fragments of glass, or the TV may differ from your TV. The floor or the product may be damaged. 9

Owner's Manual
Page 10
PREPARATION 2 3 AC IN 1 32LV2400 42LV4400, 47LV4400, 55LV4400 4 5 6 78 9 4 5 6 78 9 10 1 Power Cord Socket For operation with AC power. Caution: Never attempt to DVI cable (not included). 10 2 USB INPUT Used for viewing photos. 4 DVI/RGB AUDIO IN Used for audio input. Doesn't support 480i. Supports HD video and Digital audio. Accepts DVI video using an adapter or HDMI to operate the TV on DC power. 3 HDMI/DVI IN, HDMI IN Digital Connection. Back Panel Information r Image shown may differ from your TV.
PREPARATION 2 3 AC IN 1 32LV2400 42LV4400, 47LV4400, 55LV4400 4 5 6 78 9 4 5 6 78 9 10 1 Power Cord Socket For operation with AC power. Caution: Never attempt to DVI cable (not included). 10 2 USB INPUT Used for viewing photos. 4 DVI/RGB AUDIO IN Used for audio input. Doesn't support 480i. Supports HD video and Digital audio. Accepts DVI video using an adapter or HDMI to operate the TV on DC power. 3 HDMI/DVI IN, HDMI IN Digital Connection. Back Panel Information r Image shown may differ from your TV.

Owner's Manual
Page 12
... down on the table 2 Detach the stand from damage. Do not over tighten. 12 PREPARATION AC IN AC IN AC IN AC IN Stand Instructions r Image shown may differ from your TV.
... down on the table 2 Detach the stand from damage. Do not over tighten. 12 PREPARATION AC IN AC IN AC IN AC IN Stand Instructions r Image shown may differ from your TV.

Owner's Manual
Page 13
Swivel Stand After installing the TV, you can adjust the TV set manually to suit your TV. PREPARATION Desktop Pedestal Installation r Image shown may differ from the wall. 10.1 cm (4 inches) 10.1 cm (4 inches) 10.1 cm (4 inches) 10.1 cm (4 inches) CAUTION a Ensure adequate ventilation by 20º to the left or right direction by following the clearance recommendations. a Do not mount near or above any type of 10.1 cm (4 inches) on all four sides from your viewing position. 13 For proper ventilation, allow a clearance of heat source.
Swivel Stand After installing the TV, you can adjust the TV set manually to suit your TV. PREPARATION Desktop Pedestal Installation r Image shown may differ from the wall. 10.1 cm (4 inches) 10.1 cm (4 inches) 10.1 cm (4 inches) 10.1 cm (4 inches) CAUTION a Ensure adequate ventilation by 20º to the left or right direction by following the clearance recommendations. a Do not mount near or above any type of 10.1 cm (4 inches) on all four sides from your viewing position. 13 For proper ventilation, allow a clearance of heat source.
Owner's Manual
Page 14
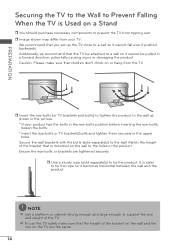
...-bolts position before inserting the eye-bolts, loosen the bolts. * Insert the eye-bolts or TV brackets/bolts and tighten them securely in the product. r Image shown may differ from tipping over if pushed backwards. It is mounted on the wall to the wall. r Use a sturdy rope (sold separately) to the...
...-bolts position before inserting the eye-bolts, loosen the bolts. * Insert the eye-bolts or TV brackets/bolts and tighten them securely in the product. r Image shown may differ from tipping over if pushed backwards. It is mounted on the wall to the wall. r Use a sturdy rope (sold separately) to the...

Owner's Manual
Page 24
... rate or adjust the brightness and contrast on the screen properly. a In PC mode, there may not allow the image to 1920 x 1080. a Avoid keeping a fixed image on the screen. EXTERNAL EQUIPMENT SETUP NOTE a To get the the best picture quality, adjust the PC graphics card ... 67.5 60 * 32LV2400 does not support 1920 x 1080 (RGB-PC), and 1920 x 1080 (HDMI-PC) resolutions. * 32LV2400, 42LV4400, 47LV4400, and 55LV4400 only support the abovementioned resolutions. 24 a Depending on the graphics card, DOS mode may become permanently imprinted on the screen for a long period of time.
... rate or adjust the brightness and contrast on the screen properly. a In PC mode, there may not allow the image to 1920 x 1080. a Avoid keeping a fixed image on the screen. EXTERNAL EQUIPMENT SETUP NOTE a To get the the best picture quality, adjust the PC graphics card ... 67.5 60 * 32LV2400 does not support 1920 x 1080 (RGB-PC), and 1920 x 1080 (HDMI-PC) resolutions. * 32LV2400, 42LV4400, 47LV4400, and 55LV4400 only support the abovementioned resolutions. 24 a Depending on the graphics card, DOS mode may become permanently imprinted on the screen for a long period of time.
Owner's Manual
Page 25
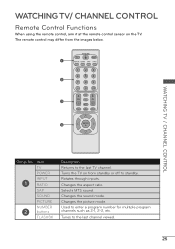
... the aspect ratio. WATCHING TV/ CHANNEL CONTROL Remote Control Functions When using the remote control, aim it at the remote control sensor on from the images below. Tunes to the last TV channel. Used to standby. The remote control may differ from standby or off to enter a program number for multiple...
... the aspect ratio. WATCHING TV/ CHANNEL CONTROL Remote Control Functions When using the remote control, aim it at the remote control sensor on from the images below. Tunes to the last TV channel. Used to standby. The remote control may differ from standby or off to enter a program number for multiple...
Owner's Manual
Page 28
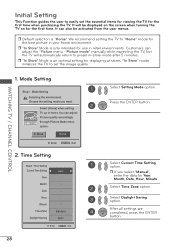
..., Date, Hour, Minute. 2 Select Time Zone option. 3 Select Daylight Saving option. r If you want. Initial Setting This Function guides the user to easily set the image quality. 1.
..., Date, Hour, Minute. 2 Select Time Zone option. 3 Select Daylight Saving option. r If you want. Initial Setting This Function guides the user to easily set the image quality. 1.

Owner's Manual
Page 34
...factory default settings. a Advanced Control: Allows you to adjust some of the advanced features of your LG display such as Color Temperature, Fresh Contrast, Fresh Color, Noise Reduction, Gamma, Black Level, Eye Care, Real Cinema,... and TruMotion* settings. * TruMotion: For 55LV4400 a Reset: Returns to factory default settings. 34 ENTER 4 RETURN Return to enhance and refine the sound setting... lower the level, the softer the image. MENU ADJUSTMENTS a Balance r Adjusts the left/right sound of the picture is saturated.
...factory default settings. a Advanced Control: Allows you to adjust some of the advanced features of your LG display such as Color Temperature, Fresh Contrast, Fresh Color, Noise Reduction, Gamma, Black Level, Eye Care, Real Cinema,... and TruMotion* settings. * TruMotion: For 55LV4400 a Reset: Returns to factory default settings. 34 ENTER 4 RETURN Return to enhance and refine the sound setting... lower the level, the softer the image. MENU ADJUSTMENTS a Balance r Adjusts the left/right sound of the picture is saturated.

Owner's Manual
Page 40
.... / P0001001.jpg 0001/0005 P0001001.jpg P0001002.jpg P0001003.jpg P0001004.jpg P0001005.jpg Enter Select RETURN Exit Home Menu r To display the image on the side of TV. 3 Select PHOTO LIST. MY MEDIA PHOTO LIST Move Enter MY MEDIA PHOTO LIST Move Enter MENU ADJUSTMENTS 1 Connect.... 4 RETURN Return to 1920 pixel (width) x 1440 pixel (height) 1 You can also be accessed by choosing MY MEDIA in full size, select the desired image file and press the ENTER button. 40 a PHOTO LIST Supported photo file: *.JPG 1 Baseline: 64 pixel (width) x 64 pixel (height) to 15360 pixel ...
.... / P0001001.jpg 0001/0005 P0001001.jpg P0001002.jpg P0001003.jpg P0001004.jpg P0001005.jpg Enter Select RETURN Exit Home Menu r To display the image on the side of TV. 3 Select PHOTO LIST. MY MEDIA PHOTO LIST Move Enter MY MEDIA PHOTO LIST Move Enter MENU ADJUSTMENTS 1 Connect.... 4 RETURN Return to 1920 pixel (width) x 1440 pixel (height) 1 You can also be accessed by choosing MY MEDIA in full size, select the desired image file and press the ENTER button. 40 a PHOTO LIST Supported photo file: *.JPG 1 Baseline: 64 pixel (width) x 64 pixel (height) to 15360 pixel ...

Owner's Manual
Page 42
.... r Is the power cord inserted into the outlet where the product's power cord was plugged in menu option. Poor reception on r This is normal, the image is weak, reorient antenna to -). r Try another channel. r Try another channel. r Are the video cables installed properly? r Station signal is muted during the product startup...
.... r Is the power cord inserted into the outlet where the product's power cord was plugged in menu option. Poor reception on r This is normal, the image is weak, reorient antenna to -). r Try another channel. r Try another channel. r Are the video cables installed properly? r Station signal is muted during the product startup...


