
Owners Manual
Page 1
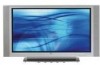
PLASMATV carefully and completely before reference, number of the TV in the cover and retate this uire service,
PLASMATV carefully and completely before reference, number of the TV in the cover and retate this uire service,
Owners Manual
Page 2
...,com J WARNI NG/CAUTION TO REDUCE THE RISK OF FiRE AND ELECTRIC SHOCK, DO NOT EXPOSE THIS PRODUCT TO RAIN OR MOISTURE. 2 Plasma TV Unauthorized mod _ COMPLIANCE: The responsible pe_ for help • Any changes or modifications not expressly approved by turning the equipment off and on... a circuit different from LG Electroni_. the presence of the foIQowing measures: - This equipment generates, uses and can radiate radio frequency energy and, if not installed and ...
...,com J WARNI NG/CAUTION TO REDUCE THE RISK OF FiRE AND ELECTRIC SHOCK, DO NOT EXPOSE THIS PRODUCT TO RAIN OR MOISTURE. 2 Plasma TV Unauthorized mod _ COMPLIANCE: The responsible pe_ for help • Any changes or modifications not expressly approved by turning the equipment off and on... a circuit different from LG Electroni_. the presence of the foIQowing measures: - This equipment generates, uses and can radiate radio frequency energy and, if not installed and ...

Owners Manual
Page 4
... being twisted, kinked, pinched, closed in a door, or walked upon a dedicated circuit; Protect the power cord from physical or mechanical abuse, such as vans, shall 4 Plasma TV To Reduce The Risk Of Fke Or Electric Shock, Do Not Expose This Appliance To Rain Or Moisture. 17. and no additional outlets or branch...
... being twisted, kinked, pinched, closed in a door, or walked upon a dedicated circuit; Protect the power cord from physical or mechanical abuse, such as vans, shall 4 Plasma TV To Reduce The Risk Of Fke Or Electric Shock, Do Not Expose This Appliance To Rain Or Moisture. 17. and no additional outlets or branch...
Owners Manual
Page 5
... audio equipment. See pages 25, 7 Fine4une source image and sound ence or as required by source, See pages 26~ 29. Turn TV on , 2. Contenls Warning/Caution Saf eby Instructions Introduction Controis 2 3~4 7 Connection Options Remote Control Key Functions 8 9-10 Installation Accessories ...Control Device Setup IR _es Programming the Remote Programming Codes Troubleshooting Ch_kUst Maintenance Product Specifications Warranty 42_-47 48~49 50 51 _52 53 54 55 59~60 Setup and Operation Checklist Setup and Operation Checkli_ (See pages 13-,21 ...
... audio equipment. See pages 25, 7 Fine4une source image and sound ence or as required by source, See pages 26~ 29. Turn TV on , 2. Contenls Warning/Caution Saf eby Instructions Introduction Controis 2 3~4 7 Connection Options Remote Control Key Functions 8 9-10 Installation Accessories ...Control Device Setup IR _es Programming the Remote Programming Codes Troubleshooting Ch_kUst Maintenance Product Specifications Warranty 42_-47 48~49 50 51 _52 53 54 55 59~60 Setup and Operation Checklist Setup and Operation Checkli_ (See pages 13-,21 ...
Owners Manual
Page 6
...inches thick, colors that you expect, Each sub-pixet Afi of these se_l defects during the manufacture and operation of the Plasma Display is so wide that this product. 6 Plasma TV over images that are comprised of 3 sub pixels, corresponding to 2.2 mi[Uion ceils. This means that are not sufficient ...defec _ve. Wide angle range of the neon lamp and it work? The tiny dots appearing does not mean that your plasma display in a vanety of locations where conventional TVs will not fit, The PDP Manufacturing ProceSS: a few cell defects are easily viewable, The PDP can see the screen...
...inches thick, colors that you expect, Each sub-pixet Afi of these se_l defects during the manufacture and operation of the Plasma Display is so wide that this product. 6 Plasma TV over images that are comprised of 3 sub pixels, corresponding to 2.2 mi[Uion ceils. This means that are not sufficient ...defec _ve. Wide angle range of the neon lamp and it work? The tiny dots appearing does not mean that your plasma display in a vanety of locations where conventional TVs will not fit, The PDP Manufacturing ProceSS: a few cell defects are easily viewable, The PDP can see the screen...

Owners Manual
Page 7
- Remote Control Sensor 3. Front Panel Controls Introduction 23 4 5 i, POWER Button 2. MENU Button 6, ENTER Button 7. VOLUME (_1, I_) Buttons 8, CHANNEL (Y, A) Buttons Operating Guide 7 This is a simplified representation of front pane]. Power Standby Indicator 4, TV/VtDEO Button 5. Here shown may be somewhat different from your TV.
- Remote Control Sensor 3. Front Panel Controls Introduction 23 4 5 i, POWER Button 2. MENU Button 6, ENTER Button 7. VOLUME (_1, I_) Buttons 8, CHANNEL (Y, A) Buttons Operating Guide 7 This is a simplified representation of front pane]. Power Standby Indicator 4, TV/VtDEO Button 5. Here shown may be somewhat different from your TV.
Owners Manual
Page 8
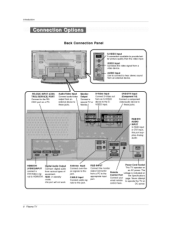
...pewe_. Audio/Video input Connect audio/video output from an external device to the appropriate input Remote Control Conned Power Cord Socket Thi;s TV operates on Port the Specifications your page, Never attempt port, wired remote to RGBiDVI AUOIO INPLrr In RGB input or DVl input, th... RGB INPUT Connect the monitor output connector from an extema_ device. RS-232C INPUT (CONTROLiSERVICE) PORT Connect to this _aek. DC power. 8 Plasma TV Note: tn standby mode, this port will not work, Antenna Input Connect over-the_ air s{gnais to this iack, CABLE Input Connect came signals...
...pewe_. Audio/Video input Connect audio/video output from an external device to the appropriate input Remote Control Conned Power Cord Socket Thi;s TV operates on Port the Specifications your page, Never attempt port, wired remote to RGBiDVI AUOIO INPLrr In RGB input or DVl input, th... RGB INPUT Connect the monitor output connector from an extema_ device. RS-232C INPUT (CONTROLiSERVICE) PORT Connect to this _aek. DC power. 8 Plasma TV Note: tn standby mode, this port will not work, Antenna Input Connect over-the_ air s{gnais to this iack, CABLE Input Connect came signals...

Owners Manual
Page 9
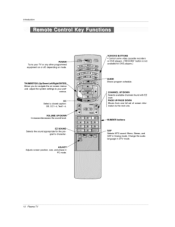
... select the amount of time before your _¢ turns itseff off automatically, Switches the sound on or off.(Refer to TV viewing from any menu, Lets you watch the TV, information displays on the viewing environment. the batteries matching correct polarity (+ w_th +, =with -) . [nstalt two ...to the screen. Close cove K Operating Guide 9 Introduction - picture, Installing Bakeries * Open the battery compartment cover on the TV, • Reties the inp_ mode TV between Antenna _d Cable. When using the remote control, aim it at the remote control sensor on the back side and instai...
... select the amount of time before your _¢ turns itseff off automatically, Switches the sound on or off.(Refer to TV viewing from any menu, Lets you watch the TV, information displays on the viewing environment. the batteries matching correct polarity (+ w_th +, =with -) . [nstalt two ...to the screen. Close cove K Operating Guide 9 Introduction - picture, Installing Bakeries * Open the battery compartment cover on the TV, • Reties the inp_ mode TV between Antenna _d Cable. When using the remote control, aim it at the remote control sensor on the back side and instai...
Owners Manual
Page 10
... from one ,, infor- Change the audio langua_ in Analog mode. SAP _tects MTS sound: Mono_ Stereo_ and SAP in DTV m_e. 10 P_a TV introduction Turns your TV or any other programmed equipment on ot off, depending on mode, _UMBS"rlCK AUIows you to navigate the on*screen menus and adjust the...
... from one ,, infor- Change the audio langua_ in Analog mode. SAP _tects MTS sound: Mono_ Stereo_ and SAP in DTV m_e. 10 P_a TV introduction Turns your TV or any other programmed equipment on ot off, depending on mode, _UMBS"rlCK AUIows you to navigate the on*screen menus and adjust the...
Owners Manual
Page 11
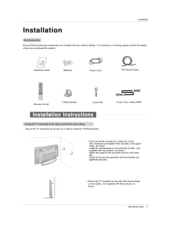
..., please contact the _er Operating Guide Batteries Power Cord 75_ Round Cable Remote Contro_ 2-Wall brackets 2-eye -bo_ts D-sub 15 pin Cable (RGB) * Secure the TV assembEy by joining it to be mounted on a _sk top, insert the 2 eye-bolts and tighten them securely in the upper holes as shown hstall... with the product), as shown, /, J Operating Guide 11 Match the height of the eye-bolts and the walt brackets_ Check to a wail by using the TV!Wat[ brackets, i , If the set will be sure the eye-boBts and the brackets are included with the product), as shown.
..., please contact the _er Operating Guide Batteries Power Cord 75_ Round Cable Remote Contro_ 2-Wall brackets 2-eye -bo_ts D-sub 15 pin Cable (RGB) * Secure the TV assembEy by joining it to be mounted on a _sk top, insert the 2 eye-bolts and tighten them securely in the upper holes as shown hstall... with the product), as shown, /, J Operating Guide 11 Match the height of the eye-bolts and the walt brackets_ Check to a wail by using the TV!Wat[ brackets, i , If the set will be sure the eye-boBts and the brackets are included with the product), as shown.

Owners Manual
Page 12
... be [ns_led in the optional Desktop Stand _nstai[aflon. 12 P_a TV To Install on a desktop etc, • The TV is designed to be mounted horizontally, GROUNDING Ensure that you connect the earth ground wire to prevent possible e_ectric shock If grounding methods are includ_ ...
... be [ns_led in the optional Desktop Stand _nstai[aflon. 12 P_a TV To Install on a desktop etc, • The TV is designed to be mounted horizontally, GROUNDING Ensure that you connect the earth ground wire to prevent possible e_ectric shock If grounding methods are includ_ ...
Owners Manual
Page 13
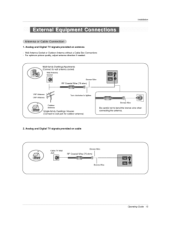
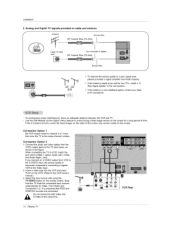
J ,.i' 2, Analog and Digital TV signals provided on antenna - Wall Antenna Socket or Outdoor Antenna without a CaMe Box Connections For optimum picture quality, adjust antenna direction if needed. Mufti-family ... antenna. Outer Antenna Single-family Dwellings/Houses (Connect to walE jack for outdoor antenna) Bronze Wire Be careful not to tkjhten. Installation 1, Analog and Digital TV signals provided on cable CaMe TV Wail Bronze Wire BroPuze Wire Operating Guide 13
J ,.i' 2, Analog and Digital TV signals provided on antenna - Wall Antenna Socket or Outdoor Antenna without a CaMe Box Connections For optimum picture quality, adjust antenna direction if needed. Mufti-family ... antenna. Outer Antenna Single-family Dwellings/Houses (Connect to walE jack for outdoor antenna) Bronze Wire Be careful not to tkjhten. Installation 1, Analog and Digital TV signals provided on cable CaMe TV Wail Bronze Wire BroPuze Wire Operating Guide 13
Owners Manual
Page 14
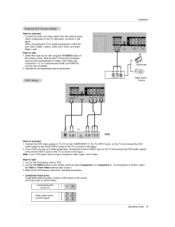
...act your dealer for assistance. - To avoid picture noise (interference), leave an adequate distance between the VCR and "P.7 - It is presumed that this TV finds the connected input sources automatically for a _eng period ef time If the 4:3 picture format is used; compared to connecting a regular VCR to the...the _/VIDEO bu_on on the screen for Video, Front Video and Component 1-2. the fixed images on cable and antenna /f Antenna Bronze Wire Cable TV Wall Jack Turn clockwise to tighten. Use the ISM Method (on the Option menu) feature to avoid having a fix_ image remain on the...
...act your dealer for assistance. - To avoid picture noise (interference), leave an adequate distance between the VCR and "P.7 - It is presumed that this TV finds the connected input sources automatically for a _eng period ef time If the 4:3 picture format is used; compared to connecting a regular VCR to the...the _/VIDEO bu_on on the screen for Video, Front Video and Component 1-2. the fixed images on cable and antenna /f Antenna Bronze Wire Cable TV Wall Jack Turn clockwise to tighten. Use the ISM Method (on the Option menu) feature to avoid having a fix_ image remain on the...
Owners Manual
Page 15
... Left = whffe, and Audio Right = red). Operate the corresponding external equipment. Note: If your DVD on_y has an S-Video output jack, connect this TV finds the connected input sources automaticafly for Video, Front Video and Component 1-2 it is presumed that this to the SWIDEO input on the...operating instructions, 1 or Component 2 (If connected to use SoVideo. Note that RGB and HDMIiDVI sources are connected. 2. Use the _iVIOEO button on the TV, as shown in the figure. How to the AUDIO INPUT jacks on DVD player Operating Guide 15 Select the input source with using the TW_...
... Left = whffe, and Audio Right = red). Operate the corresponding external equipment. Note: If your DVD on_y has an S-Video output jack, connect this TV finds the connected input sources automaticafly for Video, Front Video and Component 1-2 it is presumed that this to the SWIDEO input on the...operating instructions, 1 or Component 2 (If connected to use SoVideo. Note that RGB and HDMIiDVI sources are connected. 2. Use the _iVIOEO button on the TV, as shown in the figure. How to the AUDIO INPUT jacks on DVD player Operating Guide 15 Select the input source with using the TW_...
Owners Manual
Page 16
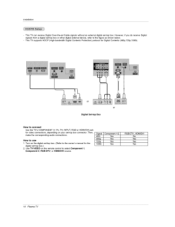
...set4op box.) 2. Use TViVIDEO on the digital set4op box. (Refer to _lect Component Com_nent 2, RGB-DTV, or HDM|iDVl source. This TV can receive Digital Over4he-aidCab[e signals without an external digital set4op box. However, if you _ receive signals from a dig_ta_ set4op box or... other digital externa_ device, refer to use 1. This TV supports HDCP (HJgh-bandwio_h Digital Contents Prot_tion) protocol for video connections depending on your set4op box connector Then, make _e corresponding audio connections...
...set4op box.) 2. Use TViVIDEO on the digital set4op box. (Refer to _lect Component Com_nent 2, RGB-DTV, or HDM|iDVl source. This TV can receive Digital Over4he-aidCab[e signals without an external digital set4op box. However, if you _ receive signals from a dig_ta_ set4op box or... other digital externa_ device, refer to use 1. This TV supports HDCP (HJgh-bandwio_h Digital Contents Prot_tion) protocol for video connections depending on your set4op box connector Then, make _e corresponding audio connections...
Owners Manual
Page 17
... best picture quality, adjust the PC graphics _rd to 1024x7_, 60Hz. 2. There may be noise associated with this purpose, 3, Check the image on your TV'. Check the image on the PC graphic card, ch_qge the screen scanning rate for the graphic How to connect 1. ff noise is present, change the...graphic card or consult the manufacturer of the PC graphic card. Select HDMIiDVI input source in input source option of SETUP menu.(Refer to P.25) TV/VIDEO button is also avaii_le for this product). 2. To get the best picture quality, adjust the PC graphics card to 1024x768_ 60 Hz 2 Select...
... best picture quality, adjust the PC graphics _rd to 1024x7_, 60Hz. 2. There may be noise associated with this purpose, 3, Check the image on your TV'. Check the image on the PC graphic card, ch_qge the screen scanning rate for the graphic How to connect 1. ff noise is present, change the...graphic card or consult the manufacturer of the PC graphic card. Select HDMIiDVI input source in input source option of SETUP menu.(Refer to P.25) TV/VIDEO button is also avaii_le for this product). 2. To get the best picture quality, adjust the PC graphics card to 1024x768_ 60 Hz 2 Select...
Owners Manual
Page 18
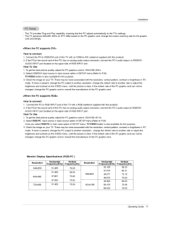
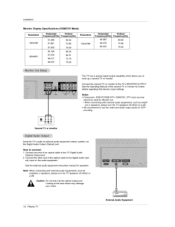
...the _ideo andaudio output jacks for further detaims regarding that devices input settings. Looking at the [_er _am may damage your vision. 18 P_a TV External Audio Equipment See the external audio equipment instruction manual for Monitor out. . Notes: * Component, RGB-PC/RGB-DTV, HDMI/DVI_ ...DTV input sources cannot be used for operation_ Note: When connecting with external audio equipments, such as amplifers or speaker& pteas_ turn the TV speakers elL(Refer to p,28) * We t;_commend to the digital audio c[) input on the audio equipmenL (opti- When connecting with external ...
...the _ideo andaudio output jacks for further detaims regarding that devices input settings. Looking at the [_er _am may damage your vision. 18 P_a TV External Audio Equipment See the external audio equipment instruction manual for Monitor out. . Notes: * Component, RGB-PC/RGB-DTV, HDMI/DVI_ ...DTV input sources cannot be used for operation_ Note: When connecting with external audio equipments, such as amplifers or speaker& pteas_ turn the TV speakers elL(Refer to p,28) * We t;_commend to the digital audio c[) input on the audio equipmenL (opti- When connecting with external ...

Owners Manual
Page 19
...port leoat - off the source device has an HDMI output, no HDMI output, a separated aud{o connection is a ttade_rk or registered trademark This TV can receive the High-Definition Multimedia _nterface(HDMI) or the Digita} Visua_ tnterface(DVI). - Connect the source 2. if the source device does not ...HDMI connection includes both video and audio. - o Select HDMI/DVl input source in input source option of SETUP menu(Refer to P,25) TV/VIDEO b_on is also avail_le for 720x480p, 1280x720p, of the source device wiB be automatically set to 1024x768, 60Hz. tnstallation HIGH _NR-k3N ...
...port leoat - off the source device has an HDMI output, no HDMI output, a separated aud{o connection is a ttade_rk or registered trademark This TV can receive the High-Definition Multimedia _nterface(HDMI) or the Digita} Visua_ tnterface(DVI). - Connect the source 2. if the source device does not ...HDMI connection includes both video and audio. - o Select HDMI/DVl input source in input source option of SETUP menu(Refer to P,25) TV/VIDEO b_on is also avail_le for 720x480p, 1280x720p, of the source device wiB be automatically set to 1024x768, 60Hz. tnstallation HIGH _NR-k3N ...

Owners Manual
Page 20
installation Cable sample / %*_ ..... 20 P_a TV (not supplied with the product) HDMI Cable HDMI to DVI Cable (not supplied with the product) Fiber Optic Digital Audio Cable (not supplied with the product) Analog Audio Cable(RCA type) (not supplied with the product) Analog Audio Cable(Stereo to RCA type) (not supplied with the product) . ..J...
installation Cable sample / %*_ ..... 20 P_a TV (not supplied with the product) HDMI Cable HDMI to DVI Cable (not supplied with the product) Fiber Optic Digital Audio Cable (not supplied with the product) Analog Audio Cable(RCA type) (not supplied with the product) Analog Audio Cable(Stereo to RCA type) (not supplied with the product) . ..J...
Owners Manual
Page 21
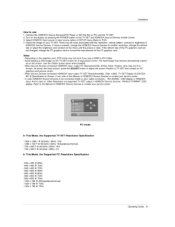
... EIAJCEA861-B Specification to Screen. refer to the Manual of HDMI/DVI Source Devices or contact your service center` - PC mode In This Mode,, the Supported TV SET Resolution Specification o 1920 x 1080 I @ 59,94Hz / 60Hz, 16:9 1280 x 720 P @ 59.94Hz / 60Hz, 16:9(preferred - 720 x 480 P @ 59,94Hz / 60Hz, 16:9 -...your service center. ff not. When Source Devices connected HDMI/DVt Input; Turn on the dispiay by pressing the POWER button on the TV SET and HDMP'DVI _urce Devices remote control. 3. _fect HDMIiDV[ Input source in HDMi/DV[ Source Devices. Installation How to use a...
... EIAJCEA861-B Specification to Screen. refer to the Manual of HDMI/DVI Source Devices or contact your service center` - PC mode In This Mode,, the Supported TV SET Resolution Specification o 1920 x 1080 I @ 59,94Hz / 60Hz, 16:9 1280 x 720 P @ 59.94Hz / 60Hz, 16:9(preferred - 720 x 480 P @ 59,94Hz / 60Hz, 16:9 -...your service center. ff not. When Source Devices connected HDMI/DVt Input; Turn on the dispiay by pressing the POWER button on the TV SET and HDMP'DVI _urce Devices remote control. 3. _fect HDMIiDV[ Input source in HDMi/DV[ Source Devices. Installation How to use a...


