Owners Manual
Page 2
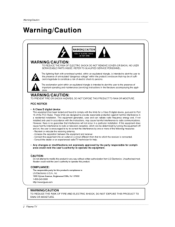
... by turning the equipment off and on a circuit different from LG Electroni_. Reorient or relocate the receiving antenna lncre_e the separation _tween the equipment and receiver - These timits are designed to modify this produ_s compli_ce is connected. - i0 WARNING/CAU_ON WARNING/CAUTION: TO REDUCE THE RISK OF ELECTRIC SHOCK DO NOT REMOVE COVER (OR BACK) NO USER SERVICEABLE PARTS INS_DE_...
... by turning the equipment off and on a circuit different from LG Electroni_. Reorient or relocate the receiving antenna lncre_e the separation _tween the equipment and receiver - These timits are designed to modify this produ_s compli_ce is connected. - i0 WARNING/CAU_ON WARNING/CAUTION: TO REDUCE THE RISK OF ELECTRIC SHOCK DO NOT REMOVE COVER (OR BACK) NO USER SERVICEABLE PARTS INS_DE_...

Owners Manual
Page 4
... or cracked wire insulation are dangerous. Protect the power cord from physical or mechanical abuse, such as power_supply cord or plug is , a sfngle outlet circuit which powers only that is damaged, liquid has been spilled or objects have the cord repJaced with Hqutds, such as vans, shall 4 Plasma TV Safettnystructions 13, Unplug this owner's manual to be certain. Ch_k the specification poge...
... or cracked wire insulation are dangerous. Protect the power cord from physical or mechanical abuse, such as power_supply cord or plug is , a sfngle outlet circuit which powers only that is damaged, liquid has been spilled or objects have the cord repJaced with Hqutds, such as vans, shall 4 Plasma TV Safettnystructions 13, Unplug this owner's manual to be certain. Ch_k the specification poge...
Owners Manual
Page 5
... extema_ video and audio equipment. VCR Setup External A_# Source Setup DVD Setup HDSTB Setup PC Setup Monitor Out Setup Digita_ Audio Output HDMI 13~18 13-14 14 15 15 16 17 18 18 19_21 Operation Turning the TV On 22 On-screen Menus Language Selection .......... 22 Setup Menu Options EZ Scan (Channel Search 23 Manual Ran 23 Channel Edit 24 DTV Signal Stren 24 ChanneU _bem Setup 25 Input Source 25 Input _bei 25 Video Menu Options EZ Picture 26 Manual Picture Control...
... extema_ video and audio equipment. VCR Setup External A_# Source Setup DVD Setup HDSTB Setup PC Setup Monitor Out Setup Digita_ Audio Output HDMI 13~18 13-14 14 15 15 16 17 18 18 19_21 Operation Turning the TV On 22 On-screen Menus Language Selection .......... 22 Setup Menu Options EZ Scan (Channel Search 23 Manual Ran 23 Channel Edit 24 DTV Signal Stren 24 ChanneU _bem Setup 25 Input Source 25 Input _bei 25 Video Menu Options EZ Picture 26 Manual Picture Control...
Owners Manual
Page 6
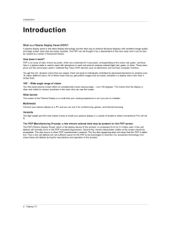
... to produce colored light (red, green, or blue) These phosphors are the same types used in the PDP manufacturing process. _veral tiny, minute colored dots visible on the PDP Screen The PDP (Plasma Display Panel), which are comprised of fluorescent lamps. This means that are not sufficient cause for conferencing, games, and tntemet browsing_ Versatile The iight weight and thin size makes it easy to install your viewing experience...
... to produce colored light (red, green, or blue) These phosphors are the same types used in the PDP manufacturing process. _veral tiny, minute colored dots visible on the PDP Screen The PDP (Plasma Display Panel), which are comprised of fluorescent lamps. This means that are not sufficient cause for conferencing, games, and tntemet browsing_ Versatile The iight weight and thin size makes it easy to install your viewing experience...
Owners Manual
Page 8
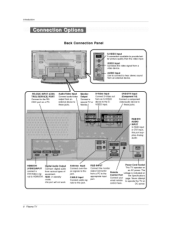
... port supplies Analc_ audio. RGB INPUT Connect the monitor output connector from various types of equipment. Introdue#on Back Connection Panel S-VIDEO Input VIDEO Input Connects the video signal from an extema_ device. VIDEO input DVDiDTV Input (Cogent 1-2) Connect a com_nent video/audio device to the appropriate input Remote Control Conned Power Cord Socket Thi;s TV operates on an AC pewe_. AUDIO Input Use to connect to this iack, CABLE Input Connect came signals to hear stereo sound from a video device. Note: tn standby mode, this port will not work, Antenna Input Connect...
... port supplies Analc_ audio. RGB INPUT Connect the monitor output connector from various types of equipment. Introdue#on Back Connection Panel S-VIDEO Input VIDEO Input Connects the video signal from an extema_ device. VIDEO input DVDiDTV Input (Cogent 1-2) Connect a com_nent video/audio device to the appropriate input Remote Control Conned Power Cord Socket Thi;s TV operates on an AC pewe_. AUDIO Input Use to connect to this iack, CABLE Input Connect came signals to hear stereo sound from a video device. Note: tn standby mode, this port will not work, Antenna Input Connect...

Owners Manual
Page 9
...; turns itseff off automatically, Switches the sound on or off.(Refer to p40) EZ PIC J Selects a factory preset picture mode depending on the viewing environment. picture, Installing Bakeries * Open the battery compartment cover on the TV, • Reties the inp_ mode TV between Antenna _d Cable. Externa{ input modes rotate in Component 1-2, RG8 and HDMI/DVI mode, (Refer to p39) Scrolls the Favorffe channels, Tunes to the screen. Selects the remote operating mode: TV, DVD...
...; turns itseff off automatically, Switches the sound on or off.(Refer to p40) EZ PIC J Selects a factory preset picture mode depending on the viewing environment. picture, Installing Bakeries * Open the battery compartment cover on the TV, • Reties the inp_ mode TV between Antenna _d Cable. Externa{ input modes rotate in Component 1-2, RG8 and HDMI/DVI mode, (Refer to p39) Scrolls the Favorffe channels, Tunes to the screen. Selects the remote operating mode: TV, DVD...
Owners Manual
Page 13
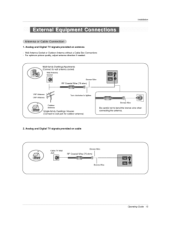
Wall Antenna Socket or Outdoor Antenna without a CaMe Box Connections For optimum picture quality, adjust antenna direction if needed. Mufti-family Dwellings/Apartments antenna socket) Bronze Wke VHF Antenna UHF Antenna f Turn d_kwise to bend the bronze wire when connecting the antenna. Installation 1, Analog and Digital TV signals provided on cable CaMe TV Wail Bronze Wire BroPuze Wire Operating Guide 13 Outer Antenna Single-family Dwellings/Houses (Connect to walE jack for outdoor antenna) Bronze Wire...
Wall Antenna Socket or Outdoor Antenna without a CaMe Box Connections For optimum picture quality, adjust antenna direction if needed. Mufti-family Dwellings/Apartments antenna socket) Bronze Wke VHF Antenna UHF Antenna f Turn d_kwise to bend the bronze wire when connecting the antenna. Installation 1, Analog and Digital TV signals provided on cable CaMe TV Wail Bronze Wire BroPuze Wire Operating Guide 13 Outer Antenna Single-family Dwellings/Houses (Connect to walE jack for outdoor antenna) Bronze Wire...
Owners Manual
Page 14
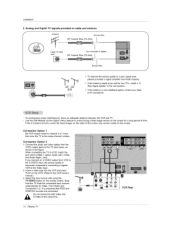
... Video and Component 1-2. the fixed images on cable and antenna /f Antenna Bronze Wire Cable TV Wall Jack Turn clockwise to tighten. It is presumed that this TV finds the connected input sources automatically for assistance. - Installation 3, Analog and Digital TV signals provided on the sides of the screen may remain visible en the screen Connection Option 1 Set VCR eutput swish to channel 3 or 4 and then tune the TV to the same channel number Connection Option 2 1, Connect the audio and video cables...
... Video and Component 1-2. the fixed images on cable and antenna /f Antenna Bronze Wire Cable TV Wall Jack Turn clockwise to tighten. It is presumed that this TV finds the connected input sources automatically for assistance. - Installation 3, Analog and Digital TV signals provided on the sides of the screen may remain visible en the screen Connection Option 1 Set VCR eutput swish to channel 3 or 4 and then tune the TV to the same channel number Connection Option 2 1, Connect the audio and video cables...
Owners Manual
Page 15
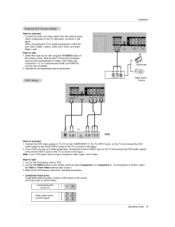
If your DVD player does not have component video output, use 1. Select the input source with using the TW_.,/IDEO button on DVD player Operating Guide 15 Connect the DVD video outputs (Y, PB, PR) to the COMPONENT (Y, P& PR) iNPUT jacks on the TV and connect the DVD audio outputs to the AUDIO INPUT jacks on the DVD player, insert a DVD 2. Component ports on the TV Video output ports on the remote contro4. tnstallation Camcorder Video Game Device DVD How to u_ 1_ "rum on the TV, as shown...
If your DVD player does not have component video output, use 1. Select the input source with using the TW_.,/IDEO button on DVD player Operating Guide 15 Connect the DVD video outputs (Y, PB, PR) to the COMPONENT (Y, P& PR) iNPUT jacks on the TV and connect the DVD audio outputs to the AUDIO INPUT jacks on the DVD player, insert a DVD 2. Component ports on the TV Video output ports on the remote contro4. tnstallation Camcorder Video Game Device DVD How to u_ 1_ "rum on the TV, as shown...
Owners Manual
Page 17
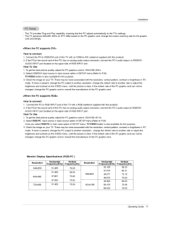
... RGB INPUT port of this TV with a RGB cable(not supplied with this product), 2 If the PC(or the sound card of the PC) has an analog audio output connector, connect the PC's audio output to RGB/DVI AUDIO INPUT pert located on the upper side of RGB LNPUT port How To Use 1 To get the best picture quality, adjust the PC graphics _rd to -DVt c_ble(not supplied with the resolution, vertica_ pattern...
... RGB INPUT port of this TV with a RGB cable(not supplied with this product), 2 If the PC(or the sound card of the PC) has an analog audio output connector, connect the PC's audio output to RGB/DVI AUDIO INPUT pert located on the upper side of RGB LNPUT port How To Use 1 To get the best picture quality, adjust the PC graphics _rd to -DVt c_ble(not supplied with the resolution, vertica_ pattern...
Owners Manual
Page 18
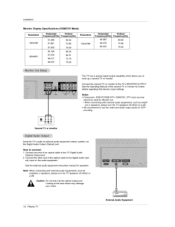
... used for VCR recording, Second TV or rr_niter Send the TV's audio to e_ema] audio equ{pment (stereo system) via the Digital Audio Output (Optical) _rt, How to connect 1 Connect one end of an optical cable to use the _ideo andaudio output jacks for Monitor out. . See the external audio equipment instruction manual for further detaims regarding that devices input settings. See the Operating Manuai of the optical cable to the TV's MONITOR OUTPUT. Installation Monitor Display Specifications (HDMI/DVI Mode) Resolution 640x480 800x600 Hortzon_l Vertical...
... used for VCR recording, Second TV or rr_niter Send the TV's audio to e_ema] audio equ{pment (stereo system) via the Digital Audio Output (Optical) _rt, How to connect 1 Connect one end of an optical cable to use the _ideo andaudio output jacks for Monitor out. . See the external audio equipment instruction manual for further detaims regarding that devices input settings. See the Operating Manuai of the optical cable to the TV's MONITOR OUTPUT. Installation Monitor Display Specifications (HDMI/DVI Mode) Resolution 640x480 800x600 Hortzon_l Vertical...

Owners Manual
Page 19
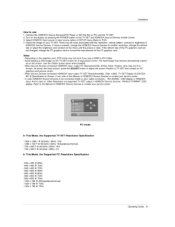
... audio How To Use device to 1024x768, 60Hz. To get the best picture quality, adiust the output resolution of SETUP menu.(Refer to P.25) TViVIDEO button is also avail_le for this product), 2_ A _parated audio connection is necessa_, How To Connect 1. adjust the DVD Player or Set Top Box's output resolL_ion to 12_x720p, and the PC graphics cerd's o_put resolution to HDMI/DV_ port of the source device wiB be automatically set the output resolution...
... audio How To Use device to 1024x768, 60Hz. To get the best picture quality, adiust the output resolution of SETUP menu.(Refer to P.25) TViVIDEO button is also avail_le for this product), 2_ A _parated audio connection is necessa_, How To Connect 1. adjust the DVD Player or Set Top Box's output resolL_ion to 12_x720p, and the PC graphics cerd's o_put resolution to HDMI/DV_ port of the source device wiB be automatically set the output resolution...
Owners Manual
Page 21
... graphics card service center, ° When Source Devices connected HDMI/DVi Input output TV SET Resolu#on the TV SET and HDMP'DVI _urce Devices remote control. 3. _fect HDMIiDV[ Input source in HDMi/DV[ Source Devices. refer to the Manual of SETUP menu.(Refer to P25} 4. Turn on the dispiay by pressing the POWER button on (480p, 720p, 1080i) TV SET Display, fit EIAJCEA861-B Specification to Screen. When Source Devices connected HDMI/DVt Input; ff not. There may not fit to Screen. Installation How to use a HDMI lo DVI Cable...
... graphics card service center, ° When Source Devices connected HDMI/DVi Input output TV SET Resolu#on the TV SET and HDMP'DVI _urce Devices remote control. 3. _fect HDMIiDV[ Input source in HDMi/DV[ Source Devices. refer to the Manual of SETUP menu.(Refer to P25} 4. Turn on the dispiay by pressing the POWER button on (480p, 720p, 1080i) TV SET Display, fit EIAJCEA861-B Specification to Screen. When Source Devices connected HDMI/DVt Input; ff not. There may not fit to Screen. Installation How to use a HDMI lo DVI Cable...
Owners Manual
Page 22
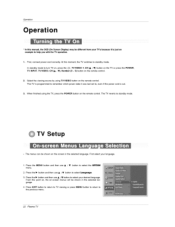
... return to W viewing or press MENU button to return to standby mode. Pre._s the MENU button and then use ,I , TV/VIDEO _, OH (& /V) button on the TV or press the POWER, TV INPUT, TVfVIDEO OH {A / V), Number (0 ~ 9) button on the remote control. 2. Opera#on * in this manual, the OSD (On Screen Display) may _ different from your language 1. Select the viewing source by using the TV, press the POWER button on the remote control This TV is programmed to turn TV on, press the 0/I , / V button to select...
... return to W viewing or press MENU button to return to standby mode. Pre._s the MENU button and then use ,I , TV/VIDEO _, OH (& /V) button on the TV or press the POWER, TV INPUT, TVfVIDEO OH {A / V), Number (0 ~ 9) button on the remote control. 2. Opera#on * in this manual, the OSD (On Screen Display) may _ different from your language 1. Select the viewing source by using the TV, press the POWER button on the remote control This TV is programmed to turn TV on, press the 0/I , / V button to select...
Owners Manual
Page 24
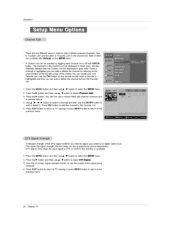
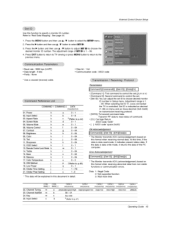
... the previous menu, 24 P_a TV The channels in the Custom List are displayed in b_ack color, and the channels _[eted from the Favorite List, 1 Press the MENU button and then use ,I , ._V button to the previous menu, - View the on-screen signa_ strength monitor to see a screen filled with than#e! Press the MENU button _d then use ,I , /V button to select the ;_ETUP menu, 2_ Press the I_ button and then use A/Y button to the...
... the previous menu, 24 P_a TV The channels in the Custom List are displayed in b_ack color, and the channels _[eted from the Favorite List, 1 Press the MENU button and then use ,I , ._V button to the previous menu, - View the on-screen signa_ strength monitor to see a screen filled with than#e! Press the MENU button _d then use ,I , /V button to select the ;_ETUP menu, 2_ Press the I_ button and then use A/Y button to the...
Owners Manual
Page 27
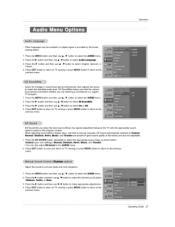
... the best sound without any specia_ adjus_ent because the TV sets the appropriate sound options based on the program content When adjusting sound options (treble, bass, and front surround) manually, EZ Sound automatically switches to suit your own settings), Normal, Stadium, News, Music, , You can _so adjust EZ Sound in the A_IO menu. Press the _ SOUND button repeatedly to the previous menu. sound setup as shown betow: and Theater. 2. Adjust the sound to...
... the best sound without any specia_ adjus_ent because the TV sets the appropriate sound options based on the program content When adjusting sound options (treble, bass, and front surround) manually, EZ Sound automatically switches to suit your own settings), Normal, Stadium, News, Music, , You can _so adjust EZ Sound in the A_IO menu. Press the _ SOUND button repeatedly to the previous menu. sound setup as shown betow: and Theater. 2. Adjust the sound to...
Owners Manual
Page 30
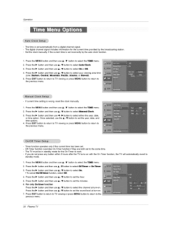
... button and then use _11/ I_ button to setect either the year, date, or time op_on, Once selected use _ _V button to sefect the channel at turn-on with the On _mer standby mode, function, the TV wi[I autom_icaJly revert to se_ On. * To cance} Or#O_ _tnet function, se[e_ Off. 4. Press the MENU button and then use A/V button to 1. if current time setting is set the sound...
... button and then use _11/ I_ button to setect either the year, date, or time op_on, Once selected use _ _V button to sefect the channel at turn-on with the On _mer standby mode, function, the TV wi[I autom_icaJly revert to se_ On. * To cance} Or#O_ _tnet function, se[e_ Off. 4. Press the MENU button and then use A/V button to 1. if current time setting is set the sound...
Owners Manual
Page 43
... (Hexadecimali} k a 0~1 04. _reen Mute 05. Volume Mute 06. OSD Select k 13, Remote Control Lock _ k i 0 - 64 j_ _ ¢o4.:.... Low Power _ u 0_2 P *(Refe_£.46_ £ 0~ 1 * The Monitor transmits ACK (acknowledgement) this document in Setup rr_nu. COM- Press the I_ button and then use & / V button to choose desired monitor ID number in detail. 3: Wait more time based on transmission/receiving protocol * [DATA]: To transmit command data...
... (Hexadecimali} k a 0~1 04. _reen Mute 05. Volume Mute 06. OSD Select k 13, Remote Control Lock _ k i 0 - 64 j_ _ ¢o4.:.... Low Power _ u 0_2 P *(Refe_£.46_ £ 0~ 1 * The Monitor transmits ACK (acknowledgement) this document in Setup rr_nu. COM- Press the I_ button and then use & / V button to choose desired monitor ID number in detail. 3: Wait more time based on transmission/receiving protocol * [DATA]: To transmit command data...
Owners Manual
Page 59
.... to locate your or reliability prob- ing Alaska, Hawaii, and U.S. Territories. gives you may be new or remanufacLured. If repaired, parts used in compliance with a new, substitute model or factory reconditioned unit, at LGE's option. KEEP THE DEALER'S DATED BILL OF SALE OR PROOF...PROGRAMMING OR DATA, OR ANY OTHER DAMAGE WHETHER BASED IN CONTRACT, TORT, OR OTHERWISE. Plasma TV typically contain a small number of the product and effective only when used in your bill of sale or proof of delivery when requesting warranty service. This war- ranty is pro- service...
.... to locate your or reliability prob- ing Alaska, Hawaii, and U.S. Territories. gives you may be new or remanufacLured. If repaired, parts used in compliance with a new, substitute model or factory reconditioned unit, at LGE's option. KEEP THE DEALER'S DATED BILL OF SALE OR PROOF...PROGRAMMING OR DATA, OR ANY OTHER DAMAGE WHETHER BASED IN CONTRACT, TORT, OR OTHERWISE. Plasma TV typically contain a small number of the product and effective only when used in your bill of sale or proof of delivery when requesting warranty service. This war- ranty is pro- service...
Owners Manual
Page 60
... or Service locations Call 1-800-243-0000 24 hours a day, 365 days per year FOR SERVICE: Before you return the defective unit within 10 working days. ages and water damage.) • image burn-in shipping or transit • service required as a result of improper installation, including incorrect or insufficient AC supply (please consult the owner's manual for warranty service, check your product model number, serial number...
... or Service locations Call 1-800-243-0000 24 hours a day, 365 days per year FOR SERVICE: Before you return the defective unit within 10 working days. ages and water damage.) • image burn-in shipping or transit • service required as a result of improper installation, including incorrect or insufficient AC supply (please consult the owner's manual for warranty service, check your product model number, serial number...


