Specification
Page 2
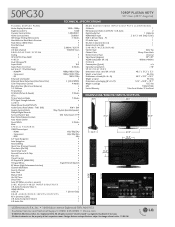
... Channel • Auto Clock • Manual Clock • On/Off Timer • Sleep Timer • Auto Off (When no video is a registered trademark of their respective owners. PC 1 PC Audio Input 1 RS-232c In (Control/Service) 1 Remote Control In (IR) 1 CABINET/ACCESSORIES Cabinet Style Table Top Cabinet Color Glossy Piano-black Remote Control Type Universal Stand Swivel (degrees) 20º / 20º VESA® Compatible (W x H) 400mm x 400mm POWER Consumption (Typical) n/a Stand-by Consumption...
... Channel • Auto Clock • Manual Clock • On/Off Timer • Sleep Timer • Auto Off (When no video is a registered trademark of their respective owners. PC 1 PC Audio Input 1 RS-232c In (Control/Service) 1 Remote Control In (IR) 1 CABINET/ACCESSORIES Cabinet Style Table Top Cabinet Color Glossy Piano-black Remote Control Type Universal Stand Swivel (degrees) 20º / 20º VESA® Compatible (W x H) 400mm x 400mm POWER Consumption (Typical) n/a Stand-by Consumption...
Owner's Manual (English)
Page 4
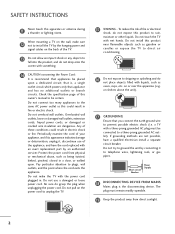
..., and have a qualified electrician install a separate circuit breaker. Be sure do not place objects filled with an exact replacement part by an authorized servicer. Do not touch the TV with the power cord plugged in fire or electric shock. on the power cord to dripping or splashing and do grasp the plug when unplugging the power cord. SAFETY INSTRUCTIONS 11 Never touch this...
..., and have a qualified electrician install a separate circuit breaker. Be sure do not place objects filled with an exact replacement part by an authorized servicer. Do not touch the TV with the power cord plugged in fire or electric shock. on the power cord to dripping or splashing and do grasp the plug when unplugging the power cord. SAFETY INSTRUCTIONS 11 Never touch this...
Owner's Manual (English)
Page 5
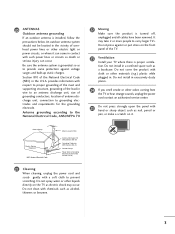
...) Ground Clamps Power Service Grounding Electrode System (NEC Art 250, Part H) 21 Cleaning When cleaning, unplug the power cord and scrub gently with respect to proper grounding of the mast and supporting structure, grounding of the lead-in wire to carry larger TVs. Be sure the antenna system is turned off, unplugged and all cables have been removed. Antenna grounding according...
...) Ground Clamps Power Service Grounding Electrode System (NEC Art 250, Part H) 21 Cleaning When cleaning, unplug the power cord and scrub gently with respect to proper grounding of the mast and supporting structure, grounding of the lead-in wire to carry larger TVs. Be sure the antenna system is turned off, unplugged and all cables have been removed. Antenna grounding according...
Owner's Manual (English)
Page 6
... Panel Information 9 Stand Instruction 10 Cable Management 11 Desktop Pedestal Installation 12 Swivel Stand 12 VESA Wall Mounting 13 Securing the TV to the wall to prevent falling . . . . 14 Antenna or Cable Connection 15 EXTERNAL EQUIPMENT SETUP HD Receiver Setup 16 DVD Setup 19 VCR Setup 21 Other A/V Source Setup 23 Audio Out Connection 23 PC Setup 24 WATCHING TV / CHANNEL CONTROL Remote Control Functions 30 Turning On TV 32 Channel Selection 32 Volume Adjustment 32 Initial Setting 33 Quick Menu 34 On-Screen Menus Selection 35 Channel Setup - User Mode 48 - Black...
... Panel Information 9 Stand Instruction 10 Cable Management 11 Desktop Pedestal Installation 12 Swivel Stand 12 VESA Wall Mounting 13 Securing the TV to the wall to prevent falling . . . . 14 Antenna or Cable Connection 15 EXTERNAL EQUIPMENT SETUP HD Receiver Setup 16 DVD Setup 19 VCR Setup 21 Other A/V Source Setup 23 Audio Out Connection 23 PC Setup 24 WATCHING TV / CHANNEL CONTROL Remote Control Functions 30 Turning On TV 32 Channel Selection 32 Volume Adjustment 32 Initial Setting 33 Quick Menu 34 On-Screen Menus Selection 35 Channel Setup - User Mode 48 - Black...

Owner's Manual (English)
Page 10
... VOL MENU ENTER INPUT Button ENTER VOL MENU Button VOL CH ENTER VOLUME Button (-, +) Buttons CH CH CHANNEL (E,D)Buttons PREPARATION PREPARATION FRONT PANEL INFORMATION I NOTE: If your TV has a protection tape attached, remove the tape. And then wipe the TV with a cloth (If a polishing cloth is switched on . I Image shown may differ from your TV, use it). 42/50PG10 Remote Control Sensor Power/Standby Indicator Illuminates red in standby mode.
... VOL MENU ENTER INPUT Button ENTER VOL MENU Button VOL CH ENTER VOLUME Button (-, +) Buttons CH CH CHANNEL (E,D)Buttons PREPARATION PREPARATION FRONT PANEL INFORMATION I NOTE: If your TV has a protection tape attached, remove the tape. And then wipe the TV with a cloth (If a polishing cloth is switched on . I Image shown may differ from your TV, use it). 42/50PG10 Remote Control Sensor Power/Standby Indicator Illuminates red in standby mode.

Owner's Manual (English)
Page 11
...support 480i. Analog PC Connection. Uses a D-sub 15 pin cable (VGA cable). Used by third party devices. 9 USB SERVICE ONLY 4 REMOTE CONTROL PORT Used for analog PC audio input. 9 For a wired remote control. 10 Power Cord Socket 5 RGB (PC) For operation with amps and home theater systems. Includes an optical connection. AUDIO (RGB/DVI) 1/8" headphone jack for software updates. Connect cable signals to this jack. 7 HDMI/DVI IN, HDMI IN Digital Connection. Uses a red, green, and blue cable for video & red and white for use with AC power. Caution: Never attempt to DVI...
...support 480i. Analog PC Connection. Uses a D-sub 15 pin cable (VGA cable). Used by third party devices. 9 USB SERVICE ONLY 4 REMOTE CONTROL PORT Used for analog PC audio input. 9 For a wired remote control. 10 Power Cord Socket 5 RGB (PC) For operation with amps and home theater systems. Includes an optical connection. AUDIO (RGB/DVI) 1/8" headphone jack for software updates. Connect cable signals to this jack. 7 HDMI/DVI IN, HDMI IN Digital Connection. Uses a red, green, and blue cable for video & red and white for use with AC power. Caution: Never attempt to DVI...
Owner's Manual (English)
Page 18
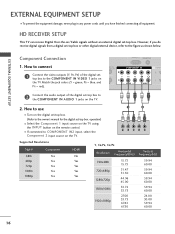
... SETUP This TV can receive Digital Over-the-air/Cable signals without an external digital set -top box. I If connected to COMPONENT IN2 input, select the Component 2 input source on the TV. 2. However, if you have finished connecting all equipment. RGB(PC) (RGB/DVI) COMPONENT IN VIDEO AUDIO HDMI/ 2 1 2 Connect the audio output of the digital settop box to the COMPONENT IN VIDEO 1 jacks on the remote control. Component Connection 1. Match the jack colors (Y = green, PB = blue, and( ) PR = red). How to connect MOTE TROL IN 2 1 Connect...
... SETUP This TV can receive Digital Over-the-air/Cable signals without an external digital set -top box. I If connected to COMPONENT IN2 input, select the Component 2 input source on the TV. 2. However, if you have finished connecting all equipment. RGB(PC) (RGB/DVI) COMPONENT IN VIDEO AUDIO HDMI/ 2 1 2 Connect the audio output of the digital settop box to the COMPONENT IN VIDEO 1 jacks on the remote control. Component Connection 1. Match the jack colors (Y = green, PB = blue, and( ) PR = red). How to connect MOTE TROL IN 2 1 Connect...
Owner's Manual (English)
Page 19
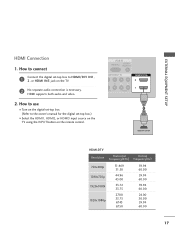
...to connect 1 Connect the digital set-top box to the owner's manual for the digital set-top box.) I Turn on the digital set-top box. (Refer to HDMI/DVI IN1, 2, or HDMI IN3 jack on the remote control. RGB IN RGB(PC) AUDIO (RGB/DVI) OMPONENT IN B PR L R EO AUDIO HDMI/DVI IN 2 1 1 HDMI-DTV OUTPUT HDMI-DTV Resolution Horizontal... ( ) 17 How to use I Select the HDMI1, HDMI2, or HDMI3 input source on the TV using the INPUT button on the TV. 2 No separate audio connection is necessary. ( ) HDMI supports both audio and video. 2. EXTERNAL EQUIPMENT SETUP HDMI Connection 1.
...to connect 1 Connect the digital set-top box to the owner's manual for the digital set-top box.) I Turn on the digital set-top box. (Refer to HDMI/DVI IN1, 2, or HDMI IN3 jack on the remote control. RGB IN RGB(PC) AUDIO (RGB/DVI) OMPONENT IN B PR L R EO AUDIO HDMI/DVI IN 2 1 1 HDMI-DTV OUTPUT HDMI-DTV Resolution Horizontal... ( ) 17 How to use I Select the HDMI1, HDMI2, or HDMI3 input source on the TV using the INPUT button on the TV. 2 No separate audio connection is necessary. ( ) HDMI supports both audio and video. 2. EXTERNAL EQUIPMENT SETUP HDMI Connection 1.
Owner's Manual (English)
Page 20
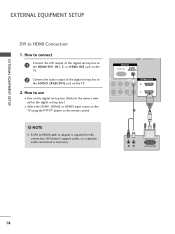
... the TV using the INPUT button on the TV. 2. How to use ( ) I Turn on the digital set-top box. (Refer to HDMI cable or adapter is necessary. NOTE G A DVI to the owner's manual for this connection. R L DVI-DTV OUTPUT 18 DVI doesn't support audio, so a separate audio connection is required for the digital set -top box to HDMI Connection 1. EXTERNAL EQUIPMENT SETUP EXTERNAL EQUIPMENT SETUP DVI to the AUDIO (RGB/DVI) jack on the remote control. RGB IN RGB(PC) AUDIO (RGB/DVI) CABLE IN COMPONENT IN PB PR L R VIDEO AUDIO HDMI/DVI IN...
... the TV using the INPUT button on the TV. 2. How to use ( ) I Turn on the digital set-top box. (Refer to HDMI cable or adapter is necessary. NOTE G A DVI to the owner's manual for this connection. R L DVI-DTV OUTPUT 18 DVI doesn't support audio, so a separate audio connection is required for the digital set -top box to HDMI Connection 1. EXTERNAL EQUIPMENT SETUP EXTERNAL EQUIPMENT SETUP DVI to the AUDIO (RGB/DVI) jack on the remote control. RGB IN RGB(PC) AUDIO (RGB/DVI) CABLE IN COMPONENT IN PB PR L R VIDEO AUDIO HDMI/DVI IN...

Owner's Manual (English)
Page 23
If the 4:3 picture format is not covered by warranty. How to connect 1 Connect the RF antenna out socket of the VCR to the ANTENNA/CABLE IN socket on the VCR. (Refer to the VCR owner's manual.) ANTENNA/ CABLE IN IO DVI) 1 HDMI/DVI IN 2 R 1 ANT OUT S-VIDEO VIDEO L R ANT IN OUTPUT SWITCH Wall Jack 2 Antenna ( ) 21 EXTERNAL EQUIPMENT SETUP VCR SETUP I Set VCR output switch to 3 or 4 and then tune TV to the same channel number. How to use I To avoid picture noise (interference), leave an adequate distance...
If the 4:3 picture format is not covered by warranty. How to connect 1 Connect the RF antenna out socket of the VCR to the ANTENNA/CABLE IN socket on the VCR. (Refer to the VCR owner's manual.) ANTENNA/ CABLE IN IO DVI) 1 HDMI/DVI IN 2 R 1 ANT OUT S-VIDEO VIDEO L R ANT IN OUTPUT SWITCH Wall Jack 2 Antenna ( ) 21 EXTERNAL EQUIPMENT SETUP VCR SETUP I Set VCR output switch to 3 or 4 and then tune TV to the same channel number. How to use I To avoid picture noise (interference), leave an adequate distance...

Owner's Manual (English)
Page 27
... of time. NOTES G To get the the best picture quality, adjust the PC graphics card to another rate or adjust the brightness and contrast on the graphics card, DOS mode may not allow the image to DVI Cable is separate. The fixed image could become permanently imprinted on the screen for Horizontal and Vertical frequencies is in use. EXTERNAL EQUIPMENT SETUP Supported Display Specifications (RGB-PC, HDMI-PC) Resolution 640x350...
... of time. NOTES G To get the the best picture quality, adjust the PC graphics card to another rate or adjust the brightness and contrast on the graphics card, DOS mode may not allow the image to DVI Cable is separate. The fixed image could become permanently imprinted on the screen for Horizontal and Vertical frequencies is in use. EXTERNAL EQUIPMENT SETUP Supported Display Specifications (RGB-PC, HDMI-PC) Resolution 640x350...
Owner's Manual (English)
Page 36
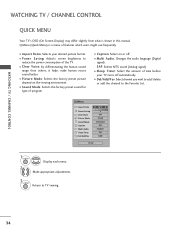
...a menu of time before your desired picture format. Q.Menu Aspect Ratio Power Saving Clear Voice Picture Mode Sound Mode Caption Multi Audio Sleep Timer CH Del/Add/Fav F 16:9 G 3 Off Vivid Standard Off English Off Add Close 1Q. I Sleep Timer: Select the amount of features which users might use frequently. I P o w e r S a v i n g: Adjusts screen brightness to reduce the power consumption of program. MENU Return to the Favorite List. I Multi Audio: Changes the audio language (Digital signal). Q.Menu (Quick Menu) is shown in this manual. I Del/Add/Fav: Select channel...
...a menu of time before your desired picture format. Q.Menu Aspect Ratio Power Saving Clear Voice Picture Mode Sound Mode Caption Multi Audio Sleep Timer CH Del/Add/Fav F 16:9 G 3 Off Vivid Standard Off English Off Add Close 1Q. I Sleep Timer: Select the amount of features which users might use frequently. I P o w e r S a v i n g: Adjusts screen brightness to reduce the power consumption of program. MENU Return to the Favorite List. I Multi Audio: Changes the audio language (Digital signal). Q.Menu (Quick Menu) is shown in this manual. I Del/Add/Fav: Select channel...
Owner's Manual (English)
Page 37
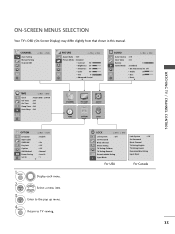
... Auto Volume : Off Clear Voice : On Balance 0L R Sound Mode : Standard • SRS TruSurround XT: Off • Treble 50 • Bass 50 • Reset E TIME Move Enter Clock : Feb/21/2008/ 2:10 AM Off Time : Off On Time : Off Sleep Timer : Off Auto Sleep : Off CHANNEL PICTURE AUDIO TIME OPTION LOCK OPTION Move Enter Language : English Input Label SIMPLINK : On Key Lock : Off Caption : Off ISM Method : Normal Power Saving : Level 0 Set ID : 1 E 1 MENU Display...
... Auto Volume : Off Clear Voice : On Balance 0L R Sound Mode : Standard • SRS TruSurround XT: Off • Treble 50 • Bass 50 • Reset E TIME Move Enter Clock : Feb/21/2008/ 2:10 AM Off Time : Off On Time : Off Sleep Timer : Off Auto Sleep : Off CHANNEL PICTURE AUDIO TIME OPTION LOCK OPTION Move Enter Language : English Input Label SIMPLINK : On Key Lock : Off Caption : Off ISM Method : Normal Power Saving : Level 0 Set ID : 1 E 1 MENU Display...

Owner's Manual (English)
Page 44
... function properly when using SIMPLINK, turn it with other AV devices connected with the INPUT button on in the user menus. G When you select a device with home theater functionality, the sound output automatically switches to the previous menu. WATCHING TV / CHANNEL CONTROL This function operates only with devices with HDMI-CEC function. OPTION Move Enter Language Input Label SIMPLINK Key Lock Caption ISM Method Power Saving Set ID E : English : On : Off : Off...
... function properly when using SIMPLINK, turn it with other AV devices connected with the INPUT button on in the user menus. G When you select a device with home theater functionality, the sound output automatically switches to the previous menu. WATCHING TV / CHANNEL CONTROL This function operates only with devices with HDMI-CEC function. OPTION Move Enter Language Input Label SIMPLINK Key Lock Caption ISM Method Power Saving Set ID E : English : On : Off : Off...
Owner's Manual (English)
Page 68
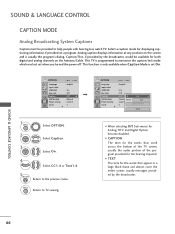
... for both digital and analog channels on the Antenna/Cable. Select O n. 4 Select C C 1-4 or Text1-4. 5 RETURN Return to help people with hearing loss watch TV. OPTION Move Enter Language : English Input Label SIMPLINK : On Key Lock : Off Caption : CC1 F On G ISM Method Power Saving Set ID E : Normal Mode CC1 : Level 0 : 1 Digital Option Close I TEXT The term for the words that scroll across the bottom of the program provided for...
... for both digital and analog channels on the Antenna/Cable. Select O n. 4 Select C C 1-4 or Text1-4. 5 RETURN Return to help people with hearing loss watch TV. OPTION Move Enter Language : English Input Label SIMPLINK : On Key Lock : Off Caption : CC1 F On G ISM Method Power Saving Set ID E : Normal Mode CC1 : Level 0 : 1 Digital Option Close I TEXT The term for the words that scroll across the bottom of the program provided for...

Owner's Manual (English)
Page 76
The Parental Control Function (V-Chip) is used to block all programs to block program viewing based on the ratings sent by choosing the type of the program and the categories. The default setting is required to gain access to block specific channels, ratings, and external viewing sources. Ratings for Television programs including made-for a time period. A password is to allow all program viewing for -TV movies : I TV-G (General audience) I TV-PG (Parental guidance suggested...
The Parental Control Function (V-Chip) is used to block all programs to block program viewing based on the ratings sent by choosing the type of the program and the categories. The default setting is required to gain access to block specific channels, ratings, and external viewing sources. Ratings for Television programs including made-for a time period. A password is to allow all program viewing for -TV movies : I TV-G (General audience) I TV-PG (Parental guidance suggested...
Owner's Manual (English)
Page 88
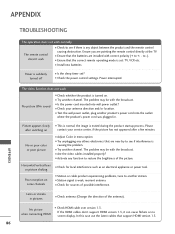
... remote operating mode is causing the problem. No picture when connecting HDMI I Check antenna (Change the direction of the antenna). to restore the brightness of possible interference. Horizontal/vertical bars I Check for local interference such as an electrical appliance or power tool. I Is the sleep timer set : TV, VCR etc. I Check for sources of the picture. I Try another product's power cord into wall power outlet? APPENDIX TROUBLESHOOTING The operation does not work . I Is the power cord...
... remote operating mode is causing the problem. No picture when connecting HDMI I Check antenna (Change the direction of the antenna). to restore the brightness of possible interference. Horizontal/vertical bars I Check for local interference such as an electrical appliance or power tool. I Is the sleep timer set : TV, VCR etc. I Check for sources of the picture. I Try another product's power cord into wall power outlet? APPENDIX TROUBLESHOOTING The operation does not work . I Is the power cord...
Owner's Manual (English)
Page 89
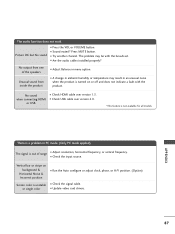
... USB cable over version 1.3. I Adjust resolution, horizontal frequency, or vertical frequency. No sound when connecting HDMI or USB I Check HDMI cable over version 2.0. *This feature is unstable or single color I Run the Auto configure or adjust clock, phase, or H/V position. (Option) I A change in ambient humidity or temperature may be with the product. I Are the audio cables installed properly? I Try another channel. I Press the VOL or VOLUME button. I Check the signal cable. Vertical...
... USB cable over version 1.3. I Adjust resolution, horizontal frequency, or vertical frequency. No sound when connecting HDMI or USB I Check HDMI cable over version 2.0. *This feature is unstable or single color I Run the Auto configure or adjust clock, phase, or H/V position. (Option) I A change in ambient humidity or temperature may be with the product. I Are the audio cables installed properly? I Try another channel. I Press the VOL or VOLUME button. I Check the signal cable. Vertical...
Owner's Manual (English)
Page 93
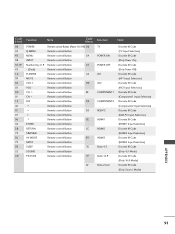
... control Button BF CH Remote control Button FAV Remote control Button D4 Remote control Button Remote control Button D5 Remote control Button Remote control Button CE ENTER Remote control Button RETURN Remote control Button CC SIMPLINK Remote control Button AV MODE Remote control Button E9 RATIO Remote control Button SLEEP Remote control Button 76 SOUND Remote control Button PICTURE Remote control Button 77 AF Function Note TV POWER ON POWER OFF AV1 AV2 COMPONENT1 COMPONENT2 RGB-PC HDMI1 HDMI2 HDMI3 Ratio 4:3 Ratio 16:9 Ratio Zoom Discrete IR Code (TV Input...
... control Button BF CH Remote control Button FAV Remote control Button D4 Remote control Button Remote control Button D5 Remote control Button Remote control Button CE ENTER Remote control Button RETURN Remote control Button CC SIMPLINK Remote control Button AV MODE Remote control Button E9 RATIO Remote control Button SLEEP Remote control Button 76 SOUND Remote control Button PICTURE Remote control Button 77 AF Function Note TV POWER ON POWER OFF AV1 AV2 COMPONENT1 COMPONENT2 RGB-PC HDMI1 HDMI2 HDMI3 Ratio 4:3 Ratio 16:9 Ratio Zoom Discrete IR Code (TV Input...

Owner's Manual (English)
Page 98
... the TV, use this mode. Transmission [m][a][ ][Set ID][ ][Data00][ ][Data01] [ ][Data02][ ][Data03][ ][Data04][ ][Data05][Cr] Digital channels have a Physical, Major, and Minor channel number. APPENDIX 12. Transmission [k][l][ ][Set ID][ ][Data][Cr] Data 00: OSD off . See page 97. Remote Control Lock Mode (Command: k m) To lock the remote control and the front panel controls on screen. Color Temperature (Command: k u) To adjust color temperature. ISM Method (Command: j p) To avoid having a fixed image remain on the...
... the TV, use this mode. Transmission [m][a][ ][Set ID][ ][Data00][ ][Data01] [ ][Data02][ ][Data03][ ][Data04][ ][Data05][Cr] Digital channels have a Physical, Major, and Minor channel number. APPENDIX 12. Transmission [k][l][ ][Set ID][ ][Data][Cr] Data 00: OSD off . See page 97. Remote Control Lock Mode (Command: k m) To lock the remote control and the front panel controls on screen. Color Temperature (Command: k u) To adjust color temperature. ISM Method (Command: j p) To avoid having a fixed image remain on the...


