
Owner's Manual (English)
Page 2
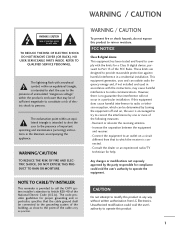
... expose this product 1 This equipment generates, uses and can be determined by one or more of the National Electric Code (U.S.A.). If this product in accordance with the instructions, may be connected to the grounding system of the cable entry as close to persons. REFER TO QUALIFIED SERVICE PERSONNEL. The lightning flash with the limits for proper grounding and...
... expose this product 1 This equipment generates, uses and can be determined by one or more of the National Electric Code (U.S.A.). If this product in accordance with the instructions, may be connected to the grounding system of the cable entry as close to persons. REFER TO QUALIFIED SERVICE PERSONNEL. The lightning flash with the limits for proper grounding and...
Owner's Manual (English)
Page 5
... 8 Home Menu 9 Front Panel Controls 10 Back Panel Information 11 Attaching the TV to a Wall 12 Back Cover for Wire Arrangement 13 Vesa Wall Mounting 14 Desktop Pedestal Installation 15 Antenna or Cable Connection 16 TM CableCARD 17 EXTERNAL EQUIPMENT SETUP HD Receiver Setup 22 DVD Setup 25 VCR Setup 27 Other A/V Source Setup 29 PC Setup 30 Audio Out Setup 35 WATCHING TV / CHANNEL CONTROL Remote Control Functions 36 Turning on TV 38 Channel Selection 39 Volume Adjustment 39 On-Screen Menus Selection 40 Channel Setup -Auto Scan ( EZ Scan...
... 8 Home Menu 9 Front Panel Controls 10 Back Panel Information 11 Attaching the TV to a Wall 12 Back Cover for Wire Arrangement 13 Vesa Wall Mounting 14 Desktop Pedestal Installation 15 Antenna or Cable Connection 16 TM CableCARD 17 EXTERNAL EQUIPMENT SETUP HD Receiver Setup 22 DVD Setup 25 VCR Setup 27 Other A/V Source Setup 29 PC Setup 30 Audio Out Setup 35 WATCHING TV / CHANNEL CONTROL Remote Control Functions 36 Turning on TV 38 Channel Selection 39 Volume Adjustment 39 On-Screen Menus Selection 40 Channel Setup -Auto Scan ( EZ Scan...
Owner's Manual (English)
Page 6
...Power Picture Mode 105 Programming the Remote Control 137 IR Codes 141 External Control through RS-232C 143 SOUND & LANGUAGE CONTROL Auto Volume Leveler ( EZ SoundRite 106 Preset Sound Settings( EZ Sound 107 Sound Setting Adjustment - Sound Improvement Technology 111 Stereo / SAP Broadcast Setup 112 TV Speakers On/ Off Setup 113 Audio Language 114 On-Screen Menus Lanaguage Selection 115 Caption / Text 116 Caption Option 118 TIME SETTING Clock Setting 119 Auto On/ Off Timer Setting 121 Sleep Timer Setting 122 Auto Shut-off Setting 123 PARENTAL CONTROL / RATINGS Set Password...
...Power Picture Mode 105 Programming the Remote Control 137 IR Codes 141 External Control through RS-232C 143 SOUND & LANGUAGE CONTROL Auto Volume Leveler ( EZ SoundRite 106 Preset Sound Settings( EZ Sound 107 Sound Setting Adjustment - Sound Improvement Technology 111 Stereo / SAP Broadcast Setup 112 TV Speakers On/ Off Setup 113 Audio Language 114 On-Screen Menus Lanaguage Selection 115 Caption / Text 116 Caption Option 118 TIME SETTING Clock Setting 119 Auto On/ Off Timer Setting 121 Sleep Timer Setting 122 Auto Shut-off Setting 123 PARENTAL CONTROL / RATINGS Set Password...
Owner's Manual (English)
Page 7
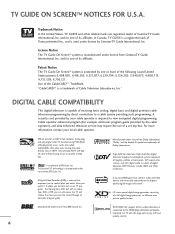
... one or more of Deployment) access cards, also called CableCARDs, that connect audio and video devices with no videotape. High-resolution digital television broadcast and playback system composed of the CableCARDTM TradeMark. With HDMI CEC support of LG's audio/video device connected to record through an electronic program guide. Cable operator enhanced program (For example, electronic program guide provided by direct connection to the plugand-play digital cable TV standard using POD (Point of the following...
... one or more of Deployment) access cards, also called CableCARDs, that connect audio and video devices with no videotape. High-resolution digital television broadcast and playback system composed of the CableCARDTM TradeMark. With HDMI CEC support of LG's audio/video device connected to record through an electronic program guide. Cable operator enhanced program (For example, electronic program guide provided by direct connection to the plugand-play digital cable TV standard using POD (Point of the following...
Owner's Manual (English)
Page 12
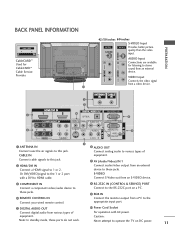
... stereo sound from an external device to this jack. Caution : Never attempt to the RS-232C port on DC power. 11 AUDIO OUT Connect analog audio to various types of equipment. CABLE IN Connect cable signals to these ports do not work. AV (Audio/Video) IN 1 Connect audio/video output from an external device. HDMI/DVI IN Connect a HDMI signal to the appropriate input port. RGB IN Connect the monitor output from various types of equipment. DIGITAL AUDIO OUT Connect digital audio from a PC to 1 or 2. REMOTE CONTROL IN Connect your wired remote control. S-VIDEO...
... stereo sound from an external device to this jack. Caution : Never attempt to the RS-232C port on DC power. 11 AUDIO OUT Connect analog audio to various types of equipment. CABLE IN Connect cable signals to these ports do not work. AV (Audio/Video) IN 1 Connect audio/video output from an external device. HDMI/DVI IN Connect a HDMI signal to the appropriate input port. RGB IN Connect the monitor output from various types of equipment. DIGITAL AUDIO OUT Connect digital audio from a PC to 1 or 2. REMOTE CONTROL IN Connect your wired remote control. S-VIDEO...
Owner's Manual (English)
Page 23
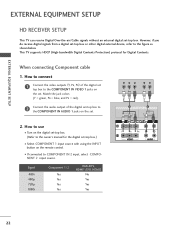
... the digital set -top box or other digital external device, refer to COMPONENT IN 2 input, select COMPONENT 2 input source. Match the jack colors (Y = green, PB = blue, and PR = red). 2 Connect the audio output of the digital set top box to the COMPONENT IN AUDIO 1 jacks on the set. How to connect 1 Connect the video outputs (Y, PB, PR) of the digital set-top box to the COMPONENT IN VIDEO 1 jacks on the set -top box. How to use I Turn on the digital set-top box. (Refer to the owner's manual for Digital Contents. When connecting Component cable...
... the digital set -top box or other digital external device, refer to COMPONENT IN 2 input, select COMPONENT 2 input source. Match the jack colors (Y = green, PB = blue, and PR = red). 2 Connect the audio output of the digital set top box to the COMPONENT IN AUDIO 1 jacks on the set. How to connect 1 Connect the video outputs (Y, PB, PR) of the digital set-top box to the COMPONENT IN VIDEO 1 jacks on the set -top box. How to use I Turn on the digital set-top box. (Refer to the owner's manual for Digital Contents. When connecting Component cable...
Owner's Manual (English)
Page 24
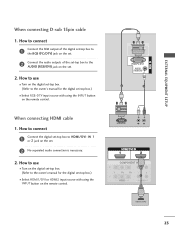
... set -top box to the RGB (PC/DTV) jack on the set. 2 Connect the audio outputs of the set . 2. How to use I Turn on the digital set-top box. (Refer to the owner's manual for the digital set-top box.) I Select RGB-DTV input source with using the INPUT button on the set -top box to connect 1 Connect the digital set . 2 No separated audio connection is necessary. 2. RGB OUTPUT L R L R AUDIO HDMI-DTV OUTPUT 23 EXTERNAL EQUIPMENT SETUP When connecting D-sub 15pin cable 1. When connecting HDMI cable 1. How to the AUDIO (RGB/DVI) jack on the remote control...
... set -top box to the RGB (PC/DTV) jack on the set. 2 Connect the audio outputs of the set . 2. How to use I Turn on the digital set-top box. (Refer to the owner's manual for the digital set-top box.) I Select RGB-DTV input source with using the INPUT button on the set -top box to connect 1 Connect the digital set . 2 No separated audio connection is necessary. 2. RGB OUTPUT L R L R AUDIO HDMI-DTV OUTPUT 23 EXTERNAL EQUIPMENT SETUP When connecting D-sub 15pin cable 1. When connecting HDMI cable 1. How to the AUDIO (RGB/DVI) jack on the remote control...
Owner's Manual (English)
Page 25
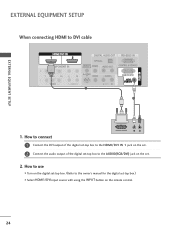
EXTERNAL EQUIPMENT SETUP When connecting HDMI to the AUDIO(RGB/DVI) jack on the set -top box.) I Select HDMI1/DVI input source with using the INPUT button on the remote control. 24 How to use I Turn on the set. 2 Connect the audio output of the digital set-top box to DVI cable EXTERNAL EQUIPMENT SETUP AUDIO 1. How to connect DVI-DTV OUTPUT L R 1 Connect the DVI output of the digital set-top box to the HDMI/DVI IN 1 jack on the digital set-top box. (Refer to the owner's manual for the digital set . 2.
EXTERNAL EQUIPMENT SETUP When connecting HDMI to the AUDIO(RGB/DVI) jack on the set -top box.) I Select HDMI1/DVI input source with using the INPUT button on the remote control. 24 How to use I Turn on the set. 2 Connect the audio output of the digital set-top box to DVI cable EXTERNAL EQUIPMENT SETUP AUDIO 1. How to connect DVI-DTV OUTPUT L R 1 Connect the DVI output of the digital set-top box to the HDMI/DVI IN 1 jack on the digital set-top box. (Refer to the owner's manual for the digital set . 2.
Owner's Manual (English)
Page 26
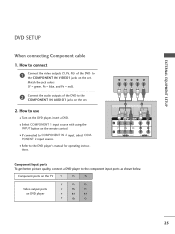
AUDIO EXTERNAL EQUIPMENT SETUP DVD SETUP When connecting Component cable 1. How to connect 1 Connect the video outputs (Y, PB, PR) of the DVD to the COMPONENT IN AUDIO1 jacks on the set . How to use I If connected to the DVD player's manual for operating instruc- tions. Y PB PR L R Component Input ports To get better picture quality, connect a DVD player to the COMPONENT IN VIDEO1 jacks on the DVD player, insert a DVD. I Turn on the set . 2. I Refer to COMPONENT IN 2 input, select COM- Match the jack colors (Y = green, PB = blue, and PR = red). 2 Connect the audio outputs of...
AUDIO EXTERNAL EQUIPMENT SETUP DVD SETUP When connecting Component cable 1. How to connect 1 Connect the video outputs (Y, PB, PR) of the DVD to the COMPONENT IN AUDIO1 jacks on the set . How to use I If connected to the DVD player's manual for operating instruc- tions. Y PB PR L R Component Input ports To get better picture quality, connect a DVD player to the COMPONENT IN VIDEO1 jacks on the DVD player, insert a DVD. I Turn on the set . 2. I Refer to COMPONENT IN 2 input, select COM- Match the jack colors (Y = green, PB = blue, and PR = red). 2 Connect the audio outputs of...
Owner's Manual (English)
Page 27
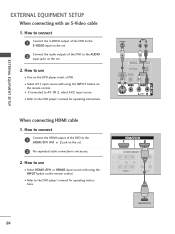
... with using the INPUT button on the set . 2. How to connect 1 Connect the S-VIDEO output of the DVD to use I Turn on the set. 2 Connect the audio outputs of the DVD to the DVD player's manual for operating instructions. 26 S-VIDEO AUDIO L R L R AUDIO HDMI-DVD OUTPUT I Refer to AV IN 2, select A V 2 input source. I Refer to the AUDIO input jacks on the remote control. I If connected to the DVD player's manual for operating instructions. When connecting HDMI cable 1. How to the HDMI/DVI IN1 or 2 jack on the remote control. EXTERNAL EQUIPMENT SETUP EXTERNAL...
... with using the INPUT button on the set . 2. How to connect 1 Connect the S-VIDEO output of the DVD to use I Turn on the set. 2 Connect the audio outputs of the DVD to the DVD player's manual for operating instructions. 26 S-VIDEO AUDIO L R L R AUDIO HDMI-DVD OUTPUT I Refer to AV IN 2, select A V 2 input source. I Refer to the AUDIO input jacks on the remote control. I If connected to the DVD player's manual for operating instructions. When connecting HDMI cable 1. How to the HDMI/DVI IN1 or 2 jack on the remote control. EXTERNAL EQUIPMENT SETUP EXTERNAL...
Owner's Manual (English)
Page 33
... there is a poor cable connection, "No signal" is separate. 32 In this case, that Video Resolution is displayed, refer to DVI Cable is in the HDMI/DVI Input. If "Invalid Format" is not supported. If not, refer to Screen. The fixed image may not work if a HDMI to the Source Device manual or contact your service center. When Source Devices connected with HDMI/DVI Input, the output PC Resolution(VGA, SVGA, XGA), Position and Size may not fit...
... there is a poor cable connection, "No signal" is separate. 32 In this case, that Video Resolution is displayed, refer to DVI Cable is in the HDMI/DVI Input. If "Invalid Format" is not supported. If not, refer to Screen. The fixed image may not work if a HDMI to the Source Device manual or contact your service center. When Source Devices connected with HDMI/DVI Input, the output PC Resolution(VGA, SVGA, XGA), Position and Size may not fit...
Owner's Manual (English)
Page 36
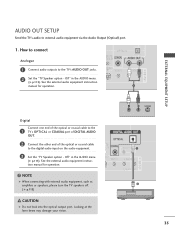
... speakers, please turn the TV speakers off. ( p.113) CAUTION Do not look into the optical output port. Looking at the laser beam may damage your vision. See the external audio equipment instruction manual for operation. AUDIO OUT SETUP Send the TV's audio to the digital audio input on the audio equipment. 3 Set the "TV Speaker option - EXTERNAL EQUIPMENT SETUP Digital Connect one end of the optical or coaxial cable to the 1 TV's OPTICAL or COAXIAL port of DIGITAL AUDIO OUT. 2 Connect...
... speakers, please turn the TV speakers off. ( p.113) CAUTION Do not look into the optical output port. Looking at the laser beam may damage your vision. See the external audio equipment instruction manual for operation. AUDIO OUT SETUP Send the TV's audio to the digital audio input on the audio equipment. 3 Set the "TV Speaker option - EXTERNAL EQUIPMENT SETUP Digital Connect one end of the optical or coaxial cable to the 1 TV's OPTICAL or COAXIAL port of DIGITAL AUDIO OUT. 2 Connect...
Owner's Manual (English)
Page 42
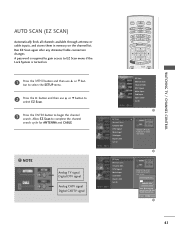
... Scan Manual Scan Channel Edit DTV Signal Main Input Sub Input Input Label Set ID EZ Scan Manual Scan Channel Edit DTV Signal Main Input Sub Input Input Label Set ID G Selection ( G or ) leads you to the EZ scan screen. Next MENU Previous 41 A password is required to gain access to EZ Scan menu if the Lock System is turned on the channel list. Processing EZ scan... Allow EZ Scan to stop the current scan and start CABLE channel scan. Run EZ Scan again after any Antenna/Cable connection changes. EZ Scan Manual Scan Channel...
... Scan Manual Scan Channel Edit DTV Signal Main Input Sub Input Input Label Set ID EZ Scan Manual Scan Channel Edit DTV Signal Main Input Sub Input Input Label Set ID G Selection ( G or ) leads you to the EZ scan screen. Next MENU Previous 41 A password is required to gain access to EZ Scan menu if the Lock System is turned on the channel list. Processing EZ scan... Allow EZ Scan to stop the current scan and start CABLE channel scan. Run EZ Scan again after any Antenna/Cable connection changes. EZ Scan Manual Scan Channel...
Owner's Manual (English)
Page 55
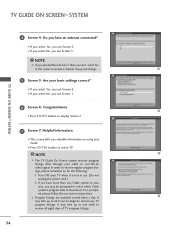
... button to display Screen 7. 7 Screen 7: Helpful Information I If you select No, you see Screen 5. NOTE The TV Guide On Screen system receives program listings data through your TV when it is not in use. (Do not unplug the power cord.) 2. It may take up to 24 hours to begin to receive a channel lineup and listings. 5 Screen 5: Are your basic settings correct? I This screen tells you valuable information on -screen instructions. Program listings are updated...
... button to display Screen 7. 7 Screen 7: Helpful Information I If you select No, you see Screen 5. NOTE The TV Guide On Screen system receives program listings data through your TV when it is not in use. (Do not unplug the power cord.) 2. It may take up to 24 hours to begin to receive a channel lineup and listings. 5 Screen 5: Are your basic settings correct? I This screen tells you valuable information on -screen instructions. Program listings are updated...
Owner's Manual (English)
Page 67
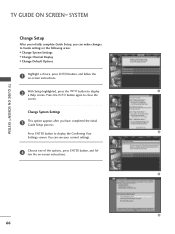
... Guide settings in the following areas: I Change System Settings I Change Channel Display I Change Default Options 1 Highlight a choice, press ENTER button, and follow the on -screen instructions. 2 With Setup highlighted, press the INFO button to display a Help screen. Press the INFO button again to display the Confirming Your Settings screen. Press ENTER button to close the screen. TV GUIDE ON SCREENTM SYSTEM TV GUIDE ON SCREENTM SYSTEM Change Setup After you initially complete Guide Setup, you have completed the initial Guide Setup process. Change...
... Guide settings in the following areas: I Change System Settings I Change Channel Display I Change Default Options 1 Highlight a choice, press ENTER button, and follow the on -screen instructions. 2 With Setup highlighted, press the INFO button to display a Help screen. Press the INFO button again to display the Confirming Your Settings screen. Press ENTER button to close the screen. TV GUIDE ON SCREENTM SYSTEM TV GUIDE ON SCREENTM SYSTEM Change Setup After you initially complete Guide Setup, you have completed the initial Guide Setup process. Change...
Owner's Manual (English)
Page 125
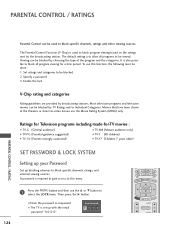
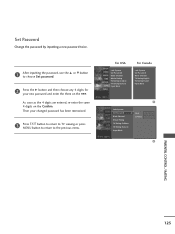
... your Password Set up with the initial password "0-0-0-0". 124 The Parental Control Function (V-Chip) is also possible to block all programs to be used to block specific channels, ratings and other viewing sources. Enter Password I Enter the password as requested. PARENTAL CONTROL / RATINGS Parental Control can be viewed. Viewing can be done : 1. It is used to block program viewing based on the ratings sent by broadcasting stations. To use this menu. Specify a password 3. Ratings for Television programs...
... your Password Set up with the initial password "0-0-0-0". 124 The Parental Control Function (V-Chip) is also possible to block all programs to be used to block specific channels, ratings and other viewing sources. Enter Password I Enter the password as requested. PARENTAL CONTROL / RATINGS Parental Control can be viewed. Viewing can be done : 1. It is used to block program viewing based on the ratings sent by broadcasting stations. To use this menu. Specify a password 3. Ratings for Television programs...
Owner's Manual (English)
Page 126
... TV Rating-General Input Block New Confirm PARENTAL CONTROL / RATING 125 Then your new password and enter the them on the Confirm. Set Password Change the password by inputting a new password twice. 1 After inputting the password, use the D or E button to choose Set password. 2 Press the G button and then choose any 4 digits for your changed password has been memorized. 3 Press EXIT button to return to TV viewing or press MENU button to return to...
... TV Rating-General Input Block New Confirm PARENTAL CONTROL / RATING 125 Then your new password and enter the them on the Confirm. Set Password Change the password by inputting a new password twice. 1 After inputting the password, use the D or E button to choose Set password. 2 Press the G button and then choose any 4 digits for your changed password has been memorized. 3 Press EXIT button to return to TV viewing or press MENU button to return to...
Owner's Manual (English)
Page 133
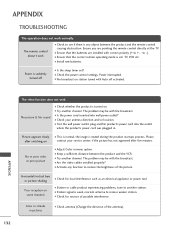
... product and the VCR. I This is normal, the image is weak, reorient antenna to another product's power cord into wall power outlet? Picture appears slowly I Try another channel. No picture & No sound I Check antenna (Change the direction of the antenna). Poor reception on . No or poor color or poor picture I Adjust Color in pictures I Check whether the product is any function to +, - The remote control doesn't work I Is the sleep timer set : TV, VCR etc. I Check for...
... product and the VCR. I This is normal, the image is weak, reorient antenna to another product's power cord into wall power outlet? Picture appears slowly I Try another channel. No picture & No sound I Check antenna (Change the direction of the antenna). Poor reception on . No or poor color or poor picture I Adjust Color in pictures I Check whether the product is any function to +, - The remote control doesn't work I Is the sleep timer set : TV, VCR etc. I Check for...
Owner's Manual (English)
Page 138
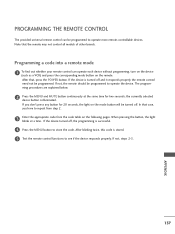
... models of other brands. If the device turned off . Note that , press the POWER button. The programming procedures are explained below. 2 Press the MENU and MUTE button continuously at a time. Programming a code into a remote mode 1 To find out whether your remote control can be turned off , the programming is stored. 5 Test the remote control functions to operate most remote-controllable devices. If you have to operate the device. When pressing the button, the light blinks...
... models of other brands. If the device turned off . Note that , press the POWER button. The programming procedures are explained below. 2 Press the MENU and MUTE button continuously at a time. Programming a code into a remote mode 1 To find out whether your remote control can be turned off , the programming is stored. 5 Test the remote control functions to operate most remote-controllable devices. If you have to operate the device. When pressing the button, the light blinks...
Owner's Manual (English)
Page 151
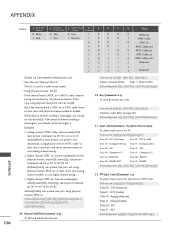
.... Input select(Command: x b) (Main Picture Input) To select input source for sub picture in case digital channel tuning. 3. PIP Input Select(Command: x y) To adjust input source for TV. In this case, using physical channel, ATSC air. Acknowledgement [c][ ][Set ID][ ][OK/NG][Data][x] 31. But if the channel band is ATSC air or ATSC cable, there are transmitted by Hexadecimal code * Two/One part Channel: 6th bit This bit is used in case analog channel...
.... Input select(Command: x b) (Main Picture Input) To select input source for sub picture in case digital channel tuning. 3. PIP Input Select(Command: x y) To adjust input source for TV. In this case, using physical channel, ATSC air. Acknowledgement [c][ ][Set ID][ ][OK/NG][Data][x] 31. But if the channel band is ATSC air or ATSC cable, there are transmitted by Hexadecimal code * Two/One part Channel: 6th bit This bit is used in case analog channel...

