

Owner's Manual
Page 14
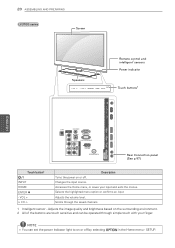
... 1 (ARC) 2 /DVI IN AV IN2 Rear Connection panel (See p.97) VIDEO L/MONO AUDIO R Touch button2 / I INPUT HOME ENTER ꔉ - Adjusts the image quality and brightness based on or off.
... 1 (ARC) 2 /DVI IN AV IN2 Rear Connection panel (See p.97) VIDEO L/MONO AUDIO R Touch button2 / I INPUT HOME ENTER ꔉ - Adjusts the image quality and brightness based on or off.

Owner's Manual
Page 15
... saves your finger. SETUP. Changes the input source. Scrolls through simple touch with your input and exits the menus. Adjusts the image quality and brightness based on the surrounding environment. 2 All of the buttons are touch sensitive and can set the power indicator light to on or off by selecting OPTION...
... saves your finger. SETUP. Changes the input source. Scrolls through simple touch with your input and exits the menus. Adjusts the image quality and brightness based on the surrounding environment. 2 All of the buttons are touch sensitive and can set the power indicator light to on or off by selecting OPTION...

Owner's Manual
Page 16
... light to on or off . VOL + v CH ^ Description Turns the power on the surrounding environment. Changes the input source. Adjusts the image quality and brightness based on or off by selecting OPTION in the Home menu - Accesses the Home menu, or saves your input and exits the menus. SETUP. Scrolls through...
... light to on or off . VOL + v CH ^ Description Turns the power on the surrounding environment. Changes the input source. Adjusts the image quality and brightness based on or off by selecting OPTION in the Home menu - Accesses the Home menu, or saves your input and exits the menus. SETUP. Scrolls through...

Owner's Manual
Page 17
.... 1 Intelligent sensor - VOL + v CH ^ Description Turns the power on or off . Accesses the Home menu, or saves your finger. Adjusts the image quality and brightness based on the surrounding environment. 2 All of the buttons are touch sensitive and can set the power indicator light to on or off by selecting OPTION...
.... 1 Intelligent sensor - VOL + v CH ^ Description Turns the power on or off . Accesses the Home menu, or saves your finger. Adjusts the image quality and brightness based on the surrounding environment. 2 All of the buttons are touch sensitive and can set the power indicator light to on or off by selecting OPTION...

Owner's Manual
Page 18
... environment. 2 All of the buttons are touch sensitive and can set the power indicator light to on or off . Adjusts the image quality and brightness based on or off by selecting OPTION in the Home menu - Accesses the Home menu, or saves your finger. SETUP. Changes the input source.
... environment. 2 All of the buttons are touch sensitive and can set the power indicator light to on or off . Adjusts the image quality and brightness based on or off by selecting OPTION in the Home menu - Accesses the Home menu, or saves your finger. SETUP. Changes the input source.

Owner's Manual
Page 19
... IN IN 2 AV RS-232C IN (CONTROL&SERVICE) Rear Connection panel (See p.97) Touch button2 / I INPUT HOME ENTER ꔉ - Adjusts the image quality and brightness based on the surrounding environment. 2 All of the buttons are touch sensitive and can set the power indicator light to on or off by selecting OPTION...
... IN IN 2 AV RS-232C IN (CONTROL&SERVICE) Rear Connection panel (See p.97) Touch button2 / I INPUT HOME ENTER ꔉ - Adjusts the image quality and brightness based on the surrounding environment. 2 All of the buttons are touch sensitive and can set the power indicator light to on or off by selecting OPTION...
Owner's Manual
Page 20
VOL + v CH ^ Description Turns the power on or off . Changes the input source. Adjusts the image quality and brightness based on the surrounding environment. 2 All of the buttons are touch sensitive and can set the power indicator light to on or off by selecting OPTION ...
VOL + v CH ^ Description Turns the power on or off . Changes the input source. Adjusts the image quality and brightness based on the surrounding environment. 2 All of the buttons are touch sensitive and can set the power indicator light to on or off by selecting OPTION ...

Owner's Manual
Page 21
... or off . Changes the input source. Selects the highlighted menu option or confirms an input Adjusts the volume level. Adjusts the image quality and brightness based on the surrounding environment. 2 All of the buttons are touch sensitive and can set the power indicator light to on or off by selecting OPTION...
... or off . Changes the input source. Selects the highlighted menu option or confirms an input Adjusts the volume level. Adjusts the image quality and brightness based on the surrounding environment. 2 All of the buttons are touch sensitive and can set the power indicator light to on or off by selecting OPTION...

Owner's Manual
Page 22
... Turns the power on the surrounding environment. Accesses the Home menu, or saves your input and exits the menus. Adjusts the image quality and brightness based on or off. USB IN 1 USB IN 2 H/P USB Apps 22 ASSEMBLING AND PREPARING LK530 series Side connection panel Screen CH VOL ENTER HOME INPUT Buttons...
... Turns the power on the surrounding environment. Accesses the Home menu, or saves your input and exits the menus. Adjusts the image quality and brightness based on or off. USB IN 1 USB IN 2 H/P USB Apps 22 ASSEMBLING AND PREPARING LK530 series Side connection panel Screen CH VOL ENTER HOME INPUT Buttons...

Owner's Manual
Page 23
..., as shown in damage to the screen. yyHold the top and bottom of the TV. Make sure not to attach the stand. Stand Body Stand Base ENEGNLGISH yyWhen transporting the TV, do not expose the TV to protect the screen from you are not mounting the TV to a wall, use the... originally came in. Setting up the TV Put your TV on a pedestal stand and mount the TV on its type and size. Stand Body Stand Base yyWhen transporting the TV, keep the TV upright, never turn the TV on a table or wall. PZ750, PZ950, PZ950U series 1 Lay the TV with the...
..., as shown in damage to the screen. yyHold the top and bottom of the TV. Make sure not to attach the stand. Stand Body Stand Base ENEGNLGISH yyWhen transporting the TV, do not expose the TV to protect the screen from you are not mounting the TV to a wall, use the... originally came in. Setting up the TV Put your TV on a pedestal stand and mount the TV on its type and size. Stand Body Stand Base yyWhen transporting the TV, keep the TV upright, never turn the TV on a table or wall. PZ750, PZ950, PZ950U series 1 Lay the TV with the...

Owner's Manual
Page 25
To detach the stand, 1 Lay the TV with the stand base of the TV. Screw for assembly LV3700, M4 x 12 LV5400, LV5500, LW5600, LW5700, LW7700 series, 47/55LW6500 65LW6500 M4 x 16 Number of the stand body ... screws 4 4 CAUTION yyTighten the screws firmly to protect the screen from the TV. Model Screw for assembly M4 x 12 Number of screws 4 4 Stand Body Stand Base 3 Secure the TV and the stand with the screen side down on the surface to prevent the TV from tilting forward. Model Screw for assembly...
To detach the stand, 1 Lay the TV with the stand base of the TV. Screw for assembly LV3700, M4 x 12 LV5400, LV5500, LW5600, LW5700, LW7700 series, 47/55LW6500 65LW6500 M4 x 16 Number of the stand body ... screws 4 4 CAUTION yyTighten the screws firmly to protect the screen from the TV. Model Screw for assembly M4 x 12 Number of screws 4 4 Stand Body Stand Base 3 Secure the TV and the stand with the screen side down on the surface to prevent the TV from tilting forward. Model Screw for assembly...

Owner's Manual
Page 26
... for assembly M4 x 16 Number of the stand rear cover with the TV. Stand Rear Cover 4 Secure the TV and the stand with the stand base of screws 4 CAUTION yyTighten the screws firmly to protect the screen from tilting forward. Do not over tighten. 26 ASSEMBLING AND PREPARING LW9500 series 1 Lay... mat or soft protective cloth on the surface to prevent the TV from damage. Screw for assembly M4 x 16 Number of screws 4 Stand Body Stand Base 3 Assemble the parts of screws 4 ENEGNLGISH Screw for assembly M4 x 16 Number of the TV.
... for assembly M4 x 16 Number of the stand rear cover with the TV. Stand Rear Cover 4 Secure the TV and the stand with the stand base of screws 4 CAUTION yyTighten the screws firmly to protect the screen from tilting forward. Do not over tighten. 26 ASSEMBLING AND PREPARING LW9500 series 1 Lay... mat or soft protective cloth on the surface to prevent the TV from damage. Screw for assembly M4 x 16 Number of screws 4 Stand Body Stand Base 3 Assemble the parts of screws 4 ENEGNLGISH Screw for assembly M4 x 16 Number of the TV.

Owner's Manual
Page 27
.... 2 Remove the 4 screws and pull the stand away from the TV. Do not over tighten. Stand Body Stand Base 3 Assemble the TV. To detach the stand, 1 Lay the TV with the stand base of screws 4 CAUTION yyTighten the screws firmly to protect the screen from tilting forward. Screw for assembly M4 x 26...
.... 2 Remove the 4 screws and pull the stand away from the TV. Do not over tighten. Stand Body Stand Base 3 Assemble the TV. To detach the stand, 1 Lay the TV with the stand base of screws 4 CAUTION yyTighten the screws firmly to protect the screen from tilting forward. Screw for assembly M4 x 26...

Owner's Manual
Page 28
... with the 4 screws. Do not over tighten. Screw for assembly M4 x 20 Number of screws 4 2 Assemble the parts of the stand body with the stand base of screws 4 ENEGNLGISH To detach the stand, 1 Lay the TV with the screen side down on a flat surface. Stand... Base 김동원 Front 3 Assemble the TV as shown. CAUTION yyLay a foam mat or soft protective cloth on the surface to prevent the TV from ...
... with the 4 screws. Do not over tighten. Screw for assembly M4 x 20 Number of screws 4 2 Assemble the parts of the stand body with the stand base of screws 4 ENEGNLGISH To detach the stand, 1 Lay the TV with the screen side down on a flat surface. Stand... Base 김동원 Front 3 Assemble the TV as shown. CAUTION yyLay a foam mat or soft protective cloth on the surface to prevent the TV from ...

Owner's Manual
Page 34
Please read this manual are based on the buttons on the remote control. LIGHT (Depending on or off. INPUT (See p.48) Changes the input source; FLASHBK Alternates between numbers such as ...
Please read this manual are based on the buttons on the remote control. LIGHT (Depending on or off. INPUT (See p.48) Changes the input source; FLASHBK Alternates between numbers such as ...

Owner's Manual
Page 54
...point, distance between the TV and access point, and the location of network equipments (wired/wireless router, hub, etc). yyA 10 Base-T or 100 Base-TX LAN port is designated as cordless telephone, Bluetooth® devices, microwave oven, and can be affected by interference from the ... allow for such a connection, you have questions about such content, please contact the producer of devices you can often be compatible with LG wireless media box, cordless telephone, other connected equipment. yyPlease verify the security settings of AP SSID for wireless AP connection, and enquire...
...point, distance between the TV and access point, and the location of network equipments (wired/wireless router, hub, etc). yyA 10 Base-T or 100 Base-TX LAN port is designated as cordless telephone, Bluetooth® devices, microwave oven, and can be affected by interference from the ... allow for such a connection, you have questions about such content, please contact the producer of devices you can often be compatible with LG wireless media box, cordless telephone, other connected equipment. yyPlease verify the security settings of AP SSID for wireless AP connection, and enquire...

Owner's Manual
Page 70
... , if the next file name is not synchronized with a single audio track cannot be played back repeatedly. 70 ENTERTAINMENT Q.MENU options for videos. When set based on page 82). Set Audio. Position Move the location of movie playback. Allows you want to restart where it can be turned on , the file...
... , if the next file name is not synchronized with a single audio track cannot be played back repeatedly. 70 ENTERTAINMENT Q.MENU options for videos. When set based on page 82). Set Audio. Position Move the location of movie playback. Allows you want to restart where it can be turned on , the file...

Owner's Manual
Page 72
The displays on the screen may based on the from the model. 1 Press Home to access the Home menu. 2 Press the Navigation buttons to scroll to Smart Share and press ENTER. 3 Press ...
The displays on the screen may based on the from the model. 1 Press Home to access the Home menu. 2 Press the Navigation buttons to scroll to Smart Share and press ENTER. 3 Press ...

Owner's Manual
Page 84
... the options automatically for the TV display. Medium Deepens black levels using the strong local dimming. Off, Minimum, Medium", Backlight will be available. Adjusts the base level of the picture. Adjusts the balance between the light and dark areas of the signal in the edges between red and green levels. 84...
... the options automatically for the TV display. Medium Deepens black levels using the strong local dimming. Off, Minimum, Medium", Backlight will be available. Adjusts the base level of the picture. Adjusts the balance between the light and dark areas of the signal in the edges between red and green levels. 84...

Owner's Manual
Page 90
... and under 13 R Restricted - Fantasy violence, suitable for children under admitted. The available lock settings are only broadcasted on the TV and contain inappropriate contents, based on the Motion Picture Association of America (MPAA) rating. The default PIN is muted. The channels can be inappropriate for children age 6 and above ) Fantasy...
... and under 13 R Restricted - Fantasy violence, suitable for children under admitted. The available lock settings are only broadcasted on the TV and contain inappropriate contents, based on the Motion Picture Association of America (MPAA) rating. The default PIN is muted. The channels can be inappropriate for children age 6 and above ) Fantasy...


