
Owners Manual
Page 4
... Pedestal Installation 13 Wall Mount: Horizontal installation 13 Antenna Connection 14 EXTERNAL EQUIPMENT SETUP HD Receiver Setup 15 DVD Setup 18 VCR Setup 21 Other A/V Source Setup 24 AV Output Setup 25 External Stereo Setup 25 USB in Setup 26 PC Setup 27 - CONTENTS CONTENTS ACCESSORIES 1 PREPARATION Home Menu 4 Front Panel Controls 5 Back Panel Information 7 Stand Installation 9 Attaching the TV to a Wall 10 Back Cover for PC Mode 30 WATCHING TV / PROGRAMME CONTROL Remote Control Key Functions 34 Turning on the TV 36 Programme Selection 36 Volume Adjustment...
... Pedestal Installation 13 Wall Mount: Horizontal installation 13 Antenna Connection 14 EXTERNAL EQUIPMENT SETUP HD Receiver Setup 15 DVD Setup 18 VCR Setup 21 Other A/V Source Setup 24 AV Output Setup 25 External Stereo Setup 25 USB in Setup 26 PC Setup 27 - CONTENTS CONTENTS ACCESSORIES 1 PREPARATION Home Menu 4 Front Panel Controls 5 Back Panel Information 7 Stand Installation 9 Attaching the TV to a Wall 10 Back Cover for PC Mode 30 WATCHING TV / PROGRAMME CONTROL Remote Control Key Functions 34 Turning on the TV 36 Programme Selection 36 Volume Adjustment...
Owners Manual
Page 5
... - Sound Mode 93 Sound Setting Adjustment - Auto Colour Temperature Control(Warm/Medium/Cool) ..82 Manual Picture Adjustment - User Mode 94 Balance 95 TV Speakers On/Off Setup 96 I/II - CONTENTS PICCTTUURREECCOONNTTROROL L Watching PIP(Picture-in-Picture 77 Picture Size (Aspect Ratio)Control 79 Preset Picture Settings - Colour Temperature - Speaker Sound Output Selection 98 On-Screen Menu Language Selection 99 APPENDIX Troubleshooting 107 Maintenance 109 Product Specifications 110 Programming the Remote Control 112 IR Codes 114 External Control Device Setup 116...
... - Sound Mode 93 Sound Setting Adjustment - Auto Colour Temperature Control(Warm/Medium/Cool) ..82 Manual Picture Adjustment - User Mode 94 Balance 95 TV Speakers On/Off Setup 96 I/II - CONTENTS PICCTTUURREECCOONNTTROROL L Watching PIP(Picture-in-Picture 77 Picture Size (Aspect Ratio)Control 79 Preset Picture Settings - Colour Temperature - Speaker Sound Output Selection 98 On-Screen Menu Language Selection 99 APPENDIX Troubleshooting 107 Maintenance 109 Product Specifications 110 Programming the Remote Control 112 IR Codes 114 External Control Device Setup 116...
Owners Manual
Page 9
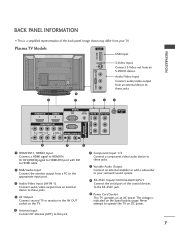
...(CONTROL&SERVICE) R AUDIO L/MONO VIDEO AV IN 1 AV OUT ANTENNA IN 6 7 8 1 HDMI/DVI1, HDMI2 Input Connect a HDMI signal to your TV. BACK PANEL INFORMATION PREPARATION I This is indicated on the Specifications page. Or DVI(VIDEO)signal to HDMI/DVI port with DVI to HDMI cable. 2 RGB/Audio Input Connect the monitor output from a PC to the appropriate input port. 3 Audio/Video Input (AV IN 1) Connect audio/video output from an external device to these jacks. 7 Variable Audio Output Connect an external amplifier or add a subwoofer to HDMI IN. Plasma TV Models AV IN 2 USB Input...
...(CONTROL&SERVICE) R AUDIO L/MONO VIDEO AV IN 1 AV OUT ANTENNA IN 6 7 8 1 HDMI/DVI1, HDMI2 Input Connect a HDMI signal to your TV. BACK PANEL INFORMATION PREPARATION I This is indicated on the Specifications page. Or DVI(VIDEO)signal to HDMI/DVI port with DVI to HDMI cable. 2 RGB/Audio Input Connect the monitor output from a PC to the appropriate input port. 3 Audio/Video Input (AV IN 1) Connect audio/video output from an external device to these jacks. 7 Variable Audio Output Connect an external amplifier or add a subwoofer to HDMI IN. Plasma TV Models AV IN 2 USB Input...
Owners Manual
Page 17
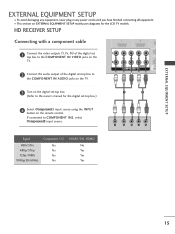
... owner's manual for the LCD TV models. EXTERNAL EQUIPMENT SETUP EXTERNAL EQUIPMENT SETUP I This section on EXTERNAL EQUIPMENT SETUP mainly uses diagrams for the digital set-top box.) 1 2 4 Select Component1 input source using the INPUT button on the digital set -top box to the COMPONENT IN AUDIO jacks on the TV. 1 2 VIDEO AUDIO VA COMPONENT IN AU 3 Turn on the remote control. HD RECEIVER SETUP Connecting with a component cable 1 2 1 Connect the video outputs (Y, PB, PR) of the digital set top box to the COMPONENT IN VIDEO jacks on the TV. 2 Connect the audio output...
... owner's manual for the LCD TV models. EXTERNAL EQUIPMENT SETUP EXTERNAL EQUIPMENT SETUP I This section on EXTERNAL EQUIPMENT SETUP mainly uses diagrams for the digital set-top box.) 1 2 4 Select Component1 input source using the INPUT button on the digital set -top box to the COMPONENT IN AUDIO jacks on the TV. 1 2 VIDEO AUDIO VA COMPONENT IN AU 3 Turn on the remote control. HD RECEIVER SETUP Connecting with a component cable 1 2 1 Connect the video outputs (Y, PB, PR) of the digital set top box to the COMPONENT IN VIDEO jacks on the TV. 2 Connect the audio output...
Owners Manual
Page 18
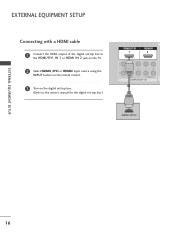
EXTERNAL EQUIPMENT SETUP Connecting with a HDMI cable 1 Connect the HDMI output of the digital set-top box to the HDMI/DVI IN 1 or HDMI IN 2 jack on the TV. 2 Select HDMI1/DVI or HDMI2 input source using the INPUT button on the remote control. 3 Turn on the digital set-top box. (Refer to the owner's manual for the digital set-top box.) HDMI/DVI IN 1 HDMI IN 2 1 2 VIDEO AUDIO COMPONENT IN 1 HDMI-DTV OUTPUT EXTERNAL EQUIPMENT SETUP 16
EXTERNAL EQUIPMENT SETUP Connecting with a HDMI cable 1 Connect the HDMI output of the digital set-top box to the HDMI/DVI IN 1 or HDMI IN 2 jack on the TV. 2 Select HDMI1/DVI or HDMI2 input source using the INPUT button on the remote control. 3 Turn on the digital set-top box. (Refer to the owner's manual for the digital set-top box.) HDMI/DVI IN 1 HDMI IN 2 1 2 VIDEO AUDIO COMPONENT IN 1 HDMI-DTV OUTPUT EXTERNAL EQUIPMENT SETUP 16
Owners Manual
Page 19
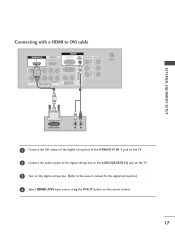
...(PC) AUDIO (RGB/DVI) AV IN 1 AV OUT ANTENNA IN RS-232C IN (CONTROL&SERVICE) R AUDIO L/MONO VIDEO 1 2 VIDEO AUDIO COMPONENT IN VARIABLE AUDIO OUT 1 2 EXTERNAL EQUIPMENT SETUP 1 Connect the DVI output of the digital set-top box to the HDMI/DVI IN 1 jack on the TV. 2 Connect the audio output of the digital set-top box to the AUDIO(RGB/DVI) jack on the TV. 3 Turn on the digital set-top box. (Refer to the owner's manual for the digital set-top box.) 4 Select HDMI1/DVI input source using the INPUT button on the remote control. 17
...(PC) AUDIO (RGB/DVI) AV IN 1 AV OUT ANTENNA IN RS-232C IN (CONTROL&SERVICE) R AUDIO L/MONO VIDEO 1 2 VIDEO AUDIO COMPONENT IN VARIABLE AUDIO OUT 1 2 EXTERNAL EQUIPMENT SETUP 1 Connect the DVI output of the digital set-top box to the HDMI/DVI IN 1 jack on the TV. 2 Connect the audio output of the digital set-top box to the AUDIO(RGB/DVI) jack on the TV. 3 Turn on the digital set-top box. (Refer to the owner's manual for the digital set-top box.) 4 Select HDMI1/DVI input source using the INPUT button on the remote control. 17

Owners Manual
Page 23
EXTERNAL EQUIPMENT SETUP VCR SETUP I Typically a frozen still picture from a VCR. Connecting with a RF Cable RGB IN B(PC) AUDIO AV IN 1 AV OUT (RGB/DVI) ANTENNA 1 IN ANT OUT S-VIDEO VIDEO L R RS-232C IN (CONTROL&SERVICE) R AUDIO L/MONO VIDEO ANT IN OUTPUT SWITCH ABLE O OUT Wall Jack 2 Antenna 1 Connect the ANT OUT socket of the VCR to the ANTENNA IN socket on the TV. 2 Connect the antenna cable to the ANT IN socket of the VCR. 3 Press the PLAY button on the...
EXTERNAL EQUIPMENT SETUP VCR SETUP I Typically a frozen still picture from a VCR. Connecting with a RF Cable RGB IN B(PC) AUDIO AV IN 1 AV OUT (RGB/DVI) ANTENNA 1 IN ANT OUT S-VIDEO VIDEO L R RS-232C IN (CONTROL&SERVICE) R AUDIO L/MONO VIDEO ANT IN OUTPUT SWITCH ABLE O OUT Wall Jack 2 Antenna 1 Connect the ANT OUT socket of the VCR to the ANTENNA IN socket on the TV. 2 Connect the antenna cable to the ANT IN socket of the VCR. 3 Press the PLAY button on the...
Owners Manual
Page 31
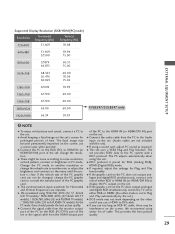
... with the set). G The synchronization input waveform for RGB (Analog RGB), HDMI (Digital RGB) mode. G We recommend using a sound card, adjust PC sound as required. G If using 1366x768, 60Hz (32, 37 ,42inch LCD TV models)/ 1920x1080, 60Hz (47, 52inch LCD TV models) / 1024x768, 60Hz (42 inch PLASMA TV models) / 1360x768, 60Hz (50 inch PLASMA TV models) for the PC mode, these should provide the best picture quality. We recommend using this set 's screen for Plug and Play functionality G If...
... with the set). G The synchronization input waveform for RGB (Analog RGB), HDMI (Digital RGB) mode. G We recommend using a sound card, adjust PC sound as required. G If using 1366x768, 60Hz (32, 37 ,42inch LCD TV models)/ 1920x1080, 60Hz (47, 52inch LCD TV models) / 1024x768, 60Hz (42 inch PLASMA TV models) / 1360x768, 60Hz (50 inch PLASMA TV models) for the PC mode, these should provide the best picture quality. We recommend using this set 's screen for Plug and Play functionality G If...
Owners Manual
Page 33
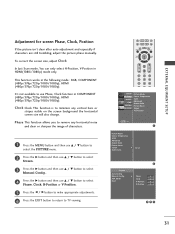
...), HDMI (480p/576p/720p/1080i/1080p). Manual Config. EXTERNAL EQUIPMENT SETUP Adjustment for screen Phase, Clock, Position If the picture isn't clear after auto adjustment and especially if characters are still trembling, adjust the picture phase manually. To correct the screen size, adjust Clock. LIST MENU TIME MACHINE LIVE TV EXIT TIME OK TIME SHIFT SHIFT FAV/ MARK VOL PR MUTE 1 2 3 4 5 6 7 8 9 SETUPO Picture Mode PICTURE G Colour Temperature AUDIOO Advanced TIMEO Aspect Ratio OPTIONO Picture Reset TIME MACHINEO Screen Demo Menu Prev. 1 Picture Mode...
...), HDMI (480p/576p/720p/1080i/1080p). Manual Config. EXTERNAL EQUIPMENT SETUP Adjustment for screen Phase, Clock, Position If the picture isn't clear after auto adjustment and especially if characters are still trembling, adjust the picture phase manually. To correct the screen size, adjust Clock. LIST MENU TIME MACHINE LIVE TV EXIT TIME OK TIME SHIFT SHIFT FAV/ MARK VOL PR MUTE 1 2 3 4 5 6 7 8 9 SETUPO Picture Mode PICTURE G Colour Temperature AUDIOO Advanced TIMEO Aspect Ratio OPTIONO Picture Reset TIME MACHINEO Screen Demo Menu Prev. 1 Picture Mode...

Owners Manual
Page 36
... INPUT TV INPUT POWER RATIO BRIGHT MODE TV DVD VCR SIMPLINK PIP TEXT I/II PIP PR- TV INPUT Returns to Live programme from any menu. 2 DivX Selects a DivX Audio Language or Subtitle Language 34 MUTE 1 2 3 4 5 6 7 8 9 SLEEP 0 Q.VIEW SIZE TIME POSITION HOLD INDEX ? PIP INPUT Selects the input source for the sub picture. SIZE Adjusts the sub picture size. control buttons Control connected AV devices by chang- MENU Selects a menu. WATCHING TV / PROGRAMME CONTROL WATCHING TV / PROGRAMME CONTROL REMOTE CONTROL KEY FUNCTIONS When using the remote control...
... INPUT TV INPUT POWER RATIO BRIGHT MODE TV DVD VCR SIMPLINK PIP TEXT I/II PIP PR- TV INPUT Returns to Live programme from any menu. 2 DivX Selects a DivX Audio Language or Subtitle Language 34 MUTE 1 2 3 4 5 6 7 8 9 SLEEP 0 Q.VIEW SIZE TIME POSITION HOLD INDEX ? PIP INPUT Selects the input source for the sub picture. SIZE Adjusts the sub picture size. control buttons Control connected AV devices by chang- MENU Selects a menu. WATCHING TV / PROGRAMME CONTROL WATCHING TV / PROGRAMME CONTROL REMOTE CONTROL KEY FUNCTIONS When using the remote control...

Owners Manual
Page 37
...' section. WATCHING TV / PROGRAMME CONTROL INPUT TV INPUT POWER RATIO BRIGHT MODE TV DVD VCR 3 SIMPLINK PIP TEXT I Install two 1.5V AA batteries. VOLUME Adjusts the volume. PIP PR+ SWAP PIP INPUT MODE Selects the remote operating modes. 3 TELETEXT These buttons are used for teletext. LIST MENU TIME MACHINE LIVE TV EXIT TIME OK TIME SHIFT SHIFT FAV/ MARK VOL PR MUTE 1 2 3 4 5 6 7 8 9 SLEEP 0 Q.VIEW SIZE POSITION INDEX 3 ? Don't mix old or used for teletext (only TELETEXT buttons models) or Programme edit.
...' section. WATCHING TV / PROGRAMME CONTROL INPUT TV INPUT POWER RATIO BRIGHT MODE TV DVD VCR 3 SIMPLINK PIP TEXT I Install two 1.5V AA batteries. VOLUME Adjusts the volume. PIP PR+ SWAP PIP INPUT MODE Selects the remote operating modes. 3 TELETEXT These buttons are used for teletext. LIST MENU TIME MACHINE LIVE TV EXIT TIME OK TIME SHIFT SHIFT FAV/ MARK VOL PR MUTE 1 2 3 4 5 6 7 8 9 SLEEP 0 Q.VIEW SIZE POSITION INDEX 3 ? Don't mix old or used for teletext (only TELETEXT buttons models) or Programme edit.
Owners Manual
Page 39
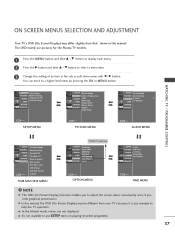
... CONTROL SETUPO PICTURE O AUDIOO TIMEO OPTIONO TIME MACHINE G TimeShift Mode Record Quality Recorded TV Schedule List Manual Record HDD Format DivX Reg. OPTION MENU SETUPO Clock PICTUREO Off Time AUDIOO On Time Sleep Time TIME G Auto Sleep OPTIONO TIME MACHINEO Menu Prev. NOTE G. TIMEO OPTIONO TIME MACHINEO Menu Prev. TIME MENU ! PICTURE MENU SETUPO Sound Mode PICTUREO Auto Volume AUDIO G Balance 0 TV Speaker TIMEO OPTIONO TIME MACHINEO Menu Prev. Code USB Backup USB HDD Format Menu Prev. The OSD (On Screen Display) function enables you to adjust the screen...
... CONTROL SETUPO PICTURE O AUDIOO TIMEO OPTIONO TIME MACHINE G TimeShift Mode Record Quality Recorded TV Schedule List Manual Record HDD Format DivX Reg. OPTION MENU SETUPO Clock PICTUREO Off Time AUDIOO On Time Sleep Time TIME G Auto Sleep OPTIONO TIME MACHINEO Menu Prev. NOTE G. TIMEO OPTIONO TIME MACHINEO Menu Prev. TIME MENU ! PICTURE MENU SETUPO Sound Mode PICTUREO Auto Volume AUDIO G Balance 0 TV Speaker TIMEO OPTIONO TIME MACHINEO Menu Prev. Code USB Backup USB HDD Format Menu Prev. The OSD (On Screen Display) function enables you to adjust the screen...

Owners Manual
Page 48
... Power TIME MACHINEO Set ID Menu Prev. 1 Language Input Label SIMPLINK Key Lock ISM Method Low Power Set ID G To Set 2 Input Label AV1 G AV2 Component1 Component2 RGB HDMI1/DVI HDMI2 Off VCR DVD Set Top Box Satellite Cable Box Game PC 3 46 INPUT TV INPUT POWER RATIO BRIGHT MODE TV DVD VCR SIMPLINK PIP TEXT I/II PIP PR- PIP PR+ SWAP PIP INPUT 1 Press the MENU button and then use D / E button to select the OPTION menu. 2 Press the G button and then use D / E button to select Input...
... Power TIME MACHINEO Set ID Menu Prev. 1 Language Input Label SIMPLINK Key Lock ISM Method Low Power Set ID G To Set 2 Input Label AV1 G AV2 Component1 Component2 RGB HDMI1/DVI HDMI2 Off VCR DVD Set Top Box Satellite Cable Box Game PC 3 46 INPUT TV INPUT POWER RATIO BRIGHT MODE TV DVD VCR SIMPLINK PIP TEXT I/II PIP PR- PIP PR+ SWAP PIP INPUT 1 Press the MENU button and then use D / E button to select the OPTION menu. 2 Press the G button and then use D / E button to select Input...

Owners Manual
Page 49
... Key Lock O n, the display ' Key Lock On' appears on the screen if any button on . WATCHING TV / PROGRAMME CONTROL KEY LOCK The TV can be used to control it was last set so that the remote control is needed to prevent unauthorized viewing. This TV is pressed while viewing the TV. 47 or NUMBER buttons on the remote control then the TV will be turned on the front panel is programmed to...
... Key Lock O n, the display ' Key Lock On' appears on the screen if any button on . WATCHING TV / PROGRAMME CONTROL KEY LOCK The TV can be used to control it was last set so that the remote control is needed to prevent unauthorized viewing. This TV is pressed while viewing the TV. 47 or NUMBER buttons on the remote control then the TV will be turned on the front panel is programmed to...

Owners Manual
Page 53
... programme. The 'Progress Bar'? G When turning power on progressing the Timeshift. one hour). 4 Indicates current TimeShift Mode position. 2 When finishing the Timeshift function, enter the TIME MACHINE menu and turn TimeShift Mode Off. ! TIME MACHINE Using the TimeShift Mode function LIVE 1 2 3 4 1 After selecting TimeShift Mode On, press the OK button. G Because an analogue broadcast is available in the digital signal. G The total storage space of...
... programme. The 'Progress Bar'? G When turning power on progressing the Timeshift. one hour). 4 Indicates current TimeShift Mode position. 2 When finishing the Timeshift function, enter the TIME MACHINE menu and turn TimeShift Mode Off. ! TIME MACHINE Using the TimeShift Mode function LIVE 1 2 3 4 1 After selecting TimeShift Mode On, press the OK button. G Because an analogue broadcast is available in the digital signal. G The total storage space of...

Owners Manual
Page 81
... works in 4:3, but is viewed in the same way as in the following signal. 1 Press the RATIO button repeatedly to the left and right hand of 14:9 or a general TV programme in the PICTURE menu. INPUT TV INPUT POWER RATIO BRIGHT MODE TV DVD VCR SIMPLINK PIP TEXT I/II PIP PR- The screen 14:9 is magnified to select the desired picture format. You can also adjust Aspect Ratio in the 14:9 mode...
... works in 4:3, but is viewed in the same way as in the following signal. 1 Press the RATIO button repeatedly to the left and right hand of 14:9 or a general TV programme in the PICTURE menu. INPUT TV INPUT POWER RATIO BRIGHT MODE TV DVD VCR SIMPLINK PIP TEXT I/II PIP PR- The screen 14:9 is magnified to select the desired picture format. You can also adjust Aspect Ratio in the 14:9 mode...
Owners Manual
Page 92
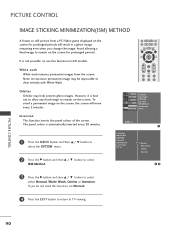
... image may help prevent ghost images. To avoid a permanent image on the screen. PICTURE CONTROL 90 White wash White wash removes permanent images from a PC/Video game displayed on the screen for prolonged periods will move every 2 minutes. LIST MENU TIME MACHINE LIVE TV EXIT TIME OK TIME SHIFT SHIFT FAV/ MARK VOL PR MUTE 1 2 3 4 5 6 SETUPO Language PICTUREO Input Label AUDIOO SIMPLINK Key Lock TIMEO ISM Method OPTION G Low Power TIME MACHINEO Set...
... image may help prevent ghost images. To avoid a permanent image on the screen. PICTURE CONTROL 90 White wash White wash removes permanent images from a PC/Video game displayed on the screen for prolonged periods will move every 2 minutes. LIST MENU TIME MACHINE LIVE TV EXIT TIME OK TIME SHIFT SHIFT FAV/ MARK VOL PR MUTE 1 2 3 4 5 6 SETUPO Language PICTUREO Input Label AUDIOO SIMPLINK Key Lock TIMEO ISM Method OPTION G Low Power TIME MACHINEO Set...

Owners Manual
Page 93
... Input Label AUDIOO SIMPLINK Key Lock TIMEO ISM Method OPTION G Low Power TIME MACHINEO Set ID Menu Prev. 1 Language Input Label SIMPLINK Key Lock ISM Method Low Power Set ID G Off On 23 PICTURE CONTROL 91 It is not possible to use this function in LCD models. 1 Press the MENU button and then D / E button to select the OPTION menu. 2 Press the G button and then D / E button to select Low Power. 3 Press the G button and then D / E button to select...
... Input Label AUDIOO SIMPLINK Key Lock TIMEO ISM Method OPTION G Low Power TIME MACHINEO Set ID Menu Prev. 1 Language Input Label SIMPLINK Key Lock ISM Method Low Power Set ID G Off On 23 PICTURE CONTROL 91 It is not possible to use this function in LCD models. 1 Press the MENU button and then D / E button to select the OPTION menu. 2 Press the G button and then D / E button to select Low Power. 3 Press the G button and then D / E button to select...
Owners Manual
Page 109
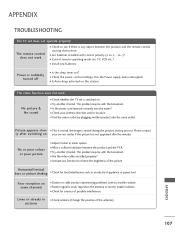
..., the image is switched on this station. I Check your service center, if the picture has not appeared after switching on some channels I Try another channel. I Are the video cables installed properly? Has the Power supply been interrupted. I Station or cable product experiencing problems, tune to restore the brightness of the antenna). Poor reception on your antenna direction and/or location. I Correct remote operating mode set does not operate properly The remote control does not work...
..., the image is switched on this station. I Check your service center, if the picture has not appeared after switching on some channels I Try another channel. I Are the video cables installed properly? Has the Power supply been interrupted. I Station or cable product experiencing problems, tune to restore the brightness of the antenna). Poor reception on your antenna direction and/or location. I Correct remote operating mode set does not operate properly The remote control does not work...
Owners Manual
Page 114
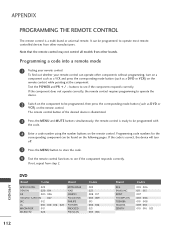
...+ / - Note that the remote control may not control all models from other components without programming, turn off. 5 Press the MENU button to store the code. 6 Test the remote control functions to be programmed with the code. 4 Enter a code number using the number buttons on the remote control. Programming code numbers for the corresponding component can be programmed. buttons to operate most remote controlled devices from step 2. APPENDIX PROGRAMMING THE REMOTE CONTROL The remote control is ready to be programmed, then press the corresponding mode button (such as a D V D or...
...+ / - Note that the remote control may not control all models from other components without programming, turn off. 5 Press the MENU button to store the code. 6 Test the remote control functions to be programmed with the code. 4 Enter a code number using the number buttons on the remote control. Programming code numbers for the corresponding component can be programmed. buttons to operate most remote controlled devices from step 2. APPENDIX PROGRAMMING THE REMOTE CONTROL The remote control is ready to be programmed, then press the corresponding mode button (such as a D V D or...

