Owner's Manual
Page 5
... Code Antenna Discharge Unit (NEC Section 810-20) Grounding Conductor (NEC Section 810-21) Power Service Grounding Electrode System (NEC Art 250, Part H) yyCleaning When cleaning, unplug the power cord and wipe gently with chemicals such as vases, cups, etc. Do not install in any way without written authorization from the AC power source even if the unit is turned...
... Code Antenna Discharge Unit (NEC Section 810-20) Grounding Conductor (NEC Section 810-21) Power Service Grounding Electrode System (NEC Art 250, Part H) yyCleaning When cleaning, unplug the power cord and wipe gently with chemicals such as vases, cups, etc. Do not install in any way without written authorization from the AC power source even if the unit is turned...

Owner's Manual
Page 8
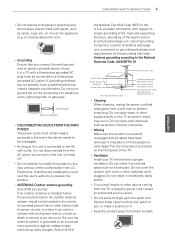
... - Changing AV modes 46 - Registration LG Apps 57 - Network Status 54 Premium Account Function 54 - Connecting USB storage devices 65 - Mounting on for the first time 40 Watching TV 41 Accessing Home Menu 42 Managing channels 42 - Notice 56 LG Apps function 56 - Connecting to music Using LG Apps 59 - Connecting DLNA DMP (Digital Living Network Alliance, Digital Media Player) 68 - Using the input list 47 Using the quick menu 48 ENTERTAINMENT 48 Network Connection 48 - Browsing Websites by Directly...
... - Changing AV modes 46 - Registration LG Apps 57 - Network Status 54 Premium Account Function 54 - Connecting USB storage devices 65 - Mounting on for the first time 40 Watching TV 41 Accessing Home Menu 42 Managing channels 42 - Notice 56 LG Apps function 56 - Connecting to music Using LG Apps 59 - Connecting DLNA DMP (Digital Living Network Alliance, Digital Media Player) 68 - Using the input list 47 Using the quick menu 48 ENTERTAINMENT 48 Network Connection 48 - Browsing Websites by Directly...
Owner's Manual
Page 9
...Power cord 119 Preventing "Image burn" or "Burn-in" on your TV screen 120 TROUBLESHOOTING 122 SPECIFICATIONS 130 IR CODES 132 EXTERNAL CONTROL DEVICE SETUP 140 OPEN SOURCE LICENSE Using Media Link 79 - When watching 3D imaging 83 - HDMI Connection 111 - Using Music Section 80 - AUDIO Settings 95 - Component Connection 108 - PICTURE Settings 93 - TIME Settings 96 - HDMI Connection 106 - Cabinet and stand 119 - Viewing Movies 80 - Using TV Program Section 81 - CHANNEL Settings 88 - DVI to HDMI Connection 112 - Screen and frame 119 - LOCK Settings 98 - Installing Plug...
...Power cord 119 Preventing "Image burn" or "Burn-in" on your TV screen 120 TROUBLESHOOTING 122 SPECIFICATIONS 130 IR CODES 132 EXTERNAL CONTROL DEVICE SETUP 140 OPEN SOURCE LICENSE Using Media Link 79 - When watching 3D imaging 83 - HDMI Connection 111 - Using Music Section 80 - AUDIO Settings 95 - Component Connection 108 - PICTURE Settings 93 - TIME Settings 96 - HDMI Connection 106 - Cabinet and stand 119 - Viewing Movies 80 - Using TV Program Section 81 - CHANNEL Settings 88 - DVI to HDMI Connection 112 - Screen and frame 119 - LOCK Settings 98 - Installing Plug...

Owner's Manual
Page 15
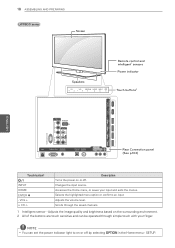
... AUDIO R PR L /DVI AUDIO RS-232C IN (CONTROL&SERVICE) R LAN RGB IN (PC) (ARUGDBI/ODVINI) OPATUICDAILODOIGUITTAL ACNATBELNENINA/ AV IN 2 AUDIO / VIDEO COMPONENT IN 2 H/P AUDIO / Y PB PR Rear Connection panel (See p.103) Touch button2 / I INPUT HOME ENTER ꔉ - Scrolls through simple touch with your input and exits the menus. VOL + v CH ^ Description Turns the power on or off . SETUP. Selects the highlighted menu option or confirms an input Adjusts the volume level. Changes the input source. Adjusts...
... AUDIO R PR L /DVI AUDIO RS-232C IN (CONTROL&SERVICE) R LAN RGB IN (PC) (ARUGDBI/ODVINI) OPATUICDAILODOIGUITTAL ACNATBELNENINA/ AV IN 2 AUDIO / VIDEO COMPONENT IN 2 H/P AUDIO / Y PB PR Rear Connection panel (See p.103) Touch button2 / I INPUT HOME ENTER ꔉ - Scrolls through simple touch with your input and exits the menus. VOL + v CH ^ Description Turns the power on or off . SETUP. Selects the highlighted menu option or confirms an input Adjusts the volume level. Changes the input source. Adjusts...

Owner's Manual
Page 16
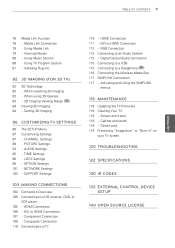
... input Adjusts the volume level. Changes the input source. Accesses the Home menu, or saves your input and exits the menus. Scrolls through the saved channels. 1 Intelligent sensor - VOL + v CH ^ Description Turns the power on or off by selecting OPTION in the Home menu - 16 ASSEMBLING AND PREPARING LW5700 series Screen Speakers CH VOL ENTER HOME H INPUT Buttons Remote control and intelligent1 sensors, Power indicator USB Apps USB IN 2 HDD IN USB IN 1 /DVI ENEGNLGISH IN 4 Y COMPONENT IN1 WIRELESS...
... input Adjusts the volume level. Changes the input source. Accesses the Home menu, or saves your input and exits the menus. Scrolls through the saved channels. 1 Intelligent sensor - VOL + v CH ^ Description Turns the power on or off by selecting OPTION in the Home menu - 16 ASSEMBLING AND PREPARING LW5700 series Screen Speakers CH VOL ENTER HOME H INPUT Buttons Remote control and intelligent1 sensors, Power indicator USB Apps USB IN 2 HDD IN USB IN 1 /DVI ENEGNLGISH IN 4 Y COMPONENT IN1 WIRELESS...

Owner's Manual
Page 17
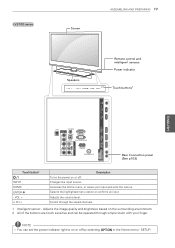
.... Changes the input source. LW5600 series Screen ASSEMBLING AND PREPARING 17 Speakers CH VOL ENTER HOME INPUT Remote control and intelligent1 sensors Power indicator Touch buttons2 USB Apps USB IN 2 HDD IN USB IN 1 /DVI ENEGNLGISH IN 4 Y COMPINO1NENT WIRELESS ꔡ CONTROL PB VIDEO AV IN1 /DVI IN 3 /DVI IN 1 (ARC) IN 2 VIDEO L/MONO AUDIO R PR L /DVI AUDIO RS-232C IN (CONTROL&SERVICE) R LAN RGB IN (PC) (ARUGDBI/ODVINI) OPATUICDAILODOIGUITTAL ACNATBELNENINA/ AV IN 2 AUDIO / VIDEO COMPONENT IN 2 H/P AUDIO / Y PB PR Rear Connection panel...
.... Changes the input source. LW5600 series Screen ASSEMBLING AND PREPARING 17 Speakers CH VOL ENTER HOME INPUT Remote control and intelligent1 sensors Power indicator Touch buttons2 USB Apps USB IN 2 HDD IN USB IN 1 /DVI ENEGNLGISH IN 4 Y COMPINO1NENT WIRELESS ꔡ CONTROL PB VIDEO AV IN1 /DVI IN 3 /DVI IN 1 (ARC) IN 2 VIDEO L/MONO AUDIO R PR L /DVI AUDIO RS-232C IN (CONTROL&SERVICE) R LAN RGB IN (PC) (ARUGDBI/ODVINI) OPATUICDAILODOIGUITTAL ACNATBELNENINA/ AV IN 2 AUDIO / VIDEO COMPONENT IN 2 H/P AUDIO / Y PB PR Rear Connection panel...
Owner's Manual
Page 18
... /DVI IN 3 /DVI IN 1 (ARC) IN 2 VIDEO L/MONO AUDIO R PR L /DVI AUDIO RS-232C IN (CONTROL&SERVICE) R LAN RGB IN (PC) (ARUGDBI/ODVINI) OPATUICDAILODOIGUITTAL ACNATBELNENINA/ AV IN 2 AUDIO / VIDEO COMPONENT IN 2 H/P AUDIO / Y PB PR Rear Connection panel (See p.103) Touch button2 / I INPUT HOME ENTER ꔉ - SETUP. Selects the highlighted menu option or confirms an input Adjusts the volume level. NOTE yyYou can be operated through the saved channels. 1 Intelligent sensor - Changes the input source. VOL + v CH ^ Description Turns the power...
... /DVI IN 3 /DVI IN 1 (ARC) IN 2 VIDEO L/MONO AUDIO R PR L /DVI AUDIO RS-232C IN (CONTROL&SERVICE) R LAN RGB IN (PC) (ARUGDBI/ODVINI) OPATUICDAILODOIGUITTAL ACNATBELNENINA/ AV IN 2 AUDIO / VIDEO COMPONENT IN 2 H/P AUDIO / Y PB PR Rear Connection panel (See p.103) Touch button2 / I INPUT HOME ENTER ꔉ - SETUP. Selects the highlighted menu option or confirms an input Adjusts the volume level. NOTE yyYou can be operated through the saved channels. 1 Intelligent sensor - Changes the input source. VOL + v CH ^ Description Turns the power...
Owner's Manual
Page 19
... Home menu - SETUP. LV3700 series Screen ASSEMBLING AND PREPARING 19 Speakers CH VOL ENTER HOME INPUT Remote control and intelligent1 sensors Power indicator Touch buttons2 USB IN 1 USB IN 2/USB Apps H/P ENEGNLGISH /DVI IN 3 LAN COMPONENT IN1 Y AUDIO IN (RGB/DVI) OPTICAL DIGITAL RGB IN (PC) PB VIDEO PR AV IN1 VIDEO L/MONO AUDIO R AUDIO OUT RS-232C IN (CONTROL&SERVICE) ꔡ WIRELESS CONTROL L AUDIO R ANTENNA/CABLE IN AV IN 2 AUDIO / VIDEO COMPONENT IN 2 AUDIO / Y PB PR /DVI /DVI IN 1 (ARC) IN 2 Rear Connection panel (See p.103) Touch button2 / I INPUT HOME...
... Home menu - SETUP. LV3700 series Screen ASSEMBLING AND PREPARING 19 Speakers CH VOL ENTER HOME INPUT Remote control and intelligent1 sensors Power indicator Touch buttons2 USB IN 1 USB IN 2/USB Apps H/P ENEGNLGISH /DVI IN 3 LAN COMPONENT IN1 Y AUDIO IN (RGB/DVI) OPTICAL DIGITAL RGB IN (PC) PB VIDEO PR AV IN1 VIDEO L/MONO AUDIO R AUDIO OUT RS-232C IN (CONTROL&SERVICE) ꔡ WIRELESS CONTROL L AUDIO R ANTENNA/CABLE IN AV IN 2 AUDIO / VIDEO COMPONENT IN 2 AUDIO / Y PB PR /DVI /DVI IN 1 (ARC) IN 2 Rear Connection panel (See p.103) Touch button2 / I INPUT HOME...

Owner's Manual
Page 20
... 2 H/P USB Apps ENEGNLGISH /DVI IN 3 /DVI IN 2 /DVI COMPONENT IN 2 AUDIO / Y PB PR AV IN 2 AUDIO / VIDEO IN 1 (ARC) Speakers CH VOL ENTER HOME INPUT Remote control and intelligent1 sensors Power indicator Touch buttons2 LAN COMPONENT IN1 Y AUDIO IN (RGB/DVI) OPTICAL DIGITAL RGB IN (PC) PB AUDIO OUT RS-232C IN (CONTROL&SERVICE) VIDEO PR AV IN1 VIDEO L/MONO AUDIO R L AUDIO R ANTENNA/CABLE IN Rear Connection panel (See p.103) Touch button2 / I INPUT HOME ENTER ꔉ - Selects the highlighted menu option or confirms an input Adjusts the volume level. Adjusts...
... 2 H/P USB Apps ENEGNLGISH /DVI IN 3 /DVI IN 2 /DVI COMPONENT IN 2 AUDIO / Y PB PR AV IN 2 AUDIO / VIDEO IN 1 (ARC) Speakers CH VOL ENTER HOME INPUT Remote control and intelligent1 sensors Power indicator Touch buttons2 LAN COMPONENT IN1 Y AUDIO IN (RGB/DVI) OPTICAL DIGITAL RGB IN (PC) PB AUDIO OUT RS-232C IN (CONTROL&SERVICE) VIDEO PR AV IN1 VIDEO L/MONO AUDIO R L AUDIO R ANTENNA/CABLE IN Rear Connection panel (See p.103) Touch button2 / I INPUT HOME ENTER ꔉ - Selects the highlighted menu option or confirms an input Adjusts the volume level. Adjusts...

Owner's Manual
Page 45
... its optimal size by pressing Q. Just Scan: Displays video images in the PICTURE menu. yyThe input sources: DTV, CADTV, Component, HDMI-DTV, and DVI-DTV (720p/1080i/1080p) support Just Scan. - MENU or accessing Aspect Ratio in the original size without cutting off the edges. Cinema Zoom: Formats an image to the previous standard. - ENEGNLGISH NOTE yyIf you select Just Scan, you enlarge or reduce an image, the image may see image noises at its...
... its optimal size by pressing Q. Just Scan: Displays video images in the PICTURE menu. yyThe input sources: DTV, CADTV, Component, HDMI-DTV, and DVI-DTV (720p/1080i/1080p) support Just Scan. - MENU or accessing Aspect Ratio in the original size without cutting off the edges. Cinema Zoom: Formats an image to the previous standard. - ENEGNLGISH NOTE yyIf you select Just Scan, you enlarge or reduce an image, the image may see image noises at its...
Owner's Manual
Page 64
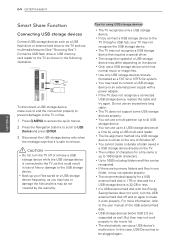
... to the TV or files. /DVI IN 1 (ARC) IN 2 /DVI 1 Press Q.MENU to access the quick menus. 2 Press the Navigation buttons to scroll to be recognized. yyIf a USB external hard disk with a power adapter. yyThe TV does not support some USB storage devices properly. yyYou cannot create or delete a folder saved in a USB storage device directly on a USB storage device frequently, as you connect a USB storage device to...
... to the TV or files. /DVI IN 1 (ARC) IN 2 /DVI 1 Press Q.MENU to access the quick menus. 2 Press the Navigation buttons to scroll to be recognized. yyIf a USB external hard disk with a power adapter. yyThe TV does not support some USB storage devices properly. yyYou cannot create or delete a folder saved in a USB storage device directly on a USB storage device frequently, as you connect a USB storage device to...
Owner's Manual
Page 65
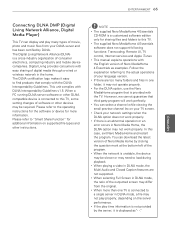
... of the program. yyCheck your TV screen. You can select a channel while viewing the small preview channel list on your network settings when the DLNA option does not work perfectly. ENTERTAINMENT 65 ENEGNLGISH Connecting DLNA DMP (Digital Living Network Alliance, Digital Media Player) This TV can display and play many folders and files in DLNA mode, the ratio of the outputted screen may not operate properly. This unit complies with the English version of...
... of the program. yyCheck your TV screen. You can select a channel while viewing the small preview channel list on your network settings when the DLNA option does not work perfectly. ENTERTAINMENT 65 ENEGNLGISH Connecting DLNA DMP (Digital Living Network Alliance, Digital Media Player) This TV can display and play many folders and files in DLNA mode, the ratio of the outputted screen may not operate properly. This unit complies with the English version of...
Owner's Manual
Page 84
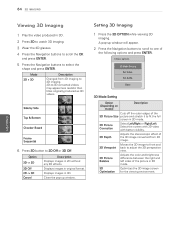
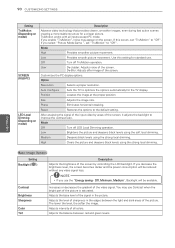
Displays images in original format. Mode 2D » 3D Description Changed from 2D image. 3D Viewpoint Moves the 3D image to front and back to adjust the 3D perspective view. 3D Picture Balance Adjusts the color and brightness difference between the right and left sides of the picture in 3D mode. 3D Picture Correction Select Left/Right or Right/Left. Displays images in 3D. Choose options. 3D Mode Setting Set Video. ENEGNLGISH Side...
Displays images in original format. Mode 2D » 3D Description Changed from 2D image. 3D Viewpoint Moves the 3D image to front and back to adjust the 3D perspective view. 3D Picture Balance Adjusts the color and brightness difference between the right and left sides of the picture in 3D mode. 3D Picture Correction Select Left/Right or Right/Left. Displays images in 3D. Choose options. 3D Mode Setting Set Video. ENEGNLGISH Side...
Owner's Manual
Page 85
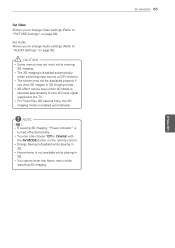
NOTE ( ) LCD yyIf viewing 3D imaging, "Power indicator" is disabled automatically when switching input source or DTV channel. Allows you to change Video settings (Refer to "AUDIO Settings" on page 93). yyThe 3D imaging is turned off automatically. yy3D effect can only choose "Off or Cinema" with the AV MODE button on page 88). yyFor *mpo files (3D camera files), the 3D imaging mode is selected appropriately for the 3D input signal supplied to the...
NOTE ( ) LCD yyIf viewing 3D imaging, "Power indicator" is disabled automatically when switching input source or DTV channel. Allows you to change Video settings (Refer to "AUDIO Settings" on page 93). yyThe 3D imaging is turned off automatically. yy3D effect can only choose "Off or Cinema" with the AV MODE button on page 88). yyFor *mpo files (3D camera files), the 3D imaging mode is selected appropriately for the 3D input signal supplied to the...
Owner's Manual
Page 90
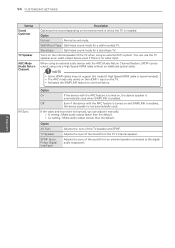
... black levels using the soft local dimming. Contrast Brightness Sharpness Color Tint Increases or decreases the gradient of all inputs except PC mode. Adjusts intensity of the video signal. If you select "Picture Mode-Game ", set "TruMotion" to "Off". Option Resolution Selects a proper resolution. Size Adjusts the image size. TruMotion works with all colors. Phase Eliminates horizontal streaking. Adjusts the balance between the light and dark areas of the input video by controlling the LCD backlight. Off Turn off LED...
... black levels using the soft local dimming. Contrast Brightness Sharpness Color Tint Increases or decreases the gradient of all inputs except PC mode. Adjusts intensity of the video signal. If you select "Picture Mode-Game ", set "TruMotion" to "Off". Option Resolution Selects a proper resolution. Size Adjusts the image size. TruMotion works with all colors. Phase Eliminates horizontal streaking. Adjusts the balance between the light and dark areas of the input video by controlling the LCD backlight. Off Turn off LED...
Owner's Manual
Page 94
Stand type Optimized sound mode for a wall-mounted TV. Turns on the TV. AV Sync. Adjusts the sync of the TV speaker and SPDIF. When using an external audio device with the ARC (Audio Return Channel) feature, SPDIF can adjust it manually. »»(-) setting : Make audio output faster than the default. »»(+) setting : Make audio output slower than the default. yyThe ARC mode only works on the HDMI 1 input on the internal speaker of the sound from the TV's internal speaker. If...
Stand type Optimized sound mode for a wall-mounted TV. Turns on the TV. AV Sync. Adjusts the sync of the TV speaker and SPDIF. When using an external audio device with the ARC (Audio Return Channel) feature, SPDIF can adjust it manually. »»(-) setting : Make audio output faster than the default. »»(+) setting : Make audio output slower than the default. yyThe ARC mode only works on the HDMI 1 input on the internal speaker of the sound from the TV's internal speaker. If...

Owner's Manual
Page 113
... TV in speaker, set the "Input Label - Digital Optical Audio Connection Transmits the digital audio signal from the TV to DVI Cable is clear. Connecting to Just scan. NOTE yyDo not look into the optical output port. If you experience overscan issues when using HDMI-PC 1920x1080, change the refresh rate to another resolution, change aspect ratio to an Audio System Use an optional external audio system instead of the built-in other video modes, afterimages or distorted images may be...
... TV in speaker, set the "Input Label - Digital Optical Audio Connection Transmits the digital audio signal from the TV to DVI Cable is clear. Connecting to Just scan. NOTE yyDo not look into the optical output port. If you experience overscan issues when using HDMI-PC 1920x1080, change the refresh rate to another resolution, change aspect ratio to an Audio System Use an optional external audio system instead of the built-in other video modes, afterimages or distorted images may be...

Owner's Manual
Page 120
... input mode such as TV or VCR is produced while images yyPress VOL + or - yyCheck if there is on or off. ENEGNLGISH Audio Problem Resolution No sound is set for 30 seconds and try again. yyCheck if the audio cables are still working and properly installed ( to , to a wall outlet. yyCheck the remote control sensor on . yyCheck if the batteries are connected properly. yyCheck if the TV Speaker...
... input mode such as TV or VCR is produced while images yyPress VOL + or - yyCheck if there is on or off. ENEGNLGISH Audio Problem Resolution No sound is set for 30 seconds and try again. yyCheck if the audio cables are still working and properly installed ( to , to a wall outlet. yyCheck the remote control sensor on . yyCheck if the batteries are connected properly. yyCheck if the TV Speaker...

Owner's Manual
Page 121
... proper direction. yyCheck whether the video/audio codec is supported. yyCheck whether the video file and subtitle file are supported by pressing INPUT. yyCheck whether the subtitle file is local interference such as an electrical appliance or power or images blur tool. Use a screen saver to the "SCREEN (RGB-PC)". yyCheck if the video card resolution and frequency are located in the background yyCheck the video cable connections. yyCheck whether the file is playing...
... proper direction. yyCheck whether the video/audio codec is supported. yyCheck whether the video file and subtitle file are supported by pressing INPUT. yyCheck whether the subtitle file is local interference such as an electrical appliance or power or images blur tool. Use a screen saver to the "SCREEN (RGB-PC)". yyCheck if the video card resolution and frequency are located in the background yyCheck the video cable connections. yyCheck whether the file is playing...

Owner's Manual
Page 138
...: j q) To control the energy saving function. ISM Method (Command: j p) ( Plasma ) To avoid having a fixed image remain on model) 05: Screen off 01: Minimum 02: Medium 03: Maximum 04: Auto (Depending on screen. Data 03 & 04: Minor Channel Number Not needed for ATSC since it doesn't matter what the physical number is. * 4th bit: Set to Hexadecimal before sending. Backlight (Command: m g) ( LCD ) To adjust screen backlight. Acknowledgement [g][ ][Set ID...
...: j q) To control the energy saving function. ISM Method (Command: j p) ( Plasma ) To avoid having a fixed image remain on model) 05: Screen off 01: Minimum 02: Medium 03: Maximum 04: Auto (Depending on screen. Data 03 & 04: Minor Channel Number Not needed for ATSC since it doesn't matter what the physical number is. * 4th bit: Set to Hexadecimal before sending. Backlight (Command: m g) ( LCD ) To adjust screen backlight. Acknowledgement [g][ ][Set ID...


