

Owner's Manual
Page 1
To your set . Retain it for future reference. Record model number and serial number of the set . Refer to the label on the back cover and quote this manual carefully before operating your dealer when requiring service. ENGLISH LCD TV PLASMA TV OWNER'S MANUAL LCD TV MODELS 22/26LG1*** 32/37LG1*** 42/47LG1*** 22/26LG3*** 32/37LG3*** 42/47LG3*** 32LG5*** 37/42LG5*** 47/52LG5*** PLASMA TV MODELS 32PC5*** 42PG1*** 50PG1*** 42PG2*** 50PG2*** Please read this information.
To your set . Retain it for future reference. Record model number and serial number of the set . Refer to the label on the back cover and quote this manual carefully before operating your dealer when requiring service. ENGLISH LCD TV PLASMA TV OWNER'S MANUAL LCD TV MODELS 22/26LG1*** 32/37LG1*** 42/47LG1*** 22/26LG3*** 32/37LG3*** 42/47LG3*** 32LG5*** 37/42LG5*** 47/52LG5*** PLASMA TV MODELS 32PC5*** 42PG1*** 50PG1*** 42PG2*** 50PG2*** Please read this information.
Owner's Manual
Page 3
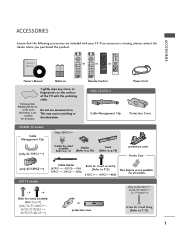
Polishing Cloth Polishing cloth for all models. LCD TV models x 4 x 4 (Only 26/32/42LG1***, 26/32/37/42LG3***, 32/37/42LG5***) Bolts for stand assembly (Refer to P. 12) 1 MENU MENU OK RETURN PIP ...
Polishing Cloth Polishing cloth for all models. LCD TV models x 4 x 4 (Only 26/32/42LG1***, 26/32/37/42LG3***, 32/37/42LG5***) Bolts for stand assembly (Refer to P. 12) 1 MENU MENU OK RETURN PIP ...
Owner's Manual
Page 8
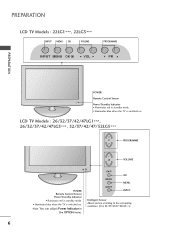
... Control Sensor Power/Standby Indicator • illuminates red in standby mode. • illuminates blue when the TV is switched on . PREPARATION LCD TV Models : 22LG1***, 22LG3*** INPUT MENU OK VOLUME PROGRAMME INPUT MENU OK VOL PR PREPARATION POWER Remote Control Sensor Power/Standby Indicator &#...8226; illuminates red in standby mode. • illuminates blue when the TV is switched on . LCD TV Models : 26/32/37/42/47LG1***, 26/32/37/42/47LG3***, 32/37/42/47/52LG5*** P PROGRAMME + VOLUME - OK MENU INPUT...
... Control Sensor Power/Standby Indicator • illuminates red in standby mode. • illuminates blue when the TV is switched on . PREPARATION LCD TV Models : 22LG1***, 22LG3*** INPUT MENU OK VOLUME PROGRAMME INPUT MENU OK VOL PR PREPARATION POWER Remote Control Sensor Power/Standby Indicator &#...8226; illuminates red in standby mode. • illuminates blue when the TV is switched on . LCD TV Models : 26/32/37/42/47LG1***, 26/32/37/42/47LG3***, 32/37/42/47/52LG5*** P PROGRAMME + VOLUME - OK MENU INPUT...
Owner's Manual
Page 11
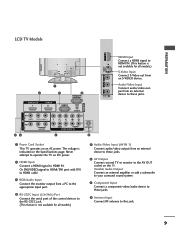
.... 9 Never attempt to operate the TV on the Specifications page. The voltage is indicated on DC power. 2 HDMI Input Connect a HDMI signal to HDMI IN. LCD TV Models AV AV RGB IN RGB IN 3 PREPARATION HDMI Input Connect a HDMI signal to HDMI IN. (This feature is not available for all models...
.... 9 Never attempt to operate the TV on the Specifications page. The voltage is indicated on DC power. 2 HDMI Input Connect a HDMI signal to HDMI IN. LCD TV Models AV AV RGB IN RGB IN 3 PREPARATION HDMI Input Connect a HDMI signal to HDMI IN. (This feature is not available for all models...
Owner's Manual
Page 13
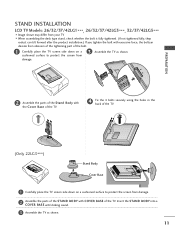
.... 1 Carefully place the TV screen side down on a cushioned surface to protect the screen from damage. 3 Assemble the TV as shown. 11 PREPARATION STAND INSTALLATION LCD TV Models: 26/32/37/42LG1***, 26/32/37/42LG3***, 32/37/42LG5*** I Image shown may differ from your TV I When assembling the desk type...
.... 1 Carefully place the TV screen side down on a cushioned surface to protect the screen from damage. 3 Assemble the TV as shown. 11 PREPARATION STAND INSTALLATION LCD TV Models: 26/32/37/42LG1***, 26/32/37/42LG3***, 32/37/42LG5*** I Image shown may differ from your TV I When assembling the desk type...

Owner's Manual
Page 17
If the TV is dropped, you may be injured or the TV may be damaged. 15 CABLE MANAGEMENT CLIP ! Only 32PC5*** Arrange the cables as necessary. NOTE G Do not use the CABLE MANAGEMENT CLIP to lift the TV. - PREPARATION LCD TV Models 1 Connect the cables as shown picture. To connect additional equipment, see the External Equipment Setup section of the manual. 2 Open the CABLE MANAGEMENT CLIP as shown and manage the cables. 3 Fit the CABLE MANAGEMENT CLIP as shown.
If the TV is dropped, you may be injured or the TV may be damaged. 15 CABLE MANAGEMENT CLIP ! Only 32PC5*** Arrange the cables as necessary. NOTE G Do not use the CABLE MANAGEMENT CLIP to lift the TV. - PREPARATION LCD TV Models 1 Connect the cables as shown picture. To connect additional equipment, see the External Equipment Setup section of the manual. 2 Open the CABLE MANAGEMENT CLIP as shown and manage the cables. 3 Fit the CABLE MANAGEMENT CLIP as shown.
Owner's Manual
Page 19
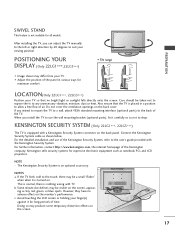
...user's guide provided with a Kensington Security System connector on . The Kensington Security System is nothing wrong with TV. Avoid touching the LCD screen or holding your TV so that the TV is placed in various ways for maximum comfort. Doing so may be a small ... 12 1.5 3 1.5 I Adjust the position of time. Also ensure that no adverse effect on the screen, appearing as notebook PCs and LCD projectors. Kensington sells security systems for all models. Care should be visible on the monitor's performance. PREPARATION SWIVEL STAND This feature is not ...
...user's guide provided with a Kensington Security System connector on . The Kensington Security System is nothing wrong with TV. Avoid touching the LCD screen or holding your TV so that the TV is placed in various ways for maximum comfort. Doing so may be a small ... 12 1.5 3 1.5 I Adjust the position of time. Also ensure that no adverse effect on the screen, appearing as notebook PCs and LCD projectors. Kensington sells security systems for all models. Care should be visible on the monitor's performance. PREPARATION SWIVEL STAND This feature is not ...
Owner's Manual
Page 21
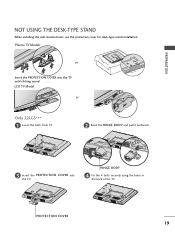
PREPARATION NOT USING THE DESK-TYPE STAND When installing the wall-mounted unit, use the protection cover for desk-type stand installation. PROTECTION COVER 19 HINGE BODY 4 Fix the 4 bolts securely using the holes in the back of the TV. Plasma TV Models or Insert the PROTECTION COVER into the TV. LCD TV Model or Only 22LG3*** 1 Loose the bolts from TV. 2 Bend the HINGE BODY and pull it backward. 3 Insert the PROTECTION COVER into the TV until clicking sound.
PREPARATION NOT USING THE DESK-TYPE STAND When installing the wall-mounted unit, use the protection cover for desk-type stand installation. PROTECTION COVER 19 HINGE BODY 4 Fix the 4 bolts securely using the holes in the back of the TV. Plasma TV Models or Insert the PROTECTION COVER into the TV. LCD TV Model or Only 22LG3*** 1 Loose the bolts from TV. 2 Bend the HINGE BODY and pull it backward. 3 Insert the PROTECTION COVER into the TV until clicking sound.

Owner's Manual
Page 51
... Zoom Setting 0 0 * PLASMA TV models power Saving only (Except 32PC5***) Picture Mode Zoom Setting On Sport Picture Mode Sport Sound Mode Sport Sound Mode Sport * LCD TV models only Multi Audio L+R Multi Audio L+R programme Edit To Set programme Edit Sleep Timer To Set Off Sleep Timer Off DEF G RETURN DEF G RETURN... combination which users might use frequently. • Aspect Ratio: Selects your desired Source. 3 Press the Q.MENU button to return to automatically set . • Backlight (only LCD TV Models):Adjusts screen brightness.
... Zoom Setting 0 0 * PLASMA TV models power Saving only (Except 32PC5***) Picture Mode Zoom Setting On Sport Picture Mode Sport Sound Mode Sport Sound Mode Sport * LCD TV models only Multi Audio L+R Multi Audio L+R programme Edit To Set programme Edit Sleep Timer To Set Off Sleep Timer Off DEF G RETURN DEF G RETURN... combination which users might use frequently. • Aspect Ratio: Selects your desired Source. 3 Press the Q.MENU button to return to automatically set . • Backlight (only LCD TV Models):Adjusts screen brightness.
Owner's Manual
Page 52
... Audio MENU Except 22LG3*** WATCHING TV / PROGRAMME CONTROL 50 PLASMA TV models Option Language SIMPLINK Key Lock ISM Method Power Saving Set ID Factory Reset LCD TV models Option Language SIMPLINK Key Lock Set ID or Power Indicator Factory Reset Except 22LG3*** Except 32/37/42/47/52LG5*** Option MENU Time...
... Audio MENU Except 22LG3*** WATCHING TV / PROGRAMME CONTROL 50 PLASMA TV models Option Language SIMPLINK Key Lock ISM Method Power Saving Set ID Factory Reset LCD TV models Option Language SIMPLINK Key Lock Set ID or Power Indicator Factory Reset Except 22LG3*** Except 32/37/42/47/52LG5*** Option MENU Time...

Owner's Manual
Page 70
Adjusts intensity of LCD panel. NOTE G You cannot adjust colour, sharpness and tint in the picture. Picture Picture Mode Colour Temperature XD Advanced Aspect Ratio Picture Reset Screen 1 G Cable ... Mode. 3 Press the button and then / button to select User1 or User2. 4 Press the button and then / button to select the desired picture option (Backlight(LCD TV Only), Contrast, Brightness, Colour, Sharpness and Tint). 5 Press the / button to make appropriate adjustments. 6 Press the MENU button to return to the previous menu...
Adjusts intensity of LCD panel. NOTE G You cannot adjust colour, sharpness and tint in the picture. Picture Picture Mode Colour Temperature XD Advanced Aspect Ratio Picture Reset Screen 1 G Cable ... Mode. 3 Press the button and then / button to select User1 or User2. 4 Press the button and then / button to select the desired picture option (Backlight(LCD TV Only), Contrast, Brightness, Colour, Sharpness and Tint). 5 Press the / button to make appropriate adjustments. 6 Press the MENU button to return to the previous menu...
Owner's Manual
Page 79
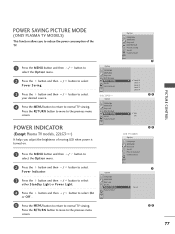
... Option 3 Press the button and then / button to select either Standby Light or Power Light. 4 Press the button and then / button to select 1 Power Indicator. LCD TV models Option Language SIMPLINK Key Lock Set ID Power Indicator Factory Reset 23 2 Press the button and then / button to select O n or Off . Press...
... Option 3 Press the button and then / button to select either Standby Light or Power Light. 4 Press the button and then / button to select 1 Power Indicator. LCD TV models Option Language SIMPLINK Key Lock Set ID Power Indicator Factory Reset 23 2 Press the button and then / button to select O n or Off . Press...
Owner's Manual
Page 116
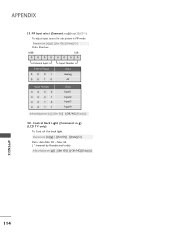
... ID][ ][Data][Cr] Data : data Min: 00 ~ Max: 64 ( * transmit by Hexadecimal code) Acknowledgement [g][ ][Set ID][ ][OK/NG][Data][x] APPENDIX 114 Control Back Light (Command: m g) (LCD TV only) To Cont rol t he back light. APPENDIX 29. Transmission [x][y][ ][Set ID][ ][Data][Cr] Data: Structure MSB LSB 0000 000 0 External Input Input Number...
... ID][ ][Data][Cr] Data : data Min: 00 ~ Max: 64 ( * transmit by Hexadecimal code) Acknowledgement [g][ ][Set ID][ ][OK/NG][Data][x] APPENDIX 114 Control Back Light (Command: m g) (LCD TV only) To Cont rol t he back light. APPENDIX 29. Transmission [x][y][ ][Set ID][ ][Data][Cr] Data: Structure MSB LSB 0000 000 0 External Input Input Number...


