
Owner's Manual
Page 4
... Picture Mode 77 Power Indicator 77 Factory Reset 78 Picture Mode-Preset 66 - Picture Mode-User Option 68 - Screen Setup for Wire Arrangement 14 Swivel Stand 17 Positioning your display 17 Location 17 Kensington Security System 17 Desktop Pedestal Installation 18 Wall Mount: Horizontal installation 18 Not using the desk-type stand 19 Antenna Connection 20 EXTERNAL EQUIPMENT SETUP HD Receiver Setup 21 DVD Setup 24 VCR Setup 27 Headphone SETUP 30 Other A/V Source Setup 31 External Stereo Setup 32 AV Output Setup 32 PC Setup 33 - Auto Colour Tone Control...
... Picture Mode 77 Power Indicator 77 Factory Reset 78 Picture Mode-Preset 66 - Picture Mode-User Option 68 - Screen Setup for Wire Arrangement 14 Swivel Stand 17 Positioning your display 17 Location 17 Kensington Security System 17 Desktop Pedestal Installation 18 Wall Mount: Horizontal installation 18 Not using the desk-type stand 19 Antenna Connection 20 EXTERNAL EQUIPMENT SETUP HD Receiver Setup 21 DVD Setup 24 VCR Setup 27 Headphone SETUP 30 Other A/V Source Setup 31 External Stereo Setup 32 AV Output Setup 32 PC Setup 33 - Auto Colour Tone Control...
Owner's Manual
Page 8
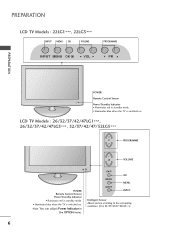
...*** P PROGRAMME + VOLUME - Note: You can adjust Power Indicator in standby mode. • illuminates blue when the TV is switched on . OK MENU INPUT OK MENU INPUT Intelligent Sensor Adjusts picture according to the surrounding conditions (Only 32/37/42/47/52LG5***) 6 POWER Remote Control Sensor Power/Standby Indicator • illuminates red in the OPTION menu. PREPARATION LCD TV Models : 22LG1***, 22LG3*** INPUT MENU OK VOLUME PROGRAMME INPUT MENU OK VOL PR PREPARATION POWER Remote Control Sensor Power/Standby...
...*** P PROGRAMME + VOLUME - Note: You can adjust Power Indicator in standby mode. • illuminates blue when the TV is switched on . OK MENU INPUT OK MENU INPUT Intelligent Sensor Adjusts picture according to the surrounding conditions (Only 32/37/42/47/52LG5***) 6 POWER Remote Control Sensor Power/Standby Indicator • illuminates red in the OPTION menu. PREPARATION LCD TV Models : 22LG1***, 22LG3*** INPUT MENU OK VOLUME PROGRAMME INPUT MENU OK VOL PR PREPARATION POWER Remote Control Sensor Power/Standby...
Owner's Manual
Page 19
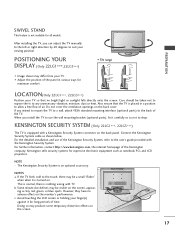
... adjust the TV manually to the left or right direction by 20 degrees to the user's guide provided with the Kensington Security System. When you install the TV to use of the Kensington Security System, refer to suit your TV so that the TV is placed in various ways for all models. For the detailed installation and use the wall mounting bracket (optional parts), fix...
... adjust the TV manually to the left or right direction by 20 degrees to the user's guide provided with the Kensington Security System. When you install the TV to use of the Kensington Security System, refer to suit your TV so that the TV is placed in various ways for all models. For the detailed installation and use the wall mounting bracket (optional parts), fix...
Owner's Manual
Page 23
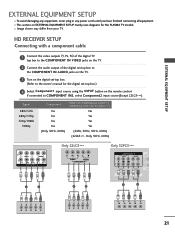
... plug in any power cords until you have finished connecting all equipment. HD RECEIVER SETUP Connecting with a component cable EXTERNAL EQUIPMENT SETUP 1 Connect the video outputs (Y, PB, PR) of the digital TV top box to the COMPONENT IN VIDEO jacks on the TV. 2 Connect the audio output of the digital set-top box to the COMPONENT IN AUDIO jacks on the TV. 3 Turn on the digital set -top box.) 4 Select Component1 input source using the INPUT button on EXTERNAL EQUIPMENT SETUP mainly uses diagrams for the digital set -top box. (Refer to COMPONENT IN2, select...
... plug in any power cords until you have finished connecting all equipment. HD RECEIVER SETUP Connecting with a component cable EXTERNAL EQUIPMENT SETUP 1 Connect the video outputs (Y, PB, PR) of the digital TV top box to the COMPONENT IN VIDEO jacks on the TV. 2 Connect the audio output of the digital set-top box to the COMPONENT IN AUDIO jacks on the TV. 3 Turn on the digital set -top box.) 4 Select Component1 input source using the INPUT button on EXTERNAL EQUIPMENT SETUP mainly uses diagrams for the digital set -top box. (Refer to COMPONENT IN2, select...
Owner's Manual
Page 24
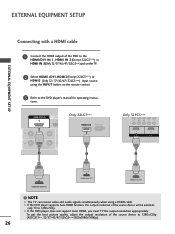
... best picture quality, adjust the output resolution of the source device will be automatically TV to TV the output resolution appropriately. AV OUT A AN 3 Turn on the remote control. EXTERNAL EQUIPMENT SETUP EXTERNAL EQUIPMENT SETUP COMPONENT IN VIDEO AUDIO 1 RS-232C IN (CONTROL&SERVICE) AUDIO IN (RGB/DVI) 2 Connecting a set-top box with using the INPUT button on the digital set-top box. (Refer to 1280x720p (42LG31F**, 32/37/42/47/52LG5***: 1920x1080i/1080p). 22 G If the digital set -top box player does not support Auto HDMI...
... best picture quality, adjust the output resolution of the source device will be automatically TV to TV the output resolution appropriately. AV OUT A AN 3 Turn on the remote control. EXTERNAL EQUIPMENT SETUP EXTERNAL EQUIPMENT SETUP COMPONENT IN VIDEO AUDIO 1 RS-232C IN (CONTROL&SERVICE) AUDIO IN (RGB/DVI) 2 Connecting a set-top box with using the INPUT button on the digital set-top box. (Refer to 1280x720p (42LG31F**, 32/37/42/47/52LG5***: 1920x1080i/1080p). 22 G If the digital set -top box player does not support Auto HDMI...
Owner's Manual
Page 25
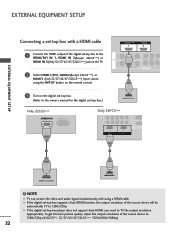
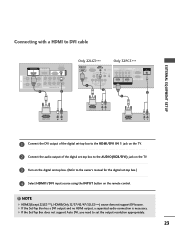
... Box does not support Auto DVI, you need to the owner's manual for the digital set the output resolution appropriately. 23 G If the Set-Top Box has a DVI output and no HDMI output, a separated audio connection is necessary. EXTERNAL EQUIPMENT SETUP Connecting with a HDMI to DVI cable COMPONENT IN VIDEO AUDIO 1 RS-232C IN (CONTROL&SERVICE) AUDIO IN (RGB/DVI) AV OUT AV IN HHDDMMI DI/DVVI ININ 1 2 HDMI IN 1 HDMI/DVI IN 2 HDMI IN RS-232C IN (CONTROL) RGB(PC) AUDIO (RGB/DVI) IN 1 AV VIDEO L/MONO AUDIO R OUT VARIABLE AUDIO...
... Box does not support Auto DVI, you need to the owner's manual for the digital set the output resolution appropriately. 23 G If the Set-Top Box has a DVI output and no HDMI output, a separated audio connection is necessary. EXTERNAL EQUIPMENT SETUP Connecting with a HDMI to DVI cable COMPONENT IN VIDEO AUDIO 1 RS-232C IN (CONTROL&SERVICE) AUDIO IN (RGB/DVI) AV OUT AV IN HHDDMMI DI/DVVI ININ 1 2 HDMI IN 1 HDMI/DVI IN 2 HDMI IN RS-232C IN (CONTROL) RGB(PC) AUDIO (RGB/DVI) IN 1 AV VIDEO L/MONO AUDIO R OUT VARIABLE AUDIO...
Owner's Manual
Page 28
... 2 COMPONENT IN Only 32PCVID5EO*** AUDIO 1 2 1 HDMI/DVI IN 2 HDMI IN RS-232C IN (CONTROL&SERVICE RGB IN (PC) 1 HDMI DVI IN HDMI IN ! NOTE VIDEO L/MONO AUDIO R G The TV can receive video and audio signals simultaneously when using the INPUT button on the remote control. 3 Refer to the DVD player's manual for operating instruc- To get the best picture quality, adjust the output resolution of the source device will VbAReIABLaEAuUDtIoOOmUTati- G If the DVD player does not support Auto HDMI, you must TV the output resolution appropriately...
... 2 COMPONENT IN Only 32PCVID5EO*** AUDIO 1 2 1 HDMI/DVI IN 2 HDMI IN RS-232C IN (CONTROL&SERVICE RGB IN (PC) 1 HDMI DVI IN HDMI IN ! NOTE VIDEO L/MONO AUDIO R G The TV can receive video and audio signals simultaneously when using the INPUT button on the remote control. 3 Refer to the DVD player's manual for operating instruc- To get the best picture quality, adjust the output resolution of the source device will VbAReIABLaEAuUDtIoOOmUTati- G If the DVD player does not support Auto HDMI, you must TV the output resolution appropriately...
Owner's Manual
Page 29
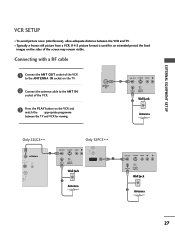
EXTERNAL EQUIPMENT SETUP L/MO RGB IN VCR SETUP I Typically a frozen still picture from a VCR. VIDEO L/MONO AUDIO R VIDEO L AUDIO R 2 Connect the antenna cable to the ANT IN socket of the VCR to the ANTENNA I N socket on the TV. ANTENNA IN ANT OUT S-VIDEO VIDEO L 1 ANT IN OUTPUT SWITCH Wall Jack 2 Antenna COMPONENT IN RS-232C IN AUDIO IN VIDEO AUDIO (CONTROL&SERVICE) (RGB/DVI) 1 Only 22LG3*** AV OUT AV IN Only 32PC5*** 2 ANT OUT S-VIDEO VIDEO L RGB IN (PC) 1 2 1 ANTENNA IN HDMI/DVI IN HDMI IN ANTENNA 1 IN...
EXTERNAL EQUIPMENT SETUP L/MO RGB IN VCR SETUP I Typically a frozen still picture from a VCR. VIDEO L/MONO AUDIO R VIDEO L AUDIO R 2 Connect the antenna cable to the ANT IN socket of the VCR to the ANTENNA I N socket on the TV. ANTENNA IN ANT OUT S-VIDEO VIDEO L 1 ANT IN OUTPUT SWITCH Wall Jack 2 Antenna COMPONENT IN RS-232C IN AUDIO IN VIDEO AUDIO (CONTROL&SERVICE) (RGB/DVI) 1 Only 22LG3*** AV OUT AV IN Only 32PC5*** 2 ANT OUT S-VIDEO VIDEO L RGB IN (PC) 1 2 1 ANTENNA IN HDMI/DVI IN HDMI IN ANTENNA 1 IN...
Owner's Manual
Page 34
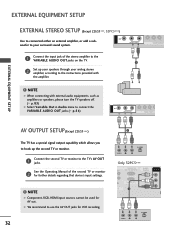
...'s input settings. 2 RS-232C IN (CONTROL&SERVICE) AUDIO IN (RGB/DVI) ! EXTERNAL EQUIPMENT SETUP HDMI DVI IN HDMI IN EXTERNAL STEREO SETUP (Except 22LG3***, 32PC5***) VIDEO L/MONO AUDIO R Use to connected either an external amplifier, or add a subwoofer to your analog stereo amplifier, according to the instructions provided with external audio equipments, such as amplifiers or speakers, please turn the TV speakers off. (G p.83) VIDEO L/MONO AUDIO R G Select Variable Out in Audio menu to connect the VARIABLE AUDIO OUT jacks.(G p.84) VARIABLE AUDIO OUT HDMI DVI...
...'s input settings. 2 RS-232C IN (CONTROL&SERVICE) AUDIO IN (RGB/DVI) ! EXTERNAL EQUIPMENT SETUP HDMI DVI IN HDMI IN EXTERNAL STEREO SETUP (Except 22LG3***, 32PC5***) VIDEO L/MONO AUDIO R Use to connected either an external amplifier, or add a subwoofer to your analog stereo amplifier, according to the instructions provided with external audio equipments, such as amplifiers or speakers, please turn the TV speakers off. (G p.83) VIDEO L/MONO AUDIO R G Select Variable Out in Audio menu to connect the VARIABLE AUDIO OUT jacks.(G p.84) VARIABLE AUDIO OUT HDMI DVI...
Owner's Manual
Page 46
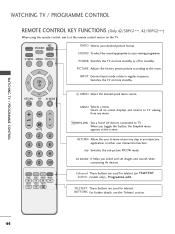
... off to your desired picture format. Coloured These buttons are used for teletext. RATIO POWER INPUT SOUND Q. SOUND To select the sound appropriate to standby. INPUT External input mode rotate in an interactive application or other user interaction function. PICTURE Adjusts the factory preset picture according to TV. RETURN PIP AV MODE FAV P MUTE 123 456 789 LIST 0 Q.VIEW TIME SIZE UPDATE REVEAL INDEX HOLD TEXT Q. TELETEXT These buttons are used for teletext (on -screen displays and returns to move...
... off to your desired picture format. Coloured These buttons are used for teletext. RATIO POWER INPUT SOUND Q. SOUND To select the sound appropriate to standby. INPUT External input mode rotate in an interactive application or other user interaction function. PICTURE Adjusts the factory preset picture according to TV. RETURN PIP AV MODE FAV P MUTE 123 456 789 LIST 0 Q.VIEW TIME SIZE UPDATE REVEAL INDEX HOLD TEXT Q. TELETEXT These buttons are used for teletext (on -screen displays and returns to move...
Owner's Manual
Page 50
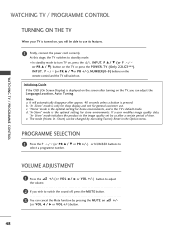
... press the POWER, TV (Only 22LG3***), INPUT, P / (or P R D / Eor P R +/-), NUMBER( 0~9 ) buttons on the remote control and the TV will be changed by executing Factory Reset in the Option menu. "In-Store" mode is the optimal setting for home environments, and is the TV's default mode. Note: a. "Home" mode is the optimal setting for store environments. e. c. If a user modifies image quality data, "In- WATCHING TV / PROGRAMME CONTROL WATCHING TV / PROGRAMME CONTROL TURNING ON THE...
... press the POWER, TV (Only 22LG3***), INPUT, P / (or P R D / Eor P R +/-), NUMBER( 0~9 ) buttons on the remote control and the TV will be changed by executing Factory Reset in the Option menu. "In-Store" mode is the optimal setting for home environments, and is the TV's default mode. Note: a. "Home" mode is the optimal setting for store environments. e. c. If a user modifies image quality data, "In- WATCHING TV / PROGRAMME CONTROL WATCHING TV / PROGRAMME CONTROL TURNING ON THE...
Owner's Manual
Page 52
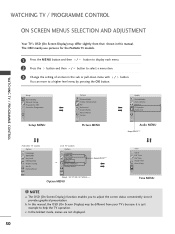
... Aspect Ratio Picture Reset Screen Picture MENU Audio Sound Mode Auto Volume Balance 0 TV Speaker Audio Out Audio MENU Except 22LG3*** WATCHING TV / PROGRAMME CONTROL 50 PLASMA TV models Option Language SIMPLINK Key Lock ISM Method Power Saving Set ID Factory Reset LCD TV models Option Language SIMPLINK Key Lock Set ID or Power Indicator Factory Reset Except 22LG3*** Except 32/37/42/47/52LG5*** Option MENU Time Clock Off Time On Time Sleep Timer Auto Sleep Time MENU ! WATCHING TV / PROGRAMME CONTROL ON SCREEN MENUS SELECTION AND ADJUSTMENT Your TV's OSD (On Screen Display...
... Aspect Ratio Picture Reset Screen Picture MENU Audio Sound Mode Auto Volume Balance 0 TV Speaker Audio Out Audio MENU Except 22LG3*** WATCHING TV / PROGRAMME CONTROL 50 PLASMA TV models Option Language SIMPLINK Key Lock ISM Method Power Saving Set ID Factory Reset LCD TV models Option Language SIMPLINK Key Lock Set ID or Power Indicator Factory Reset Except 22LG3*** Except 32/37/42/47/52LG5*** Option MENU Time Clock Off Time On Time Sleep Timer Auto Sleep Time MENU ! WATCHING TV / PROGRAMME CONTROL ON SCREEN MENUS SELECTION AND ADJUSTMENT Your TV's OSD (On Screen Display...
Owner's Manual
Page 62
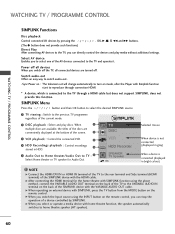
... connected (displayed in HDD. 5 Audio Out to Home theater/Audio Out to the VARIABLE AUDIO IN terminal on the remote control, you select or operate a media device with the HDMI cable. G When operating an external device with SIMPLINK, press the TV button from the MODE button on mode, after the Player with Simplink function start to turn on the remote control. Switch audio-out Offers an easy way to switch audio-out. -Sync Power on : The television set will change...
... connected (displayed in HDD. 5 Audio Out to Home theater/Audio Out to the VARIABLE AUDIO IN terminal on the remote control, you select or operate a media device with the HDMI cable. G When operating an external device with SIMPLINK, press the TV button from the MODE button on mode, after the Player with Simplink function start to turn on the remote control. Switch audio-out Offers an easy way to switch audio-out. -Sync Power on : The television set will change...
Owner's Manual
Page 66
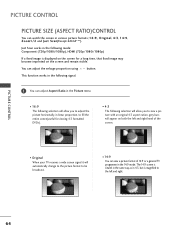
...:9 mode. You can adjust Aspect Ratio in the Picture menu. • 16:9 The following selection will allow you to view a picture with an original 4:3 aspect ration, grey bars will allow you to fill the entire screen(useful for a long time, that fixed image may become imprinted on both the left and right. This function works in the following signal. 1 You can adjust the enlarge proportion using button. Just Scan works in various picture formats...
...:9 mode. You can adjust Aspect Ratio in the Picture menu. • 16:9 The following selection will allow you to view a picture with an original 4:3 aspect ration, grey bars will allow you to fill the entire screen(useful for a long time, that fixed image may become imprinted on both the left and right. This function works in the following signal. 1 You can adjust the enlarge proportion using button. Just Scan works in various picture formats...
Owner's Manual
Page 73
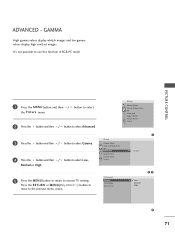
... the MENU button to return to the previous menu screen. Picture Picture Mode Colour Temperature XD Advanced Aspect Ratio Picture Reset Screen 1 Picture Picture Mode Colour Temperature XD AAddvvaanncceedd Aspect Ratio Picture Reset Screen G To Set Advanced GGaammmmaa Film Mode Black Level G Low Medium High 23 4 71 Press the RETURN or MENU(Only 22LG3***) button to move to normal TV viewing. GAMMA High gamma values display whitish images and low gamma values display high contrast images. It's not possible to use...
... the MENU button to return to the previous menu screen. Picture Picture Mode Colour Temperature XD Advanced Aspect Ratio Picture Reset Screen 1 Picture Picture Mode Colour Temperature XD AAddvvaanncceedd Aspect Ratio Picture Reset Screen G To Set Advanced GGaammmmaa Film Mode Black Level G Low Medium High 23 4 71 Press the RETURN or MENU(Only 22LG3***) button to move to normal TV viewing. GAMMA High gamma values display whitish images and low gamma values display high contrast images. It's not possible to use...
Owner's Manual
Page 74
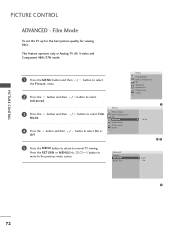
... viewing. Picture Picture Mode Colour Temperature XD Advanced Aspect Ratio Picture Reset Screen 1 Picture Picture Mode Colour Temperature XD AAddvvaanncceedd Aspect Ratio Picture Reset Screen G To Set 23 Advanced Gamma FFiillmm MMooddee Black Level G Off On 4 72 Film Mode To set the TV up for the best picture quality for viewing films. This feature operates only in Analog TV, AV, S-video and Component 480i/576i mode. 1 Press the MENU button and then / button to select the Picture menu. 2 Press the button and then / button to select A d v a n c e d. 3 Press the button...
... viewing. Picture Picture Mode Colour Temperature XD Advanced Aspect Ratio Picture Reset Screen 1 Picture Picture Mode Colour Temperature XD AAddvvaanncceedd Aspect Ratio Picture Reset Screen G To Set 23 Advanced Gamma FFiillmm MMooddee Black Level G Off On 4 72 Film Mode To set the TV up for the best picture quality for viewing films. This feature operates only in Analog TV, AV, S-video and Component 480i/576i mode. 1 Press the MENU button and then / button to select the Picture menu. 2 Press the button and then / button to select A d v a n c e d. 3 Press the button...
Owner's Manual
Page 75
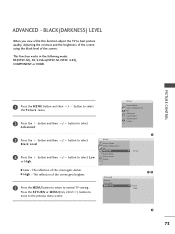
... button and then / button to the previous menu screen. Press the RETURN or MENU(Only 22LG3***) button to move to select L o w or High. Picture Picture Mode Colour Temperature XD Advanced Aspect Ratio Picture Reset Screen 1 Picture Picture Mode Colour Temperature XD AAddvvaanncceedd Aspect Ratio Picture Reset Screen G To Set Advanced Gamma Film Mode BBllaacckk LLeevveell 23 G Low High 4 73 Adjusting the contrast and the brightness of the screen using the black level of the screen. ADVANCED - BLACK(DARKNESS) LEVEL When you view...
... button and then / button to the previous menu screen. Press the RETURN or MENU(Only 22LG3***) button to move to select L o w or High. Picture Picture Mode Colour Temperature XD Advanced Aspect Ratio Picture Reset Screen 1 Picture Picture Mode Colour Temperature XD AAddvvaanncceedd Aspect Ratio Picture Reset Screen G To Set Advanced Gamma Film Mode BBllaacckk LLeevveell 23 G Low High 4 73 Adjusting the contrast and the brightness of the screen using the black level of the screen. ADVANCED - BLACK(DARKNESS) LEVEL When you view...
Owner's Manual
Page 76
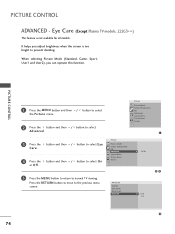
... the previous menu screen. PICTURE CONTROL ADVANCED - It helps you can operate this function. When selecting Picture Mode (Standard, Game, Sport, User1 and User2), you adjust brightness when the screen is not available for all models. Picture Picture Mode Colour Temperature XD Advanced Aspect Ratio Picture Reset Screen 1 Picture Picture Mode Colour Temperature XD AAddvvaanncceedd Aspect Ratio Picture Reset Screen G To Set 23 Advanced Gamma Film Mode Black Level EEyyee CCaarree G Off On 4 74 Press the RETURN button to move to normal TV viewing.
... the previous menu screen. PICTURE CONTROL ADVANCED - It helps you can operate this function. When selecting Picture Mode (Standard, Game, Sport, User1 and User2), you adjust brightness when the screen is not available for all models. Picture Picture Mode Colour Temperature XD Advanced Aspect Ratio Picture Reset Screen 1 Picture Picture Mode Colour Temperature XD AAddvvaanncceedd Aspect Ratio Picture Reset Screen G To Set 23 Advanced Gamma Film Mode Black Level EEyyee CCaarree G Off On 4 74 Press the RETURN button to move to normal TV viewing.

Owner's Manual
Page 97
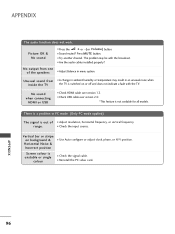
... plugging another channel. I Check HDMI cable over version 1.3. Power is switched on this case use the latest cables that support HDMI version 1.3. 95 pictures No picture I Are batteries installed with correct polarity (+ to -)? In this station. I Is the sleep time set : TV, STB, DVD etc.? I Is Auto sleep activated on . I Allow a sufficient distance between the TV and the remote control causing an obstruction. APPENDIX TROUBLESHOOTING (This feature is not available for all models...
... plugging another channel. I Check HDMI cable over version 1.3. Power is switched on this case use the latest cables that support HDMI version 1.3. 95 pictures No picture I Are batteries installed with correct polarity (+ to -)? In this station. I Is the sleep time set : TV, STB, DVD etc.? I Is Auto sleep activated on . I Allow a sufficient distance between the TV and the remote control causing an obstruction. APPENDIX TROUBLESHOOTING (This feature is not available for all models...
Owner's Manual
Page 98
... the speakers I Check the signal cable. No sound when connecting HDMI or USB I Check HDMI cable over version 2.0. *This feature is unstable or single colour I Adjust Balance in ambient humidity or temperature may be with the TV. APPENDIX The audio function does not work. Press MUTE button. No output from I Check USB cable over version 1.3. I A change in menu option. I Sound muted? I Check the input source. Picture OK & No sound I Are the audio cables installed properly...
... the speakers I Check the signal cable. No sound when connecting HDMI or USB I Check HDMI cable over version 2.0. *This feature is unstable or single colour I Adjust Balance in ambient humidity or temperature may be with the TV. APPENDIX The audio function does not work. Press MUTE button. No output from I Check USB cable over version 1.3. I A change in menu option. I Sound muted? I Check the input source. Picture OK & No sound I Are the audio cables installed properly...


