Specification (English)
Page 2
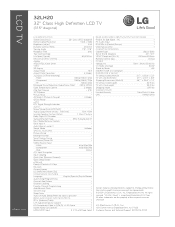
...Remote Control Type Unified POWER Voltage, Hz 100V - 240V, 50/60 Hz On Mode (Average) 84.1W Stand-by Mode >1W ENERGY STAR 3.0 Compliant • DIMENSIONS & WEIGHT TV without stand (WxHxD) 31.7" x 20.8" x 3.1" TV with stand (WxHxD) 31.7" x 23.0" x 8.8" Shipping Dimensions (WxHxD 38.7" x 24.6" x 7.4" TV without notice. All rights reserved. LCD TV 32LH20 32" Class High Definition LCD TV (31...Control w/V-Chip • Key Lock • Closed Caption • LG SIMPLINK (HDMI CEC) • CONVENIENCE FEATURES Language English/Spanish/French/...
...Remote Control Type Unified POWER Voltage, Hz 100V - 240V, 50/60 Hz On Mode (Average) 84.1W Stand-by Mode >1W ENERGY STAR 3.0 Compliant • DIMENSIONS & WEIGHT TV without stand (WxHxD) 31.7" x 20.8" x 3.1" TV with stand (WxHxD) 31.7" x 23.0" x 8.8" Shipping Dimensions (WxHxD 38.7" x 24.6" x 7.4" TV without notice. All rights reserved. LCD TV 32LH20 32" Class High Definition LCD TV (31...Control w/V-Chip • Key Lock • Closed Caption • LG SIMPLINK (HDMI CEC) • CONVENIENCE FEATURES Language English/Spanish/French/...
Owner's Manual (English)
Page 6
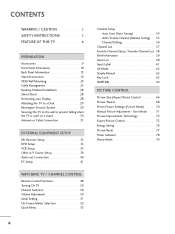
... used on a stand 30 Antenna or Cable Connection 31 EXTERNAL EQUIPMENT SETUP HD Receiver Setup 32 DVD Setup 35 VCR Setup 37 Other A/V Source Setup 39 Audio out Connection 40 PC Setup 41 WATCHING TV / CHANNEL CONTROL Remote Control Functions 48 Turning On TV 50 Channel Selection 50 Volume Adjustment 50 Initial Setting 51...
... used on a stand 30 Antenna or Cable Connection 31 EXTERNAL EQUIPMENT SETUP HD Receiver Setup 32 DVD Setup 35 VCR Setup 37 Other A/V Source Setup 39 Audio out Connection 40 PC Setup 41 WATCHING TV / CHANNEL CONTROL Remote Control Functions 48 Turning On TV 50 Channel Selection 50 Volume Adjustment 50 Initial Setting 51...
Owner's Manual (English)
Page 9
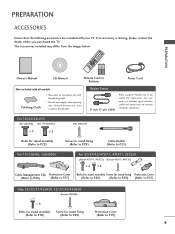
...29) Protection Cover (Refer to maintain standards compliance. If an accessory is missing, please contact the dealer where you purchased the TV. The accessories included may cause scratch or discoloration. Excessive pressure may differ from the images be7 l8o5 w6 3. PREPARATION PREPARATION ACCESSORIES... POWER 2 ENERGYINSAPVUINGT 753 86 LIST 0 9 VOL MUTE FLASHBK MENU Q.MENU ENTER RETURN FAMVARK CH P A G E 1.5V 1.5V Owner's Manual CD Manual Remote Control, Batteries Power Cord Not included with all models Polishing Cloth * Wipe spots on the exterior only with your...
...29) Protection Cover (Refer to maintain standards compliance. If an accessory is missing, please contact the dealer where you purchased the TV. The accessories included may cause scratch or discoloration. Excessive pressure may differ from the images be7 l8o5 w6 3. PREPARATION PREPARATION ACCESSORIES... POWER 2 ENERGYINSAPVUINGT 753 86 LIST 0 9 VOL MUTE FLASHBK MENU Q.MENU ENTER RETURN FAMVARK CH P A G E 1.5V 1.5V Owner's Manual CD Manual Remote Control, Batteries Power Cord Not included with all models Polishing Cloth * Wipe spots on the exterior only with your...

Owner's Manual (English)
Page 10
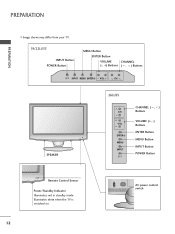
... Button MENU Button INPUT Button POWER Button ON OFF AC power control switch (Except 19/22LH20, 22LH200C) 10 Illuminates blue when the TV is switched on. (Can be adjusted Power Indicator in standby mode. PREPARATION PREPARATION FRONT PANEL INFORMATION I Image shown may differ from your... TV. 19/22/26LH20, 22LH200C INPUT Button POWER Button MENU Button ENTER Button VOLUME CHANNEL (-, +) Buttons (E,D) Buttons INPUT MENU ENTER VOL CH...
... Button MENU Button INPUT Button POWER Button ON OFF AC power control switch (Except 19/22LH20, 22LH200C) 10 Illuminates blue when the TV is switched on. (Can be adjusted Power Indicator in standby mode. PREPARATION PREPARATION FRONT PANEL INFORMATION I Image shown may differ from your... TV. 19/22/26LH20, 22LH200C INPUT Button POWER Button MENU Button ENTER Button VOLUME CHANNEL (-, +) Buttons (E,D) Buttons INPUT MENU ENTER VOL CH...

Owner's Manual (English)
Page 11
Illuminates blue when the set is switched on. CH CHANNEL ( , ) Buttons VOL ENTER MENU INPUT VOLUME (+, -) Buttons ENTER Button MENU Button INPUT Button Remote Control Sensor POWER Button 11 PREPARATION 32/37/42/47LF11, 47LF21, 32CL20 SPEAKER Power/Standby Indicator Illuminates red in standby mode.
Illuminates blue when the set is switched on. CH CHANNEL ( , ) Buttons VOL ENTER MENU INPUT VOLUME (+, -) Buttons ENTER Button MENU Button INPUT Button Remote Control Sensor POWER Button 11 PREPARATION 32/37/42/47LF11, 47LF21, 32CL20 SPEAKER Power/Standby Indicator Illuminates red in standby mode.
Owner's Manual (English)
Page 12
PREPARATION PREPARATION I Image shown may differ from your TV. 19/22LU55 INPUT Button POWER Button MENU Button ENTER Button VOLUME CHANNEL (-, +) Buttons ( , ) Buttons INPUT MENU ENTER VOL CH SPEAKER 26LU55 CH VOL ENTER MENU INPUT CHANNEL ( , ) Buttons VOLUME (+, -) Buttons ENTER Button MENU Button INPUT Button POWER Button Remote Control Sensor Power/Standby Indicator Illuminates red in standby mode. Illuminates white when the TV is switched on. 12 ❖x AC power control ❖❋❋ switch
PREPARATION PREPARATION I Image shown may differ from your TV. 19/22LU55 INPUT Button POWER Button MENU Button ENTER Button VOLUME CHANNEL (-, +) Buttons ( , ) Buttons INPUT MENU ENTER VOL CH SPEAKER 26LU55 CH VOL ENTER MENU INPUT CHANNEL ( , ) Buttons VOLUME (+, -) Buttons ENTER Button MENU Button INPUT Button POWER Button Remote Control Sensor Power/Standby Indicator Illuminates red in standby mode. Illuminates white when the TV is switched on. 12 ❖x AC power control ❖❋❋ switch
Owner's Manual (English)
Page 32
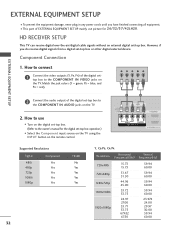
...video outputs (Y, PB, PR) of the digital settop box to the COMPONENT IN VIDEO jacks on the TV. 2. EXTERNAL EQUIPMENT SETUP EXTERNAL EQUIPMENT SETUP I This part of EXTERNAL EQUIPMENT SETUP mainly use I Turn on... use picture for the digital set-top box operation.) I Select the Component input source on the TV using the INPUT button on the remote control. 1 2 USB IN SERVICE ONLY AV IN VIDEO AUDIO L(MONO) R 2 VIDEO L... Vertical Frequency(KHz) Frequency(Hz) 720x480i 720x480p 1280x720p 1920x1080i 1920x1080p 15.73 15.73 31.47 31.50 44.96 45.00 33.72 33.75 26.97 27.00 33.71 33...
...video outputs (Y, PB, PR) of the digital settop box to the COMPONENT IN VIDEO jacks on the TV. 2. EXTERNAL EQUIPMENT SETUP EXTERNAL EQUIPMENT SETUP I This part of EXTERNAL EQUIPMENT SETUP mainly use I Turn on... use picture for the digital set-top box operation.) I Select the Component input source on the TV using the INPUT button on the remote control. 1 2 USB IN SERVICE ONLY AV IN VIDEO AUDIO L(MONO) R 2 VIDEO L... Vertical Frequency(KHz) Frequency(Hz) 720x480i 720x480p 1280x720p 1920x1080i 1920x1080p 15.73 15.73 31.47 31.50 44.96 45.00 33.72 33.75 26.97 27.00 33.71 33...
Owner's Manual (English)
Page 33
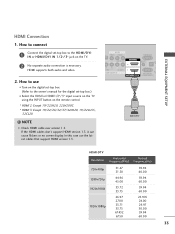
... digital set -top box to connect 1 Connect the digital set -top box.) I N or HDMI/DVI IN 1/2*/ 3* jack on the remote control. * HDMI 2: Except 19/22LH20, 22LH200C * HDMI 3: Except 19/22/26/32/37/42LH20, 19/22LU55, 32CL20 ! NOTE ...CONTROL&SERVICE) 1 HDMI OUTPUT HDMI-DTV Resolution Horizontal Vertical Frequency(KHz) Frequency(Hz) 720x480p 1280x720p 1920x1080i 1920x1080p 31.47 31.50 44.96 45.00 33.72 33.75 26.97 27.00 33.71 33.75 67.432 ...HDMI/DVI I Select the HDMI or HDMI1/2*/3* input source on the TV using the INPUT button on the TV. 2 No separate audio connection is necessary.
... digital set -top box to connect 1 Connect the digital set -top box.) I N or HDMI/DVI IN 1/2*/ 3* jack on the remote control. * HDMI 2: Except 19/22LH20, 22LH200C * HDMI 3: Except 19/22/26/32/37/42LH20, 19/22LU55, 32CL20 ! NOTE ...CONTROL&SERVICE) 1 HDMI OUTPUT HDMI-DTV Resolution Horizontal Vertical Frequency(KHz) Frequency(Hz) 720x480p 1280x720p 1920x1080i 1920x1080p 31.47 31.50 44.96 45.00 33.72 33.75 26.97 27.00 33.71 33.75 67.432 ...HDMI/DVI I Select the HDMI or HDMI1/2*/3* input source on the TV using the INPUT button on the TV. 2 No separate audio connection is necessary.
Owner's Manual (English)
Page 34
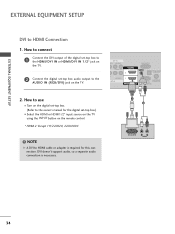
... the digital set -top box. (Refer to use I Select the HDMI or HDMI1/2* input source on the TV using the INPUT button on the remote control. * HDMI 2: Except 19/22LH20, 22LH200C ! DVI doesn't support audio, so a separate audio connection is required for the digital set-top box.) I Turn on the ...
... the digital set -top box. (Refer to use I Select the HDMI or HDMI1/2* input source on the TV using the INPUT button on the remote control. * HDMI 2: Except 19/22LH20, 22LH200C ! DVI doesn't support audio, so a separate audio connection is required for the digital set-top box.) I Turn on the ...
Owner's Manual (English)
Page 35
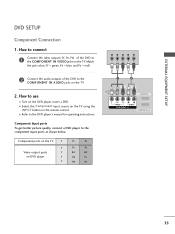
...PB, PR) of the DVD to the COMPONENT IN VIDEO jacks on the DVD player, insert a DVD. Component ports on the TV Y Y Video output ports Y on the TV. 2. Component Input ports To get better picture quality, connect a DVD player to the DVD player's manual for operating instructions. I... Select the Component input source on the TV using the INPUT button on the remote control. Y PB PR L R 2 Connect the audio outputs of the DVD to the COMPONENT IN AUDIO jacks on DVD player ...
...PB, PR) of the DVD to the COMPONENT IN VIDEO jacks on the DVD player, insert a DVD. Component ports on the TV Y Y Video output ports Y on the TV. 2. Component Input ports To get better picture quality, connect a DVD player to the DVD player's manual for operating instructions. I... Select the Component input source on the TV using the INPUT button on the remote control. Y PB PR L R 2 Connect the audio outputs of the DVD to the COMPONENT IN AUDIO jacks on DVD player ...
Owner's Manual (English)
Page 36
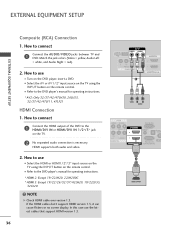
... instructions. * AV2: Only 32/37/42/47LH30, 26LU55, 32/37/42/47LF11, 47LF21 HDMI Connection 1. HDMI supports both audio and video. 2. I Turn on the TV. 2 No separated audio connection is necessary. Match the jack colors (Video = yellow, Audio Left = white, and Audio Right = red). 2. How to use the ... AUDIO RS-232C IN ACNATBELNE /DVI IN (CONTROL&SERVICE) 1 HDMI OUTPUT In this case use I Select the A V or AV1/2* input source on the TV using the INPUT button on the remote control. NOTE G Check HDMI cable over version 1.3. I Select the HDMI or HDMI1 / 2*/ 3* input source on the...
... instructions. * AV2: Only 32/37/42/47LH30, 26LU55, 32/37/42/47LF11, 47LF21 HDMI Connection 1. HDMI supports both audio and video. 2. I Turn on the TV. 2 No separated audio connection is necessary. Match the jack colors (Video = yellow, Audio Left = white, and Audio Right = red). 2. How to use the ... AUDIO RS-232C IN ACNATBELNE /DVI IN (CONTROL&SERVICE) 1 HDMI OUTPUT In this case use I Select the A V or AV1/2* input source on the TV using the INPUT button on the remote control. NOTE G Check HDMI cable over version 1.3. I Select the HDMI or HDMI1 / 2*/ 3* input source on the...
Owner's Manual (English)
Page 38
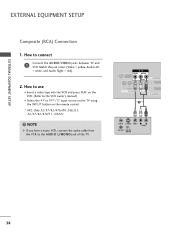
... = yellow, Audio Left = white, and Audio Right = red). 2. How to the VCR owner's manual.) I Select the A V or AV1/2* input source on the TV using the INPUT button on the remote control. * AV2: Only 32/37/42/47LH30, 26LU55, 32/37/42/47LF11, 47LF21 ! How to use I Insert a video tape into the VCR... and press PLAY on the VCR. (Refer to connect 1 Connect the AUDIO/VIDEO jacks between TV and VCR. NOTE G If you have a mono VCR...
... = yellow, Audio Left = white, and Audio Right = red). 2. How to the VCR owner's manual.) I Select the A V or AV1/2* input source on the TV using the INPUT button on the remote control. * AV2: Only 32/37/42/47LH30, 26LU55, 32/37/42/47LF11, 47LF21 ! How to use I Insert a video tape into the VCR... and press PLAY on the VCR. (Refer to connect 1 Connect the AUDIO/VIDEO jacks between TV and VCR. NOTE G If you have a mono VCR...
Owner's Manual (English)
Page 39
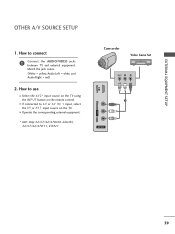
... A V 2* input source on the TV using the INPUT button on the TV. Match the jack colors. (Video = yellow, Audio Left = white, and Audio Right = red) 2. I If connected to A V or AV IN 1 input, select the A V or A V 1 input source on the remote control. How to connect 1 Connect the... AUDIO/VIDEO jacks between TV and external equipment. I Operate the corresponding external equipment. * AV2: Only 32/37/42/47LH30, 26LU55, 32/37/42/47LF11, 47LF21...
... A V 2* input source on the TV using the INPUT button on the TV. Match the jack colors. (Video = yellow, Audio Left = white, and Audio Right = red) 2. I If connected to A V or AV IN 1 input, select the A V or A V 1 input source on the remote control. How to connect 1 Connect the... AUDIO/VIDEO jacks between TV and external equipment. I Operate the corresponding external equipment. * AV2: Only 32/37/42/47LH30, 26LU55, 32/37/42/47LF11, 47LF21...
Owner's Manual (English)
Page 41
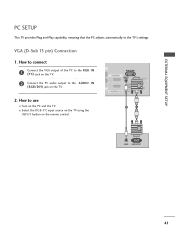
...the PC to the RGB IN (P C) jack on the TV. 2 Connect the PC audio output to the AUDIO IN (RGB/DVI) jack on the remote control. I Turn on the PC and the TV. EXTERNAL EQUIPMENT SETUP PC SETUP This TV provides Plug and Play capability, meaning that the PC adjusts ...automatically to use I Select the RGB-PC input source on the TV using the INPUT button on the TV. 2. How to the TV's settings. R 2 R...
...the PC to the RGB IN (P C) jack on the TV. 2 Connect the PC audio output to the AUDIO IN (RGB/DVI) jack on the remote control. I Turn on the PC and the TV. EXTERNAL EQUIPMENT SETUP PC SETUP This TV provides Plug and Play capability, meaning that the PC adjusts ...automatically to use I Select the RGB-PC input source on the TV using the INPUT button on the TV. 2. How to the TV's settings. R 2 R...
Owner's Manual (English)
Page 42
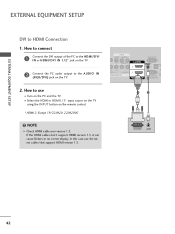
... 1.3. In this case use I Select the HDMI or HDMI1 / 2* input source on the TV using the INPUT button on the TV. 2. EXTERNAL EQUIPMENT SETUP EXTERNAL EQUIPMENT SETUP DVI to the AUDIO IN (RGB/DVI) jack on the remote control. * HDMI 2: Except 19/22LH20, 22LH200C ! How to connect 1 Connect the DVI ...output of the PC to the HDMI/DVI I N or HDMI/DVI IN 1/2* jack on the TV. 2 Connect the PC audio output to HDMI Connection 1. If the...
... 1.3. In this case use I Select the HDMI or HDMI1 / 2* input source on the TV using the INPUT button on the TV. 2. EXTERNAL EQUIPMENT SETUP EXTERNAL EQUIPMENT SETUP DVI to the AUDIO IN (RGB/DVI) jack on the remote control. * HDMI 2: Except 19/22LH20, 22LH200C ! How to connect 1 Connect the DVI ...output of the PC to the HDMI/DVI I N or HDMI/DVI IN 1/2* jack on the TV. 2 Connect the PC audio output to HDMI Connection 1. If the...

Owner's Manual (English)
Page 48
... Opens the list of AV devices connected to standby. G p.53 SIMPLINK See a list of Quick Menu options. G p.62 POWER Turns the TV on the TV. G p.60 ENERGY SAVING Adjusts the Energy Saving. G p.59 AV MODE Toggles through inputs. G p.64-65 FAV Scroll through the programmed ...Favorite channels. WATCHING TV / CHANNEL CONTROL WATCHING TV / CHANNEL CONTROL REMOTE CONTROL FUNCTIONS When using the remote control, aim it at the top of the screen. INFO Displays channel information at the remote control sensor on from standby. Also switches the TV on or off to TV. UP/DOWN PAGE...
... Opens the list of AV devices connected to standby. G p.53 SIMPLINK See a list of Quick Menu options. G p.62 POWER Turns the TV on the TV. G p.60 ENERGY SAVING Adjusts the Energy Saving. G p.59 AV MODE Toggles through inputs. G p.64-65 FAV Scroll through the programmed ...Favorite channels. WATCHING TV / CHANNEL CONTROL WATCHING TV / CHANNEL CONTROL REMOTE CONTROL FUNCTIONS When using the remote control, aim it at the top of the screen. INFO Displays channel information at the remote control sensor on from standby. Also switches the TV on or off to TV. UP/DOWN PAGE...
Owner's Manual (English)
Page 50
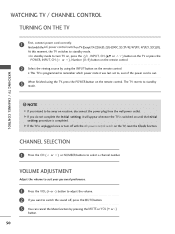
...set to remember which power state it will appear whenever the TV is unplugged once or turn TV on, press the , INPUT, CH (DE or ) button on the TV or press the POWER, INPUT, CH ( or ), Number (0~9) button on the remote control. 2 Select the viewing source by pressing the MUTE or...vacation, disconnect the power plug from the wall power outlet. G If the TV is switched on the remote control. I In standby mode to select a channel number. And switch the AC power control switch on the remote control. The TV reverts to standby mode. CHANNEL SELECTION 1 Press the CH ( or ) or...
...set to remember which power state it will appear whenever the TV is unplugged once or turn TV on, press the , INPUT, CH (DE or ) button on the TV or press the POWER, INPUT, CH ( or ), Number (0~9) button on the remote control. 2 Select the viewing source by pressing the MUTE or...vacation, disconnect the power plug from the wall power outlet. G If the TV is switched on the remote control. I In standby mode to select a channel number. And switch the AC power control switch on the remote control. The TV reverts to standby mode. CHANNEL SELECTION 1 Press the CH ( or ) or...
Owner's Manual (English)
Page 63
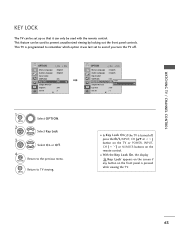
... the Key Lock On, the display ' ! This feature can only be used with the remote control. Key Lock' appears on the screen if any button on the remote control. I , INPUT, CH (DE or ) button on the TV or POWER, INPUT, CH ( ) or NUMBER buttons on the front panel is programmed to... TV viewing. This TV is pressed while viewing the TV. 63 Select Key Lock. 3 ENTER Select O n or O f ...
... the Key Lock On, the display ' ! This feature can only be used with the remote control. Key Lock' appears on the screen if any button on the remote control. I , INPUT, CH (DE or ) button on the TV or POWER, INPUT, CH ( ) or NUMBER buttons on the front panel is programmed to... TV viewing. This TV is pressed while viewing the TV. 63 Select Key Lock. 3 ENTER Select O n or O f ...
Owner's Manual (English)
Page 64
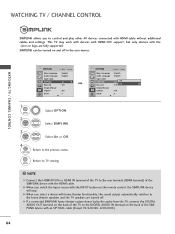
... control and play the audio from the TV, connect the DIGITAL AUDIO OUT terminal on the back of the TV to the rear terminal (HDMI terminal) of the SIMPLINK device with the INPUT button on and off . SIMPLINK can be turned on the remote control, the SIMPLINK device will stop.... MENU ! RETURN Return to the previous menu. WATCHING TV / CHANNEL CONTROL OPTION Move Enter Menu Language Audio Language Input Label SIMPLINK Key Lock Simple Manual ...
... control and play the audio from the TV, connect the DIGITAL AUDIO OUT terminal on the back of the TV to the rear terminal (HDMI terminal) of the SIMPLINK device with the INPUT button on and off . SIMPLINK can be turned on the remote control, the SIMPLINK device will stop.... MENU ! RETURN Return to the previous menu. WATCHING TV / CHANNEL CONTROL OPTION Move Enter Menu Language Audio Language Input Label SIMPLINK Key Lock Simple Manual ...
Owner's Manual (English)
Page 108
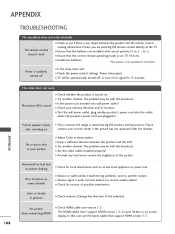
...direction of the picture. Lines or streaks in menu option. In this case use the latest cables that the batteries are pointing the remote control directly at the TV. I Check the power control settings. I Ensure that support HDMI version 1.3. No picture &No sound I Keep a sufficient distance...possible interference. Ensure you are installed with the broadcast. Power is any function to +, - I Is the sleep timer set : TV, VCR etc. The remote control doesn't work I TV will be automatically turned off I Check for sources of no screen display. I Check to -).
...direction of the picture. Lines or streaks in menu option. In this case use the latest cables that the batteries are pointing the remote control directly at the TV. I Check the power control settings. I Ensure that support HDMI version 1.3. No picture &No sound I Keep a sufficient distance...possible interference. Ensure you are installed with the broadcast. Power is any function to +, - I Is the sleep timer set : TV, VCR etc. The remote control doesn't work I TV will be automatically turned off I Check for sources of no screen display. I Check to -).


