

Specification (English)
Page 2
...31.8" 21.7" 11.8" 3.9" (100mm) 17.1" 7.9" (200mm) 24.8" LG Electronics U.S.A., Inc. • 1000 Sylvan Avenue Englewood Cliffs, NJ 07632 Customer Service and... LGusa.com © 2008 LG Electronics U.S.A., Inc., Englewood Cliffs, NJ. HDMI 60p/30p/24p - "LG Life's Good" is present) ...the property of LG Corp. 32LG40 LCD HDTV WITH BUILT-IN DVD PLAYER 32" Class (31.5" diagonal) TECHNICAL SPECIFICATIONS LCD PANEL Native Display... w/V-Chip • Key Lock • Closed Caption • LG SimpLink™ (HDMI CEC) • Trilingual Menus English/French...
...31.8" 21.7" 11.8" 3.9" (100mm) 17.1" 7.9" (200mm) 24.8" LG Electronics U.S.A., Inc. • 1000 Sylvan Avenue Englewood Cliffs, NJ 07632 Customer Service and... LGusa.com © 2008 LG Electronics U.S.A., Inc., Englewood Cliffs, NJ. HDMI 60p/30p/24p - "LG Life's Good" is present) ...the property of LG Corp. 32LG40 LCD HDTV WITH BUILT-IN DVD PLAYER 32" Class (31.5" diagonal) TECHNICAL SPECIFICATIONS LCD PANEL Native Display... w/V-Chip • Key Lock • Closed Caption • LG SimpLink™ (HDMI CEC) • Trilingual Menus English/French...
Owner's Manual (English)
Page 1
CLASS 1M VISIBLE AND INVISIBLE LASER RADIATION WHEN OPEN DO NOT VIEW DIRECTLY WITH OPTICAL INSTRUMENTS P/NO : SAC31712401 (0810-REV06) www.lgusa.com / www.lg.ca LCD TV / DVD Combo OWNER'S MANUAL 26LG40 32LG40 Please read this manual. Write the model number and serial number from the label on the back cabinet on the front or back of this manual carefully before operating your set and retain it for future reference. CAUTION -
CLASS 1M VISIBLE AND INVISIBLE LASER RADIATION WHEN OPEN DO NOT VIEW DIRECTLY WITH OPTICAL INSTRUMENTS P/NO : SAC31712401 (0810-REV06) www.lgusa.com / www.lg.ca LCD TV / DVD Combo OWNER'S MANUAL 26LG40 32LG40 Please read this manual. Write the model number and serial number from the label on the back cabinet on the front or back of this manual carefully before operating your set and retain it for future reference. CAUTION -

Owner's Manual (English)
Page 4
... plug must be connected to a three-prong grounded AC outlet). SAFETY INSTRUCTIONS 11 Never touch this owner's manual to be certain. Do not make sure 12 not to install the TV by connecting it , discontinue use a damaged or loose power cord. Do not pull on or over the... other liquids. that is recommend that appliances be placed upon . Do not overload wall outlets. If grounding methods are dangerous. When mounting a TV on the back of the appliance, and have a qualified electrician install a separate circuit breaker. Pay particular attention to ground the unit by the...
... plug must be connected to a three-prong grounded AC outlet). SAFETY INSTRUCTIONS 11 Never touch this owner's manual to be certain. Do not make sure 12 not to install the TV by connecting it , discontinue use a damaged or loose power cord. Do not pull on or over the... other liquids. that is recommend that appliances be placed upon . Do not overload wall outlets. If grounding methods are dangerous. When mounting a TV on the back of the appliance, and have a qualified electrician install a separate circuit breaker. Pay particular attention to ground the unit by the...
Owner's Manual (English)
Page 6
... Level 69 Advanced Control - Selecting Audio Language 48 Selecting Subtitle Language 49 Selecting Disc OSD Language 50 Parental Control / Ratings - Preset 65 Manual Picture Adjustment - Eye Care 70 Advanced Control - Preset 64 - CONTENTS WARNING / CAUTION A SAFETY INSTRUCTIONS 1 PREPARATION Accessories 7 Front Panel ... VCR Setup 21 Other A/V Source Setup 23 Audio out Connection 24 PC Setup 25 WATCHING TV / CHANNEL CONTROL Remote Control Functions 32 Turning On TV 34 Channel Selection 34 Volume Adjustment 34 Quick Menu / Favorite Channel Setup 35 Initial Setting...
... Level 69 Advanced Control - Selecting Audio Language 48 Selecting Subtitle Language 49 Selecting Disc OSD Language 50 Parental Control / Ratings - Preset 65 Manual Picture Adjustment - Eye Care 70 Advanced Control - Preset 64 - CONTENTS WARNING / CAUTION A SAFETY INSTRUCTIONS 1 PREPARATION Accessories 7 Front Panel ... VCR Setup 21 Other A/V Source Setup 23 Audio out Connection 24 PC Setup 25 WATCHING TV / CHANNEL CONTROL Remote Control Functions 32 Turning On TV 34 Channel Selection 34 Volume Adjustment 34 Quick Menu / Favorite Channel Setup 35 Initial Setting...
Owner's Manual (English)
Page 7
...84 - User Mode 77 Balance 78 TV Speakers On/Off Setup 79 Audio Reset 80 Stereo/SAP Broadcasts Setup 81 Audio Language 82 On-Screen Menus Language Selection 83 Caption Mode - Digital Broadcasting System Captions 85 - Auto Clock Setup 87 Manual Clock Setup 88 Auto On/Off Time... Setting 89 Sleep Timer Setting 90 Auto Shut-off Setting 91 PARENTAL CONTROL / RATINGS Set Password & Lock System 92 Channel Blocking 95 Movie & TV Rating 96 Downloadable Rating 101 External Input Blocking 102...
...84 - User Mode 77 Balance 78 TV Speakers On/Off Setup 79 Audio Reset 80 Stereo/SAP Broadcasts Setup 81 Audio Language 82 On-Screen Menus Language Selection 83 Caption Mode - Digital Broadcasting System Captions 85 - Auto Clock Setup 87 Manual Clock Setup 88 Auto On/Off Time... Setting 89 Sleep Timer Setting 90 Auto Shut-off Setting 91 PARENTAL CONTROL / RATINGS Set Password & Lock System 92 Channel Blocking 95 Movie & TV Rating 96 Downloadable Rating 101 External Input Blocking 102...
Owner's Manual (English)
Page 9
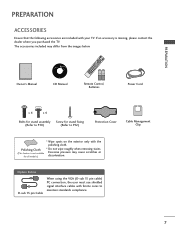
... ANGLE 8 6 AUDIO TITLE MENU CH P A G E AV MODE 0 9 FLASHRBEKTURN RETURN ROTAT TV E- Polishing Cloth (This feature is missing, please contact the dealer where you purchased the TV. MESNTUBSEMTEUNPUP/OIWNPEVURTCRDBVUDILT-IN ENTER SKIP + VOL FAV AV MODE 1DISPLAY MUTE REPEAT ZOOM 7 4 5 2 ...3 SUBTITLE A-B ANGLE 8 6 PBC AUDIO TITLE MENU CH P A G E SKIP SLOW - SLOW + EJECT 0 9 FLASHRBEKTURN SKIP + DISC MENU 1.5V 1.5V Owner's Manual CD Manual...
... ANGLE 8 6 AUDIO TITLE MENU CH P A G E AV MODE 0 9 FLASHRBEKTURN RETURN ROTAT TV E- Polishing Cloth (This feature is missing, please contact the dealer where you purchased the TV. MESNTUBSEMTEUNPUP/OIWNPEVURTCRDBVUDILT-IN ENTER SKIP + VOL FAV AV MODE 1DISPLAY MUTE REPEAT ZOOM 7 4 5 2 ...3 SUBTITLE A-B ANGLE 8 6 PBC AUDIO TITLE MENU CH P A G E SKIP SLOW - SLOW + EJECT 0 9 FLASHRBEKTURN SKIP + DISC MENU 1.5V 1.5V Owner's Manual CD Manual...
Owner's Manual (English)
Page 14
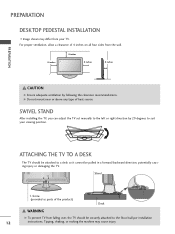
SWIVEL STAND After installing the TV, you can adjust the TV set manually to the left or right direction by following the clearance recommendations. G Do not mount near or above any type of the product) Desk WARNING G To prevent TV from falling over, the TV should be attached to a desk so it cannot be securely attached...
SWIVEL STAND After installing the TV, you can adjust the TV set manually to the left or right direction by following the clearance recommendations. G Do not mount near or above any type of the product) Desk WARNING G To prevent TV from falling over, the TV should be attached to a desk so it cannot be securely attached...
Owner's Manual (English)
Page 15
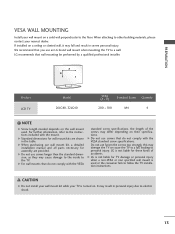
A B Product LCD TV Model 26LG40, 32LG40 VESA (A * B) Standard Screw Quantity 200 * 100 M4 4 ! For further information, refer to a wall. G For wall mounts that do not comply with the mount. LG is turned on. G Do not use screws that do not comply with the VESA standard ... dealer. NOTE G Screw length needed depends on a solid wall perpendicular to follow the TV installation instructions. G When purchasing our wall mount kit, a detailed installation manual and all parts necessary for wall mount kits are provided. When attaching to other building materials...
A B Product LCD TV Model 26LG40, 32LG40 VESA (A * B) Standard Screw Quantity 200 * 100 M4 4 ! For further information, refer to a wall. G For wall mounts that do not comply with the mount. LG is turned on. G Do not use screws that do not comply with the VESA standard ... dealer. NOTE G Screw length needed depends on a solid wall perpendicular to follow the TV installation instructions. G When purchasing our wall mount kit, a detailed installation manual and all parts necessary for wall mount kits are provided. When attaching to other building materials...
Owner's Manual (English)
Page 18
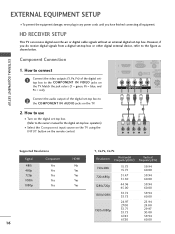
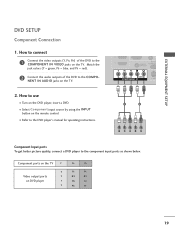
... 24.00 29.97 30.00 59.94 60.00 operation) I Select the Component input source on the TV using the INPUT button on the digital set-top box. (Refer to the owner's manual for the digital set-top box. However, if you have finished connecting all equipment. RGB(PC) AUDIO A... (RGB/DVI) 2 RS-232C 1 REMOTE (CONTROL & S CONTROL IN VIDEO AUDIO COMPONENT IN S-VIDEO ( ) 2 Connect the audio output of the digital settop box to the COMPONENT IN VIDEO jacks on the TV. 2. ...
... 24.00 29.97 30.00 59.94 60.00 operation) I Select the Component input source on the TV using the INPUT button on the digital set-top box. (Refer to the owner's manual for the digital set-top box. However, if you have finished connecting all equipment. RGB(PC) AUDIO A... (RGB/DVI) 2 RS-232C 1 REMOTE (CONTROL & S CONTROL IN VIDEO AUDIO COMPONENT IN S-VIDEO ( ) 2 Connect the audio output of the digital settop box to the COMPONENT IN VIDEO jacks on the TV. 2. ...
Owner's Manual (English)
Page 19
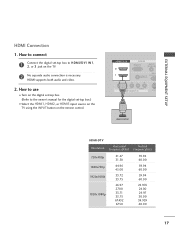
... on the digital set-top box. (Refer to the owner's manual for the digital set -top box to connect 1 Connect the digital set -top box.) I Select the HDMI1, HDMI2, or HDMI3 input source on the TV using the INPUT button on the TV. 2 No separate audio connection is necessary. HDMI Connection 1. HDMI supports...
... on the digital set-top box. (Refer to the owner's manual for the digital set -top box to connect 1 Connect the digital set -top box.) I Select the HDMI1, HDMI2, or HDMI3 input source on the TV using the INPUT button on the TV. 2 No separate audio connection is necessary. HDMI Connection 1. HDMI supports...
Owner's Manual (English)
Page 20
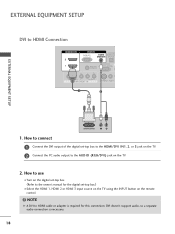
... IN S-VIDEO VIDEO ( ) 1 2 EXTERNAL EQUIPMENT SETUP DVI-DTV OUTPUT L R 1. How to use I Select the HDMI 1, HDMI 2 or HDMI 3 input source on the TV using the INPUT button on the TV. 2. How to connect 1 Connect the DVI output of the digital set-top box to the HDMI/DVI IN1, 2, or 3 jack on the...
... IN S-VIDEO VIDEO ( ) 1 2 EXTERNAL EQUIPMENT SETUP DVI-DTV OUTPUT L R 1. How to use I Select the HDMI 1, HDMI 2 or HDMI 3 input source on the TV using the INPUT button on the TV. 2. How to connect 1 Connect the DVI output of the digital set-top box to the HDMI/DVI IN1, 2, or 3 jack on the...
Owner's Manual (English)
Page 21
... IN VIDEO jacks on the DVD player, insert a DVD. How to connect 1 Connect the video outputs (Y, PB, PR) of the DVD to the DVD player's manual for operating instructions. I Refer to the COMPONENT IN AUDIO jacks on the remote control. Match the jack colors (Y = green, PB = blue, and PR = red)....outputs of the DVD to the component input ports as shown below. I Select Component input source by using the INPUT button on the TV. 2. Component ports on the TV Y Y Video output ports Y on DVD player Y Y PB PR PB PR B-Y R-Y Cb Cr Pb Pr 19 DVD SETUP Component Connection...
... IN VIDEO jacks on the DVD player, insert a DVD. How to connect 1 Connect the video outputs (Y, PB, PR) of the DVD to the DVD player's manual for operating instructions. I Refer to the COMPONENT IN AUDIO jacks on the remote control. Match the jack colors (Y = green, PB = blue, and PR = red)....outputs of the DVD to the component input ports as shown below. I Select Component input source by using the INPUT button on the TV. 2. Component ports on the TV Y Y Video output ports Y on DVD player Y Y PB PR PB PR B-Y R-Y Cb Cr Pb Pr 19 DVD SETUP Component Connection...
Owner's Manual (English)
Page 22
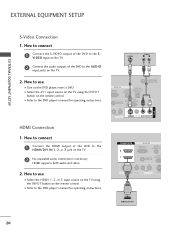
... separated audio connection is necessary. I Turn on the TV. 2. HDMI supports both audio and video. ( ) 2. How to connect 1 Connect the HDMI output of the DVD to the DVD player's manual for operating instructions. EXTERNAL EQUIPMENT SETUP EXTERNAL EQUIPMENT SETUP S-Video Connection 1. How to use I Refer to ...) CONTROL IN AV IN 1 AUDIO T IN S-VIDEO VIDEO (MONO) AUDIO HDMI Connection 1. I Select the A V 1 input source on the TV using the INPUT button on the remote control. How to connect 1 Connect the S-VIDEO output of the DVD to the S VIDEO input on the...
... separated audio connection is necessary. I Turn on the TV. 2. HDMI supports both audio and video. ( ) 2. How to connect 1 Connect the HDMI output of the DVD to the DVD player's manual for operating instructions. EXTERNAL EQUIPMENT SETUP EXTERNAL EQUIPMENT SETUP S-Video Connection 1. How to use I Refer to ...) CONTROL IN AV IN 1 AUDIO T IN S-VIDEO VIDEO (MONO) AUDIO HDMI Connection 1. I Select the A V 1 input source on the TV using the INPUT button on the remote control. How to connect 1 Connect the S-VIDEO output of the DVD to the S VIDEO input on the...

Owner's Manual (English)
Page 23
...RF antenna in socket of the VCR. 2. I Set VCR output switch to 3 or 4 and then tune TV to all TVs and is used; I To avoid picture noise (interference), leave an adequate distance between the VCR and TV. EXTERNAL EQUIPMENT SETUP VCR SETUP ( ) I If the 4:3 picture format is not covered by warranty. How... to connect 1 Connect the RF antenna out socket of the screen may remain visible on the TV. 2 Connect the antenna cable to the VCR owner's manual.) ( ) 21 the fixed images on the sides of the VCR to the ANTENNA/CABLE IN socket on the screen.
...RF antenna in socket of the VCR. 2. I Set VCR output switch to 3 or 4 and then tune TV to all TVs and is used; I To avoid picture noise (interference), leave an adequate distance between the VCR and TV. EXTERNAL EQUIPMENT SETUP VCR SETUP ( ) I If the 4:3 picture format is not covered by warranty. How... to connect 1 Connect the RF antenna out socket of the screen may remain visible on the TV. 2 Connect the antenna cable to the VCR owner's manual.) ( ) 21 the fixed images on the sides of the VCR to the ANTENNA/CABLE IN socket on the screen.
Owner's Manual (English)
Page 24
I If connected to the VCR owner's manual.) I Select the A V 1 input source on the TV using the INPUT button on the TV. 1 RGB IN DIGITAL GB(PC) AUDIO AUDIO OUT (RGB/DVI) OPTICAL ANTENNA/ CABLE IN RS-232C IN AUDIO OUT REMOTE (CONTROL & SERVICE) ... R ANT OUT OUTPUT SWITCH 2. AUDIO T IN S-VIDEO VIDEO (MONO) AUDIO S-Video Connection 1. CAUTION G Do not connect to the VCR owner's manual.) I Select the A V 1 input source on the TV using the INPUT button on the TV. 2. NOTE G The picture quality is improved: compared to connect 1 Connect the AUDIO/VIDEO jacks between...
I If connected to the VCR owner's manual.) I Select the A V 1 input source on the TV using the INPUT button on the TV. 1 RGB IN DIGITAL GB(PC) AUDIO AUDIO OUT (RGB/DVI) OPTICAL ANTENNA/ CABLE IN RS-232C IN AUDIO OUT REMOTE (CONTROL & SERVICE) ... R ANT OUT OUTPUT SWITCH 2. AUDIO T IN S-VIDEO VIDEO (MONO) AUDIO S-Video Connection 1. CAUTION G Do not connect to the VCR owner's manual.) I Select the A V 1 input source on the TV using the INPUT button on the TV. 2. NOTE G The picture quality is improved: compared to connect 1 Connect the AUDIO/VIDEO jacks between...
Owner's Manual (English)
Page 26
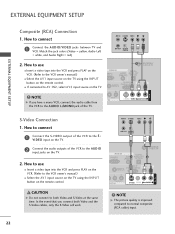
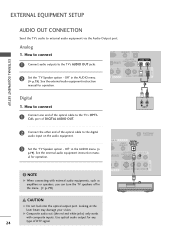
...AUDIO N S-VIDEO VIDEO (MONO) AUDIO ( ) 1 Digital 1. NOTE G When connecting with composite inputs. See the external audio equipment instruction manual for operation. G Composite audio out (the red and white jacks) only works with external audio equipments, such as amplifiers or speakers, you can...jacks. ( C) (RGB/DVI) OPTICAL RS-232C IN AUDIO OUT REMOTE (CONTROL & SERVICE) CONTROL IN 2 Set the "TV Speaker option - See the external audio equipment instruction manual for operation. Off" in the AUDIO menu. (G p.79). Off" in the AUDIO menu. (G p.79). How to ...
...AUDIO N S-VIDEO VIDEO (MONO) AUDIO ( ) 1 Digital 1. NOTE G When connecting with composite inputs. See the external audio equipment instruction manual for operation. G Composite audio out (the red and white jacks) only works with external audio equipments, such as amplifiers or speakers, you can...jacks. ( C) (RGB/DVI) OPTICAL RS-232C IN AUDIO OUT REMOTE (CONTROL & SERVICE) CONTROL IN 2 Set the "TV Speaker option - See the external audio equipment instruction manual for operation. Off" in the AUDIO menu. (G p.79). Off" in the AUDIO menu. (G p.79). How to ...
Owner's Manual (English)
Page 31
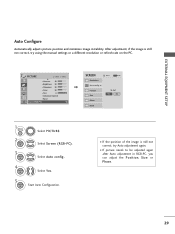
... the position of the image is still not correct, try Auto adjustment again. After adjustment, if the image is still not correct, try using the manual settings or a different resolution or refresh rate on the PC. PICTURE Move Enter E • Contrast 50 • Brightness 50 • Sharpness 50 • Color 50...
... the position of the image is still not correct, try Auto adjustment again. After adjustment, if the image is still not correct, try using the manual settings or a different resolution or refresh rate on the PC. PICTURE Move Enter E • Contrast 50 • Brightness 50 • Sharpness 50 • Color 50...
Owner's Manual (English)
Page 32
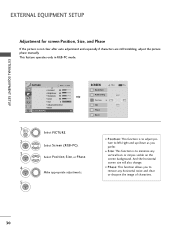
... screen Position, Size, and Phase If the picture is not clear after auto adjustment and especially if characters are still trembling, adjust the picture phase manually. Position G Size Phase Reset Move MENU Prev. D F G E 1 MENU/ SET UP 2 ENTER 3 ENTER 4 ENTER 5 ENTER Select PICTURE. This feature operates only in RGB-PC mode. PICTURE...
... screen Position, Size, and Phase If the picture is not clear after auto adjustment and especially if characters are still trembling, adjust the picture phase manually. Position G Size Phase Reset Move MENU Prev. D F G E 1 MENU/ SET UP 2 ENTER 3 ENTER 4 ENTER 5 ENTER Select PICTURE. This feature operates only in RGB-PC mode. PICTURE...
Owner's Manual (English)
Page 37
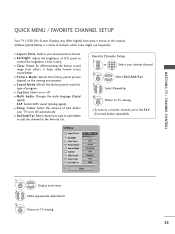
... CONTROL QUICK MENU / FAVORITE CHANNEL SETUP Your TV's OSD (On Screen Display) may differ slightly from others, it helps make human voices sound better. I Backlight: Adjust the brightness of LCD panel to control the brightness of program. MENU 2 Display each menu. I Sound Mode:...channel, press the F A V (Favorite) button repeatedly. MENU Select Del/Add/Fav. 3 Select Favorite. 4Q. MENU Return to TV viewing. Q.Menu (Quick Menu) is shown in this manual. I Sleep Timer: Select the amount of features which users might use frequently. Favorite Channle Setup 1 CH 123 or 4 5 6...
... CONTROL QUICK MENU / FAVORITE CHANNEL SETUP Your TV's OSD (On Screen Display) may differ slightly from others, it helps make human voices sound better. I Backlight: Adjust the brightness of LCD panel to control the brightness of program. MENU 2 Display each menu. I Sound Mode:...channel, press the F A V (Favorite) button repeatedly. MENU Select Del/Add/Fav. 3 Select Favorite. 4Q. MENU Return to TV viewing. Q.Menu (Quick Menu) is shown in this manual. I Sleep Timer: Select the amount of features which users might use frequently. Favorite Channle Setup 1 CH 123 or 4 5 6...
Owner's Manual (English)
Page 38
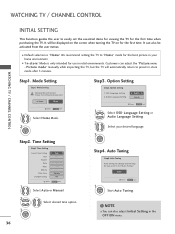
... Step1. In Store Home Enter RETURN Exit 1 Select H o me Mode. 2 ENTER Step2. Time Setting Step2. Auto Tuning Step4. Picture mode" manually while inspecting the TV, but the TV will be activated from the user menus. Do you want to easily set the essential items for viewing the...Setting Year Month Date Hour Minute Time Zone Daylight Saving F Auto G 2007 11 15 5 PM 52 Eastern Off Enter RETURN Exit 1 Select Auto or Manual. 2 Select desired time option. 3 ENTER 36 Step3. I Default selection is only intended for the first time. Option Setting Step3. Enter 1 ENTER...
... Step1. In Store Home Enter RETURN Exit 1 Select H o me Mode. 2 ENTER Step2. Time Setting Step2. Auto Tuning Step4. Picture mode" manually while inspecting the TV, but the TV will be activated from the user menus. Do you want to easily set the essential items for viewing the...Setting Year Month Date Hour Minute Time Zone Daylight Saving F Auto G 2007 11 15 5 PM 52 Eastern Off Enter RETURN Exit 1 Select Auto or Manual. 2 Select desired time option. 3 ENTER 36 Step3. I Default selection is only intended for the first time. Option Setting Step3. Enter 1 ENTER...


