
Specification (English)
Page 2
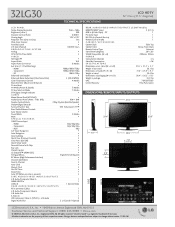
... (Antenna/Cable) 1 L/R Audio/Component Video In 1 L/R Audio Out 1 S-Video In 1 HD Component Video In (Y,Pb,Pr) + L/R Audio 2 Digital Audio Out 2 (1 Coaxial/1 Optical) SIDE BACK REAR AUDIO/VIDEO INPUTS/OUTPUTS (CONTINUED) HDMI™/HDCP Input 2 (V.1.3) RGB In (D-Sub 15pin) - THD 10%) 10W + 10W Speaker System Details 2 Way 4 System (Invisible Speaker) Dolby® Digital Decoder • Surround System Type SRS TruSurround XT™ Bass/Treble/Balance Controls • Auto Volume Leveler • Sound Mode 5 Modes...
... (Antenna/Cable) 1 L/R Audio/Component Video In 1 L/R Audio Out 1 S-Video In 1 HD Component Video In (Y,Pb,Pr) + L/R Audio 2 Digital Audio Out 2 (1 Coaxial/1 Optical) SIDE BACK REAR AUDIO/VIDEO INPUTS/OUTPUTS (CONTINUED) HDMI™/HDCP Input 2 (V.1.3) RGB In (D-Sub 15pin) - THD 10%) 10W + 10W Speaker System Details 2 Way 4 System (Invisible Speaker) Dolby® Digital Decoder • Surround System Type SRS TruSurround XT™ Bass/Treble/Balance Controls • Auto Volume Leveler • Sound Mode 5 Modes...
Owner's Manual (English)
Page 2
... USER SERVICEABLE PARTS INSIDE. These limits are designed to operate the equipment. This equipment generates, uses and can radiate radio frequency energy and, if not installed and used in accordance with the instructions, may be of sufficient magnitude to constitute a risk of electric shock to operate this equipment does cause harmful interference to radio or television reception, which the receiver is...
... USER SERVICEABLE PARTS INSIDE. These limits are designed to operate the equipment. This equipment generates, uses and can radiate radio frequency energy and, if not installed and used in accordance with the instructions, may be of sufficient magnitude to constitute a risk of electric shock to operate this equipment does cause harmful interference to radio or television reception, which the receiver is...
Owner's Manual (English)
Page 5
...charges. Do not install in the vicinity of antenna discharge unit, connection to the National Electrical Code, ANSI/NFPA 70 22 Moving Make sure the product is grounded so as death or serious injury can come in . Do not spray water or other electric light or power circuits, or ...sure the antenna system is turned off, unplugged and all cables have been removed. Do not cover the product with cloth or other odors coming from the TV or hear strange sounds, unplug the power cord contact an authorized service center. 25 Do not press strongly upon the panel with such power lines or ...
...charges. Do not install in the vicinity of antenna discharge unit, connection to the National Electrical Code, ANSI/NFPA 70 22 Moving Make sure the product is grounded so as death or serious injury can come in . Do not spray water or other electric light or power circuits, or ...sure the antenna system is turned off, unplugged and all cables have been removed. Do not cover the product with cloth or other odors coming from the TV or hear strange sounds, unplug the power cord contact an authorized service center. 25 Do not press strongly upon the panel with such power lines or ...
Owner's Manual (English)
Page 6
... when the TV is used on a stand 21 Antenna or Cable Connection 22 EXTERNAL EQUIPMENT SETUP HD Receiver Setup 23 DVD Setup 29 VCR Setup 33 Other A/V Source Setup 36 PC Setup 37 USB Connection 46 Audio Out Connection 47 WATCHING TV / CHANNEL CONTROL Remote Control Functions 48 Turning On the TV 50 Channel Selection 50 Volume Adjustment 50 Quick Menu 51 Initial Setting 52 On-Screen Menus Selection 54 Channel Setup - Add / Delete Channel (Manual Tuning 57 - Preset 74 Color Tone - Preset 75 Manual Picture Adjustment - User Mode 76 - Picture Mode - Black (Darkness...
... when the TV is used on a stand 21 Antenna or Cable Connection 22 EXTERNAL EQUIPMENT SETUP HD Receiver Setup 23 DVD Setup 29 VCR Setup 33 Other A/V Source Setup 36 PC Setup 37 USB Connection 46 Audio Out Connection 47 WATCHING TV / CHANNEL CONTROL Remote Control Functions 48 Turning On the TV 50 Channel Selection 50 Volume Adjustment 50 Quick Menu 51 Initial Setting 52 On-Screen Menus Selection 54 Channel Setup - Add / Delete Channel (Manual Tuning 57 - Preset 74 Color Tone - Preset 75 Manual Picture Adjustment - User Mode 76 - Picture Mode - Black (Darkness...

Owner's Manual (English)
Page 7
... 97 Caption Mode - Auto Clock Setup 101 Manual Clock Setup 102 Auto On/Off Time Setting 103 Sleep Timer Setting 104 Auto Shut-off Setting 105 PARENTAL CONTROL / RATINGS Set Password & Lock System 106 Channel Blocking 109 Movie & TV Rating 110 Downloadable Rating 115 External Input Blocking 116 Key lock 117 APPENDIX Troubleshooting 118 Maintenance 120 Product Specifications 121 Programming the Remote Control 124 IR Codes 127 External Control Through RS-232C 129 Open Source License 136 5 Analog Broadcasting System Captions 98 - SOUND & LANGUAGE CONTROL Auto Volume...
... 97 Caption Mode - Auto Clock Setup 101 Manual Clock Setup 102 Auto On/Off Time Setting 103 Sleep Timer Setting 104 Auto Shut-off Setting 105 PARENTAL CONTROL / RATINGS Set Password & Lock System 106 Channel Blocking 109 Movie & TV Rating 110 Downloadable Rating 115 External Input Blocking 116 Key lock 117 APPENDIX Troubleshooting 118 Maintenance 120 Product Specifications 121 Programming the Remote Control 124 IR Codes 127 External Control Through RS-232C 129 Open Source License 136 5 Analog Broadcasting System Captions 98 - SOUND & LANGUAGE CONTROL Auto Volume...
Owner's Manual (English)
Page 9
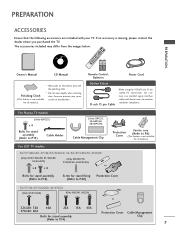
... using the VGA (D-sub 15 pin cable) PC connection, the user must use shielded signal interface cables with ferrite cores to maintain standards compliance. Excessive pressure may differ from the images below. MESNTUB MENU POWER DVD INPVUTCR ENTER VOL FAV AV MODE 1 4 MUTE 2 7 5 3 8 6 0 9 FLASHBK CH P A G E 1.5V 1.5V Copyright© 2007 LGE, All Rights Reserved. For Plasma TV models (Only 42PG25) x 4 Bolts for all models.) For LCD TV models 32...
... using the VGA (D-sub 15 pin cable) PC connection, the user must use shielded signal interface cables with ferrite cores to maintain standards compliance. Excessive pressure may differ from the images below. MESNTUB MENU POWER DVD INPVUTCR ENTER VOL FAV AV MODE 1 4 MUTE 2 7 5 3 8 6 0 9 FLASHBK CH P A G E 1.5V 1.5V Copyright© 2007 LGE, All Rights Reserved. For Plasma TV models (Only 42PG25) x 4 Bolts for all models.) For LCD TV models 32...
Owner's Manual (English)
Page 10
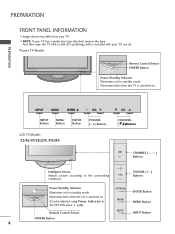
... be adjusted using Power Indicator in standby mode. Plasma TV Models Remote Control Sensor POWER Button Power/Standby Indicator Illuminates red in the OPTION menu. Illuminates blue when the set is switched on . PREPARATION PREPARATION FRONT PANEL INFORMATION I NOTE: If your TV has a protection tape attached, remove the tape. And then wipe the TV with your TV, use it). INPUT INPUT MENU INPUT MENU ENTER VOL MENU ENTER INPUT Button ENTER VOL MENU Button VOL CH ENTER VOLUME Button (-, +) Buttons CH LCD TV Models 32/42/47/52LG70, 47LG90 CH CHANNEL (E,D)Buttons CH...
... be adjusted using Power Indicator in standby mode. Plasma TV Models Remote Control Sensor POWER Button Power/Standby Indicator Illuminates red in the OPTION menu. Illuminates blue when the set is switched on . PREPARATION PREPARATION FRONT PANEL INFORMATION I NOTE: If your TV has a protection tape attached, remove the tape. And then wipe the TV with your TV, use it). INPUT INPUT MENU INPUT MENU ENTER VOL MENU ENTER INPUT Button ENTER VOL MENU Button VOL CH ENTER VOLUME Button (-, +) Buttons CH LCD TV Models 32/42/47/52LG70, 47LG90 CH CHANNEL (E,D)Buttons CH...
Owner's Manual (English)
Page 21
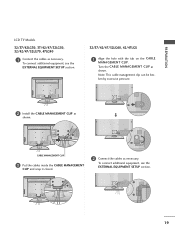
... EXTERNAL EQUIPMENT SETUP section. 19 ken by excessive pressure. 2 Install the CABLE MANAGEMENT CLIP as necessary. CABLE MANAGEMENT CLIP 3 Put the cables inside the CABLE MANAGEMENT CLIP and snap it closed. 2 Connect the cables as shown. Note: This cable management clip can be bro- Turn the CABLE MANAGEMENT CLIP as necessary. PREPARATION LCD TV Models 32/37/42LG30, 37/42/47/52LG50, 32/42/47/52LG70, 47LG90 1 Connect the cables...
... EXTERNAL EQUIPMENT SETUP section. 19 ken by excessive pressure. 2 Install the CABLE MANAGEMENT CLIP as necessary. CABLE MANAGEMENT CLIP 3 Put the cables inside the CABLE MANAGEMENT CLIP and snap it closed. 2 Connect the cables as shown. Note: This cable management clip can be bro- Turn the CABLE MANAGEMENT CLIP as necessary. PREPARATION LCD TV Models 32/37/42LG30, 37/42/47/52LG50, 32/42/47/52LG70, 47LG90 1 Connect the cables...
Owner's Manual (English)
Page 25
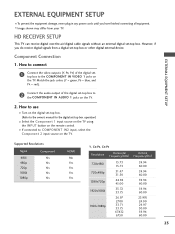
... receive digital over-the-air/digital cable signals without an external digital set -top box. (Refer to COMPONENT IN2 input, select the Component 2 input source on the remote control. Match the jack colors (Y = green, PB = blue, and PR = red). 2 Connect the audio output of the digital settop box to use I Turn on the TV. 2. Component Connection 1. How to the COMPONENT IN VIDEO 1 jacks on the TV. operation) I If connected to the owner's manual for the digital set-top box. Supported Resolutions Signal Component 480i Yes 480p Yes 720p Yes 1080i Yes 1080p Yes HDMI...
... receive digital over-the-air/digital cable signals without an external digital set -top box. (Refer to COMPONENT IN2 input, select the Component 2 input source on the remote control. Match the jack colors (Y = green, PB = blue, and PR = red). 2 Connect the audio output of the digital settop box to use I Turn on the TV. 2. Component Connection 1. How to the COMPONENT IN VIDEO 1 jacks on the TV. operation) I If connected to the owner's manual for the digital set-top box. Supported Resolutions Signal Component 480i Yes 480p Yes 720p Yes 1080i Yes 1080p Yes HDMI...
Owner's Manual (English)
Page 27
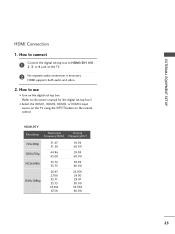
... IN1, 2, 3, or 4 jack on the remote control. HDMI-DTV Resolution Horizontal Vertical Frequency(KHz) Frequency(Hz) 720x480p 1280x720p 1920x1080i 1920x1080p 31.47 31.50 44.... 30.00 59.939 60.00 25 HDMI supports both audio and video. 2. EXTERNAL EQUIPMENT SETUP HDMI Connection 1. How to connect 1 Connect the digital set -top box.) I Turn on the digital set-top box. (Refer to the owner's manual for the digital set -top box to use I Select the HDMI1, HDMI2, HDMI3, or HDMI4 input source on the TV using the INPUT button on the TV. 2 No separate audio connection is necessary.
... IN1, 2, 3, or 4 jack on the remote control. HDMI-DTV Resolution Horizontal Vertical Frequency(KHz) Frequency(Hz) 720x480p 1280x720p 1920x1080i 1920x1080p 31.47 31.50 44.... 30.00 59.939 60.00 25 HDMI supports both audio and video. 2. EXTERNAL EQUIPMENT SETUP HDMI Connection 1. How to connect 1 Connect the digital set -top box.) I Turn on the digital set-top box. (Refer to the owner's manual for the digital set -top box to use I Select the HDMI1, HDMI2, HDMI3, or HDMI4 input source on the TV using the INPUT button on the TV. 2 No separate audio connection is necessary.
Owner's Manual (English)
Page 29
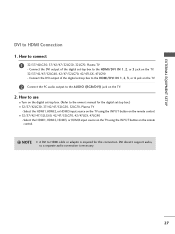
... to HDMI cable or adapter is necessary. 27 Select the HDMI1, HDMI2, HDMI3, or HDMI4 input source on the TV using the INPUT button on the remote control. How to the owner's manual for this connection. Select the HDMI1, HDMI2, or HDMI3 input source on the TV using the INPUT button on the digital set-top box. (Refer to use I Turn on the remote control. ! Connect the DVI output of the digital set-top box to the AUDIO (RGB/DVI) jack on the TV. 32...
... to HDMI cable or adapter is necessary. 27 Select the HDMI1, HDMI2, HDMI3, or HDMI4 input source on the TV using the INPUT button on the remote control. How to the owner's manual for this connection. Select the HDMI1, HDMI2, or HDMI3 input source on the TV using the INPUT button on the digital set-top box. (Refer to use I Turn on the remote control. ! Connect the DVI output of the digital set-top box to the AUDIO (RGB/DVI) jack on the TV. 32...
Owner's Manual (English)
Page 34
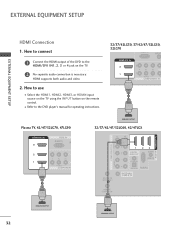
... PR 1 1 VIDEO COMPONENT 1 HDMI-DVD OUTPUT 32/37/42/47/52LG60, 42/47LGX 2 1 VIDEO COMPONENT IN ( ) RS-232C IN (SERVICE ONLY) 1 REMOTE CONTROL IN AUDIO 1 23 DIGITAL AUDIO OUT AUDIO (RGB/DVI) COAXIAL OPTICAL RGB(PC) ANTENNA/ CABLE IN 32 HDMI-DVD OUTPUT HDMI-DVD OUTPUT I Select the HDMI1, HDMI2, HDMI3, or HDMI4 input source on the TV using the INPUT button on the TV. 2 No separate audio connection is necessary. HDMI supports both audio and video. 2. How to use I Refer to the HDMI/DVI IN1, 2, 3 or 4 jack on the remote control.
... PR 1 1 VIDEO COMPONENT 1 HDMI-DVD OUTPUT 32/37/42/47/52LG60, 42/47LGX 2 1 VIDEO COMPONENT IN ( ) RS-232C IN (SERVICE ONLY) 1 REMOTE CONTROL IN AUDIO 1 23 DIGITAL AUDIO OUT AUDIO (RGB/DVI) COAXIAL OPTICAL RGB(PC) ANTENNA/ CABLE IN 32 HDMI-DVD OUTPUT HDMI-DVD OUTPUT I Select the HDMI1, HDMI2, HDMI3, or HDMI4 input source on the TV using the INPUT button on the TV. 2 No separate audio connection is necessary. HDMI supports both audio and video. 2. How to use I Refer to the HDMI/DVI IN1, 2, 3 or 4 jack on the remote control.
Owner's Manual (English)
Page 53
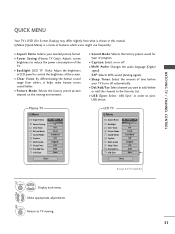
... in order to control the brightness of time before your desired picture format. I Multi Audio: Changes the audio language (Digital signal). MENU 2 Display each menu. I Caption: Select on the viewing environment. SAP: Selects MTS sound (Analog signal). Plasma TV Q.Menu Aspect Ratio Power Saving Clear Voice Picture Mode Sound Mode Caption Multi Audio Sleep Timer CH Del/Add/Fav USB Eject F 16:9 G 3 Off Vivid Standard Off English Off Add Eject Close LCD TV Q.Menu Aspect Ratio Backlight Clear Voice Picture Mode Sound Mode Caption Multi Audio Sleep Timer CH Del/Add...
... in order to control the brightness of time before your desired picture format. I Multi Audio: Changes the audio language (Digital signal). MENU 2 Display each menu. I Caption: Select on the viewing environment. SAP: Selects MTS sound (Analog signal). Plasma TV Q.Menu Aspect Ratio Power Saving Clear Voice Picture Mode Sound Mode Caption Multi Audio Sleep Timer CH Del/Add/Fav USB Eject F 16:9 G 3 Off Vivid Standard Off English Off Add Eject Close LCD TV Q.Menu Aspect Ratio Backlight Clear Voice Picture Mode Sound Mode Caption Multi Audio Sleep Timer CH Del/Add...
Owner's Manual (English)
Page 97
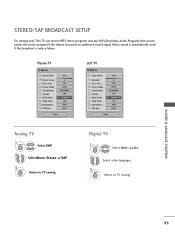
... Add Eject Close LCD TV Q.Menu Aspect Ratio Backlight Clear Voice Picture Mode Sound Mode Caption Multi Audio Sleep Timer CH Del/Add/Fav USB Eject 16:9 3 Off Vivid Standard Off F English G Off Add Eject Close Analog TV 1Q. MENU Return to TV viewing. SOUND & LANGUAGE CONTROL 95 MENU Return to TV viewing. MENU Select Multi Audio. 2 Select other languages. 3 Q. MENU Select S A P. 2 Select Mono, Stereo, or S A P. 3 Q. Digital TV 1Q. STEREO/SAP BROADCAST SETUP For Analog only: This TV can receive MTS stereo programs and...
... Add Eject Close LCD TV Q.Menu Aspect Ratio Backlight Clear Voice Picture Mode Sound Mode Caption Multi Audio Sleep Timer CH Del/Add/Fav USB Eject 16:9 3 Off Vivid Standard Off F English G Off Add Eject Close Analog TV 1Q. MENU Return to TV viewing. SOUND & LANGUAGE CONTROL 95 MENU Return to TV viewing. MENU Select Multi Audio. 2 Select other languages. 3 Q. MENU Select S A P. 2 Select Mono, Stereo, or S A P. 3 Q. Digital TV 1Q. STEREO/SAP BROADCAST SETUP For Analog only: This TV can receive MTS stereo programs and...
Owner's Manual (English)
Page 108
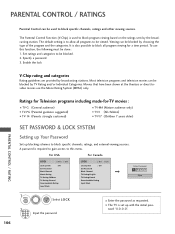
...) SET PASSWORD & LOCK SYSTEM Setting up Your Password Set up with the initial password "0-0-0-0". To use the Movie Rating System (MPAA) only. PARENTAL CONTROL / RATING 106 Ratings for Television programs including made-for a time period. The default setting is used to block specific channels, ratings and other viewing sources. A password is set up blocking schemes to block program viewing based on the ratings sent by broadcasting stations. I The TV is required to gain access to be viewed. PARENTAL CONTROL / RATINGS Parental Control...
...) SET PASSWORD & LOCK SYSTEM Setting up Your Password Set up with the initial password "0-0-0-0". To use the Movie Rating System (MPAA) only. PARENTAL CONTROL / RATING 106 Ratings for Television programs including made-for a time period. The default setting is used to block specific channels, ratings and other viewing sources. A password is set up blocking schemes to block program viewing based on the ratings sent by broadcasting stations. I The TV is required to gain access to be viewed. PARENTAL CONTROL / RATINGS Parental Control...
Owner's Manual (English)
Page 123
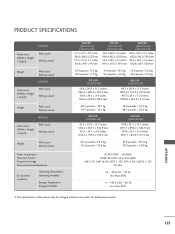
... 121 PRODUCT SPECIFICATIONS MODELS Dimensions (Width x Height x Depth) With stand Without stand Weight With stand Without stand MODELS Dimensions (Width x Height x Depth) With stand Without stand Weight With stand Without stand MODELS Dimensions (Width x Height x Depth) With stand Without stand Weight With stand Without stand Power requirement Television System Program Coverage External Antenna Impedance Environment condition Operating Temperature Operating Humidity Storage Temperature Storage Humidity 32LG30 (32LG30-UA) (32LG30-UD) 31.5 x 23.7 x 8.9 inches 801.8 x 604...
... 121 PRODUCT SPECIFICATIONS MODELS Dimensions (Width x Height x Depth) With stand Without stand Weight With stand Without stand MODELS Dimensions (Width x Height x Depth) With stand Without stand Weight With stand Without stand MODELS Dimensions (Width x Height x Depth) With stand Without stand Weight With stand Without stand Power requirement Television System Program Coverage External Antenna Impedance Environment condition Operating Temperature Operating Humidity Storage Temperature Storage Humidity 32LG30 (32LG30-UA) (32LG30-UD) 31.5 x 23.7 x 8.9 inches 801.8 x 604...
Owner's Manual (English)
Page 124
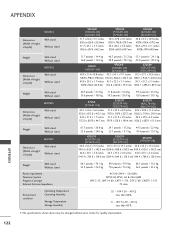
...x 796.4 x 379.5 mm 40.8 x 29.4 x 3.1 inches 1037.8 x 747.0 x 80.8 mm Weight With stand Without stand MODELS Dimensions (Width x Height x Depth) With stand Without stand Weight With stand Without stand MODELS Dimensions (Width x Height x Depth) With stand Without stand Weight With stand Without stand MODELS Dimensions (Width x Height x Depth) With stand Without stand Weight With stand Without stand Power requirement Television System Program Coverage External Antenna Impedance Environment condition Operating Temperature Operating Humidity Storage Temperature Storage Humidity...
...x 796.4 x 379.5 mm 40.8 x 29.4 x 3.1 inches 1037.8 x 747.0 x 80.8 mm Weight With stand Without stand MODELS Dimensions (Width x Height x Depth) With stand Without stand Weight With stand Without stand MODELS Dimensions (Width x Height x Depth) With stand Without stand Weight With stand Without stand MODELS Dimensions (Width x Height x Depth) With stand Without stand Weight With stand Without stand Power requirement Television System Program Coverage External Antenna Impedance Environment condition Operating Temperature Operating Humidity Storage Temperature Storage Humidity...
Owner's Manual (English)
Page 125
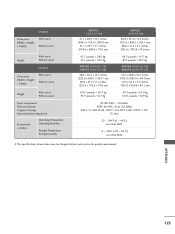
APPENDIX 123 MODELS Dimensions (Width x Height x Depth) With stand Without stand Weight With stand Without stand MODELS Dimensions (Width x Height x Depth) With stand Without stand Weight With stand Without stand Power requirement Television System Program Coverage External Antenna Impedance Environment condition Operating Temperature Operating Humidity Storage Temperature Storage Humidity 42PG25 (42PG60-UA) 41.1 x 28.9 x 12.1 inches 1044.4 x 735.4 x 308.0 mm 41.1 x 26.7 x 3.1 inches 1044.4 x 680.6 x 79.6 mm 50PG25 (50PG60-UA) 48.6 x 33.4 x 14.3 inches 1235...
APPENDIX 123 MODELS Dimensions (Width x Height x Depth) With stand Without stand Weight With stand Without stand MODELS Dimensions (Width x Height x Depth) With stand Without stand Weight With stand Without stand Power requirement Television System Program Coverage External Antenna Impedance Environment condition Operating Temperature Operating Humidity Storage Temperature Storage Humidity 42PG25 (42PG60-UA) 41.1 x 28.9 x 12.1 inches 1044.4 x 735.4 x 308.0 mm 41.1 x 26.7 x 3.1 inches 1044.4 x 680.6 x 79.6 mm 50PG25 (50PG60-UA) 48.6 x 33.4 x 14.3 inches 1235...
Owner's Manual (English)
Page 126
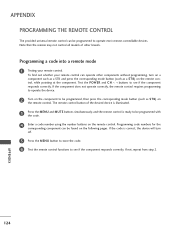
... components without programming, turn off. 5 Press the MENU button to store the code. 6 Test the remote control functions to be programmed with the code. 4 Enter a code number using the number buttons on the remote control. Test the POWER and C H buttons to operate most remote-controllable devices. If the code is ready to see if the component responds correctly. APPENDIX 124 Programming code numbers for the corresponding component can be programmed, then press the corresponding mode button (such as a S T B) on the remote control. Programming a code into a remote mode...
... components without programming, turn off. 5 Press the MENU button to store the code. 6 Test the remote control functions to be programmed with the code. 4 Enter a code number using the number buttons on the remote control. Test the POWER and C H buttons to operate most remote-controllable devices. If the code is ready to see if the component responds correctly. APPENDIX 124 Programming code numbers for the corresponding component can be programmed, then press the corresponding mode button (such as a S T B) on the remote control. Programming a code into a remote mode...
Owner's Manual (English)
Page 133
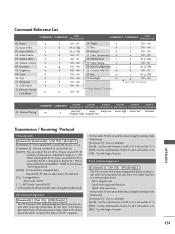
... b (G p.132) 15. Data1: Illegal Code Data2: Not supported function Data3: Wait more time * In this format when receiving abnormal data from non-viable functions or communication errors. Aspect Ratio k 04. Remote Control Lock Mode k a 00 ~ 01 14. Set ID is 0 x ab, it indicates present status data. Transmit the 'FF' data to choose desired TV ID number in Setup menu. Brightness k 09. Channel Add/Del m b 00 ~ 01...
... b (G p.132) 15. Data1: Illegal Code Data2: Not supported function Data3: Wait more time * In this format when receiving abnormal data from non-viable functions or communication errors. Aspect Ratio k 04. Remote Control Lock Mode k a 00 ~ 01 14. Set ID is 0 x ab, it indicates present status data. Transmit the 'FF' data to choose desired TV ID number in Setup menu. Brightness k 09. Channel Add/Del m b 00 ~ 01...


