
Owners Manual
Page 6
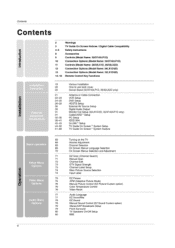
...77 77 Audio Menu 78 Options 78 79 79 80 80 Turning on the TV Volume Adjustment Channel Selection On Screen Menus Language Selection On Screen Menus Selection and Adjustment EZ Scan (Channel Search) Manual Scan Channel Edit DTV Signal Strength Channel Label Setup Main Picture Source Selection Input Label EZ Picture APM (Adaptive Picture Mode) Manual Picture Control (EZ Picture-Custom option) Color Temperature Control Video Reset Audio Language EZ SoundRite EZ Sound Manual Sound Control (EZ Sound-Custom option) Stereo/SAP Broadcasts Setup Front Surround TV Speakers On/Off Setup BBE 6
...77 77 Audio Menu 78 Options 78 79 79 80 80 Turning on the TV Volume Adjustment Channel Selection On Screen Menus Language Selection On Screen Menus Selection and Adjustment EZ Scan (Channel Search) Manual Scan Channel Edit DTV Signal Strength Channel Label Setup Main Picture Source Selection Input Label EZ Picture APM (Adaptive Picture Mode) Manual Picture Control (EZ Picture-Custom option) Color Temperature Control Video Reset Audio Language EZ SoundRite EZ Sound Manual Sound Control (EZ Sound-Custom option) Stereo/SAP Broadcasts Setup Front Surround TV Speakers On/Off Setup BBE 6
Owners Manual
Page 7
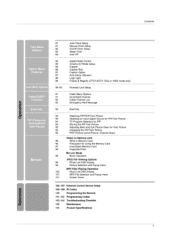
... MP3 File Selection and Popup menu 101 Screen Saver 102-107 External Control Device Setup aV ) 108-109 IR Codes C 110 Programming the Remote 111-112 Programming Codes a) 113-114 Troubleshooting Checklist CC 115 Maintenance 115 Product Specifications 7 Contents 81 Auto Clock Setup Time Menu 81 Manual Clock Setup Options 82 On/Off Timer Setup 82 Sleep Timer 83 Auto Off 84 85 85 Option Menu 86 Features 87 87 88 88 Aspect Ratio Control Cinema 3:2 Mode Setup Caption Caption/Text Caption Option Auto Demo (Review) Logo Light...
... MP3 File Selection and Popup menu 101 Screen Saver 102-107 External Control Device Setup aV ) 108-109 IR Codes C 110 Programming the Remote 111-112 Programming Codes a) 113-114 Troubleshooting Checklist CC 115 Maintenance 115 Product Specifications 7 Contents 81 Auto Clock Setup Time Menu 81 Manual Clock Setup Options 82 On/Off Timer Setup 82 Sleep Timer 83 Auto Off 84 85 85 Option Menu 86 Features 87 87 88 88 Aspect Ratio Control Cinema 3:2 Mode Setup Caption Caption/Text Caption Option Auto Demo (Review) Logo Light...

Owners Manual
Page 10
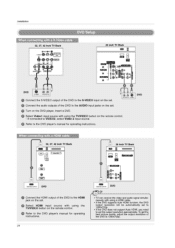
... 1394 MONITOR OUT VIDE01 CABLE 0,mq ANTENNA (ma) CableCAF1D RS-232C INPUT (CONTROL/SERVICE) / RGB INPUT (PC/DTV INPUT) ANTENNA Input PC AUDIO INPUT CABLE nput REMOTE CONTROL Port COMPONENT1 (VIDEO / AUDIO INPUT) * The HDMI port can receive video via High-Definition Multimedia Interface (HDMI) or the Digital Visual Interface (DV!). Here shown may be somewhat different from your TV. Introduction Connection Options (Model Name: 32/37/42LP1D) - Note: An adapter or special cable is required to plug DVI...
... 1394 MONITOR OUT VIDE01 CABLE 0,mq ANTENNA (ma) CableCAF1D RS-232C INPUT (CONTROL/SERVICE) / RGB INPUT (PC/DTV INPUT) ANTENNA Input PC AUDIO INPUT CABLE nput REMOTE CONTROL Port COMPONENT1 (VIDEO / AUDIO INPUT) * The HDMI port can receive video via High-Definition Multimedia Interface (HDMI) or the Digital Visual Interface (DV!). Here shown may be somewhat different from your TV. Introduction Connection Options (Model Name: 32/37/42LP1D) - Note: An adapter or special cable is required to plug DVI...

Owners Manual
Page 17
... TIMER RATIO ADJUST SWAP SAP EZ PIC APM EZ SOUND CC FREEZE AUTO DEMO Mei: EJECT ) 0 00 TV GUIDE Auto Link 1 When every external equipment is not connected- Gull.jt • IN = ► O • mARK \'`4(3 VOL • 1 4 7 - When any external equipment is connected: TV 4 HDMI/DVI Videol *. RGB-DTV (or RGB-PC) HDMI/DVI 3. SETUP VIDEO AUDIO TIME 4)' OPTION LOCK ir CABLE EZ SUE' Manual Scan Channel Edit DTV Signal Channel Label Main Input Sub Input Input Label Set ID MENU 4 Antenna Cable Vldeol Video2 Component...
... TIMER RATIO ADJUST SWAP SAP EZ PIC APM EZ SOUND CC FREEZE AUTO DEMO Mei: EJECT ) 0 00 TV GUIDE Auto Link 1 When every external equipment is not connected- Gull.jt • IN = ► O • mARK \'`4(3 VOL • 1 4 7 - When any external equipment is connected: TV 4 HDMI/DVI Videol *. RGB-DTV (or RGB-PC) HDMI/DVI 3. SETUP VIDEO AUDIO TIME 4)' OPTION LOCK ir CABLE EZ SUE' Manual Scan Channel Edit DTV Signal Channel Label Main Input Sub Input Input Label Set ID MENU 4 Antenna Cable Vldeol Video2 Component...
Owners Manual
Page 24
... the DVD does not support Auto HDMI, you need to the S-VIDEO input on the set . • Select HDMI input source with using the TVNIDEO button on the DVD player, insert a DVD. o Select Videol input source with using the TVNIDEO button on the set the output resolution appropriately. o Connect the audio outputs of the DVD to the AUDIO input jacks on the remote control. - Installation DVD Setup When connecting with a HDMI cable LI 32, 37, 42 Inch TV Back NEI umms. u I . To get the best picture quality, adjust the output resolution of the DVD to...
... the DVD does not support Auto HDMI, you need to the S-VIDEO input on the set . • Select HDMI input source with using the TVNIDEO button on the DVD player, insert a DVD. o Select Videol input source with using the TVNIDEO button on the set the output resolution appropriately. o Connect the audio outputs of the DVD to the AUDIO input jacks on the remote control. - Installation DVD Setup When connecting with a HDMI cable LI 32, 37, 42 Inch TV Back NEI umms. u I . To get the best picture quality, adjust the output resolution of the DVD to...

Owners Manual
Page 26
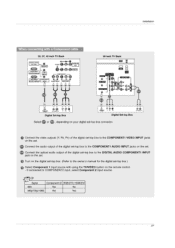
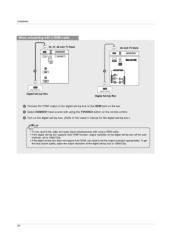
...;DTV OUTPUT Digital Set-top Box (To Meg NOIPOTV OUTPUT Digital Set-top Box • Connect the RGB output of the digital set-top box to the RGB INPUT (PC/DTV INPUT) jack on the set. • Connect the audio outputs of the set-top box to the owner's manual for the digital set-top box.) • Select RGB-DTV input source with using the TVNIDEO button on the set -top box. O Turn on the digital set-top box. (Refer to the PC AUDIO INPUT jack on the remote control. 26 Installation ID...
...;DTV OUTPUT Digital Set-top Box (To Meg NOIPOTV OUTPUT Digital Set-top Box • Connect the RGB output of the digital set-top box to the RGB INPUT (PC/DTV INPUT) jack on the set. • Connect the audio outputs of the set-top box to the owner's manual for the digital set-top box.) • Select RGB-DTV input source with using the TVNIDEO button on the set -top box. O Turn on the digital set-top box. (Refer to the PC AUDIO INPUT jack on the remote control. 26 Installation ID...
Owners Manual
Page 27
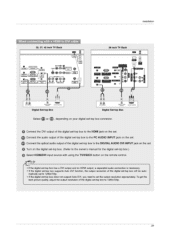
....0(3 9.._9 9 9 9 AUDIO INPUT VIDEO INPUT 1. Connect the optical audio output of the digital set-top box to the COMPONENT1 VIDEO INPUT jacks on the set. Signal Componentl /2 RGB-DTV, HDMI/DVI 480i Yes No 480p/720p/1080i Yes Yes 27 If connected to the owner's manual for the digital set-top box.) O Select Component 1 input source with a Component cable 32, 37, 42 inch TV Back DIGITAL AUDIO (OPTIGAL1 III OUTPUT d1=10 - Installation When connecting with using the TVNIDEO button on the digital set-top box. (Refer to COMPONENT2 input, select Component 2 input source.
....0(3 9.._9 9 9 9 AUDIO INPUT VIDEO INPUT 1. Connect the optical audio output of the digital set-top box to the COMPONENT1 VIDEO INPUT jacks on the set. Signal Componentl /2 RGB-DTV, HDMI/DVI 480i Yes No 480p/720p/1080i Yes Yes 27 If connected to the owner's manual for the digital set-top box.) O Select Component 1 input source with a Component cable 32, 37, 42 inch TV Back DIGITAL AUDIO (OPTIGAL1 III OUTPUT d1=10 - Installation When connecting with using the TVNIDEO button on the digital set-top box. (Refer to COMPONENT2 input, select Component 2 input source.
Owners Manual
Page 28
O Turn on the remote control. To get the best picture quality, adjust the output resolution of the digital set . O Select HDMI/DVI input source with using the TVNIDEO button on the digital set-top box. (Refer to the owner's manual for the digital set-top box.) • TV can receive the video and audio signal simultaneously with a HDMI cable 32, 37, 42 inch TV Back O i* umcum WEE 26 inch TV Back " ECM m' ic=i3a CM] 0 Co MOCKEITV OUTPUT Digital Set-top Box UPIO•OTY OVTINT...
O Turn on the remote control. To get the best picture quality, adjust the output resolution of the digital set . O Select HDMI/DVI input source with using the TVNIDEO button on the digital set-top box. (Refer to the owner's manual for the digital set-top box.) • TV can receive the video and audio signal simultaneously with a HDMI cable 32, 37, 42 inch TV Back O i* umcum WEE 26 inch TV Back " ECM m' ic=i3a CM] 0 Co MOCKEITV OUTPUT Digital Set-top Box UPIO•OTY OVTINT...
Owners Manual
Page 29
... owner's manual for the digital set-top box.) • Select HDMI/DVI input source with a HDMI to DVI cable 32, 37, 42 inch TV Back H OPUTPOOPPIT • • I G.UNK I DIGITAL AUDIO (OPTICAL I .A rr . 'MOW MIMI Digital Set-top Box Digital Set-top Box OVIOTV 01FITIO e, Select S or depending on your digital set-top box connector. • Connect the DVI output of the digital set-top box to the HDMI jack on the set. matically set to 1280x720p. • If the digital set-top box does not support Auto DVI, you need to set -top box...
... owner's manual for the digital set-top box.) • Select HDMI/DVI input source with a HDMI to DVI cable 32, 37, 42 inch TV Back H OPUTPOOPPIT • • I G.UNK I DIGITAL AUDIO (OPTICAL I .A rr . 'MOW MIMI Digital Set-top Box Digital Set-top Box OVIOTV 01FITIO e, Select S or depending on your digital set-top box connector. • Connect the DVI output of the digital set-top box to the HDMI jack on the set. matically set to 1280x720p. • If the digital set-top box does not support Auto DVI, you need to set -top box...
Owners Manual
Page 30
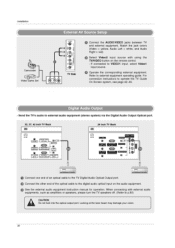
Installation Camcorder Video Game Set External AV Source Setup Er ; TV Side O Connect the AUDIONIDEO jacks between TV and external equipment. Refer to p.80) A CAUTION Do not look into the optical output port. Looking at the laser beam may damage your vision. 30 O Select Video2 input source with external audio equipments, such as amplifiers or speakers, please turn the TV speakers off. (Refer to external equipment operating guide. Digital Audio Output - O See the external audio equipment instruction manual for operation. When...
Installation Camcorder Video Game Set External AV Source Setup Er ; TV Side O Connect the AUDIONIDEO jacks between TV and external equipment. Refer to p.80) A CAUTION Do not look into the optical output port. Looking at the laser beam may damage your vision. 30 O Select Video2 input source with external audio equipments, such as amplifiers or speakers, please turn the TV speakers off. (Refer to external equipment operating guide. Digital Audio Output - O See the external audio equipment instruction manual for operation. When...
Owners Manual
Page 31
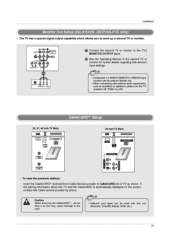
..., HDMI/DVI input sources can be used with Cable service provider by phone. COUPON AUDIO INPUT MD P UT S.VIDEO IN (FORUM° IT) VIDEO • Connect the second TV or monitor to the TV's MONITOR OUTPUT jacks. • See the Operating Manual of TV as this TV and the CableCARD is automatically displayed on the screen, contact with this unit (Motorola, Scientific Atlanta, SCM, etc.). 31 CPuomenoo S.VIDEO MONITOR OUT VIDE01 T- Installation Monitor...
..., HDMI/DVI input sources can be used with Cable service provider by phone. COUPON AUDIO INPUT MD P UT S.VIDEO IN (FORUM° IT) VIDEO • Connect the second TV or monitor to the TV's MONITOR OUTPUT jacks. • See the Operating Manual of TV as this TV and the CableCARD is automatically displayed on the screen, contact with this unit (Motorola, Scientific Atlanta, SCM, etc.). 31 CPuomenoo S.VIDEO MONITOR OUT VIDE01 T- Installation Monitor...
Owners Manual
Page 34
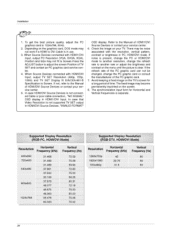
... a fixed image on the menu until the picture is not supported TV SET output in HDMI1/DVI Input. Depending on the graphics card, DOS mode may become permanently imprinted on your TV. In case that Video Resolution is clear. There may not fit to Screen.Press the ADJUST button to DVI Cable is not connected Cable or poor cable connection, "NO SIGNAL" OSD display in HDMI/DVI Source Devices, "INVALID FORMAT" OSD display. The fixed image may not work if a HDMI...
... a fixed image on the menu until the picture is not supported TV SET output in HDMI1/DVI Input. Depending on the graphics card, DOS mode may become permanently imprinted on your TV. In case that Video Resolution is clear. There may not fit to Screen.Press the ADJUST button to DVI Cable is not connected Cable or poor cable connection, "NO SIGNAL" OSD display in HDMI/DVI Source Devices, "INVALID FORMAT" OSD display. The fixed image may not work if a HDMI...
Owners Manual
Page 44
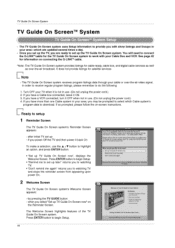
... make a selection, use . (Do not unplug the power cord.) 2. If you with the TV Guide On Screen', interactive Program Gude, *huh provides program listing', 01111400th feCOlfdri9. If so prompted, please follow the on connecting the G-LINKT1M cable. *Note: The TV Guide On Screen system provides listings for cable-ready, cable box, and digital cable services as well as over -the-air video signal. Press ENTER button to begin Setup. by pressing the TV GUIDE button - rod...
... make a selection, use . (Do not unplug the power cord.) 2. If you with the TV Guide On Screen', interactive Program Gude, *huh provides program listing', 01111400th feCOlfdri9. If so prompted, please follow the on connecting the G-LINKT1M cable. *Note: The TV Guide On Screen system provides listings for cable-ready, cable box, and digital cable services as well as over -the-air video signal. Press ENTER button to begin Setup. by pressing the TV GUIDE button - rod...

Owners Manual
Page 70
...SO Color SO Sharpness 50. Diag Screen ► VIDEO SA CableCARDT. /Host ID Screen a AUDIO TIME I ► button to select each menu. 2. CABLE SETUP El VIDEO AUDIO TIME a LOCK 40. (ABU Aspect Ratio Cinema 3:2 Mode Caption Caption/Text Caption option Language Auto Demo Logo Light ir SETUP L VIDEO rel AUDIO TIME). D VIDEO 3 AUDIO IIML 4fr ONION LOCK CABLE EZ Scan Manual Scan Channel Edit DTV Signal Channel Label Main Input Sub Input Input Label Set ID A f SETUP SA CableCARD*. OPTION i g LOCK 4' CABLE Auto Clock Manual Clock Off Timer On Timer Sleep Timer Auto Off...
...SO Color SO Sharpness 50. Diag Screen ► VIDEO SA CableCARDT. /Host ID Screen a AUDIO TIME I ► button to select each menu. 2. CABLE SETUP El VIDEO AUDIO TIME a LOCK 40. (ABU Aspect Ratio Cinema 3:2 Mode Caption Caption/Text Caption option Language Auto Demo Logo Light ir SETUP L VIDEO rel AUDIO TIME). D VIDEO 3 AUDIO IIML 4fr ONION LOCK CABLE EZ Scan Manual Scan Channel Edit DTV Signal Channel Label Main Input Sub Input Input Label Set ID A f SETUP SA CableCARD*. OPTION i g LOCK 4' CABLE Auto Clock Manual Clock Off Timer On Timer Sleep Timer Auto Off...

Owners Manual
Page 71
... O CABLE VIDEO 8 AUDIO Sp TIME I OPTION LOCK EZ Scan Manual Scan Channel Edit DTV Signal Channel Label Main Input Sub Input Input Label Set ID Selection (nor 0) leads you want to add or delete. 5 Press the ENTER button to add or delete for ANTENNA, and CABLE. Manual Scan VIDEO 5 AUDIO 9 TIME JP OPTION rif,- This channel number is a physical channel number, which is not working in TV Guide On Screen system Setup, cable channels (CATV or CADTV) will not be scanned by EZ Scan or Manual Scan. - When a cable box connects...
... O CABLE VIDEO 8 AUDIO Sp TIME I OPTION LOCK EZ Scan Manual Scan Channel Edit DTV Signal Channel Label Main Input Sub Input Input Label Set ID Selection (nor 0) leads you want to add or delete. 5 Press the ENTER button to add or delete for ANTENNA, and CABLE. Manual Scan VIDEO 5 AUDIO 9 TIME JP OPTION rif,- This channel number is a physical channel number, which is not working in TV Guide On Screen system Setup, cable channels (CATV or CADTV) will not be scanned by EZ Scan or Manual Scan. - When a cable box connects...

Owners Manual
Page 86
...digital and analog channels on program) when the TV sound is AUDIO 04 TIME OPTION Aspect Ratio Cinema 3:2 Mode Caption Caption/Text Caption Option Language Auto Demo Logo Light if SETUP VIDEO 3 AUDIO 0 TIME Aspect Ratio Cinema 3:2 Mode Caption Cdption/Text Caption Option Language Auto Demo Logo Light ► J English Spanish French LOCK la LOCK 410 CABLE 4r/ CAM. Operation Option Menu Features continued Caption/Text * Analog Broadcasting System Captions SETUP ri Into a AUDIO TIME LOCK 4IIP CABLE Aspect Ratio Cinema 3:2 Mode Caption Caption/Text Caption Option Language Auto...
...digital and analog channels on program) when the TV sound is AUDIO 04 TIME OPTION Aspect Ratio Cinema 3:2 Mode Caption Caption/Text Caption Option Language Auto Demo Logo Light if SETUP VIDEO 3 AUDIO 0 TIME Aspect Ratio Cinema 3:2 Mode Caption Cdption/Text Caption Option Language Auto Demo Logo Light ► J English Spanish French LOCK la LOCK 410 CABLE 4r/ CAM. Operation Option Menu Features continued Caption/Text * Analog Broadcasting System Captions SETUP ri Into a AUDIO TIME LOCK 4IIP CABLE Aspect Ratio Cinema 3:2 Mode Caption Caption/Text Caption Option Language Auto...

Owners Manual
Page 88
... menu. al LOCK AIP CABLE Aspect Ratio Cinema 3:2 Mod Caption Caption/Text Caption Option Language Auto Demo Logo Light - When enlarging the picture, the image may become distorted. - If you se ect on, LG logo or "Liquid Crystal Display" of TV front panel turns on. Operation Option Menu Features continued 4, SETUP E VIDEO 6 AUDIO 4' 0 TIME OPTION B. Enlarges the picture with correct proportions. - J Off On MINI' VIVVIOCI, 1 Press the MENU button and then use ♦ / ♦ button to select the OPTION menu...
... menu. al LOCK AIP CABLE Aspect Ratio Cinema 3:2 Mod Caption Caption/Text Caption Option Language Auto Demo Logo Light - When enlarging the picture, the image may become distorted. - If you se ect on, LG logo or "Liquid Crystal Display" of TV front panel turns on. Operation Option Menu Features continued 4, SETUP E VIDEO 6 AUDIO 4' 0 TIME OPTION B. Enlarges the picture with correct proportions. - J Off On MINI' VIVVIOCI, 1 Press the MENU button and then use ♦ / ♦ button to select the OPTION menu...
Owners Manual
Page 89
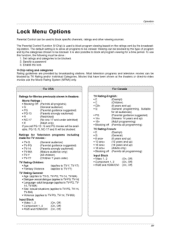
... programs to be viewed. sexual situations (applies to TV-PG, TV-14, TV-MA) • Violence (applies to TV-PG, TV14, TV-MA) • Sex- The Parental Control Function (V-Chip) is also possible to block all programming) Input Block • Video 1, 2 • Component 1, 2 • RGB and HDMI/DVI (On, Off) (On, Off) (On, Off) J 89 The default setting is to allow all programming...
... programs to be viewed. sexual situations (applies to TV-PG, TV-14, TV-MA) • Violence (applies to TV-PG, TV14, TV-MA) • Sex- The Parental Control Function (V-Chip) is also possible to block all programming) Input Block • Video 1, 2 • Component 1, 2 • RGB and HDMI/DVI (On, Off) (On, Off) (On, Off) J 89 The default setting is to allow all programming...
Owners Manual
Page 110
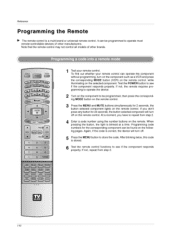
... 2. 4 Enter a code number using the number buttons on the remote control. TV GUIDE 110 Q EX :-- 774 mABK 0°C) • VOL Hug- PIP INPUT C=.: 0 C=D TIMER RATIO ADJUST SWAP SAP EZ PIC APM F2 SOU11) CC FREEZE AUTO DEW E,ECT 1 Test your remote control can be programmed, then press the corresponding MODE button on the remote control. 3 Press the MENU and MUTE buttons simultaneously for 20 seconds, the button selected component will turn off on the remote control. Test the POWER button to...
... 2. 4 Enter a code number using the number buttons on the remote control. TV GUIDE 110 Q EX :-- 774 mABK 0°C) • VOL Hug- PIP INPUT C=.: 0 C=D TIMER RATIO ADJUST SWAP SAP EZ PIC APM F2 SOU11) CC FREEZE AUTO DEW E,ECT 1 Test your remote control can be programmed, then press the corresponding MODE button on the remote control. 3 Press the MENU and MUTE buttons simultaneously for 20 seconds, the button selected component will turn off on the remote control. Test the POWER button to...
Owners Manual
Page 113
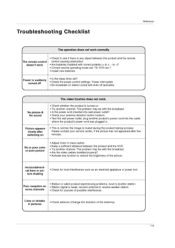
...; Correct remote operating mode set ? • Check the power control settings. The remote control doesn't work • Check to restore the brightness of the picture. Troubleshooting Checklist Reference The operation does not work . r - \ The video function does not work normally. ture shaking • Check for sources of the antenna). Power is suddenly turned off activated. Please contact your antenna direction and/or location. • Test the wall power outlet, plug another channel. in menu option. •...
...; Correct remote operating mode set ? • Check the power control settings. The remote control doesn't work • Check to restore the brightness of the picture. Troubleshooting Checklist Reference The operation does not work . r - \ The video function does not work normally. ture shaking • Check for sources of the antenna). Power is suddenly turned off activated. Please contact your antenna direction and/or location. • Test the wall power outlet, plug another channel. in menu option. •...


