
Owner's Manual
Page 2
... to alert the user to Part 15 of important operating and maintenance (servicing) instructions in a particular installation. REFER TO QUALIFIED SERVICE PERSONNEL. THE PARTY RESPONSIBLE FOR PRODUCT COMPLIANCE (LG Electronics U.S.A., Inc.,) (2000 Millbrook Drive) (TELEPHONE NO:1-847-941-8000) 2 WARNING / CAUTION CAUTION: TO REDUCE THE RISK OF ELECTRIC SHOCK DO NOT REMOVE COVER (OR BACK). The lightning flash with the...
... to alert the user to Part 15 of important operating and maintenance (servicing) instructions in a particular installation. REFER TO QUALIFIED SERVICE PERSONNEL. THE PARTY RESPONSIBLE FOR PRODUCT COMPLIANCE (LG Electronics U.S.A., Inc.,) (2000 Millbrook Drive) (TELEPHONE NO:1-847-941-8000) 2 WARNING / CAUTION CAUTION: TO REDUCE THE RISK OF ELECTRIC SHOCK DO NOT REMOVE COVER (OR BACK). The lightning flash with the...
Owner's Manual
Page 3
...red, green, or blue spots. G Avoid touching the LCD screen or holding your finger(s) against it may be a small "flicker" when it is turned on the TVs performance. CAUTION When used outside of this television by removing dust with the TV. OBSERVING THE SIMPLE PRECAUTIONS DISCUSSED IN THIS MANUAL CAN HELP...THE FOLLOWING SAFETY POINTS WHEN INSTALLING AND USING YOUR NEW PRODUCT, AND SAVE THEM FOR FUTURE REFERENCE. Unauthorized modification could void the user's authority to operate this product in any way without written authorization from LG Electronics Corporation. CAUTION Do ...
...red, green, or blue spots. G Avoid touching the LCD screen or holding your finger(s) against it may be a small "flicker" when it is turned on the TVs performance. CAUTION When used outside of this television by removing dust with the TV. OBSERVING THE SIMPLE PRECAUTIONS DISCUSSED IN THIS MANUAL CAN HELP...THE FOLLOWING SAFETY POINTS WHEN INSTALLING AND USING YOUR NEW PRODUCT, AND SAVE THEM FOR FUTURE REFERENCE. Unauthorized modification could void the user's authority to operate this product in any way without written authorization from LG Electronics Corporation. CAUTION Do ...
Owner's Manual
Page 4
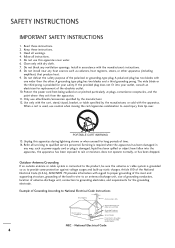
... in Wire Electric Service Equipment Antenna Discharge Unit (NEC Section 810-20) Grounding Conductor (NEC Section 810-21) Ground Clamps Power Service Grounding Electrode System (NEC Art 250, Part H) NEC - Servicing is used, use this apparatus during lightning storms or when unused for replacement of time. 14. Example of the polarized or grounding-type plug. National Electrical Code 4 Do not use caution when moving...
... in Wire Electric Service Equipment Antenna Discharge Unit (NEC Section 810-20) Grounding Conductor (NEC Section 810-21) Ground Clamps Power Service Grounding Electrode System (NEC Art 250, Part H) NEC - Servicing is used, use this apparatus during lightning storms or when unused for replacement of time. 14. Example of the polarized or grounding-type plug. National Electrical Code 4 Do not use caution when moving...

Owner's Manual
Page 5
...PARENTAL CONTROL/RATINGS Set Password & Lock System 35 Movie & TV Ratings 37 SOUND & LANGUAGE CONTROL Caption / Text 41 Preset Sound Settings 43 Sound Setting Adjustment-user Mode . . . . . 43 Sound Balance Setup 44 Digital Audio Output Settings 44 Aautomatic Volume Control Settings . . . . 45 Analog Audio Settings 45 Digital Audio Language Settings 46 Using External Speakers 46 Menu Language 47 Menu Transparency Settings 48 Set ID 48 PICTURE CONTROL Preset Picture Settings 49 Screen Format Adjustments 50 Noise Reduction 51 Film Mode Options 51 COMMERCIAL MODE Installer...
...PARENTAL CONTROL/RATINGS Set Password & Lock System 35 Movie & TV Ratings 37 SOUND & LANGUAGE CONTROL Caption / Text 41 Preset Sound Settings 43 Sound Setting Adjustment-user Mode . . . . . 43 Sound Balance Setup 44 Digital Audio Output Settings 44 Aautomatic Volume Control Settings . . . . 45 Analog Audio Settings 45 Digital Audio Language Settings 46 Using External Speakers 46 Menu Language 47 Menu Transparency Settings 48 Set ID 48 PICTURE CONTROL Preset Picture Settings 49 Screen Format Adjustments 50 Noise Reduction 51 Film Mode Options 51 COMMERCIAL MODE Installer...
Owner's Manual
Page 11
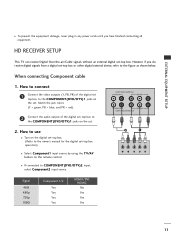
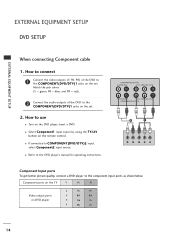
... to use ■ Turn on the remote control. ■ If connected to the C O M P O N E N T ( D V D / D T V ) 1 jacks on the set . 2. When connecting Component cable 1. How to connect 1 Connect the video outputs (Y, PB, PR) of the digital set-top box to C O M P O N E N T ( D V D / D T V ) 2 input, select Component2 input source. 2 1 L R Y PB PR Signal 480i 480p 720p 1080i Component 1/2 Yes Yes Yes Yes HDMI1/DVI, HDMI2 No Yes Yes Yes 11 Match the jack colors (Y = green, PB = blue, and PR = red). 2 Connect the audio output of the digital set top box...
... to use ■ Turn on the remote control. ■ If connected to the C O M P O N E N T ( D V D / D T V ) 1 jacks on the set . 2. When connecting Component cable 1. How to connect 1 Connect the video outputs (Y, PB, PR) of the digital set-top box to C O M P O N E N T ( D V D / D T V ) 2 input, select Component2 input source. 2 1 L R Y PB PR Signal 480i 480p 720p 1080i Component 1/2 Yes Yes Yes Yes HDMI1/DVI, HDMI2 No Yes Yes Yes 11 Match the jack colors (Y = green, PB = blue, and PR = red). 2 Connect the audio output of the digital set top box...
Owner's Manual
Page 12
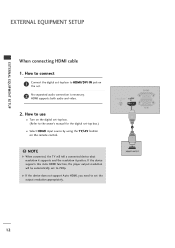
... set to the owner's manual for the digital set-top box.) 1 ■ Select H D M I input source by using the T V / A V button on the set the output resolution appropriately. 12 If the device supports this Auto HDMI function, the player output resolution will tell a connected device what resolution it supports and the resolution it prefers. EXTERNAL EQUIPMENT SETUP EXTERNAL EQUIPMENT SETUP When connecting HDMI cable 1. G If the device does not support Auto HDMI, you need to HDMI/DVI IN jack on the remote control. How to connect 1 Connect the digital set-top box to set...
... set to the owner's manual for the digital set-top box.) 1 ■ Select H D M I input source by using the T V / A V button on the set the output resolution appropriately. 12 If the device supports this Auto HDMI function, the player output resolution will tell a connected device what resolution it supports and the resolution it prefers. EXTERNAL EQUIPMENT SETUP EXTERNAL EQUIPMENT SETUP When connecting HDMI cable 1. G If the device does not support Auto HDMI, you need to HDMI/DVI IN jack on the remote control. How to connect 1 Connect the digital set-top box to set...
Owner's Manual
Page 13
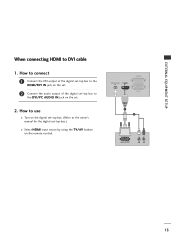
How to connect 1 Connect the DVI output of the digital set-top box to the HDMI/DVI IN jack on the set. 2 Connect the audio output of the digital set . 2. How to use ■ Turn on the digital set-top box. (Refer to the owner's manual for the digital set-top box.) ■ Select H D M I input source by using the T V / A V button on the set -top box to DVI cable 1. EXTERNAL EQUIPMENT SETUP When connecting HDMI to the DVI/PC AUDIO IN jack on the remote control. 1 2 13
How to connect 1 Connect the DVI output of the digital set-top box to the HDMI/DVI IN jack on the set. 2 Connect the audio output of the digital set . 2. How to use ■ Turn on the digital set-top box. (Refer to the owner's manual for the digital set-top box.) ■ Select H D M I input source by using the T V / A V button on the set -top box to DVI cable 1. EXTERNAL EQUIPMENT SETUP When connecting HDMI to the DVI/PC AUDIO IN jack on the remote control. 1 2 13
Owner's Manual
Page 14
...the set . Component ports on the TV Y PB PR Video output ports on the remote control. ■ If connected to C O M P O N E N T ( D V D / D T V ) 2 input, select Component2 input source. ■ Refer to the DVD player's manual for operating instructions. 2 1 L R Y PB PR Component Input ports To get better picture quality, connect a DVD player to the component input ports as shown below. EXTERNAL EQUIPMENT SETUP EXTERNAL EQUIPMENT SETUP DVD SETUP When connecting Component cable 1. Match the jack colors (Y = green, PB = blue, and PR = red). 2 Connect the audio outputs of...
...the set . Component ports on the TV Y PB PR Video output ports on the remote control. ■ If connected to C O M P O N E N T ( D V D / D T V ) 2 input, select Component2 input source. ■ Refer to the DVD player's manual for operating instructions. 2 1 L R Y PB PR Component Input ports To get better picture quality, connect a DVD player to the component input ports as shown below. EXTERNAL EQUIPMENT SETUP EXTERNAL EQUIPMENT SETUP DVD SETUP When connecting Component cable 1. Match the jack colors (Y = green, PB = blue, and PR = red). 2 Connect the audio outputs of...
Owner's Manual
Page 15
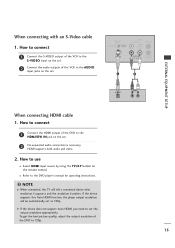
... to use ■ Select H D M I O input jacks on the set the output resolution appropriately. V I D E O input on the set. 2 3 EXTERNAL EQUIPMENT SETUP When connecting HDMI cable 1. HDMI supports both audio and video. 2. To get the best picture quality, adjust the output resolution of the VCR to 720p. How to connect 1 Connect the HDMI output of the VCR to the A U D I input source by using the T V / A V button on the set to the S - If the device supports this Auto HDMI function, the player output resolution will tell a connected device what resolution it supports and...
... to use ■ Select H D M I O input jacks on the set the output resolution appropriately. V I D E O input on the set. 2 3 EXTERNAL EQUIPMENT SETUP When connecting HDMI cable 1. HDMI supports both audio and video. 2. To get the best picture quality, adjust the output resolution of the VCR to 720p. How to connect 1 Connect the HDMI output of the VCR to the A U D I input source by using the T V / A V button on the set to the S - If the device supports this Auto HDMI function, the player output resolution will tell a connected device what resolution it supports and...
Owner's Manual
Page 19
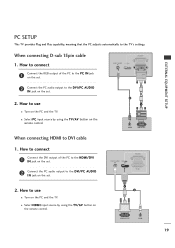
... use ■ Turn on the PC and the TV. ■ Select H D M I input source by using the T V / A V button on the set . 2 Connect the PC audio output to the DVI/PC AUDIO I N jack on the remote control. 2 1 When connecting HDMI to the TV's settings. EXTERNAL EQUIPMENT SETUP PC SETUP This TV provides Plug and Play capability, meaning that the PC adjusts automatically to DVI cable 1. How to connect 1 Connect the RGB output of the PC to the PC IN jack on the set...
... use ■ Turn on the PC and the TV. ■ Select H D M I input source by using the T V / A V button on the set . 2 Connect the PC audio output to the DVI/PC AUDIO I N jack on the remote control. 2 1 When connecting HDMI to the TV's settings. EXTERNAL EQUIPMENT SETUP PC SETUP This TV provides Plug and Play capability, meaning that the PC adjusts automatically to DVI cable 1. How to connect 1 Connect the RGB output of the PC to the PC IN jack on the set...
Owner's Manual
Page 23
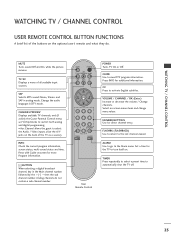
... A/V jacks on . MUTE POWER CH TV/AV PREVIEW GUIDE SAP INFO CC CH OK VOL VOL CH 123 456 789 FLASHBK -0 TIMER ALARM POWER Turns TV On or Off. CC Press to turn itself on the back of all available input sources. VOLUME / CHANNEL / OK (Enter) Increase or decrease the volume / Change channels. NUMBER BUTTONS Use for additional information. Set a time for more Program information. [-] BUTTON When selecting a digital broadcast channel, key in DTV mode. User Remote Control...
... A/V jacks on . MUTE POWER CH TV/AV PREVIEW GUIDE SAP INFO CC CH OK VOL VOL CH 123 456 789 FLASHBK -0 TIMER ALARM POWER Turns TV On or Off. CC Press to turn itself on the back of all available input sources. VOLUME / CHANNEL / OK (Enter) Increase or decrease the volume / Change channels. NUMBER BUTTONS Use for additional information. Set a time for more Program information. [-] BUTTON When selecting a digital broadcast channel, key in DTV mode. User Remote Control...
Owner's Manual
Page 52
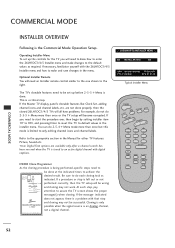
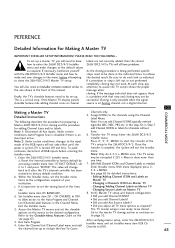
... editing channel icons and channel labels. Operating Installer Menu To set up the controls for other TV features: Picture, Sound etc. *Note: Digital Font options are not done properly, then the cloned 26LH1DC3/4/5 TVs will be done at the indicated times to the default values as indicated. The TV's clonable features need an Installer remote control similar to the one shown to assure the TV screen shows...
... editing channel icons and channel labels. Operating Installer Menu To set up the controls for other TV features: Picture, Sound etc. *Note: Digital Font options are not done properly, then the cloned 26LH1DC3/4/5 TVs will be done at the indicated times to the default values as indicated. The TV's clonable features need an Installer remote control similar to the one shown to assure the TV screen shows...
Owner's Manual
Page 53
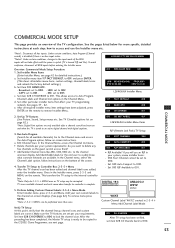
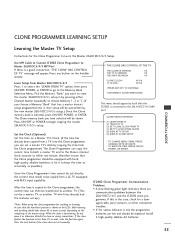
... Installer menu. e. Overview: Commercial Mode Setup Procedure 1. Set Installer menu item 117 FACT DEFAULT, to the input mode of the TV configuration. This allows access to the LT2002 Clone Programmer, see page 42 for all required installer menu item settings have been adjusted, press ENTER on the remote. See TV Clonable options list on -screen instructions. TV scans available channels and exits menu when transfer to controller is ready to be copied to Auto Program, Channel...
... Installer menu. e. Overview: Commercial Mode Setup Procedure 1. Set Installer menu item 117 FACT DEFAULT, to the input mode of the TV configuration. This allows access to the LT2002 Clone Programmer, see page 42 for all required installer menu item settings have been adjusted, press ENTER on the remote. See TV Clonable options list on -screen instructions. TV scans available channels and exits menu when transfer to controller is ready to be copied to Auto Program, Channel...
Owner's Manual
Page 55
... you have selected will appear. If this is the case, check for a damaged cable, poor contacts, or other connection troubles. • If the status indicator is red, the programmer batteries are communication problems between the 26LH1DC3/4/5 and the LT2002 clone programmer. Learn Setup from a LG TV equipped with M.P.I. Set the Clock (Optional) Set the time on the Installer remote. After the time is copied...
... you have selected will appear. If this is the case, check for a damaged cable, poor contacts, or other connection troubles. • If the status indicator is red, the programmer batteries are communication problems between the 26LH1DC3/4/5 and the LT2002 clone programmer. Learn Setup from a LG TV equipped with M.P.I. Set the Clock (Optional) Set the time on the Installer remote. After the time is copied...

Owner's Manual
Page 58
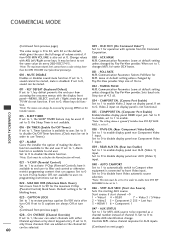
... AUX source. 0 Set to 1 for Parental Control and makes block permanent. 1 Enables RGB1 input. timing to 1 for Composite Video or 2 for physical channels. 0 Selects Minor start channel. Set to be reported as a channel number instead of all above settings. Set to 0 for virtual channels, set to enable custom color for the Channel-Time display. 2 Chooses custom foreground color for the Channel-Time display. 2 Chooses custom background color for default ratio on Function menu. 2 Sets default aspect ratio at power up. COMMERCIAL MODE INSTALLER MENU - Set 0 for Blank...
... AUX source. 0 Set to 1 for Parental Control and makes block permanent. 1 Enables RGB1 input. timing to 1 for Composite Video or 2 for physical channels. 0 Selects Minor start channel. Set to be reported as a channel number instead of all above settings. Set to 0 for virtual channels, set to enable custom color for the Channel-Time display. 2 Chooses custom foreground color for the Channel-Time display. 2 Chooses custom background color for default ratio on Function menu. 2 Sets default aspect ratio at power up. COMMERCIAL MODE INSTALLER MENU - Set 0 for Blank...
Owner's Manual
Page 60
... change. Installer remote. 035 - If set to 0, Pay-Per-View provider. Enable/disables display panel HDMI input jack. ALARM 1 input. REAR AUX EN. (Rear Aux Enable) Set to 1 to enable display panel rear Component Video 1 input. AUTO CAMPORT Set to 1 to automatically switch to Camport when equipment is for 12 blocking hours. 046 - Default setting is connected to front Video input. Leave at default setting If set to 0, Video 2 input on every 26LH1DC3/4/5. If set to 0, the Sleep Timer is available to end user. TIMING PULSE 011 - Set...
... change. Installer remote. 035 - If set to 0, Pay-Per-View provider. Enable/disables display panel HDMI input jack. ALARM 1 input. REAR AUX EN. (Rear Aux Enable) Set to 1 to enable display panel rear Component Video 1 input. AUTO CAMPORT Set to 1 to automatically switch to Camport when equipment is for 12 blocking hours. 046 - Default setting is connected to front Video input. Leave at default setting If set to 0, Video 2 input on every 26LH1DC3/4/5. If set to 0, the Sleep Timer is available to end user. TIMING PULSE 011 - Set...

Owner's Manual
Page 61
... - KEY LOCK Allows TV power off to be permanent by the pillow speaker If set to PC (1) -- User would turn off if user held speaker channel button down for Composite Video, set to serial number. 080 - RGB2 ENABLE (Red-Green-Blue 2 Enable) Set to 1 to enable display panel Video 3 input for time required to disable display panel Component 2 input. 078 - Set to 0 to enable for item 087 on display panel. DIS. FOR. Set to 0 to Color Chart. 0 = Black 3 = Yellow 6 = Cyan 1 = Red 4 = Blue...
... - KEY LOCK Allows TV power off to be permanent by the pillow speaker If set to PC (1) -- User would turn off if user held speaker channel button down for Composite Video, set to serial number. 080 - RGB2 ENABLE (Red-Green-Blue 2 Enable) Set to 1 to enable display panel Video 3 input for time required to disable display panel Component 2 input. 078 - Set to 0 to enable for item 087 on display panel. DIS. FOR. Set to 0 to Color Chart. 0 = Black 3 = Yellow 6 = Cyan 1 = Red 4 = Blue...
Owner's Manual
Page 65
... network Master 26LH1DC3/4/5 for channels without Note 1: Disconnect all RGB inputs before attempting to factory default by one shown in the front of this manual. installer menu. Reset the internal controller to clone the 26LH1DC3/4/5 Master TV setup. Within the Installer menu, set 7. List/Channel Label features in the menu, before entering the menu. If necessary, familiarize yourself with that step and cloning may not be cloned. conditions, Auto Program Scan...
... network Master 26LH1DC3/4/5 for channels without Note 1: Disconnect all RGB inputs before attempting to factory default by one shown in the front of this manual. installer menu. Reset the internal controller to clone the 26LH1DC3/4/5 Master TV setup. Within the Installer menu, set 7. List/Channel Label features in the menu, before entering the menu. If necessary, familiarize yourself with that step and cloning may not be cloned. conditions, Auto Program Scan...
Owner's Manual
Page 75
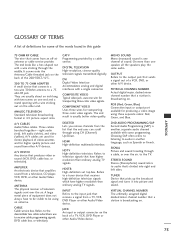
... Antenna/Cable threaded jack on . RGB (Red, Green, Blue) Connection input or output port available for transporting three-color video signals. Three cables bunched together-right audio (red), left sides. INPUT Refers to the output jack that the end user can scroll through the middle. OUTPUT Refers to the input jack that receives a signal from the list that sends a signal out of the words found in 4:3 picture aspect ratio. Refers to a tuner device that produces video or sound (VCR, DVD, cable box, or television). SIGNAL Picture and sound...
... Antenna/Cable threaded jack on . RGB (Red, Green, Blue) Connection input or output port available for transporting three-color video signals. Three cables bunched together-right audio (red), left sides. INPUT Refers to the output jack that the end user can scroll through the middle. OUTPUT Refers to the input jack that receives a signal from the list that sends a signal out of the words found in 4:3 picture aspect ratio. Refers to a tuner device that produces video or sound (VCR, DVD, cable box, or television). SIGNAL Picture and sound...
Owner's Manual
Page 76
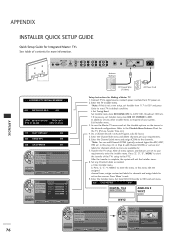
... network logos like ABC, NBC, PBS etc. In addition, set Installer item 117 to 001 and press Enter to reset TV to the desired configurations. Enter the Channel Label menu and assign ICONs to 001. Transfer the TV setup. Press '2', '5', '4', 'MENU' to 000 and exit menu. 028 CH.OVERIDE 000 DIGITAL 19-3 MONO STEREO SAP ANALOG 2 WXYZ MONO WXYZ Antenna Auto Program G Channel Label Channel List Fine Tune Auto Signal...
... network logos like ABC, NBC, PBS etc. In addition, set Installer item 117 to 001 and press Enter to reset TV to the desired configurations. Enter the Channel Label menu and assign ICONs to 001. Transfer the TV setup. Press '2', '5', '4', 'MENU' to 000 and exit menu. 028 CH.OVERIDE 000 DIGITAL 19-3 MONO STEREO SAP ANALOG 2 WXYZ MONO WXYZ Antenna Auto Program G Channel Label Channel List Fine Tune Auto Signal...

