
Owners Manual
Page 8
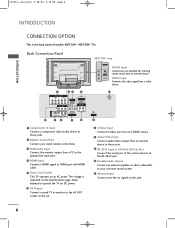
...from an external device to these jacks. 2 Remote Control Port Connect your surround sound system. 11 Antenna Input Connect over-the-air signals to HDMI port with HDMI cable. 5 Power Cord Socket This TV operates on the Specifications page. 0323G_1-en_rev01 2/28/06 4:12 PM Page 6 INTRODUCTION INTRODUCTION...OPTION This is indicated on an AC power. Back Connection Panel 1 COMPONENT IN VIDEO AUDIO 1 2 AV OUT 23 4 RGB IN (PC/DTV) HDMI IN REMOTE AUDIO IN CONTROL IN (RGB) VARIABLE AUDIO OUT 42PC1RV* only AV IN 2 AUDIO Input R Connections are available for listening AUDIO stereo ...
...from an external device to these jacks. 2 Remote Control Port Connect your surround sound system. 11 Antenna Input Connect over-the-air signals to HDMI port with HDMI cable. 5 Power Cord Socket This TV operates on the Specifications page. 0323G_1-en_rev01 2/28/06 4:12 PM Page 6 INTRODUCTION INTRODUCTION...OPTION This is indicated on an AC power. Back Connection Panel 1 COMPONENT IN VIDEO AUDIO 1 2 AV OUT 23 4 RGB IN (PC/DTV) HDMI IN REMOTE AUDIO IN CONTROL IN (RGB) VARIABLE AUDIO OUT 42PC1RV* only AV IN 2 AUDIO Input R Connections are available for listening AUDIO stereo ...
Owners Manual
Page 10
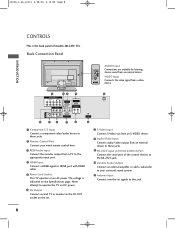
...26LC2R* TVs. The voltage is the back panel of the control devices to the RS-232C jack. 10 Variable Audio Output Connect an external amplifier or add a subwoofer to your wired remote control here. 3 RGB/Audio Input Connect the monitor output from a PC to the appropriate input port. 4 HDMI Input Connect a HDMI signal to HDMI... port with HDMI cable. 5 Power Cord Socket This TV operates on the Specifications page. 0323G_1-en_rev01 2/28/06 4:12 PM ...
...26LC2R* TVs. The voltage is the back panel of the control devices to the RS-232C jack. 10 Variable Audio Output Connect an external amplifier or add a subwoofer to your wired remote control here. 3 RGB/Audio Input Connect the monitor output from a PC to the appropriate input port. 4 HDMI Input Connect a HDMI signal to HDMI... port with HDMI cable. 5 Power Cord Socket This TV operates on the Specifications page. 0323G_1-en_rev01 2/28/06 4:12 PM ...
Owners Manual
Page 11
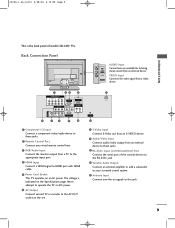
... Port Connect the serial port of models 32LC2R* TVs. L/MONO VIDEO VIDEO Input Connects the video signal from a video AV IN 2 device. 1 COMPONENT IN VIDEO AUDIO 1 2 AV OUT 23 4 RGB IN (PC/DTV) HDMI IN REMOTE AUDIO IN CONTROL IN (RGB) VARIABLE AUDIO OUT 5 AC IN AV IN 1 S-... from an external device to these jacks. 2 Remote Control Port Connect your surround sound system. 11 Antenna Input Connect over-the-air signals to HDMI port with HDMI cable. 5 Power Cord Socket This TV operates on the Specifications page. Back Connection Panel AC IN AUDIO Input R Connections are available...
... Port Connect the serial port of models 32LC2R* TVs. L/MONO VIDEO VIDEO Input Connects the video signal from a video AV IN 2 device. 1 COMPONENT IN VIDEO AUDIO 1 2 AV OUT 23 4 RGB IN (PC/DTV) HDMI IN REMOTE AUDIO IN CONTROL IN (RGB) VARIABLE AUDIO OUT 5 AC IN AV IN 1 S-... from an external device to these jacks. 2 Remote Control Port Connect your surround sound system. 11 Antenna Input Connect over-the-air signals to HDMI port with HDMI cable. 5 Power Cord Socket This TV operates on the Specifications page. Back Connection Panel AC IN AUDIO Input R Connections are available...
Owners Manual
Page 25
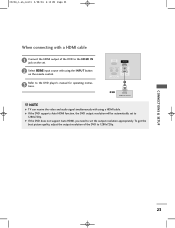
... AUDIO CONNECTIONS & SETUP 23 G If the DVD supports Auto HDMI function, the DVD output resolution will be automatically set to set . 2 Select HDMI input source with using a HDMI cable. NOTE G TV can receive the video and audio signal simultaneously with using the INPUT button on the set the output ...resolution appropriately. G If the DVD does not support Auto HDMI, you need to 1280x720p. tions....
... AUDIO CONNECTIONS & SETUP 23 G If the DVD supports Auto HDMI function, the DVD output resolution will be automatically set to set . 2 Select HDMI input source with using a HDMI cable. NOTE G TV can receive the video and audio signal simultaneously with using the INPUT button on the set the output ...resolution appropriately. G If the DVD does not support Auto HDMI, you need to 1280x720p. tions....

Owners Manual
Page 26
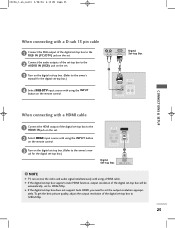
... DVI, you need to set -top box has a DVI output and no HDMI output, a separated audio connection is necessary. NOTE Signal 480i/576i 480p/576p/720p/1080i Component Yes Yes RGB-DTV No Yes HDMI Yes Yes When connecting with a HDMI to DVI cable 1 Connect the DVI output of the digital set-top box... to the HDMI I N jack on the set. 2 Connect the audio outputs of the ...
... DVI, you need to set -top box has a DVI output and no HDMI output, a separated audio connection is necessary. NOTE Signal 480i/576i 480p/576p/720p/1080i Component Yes Yes RGB-DTV No Yes HDMI Yes Yes When connecting with a HDMI to DVI cable 1 Connect the DVI output of the digital set-top box... to the HDMI I N jack on the set. 2 Connect the audio outputs of the ...
Owners Manual
Page 27
...will be automatically set to 1280x720p. G If the digital set-top box supports Auto HDMI function, output resolution of the digital set-top box to 1280x720p. NOTE G TV can receive the video and audio signal simultaneously with using a HDMI cable. G If the digital set-top box does not support Auto... HDMI, you need to set -top box. (Refer to the owner's man- COMPONENT IN 3 Turn on ...
...will be automatically set to 1280x720p. G If the digital set-top box supports Auto HDMI function, output resolution of the digital set-top box to 1280x720p. NOTE G TV can receive the video and audio signal simultaneously with using a HDMI cable. G If the digital set-top box does not support Auto... HDMI, you need to set -top box. (Refer to the owner's man- COMPONENT IN 3 Turn on ...
Owners Manual
Page 56
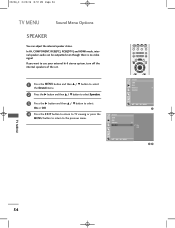
... return to use your external hi-fi stereo system, turn off the internal speakers of the set. In AV, COMPONENT, RGB[PC], RGB[DTV] and HDMI mode, internal speaker audio can adjust the internal speaker status. If you want to the previous menu. Sound SSM AVL Balance 0 Speaker Sound SSM AVL... PIP PR- 0323G_2 2/22/06 8:57 PM Page 54 TV MENU Sound Menu Options SPEAKER You can be outputted even though there is no video signal.
... return to use your external hi-fi stereo system, turn off the internal speakers of the set. In AV, COMPONENT, RGB[PC], RGB[DTV] and HDMI mode, internal speaker audio can adjust the internal speaker status. If you want to the previous menu. Sound SSM AVL Balance 0 Speaker Sound SSM AVL... PIP PR- 0323G_2 2/22/06 8:57 PM Page 54 TV MENU Sound Menu Options SPEAKER You can be outputted even though there is no video signal.

Service Manual
Page 17
... Cyan area is OK or not. => Push the Read area (Ackn. Use the proper cables below for EDID Download * Caution: - Tuning the RF signal ZJ, TJ, CJ : PAL Philips Pattern (with Color Bar) MJ : NTSC Digital Pattern (with Color Bar) (3) Push the button change and select ...widow will be careful) 4.2.1 EDID(The Extended Display Identification Data ) / DDC(Display Data Channel) download (1) Extract a Zip file * Caution - 4.1.2. Use the proper signal cable for EDID Writing - 17 - S/W program download (1) Connect the download jig to LCD Module, especially be opened. 4.1.3. Never connect...
... Cyan area is OK or not. => Push the Read area (Ackn. Use the proper cables below for EDID Download * Caution: - Tuning the RF signal ZJ, TJ, CJ : PAL Philips Pattern (with Color Bar) MJ : NTSC Digital Pattern (with Color Bar) (3) Push the button change and select ...widow will be careful) 4.2.1 EDID(The Extended Display Identification Data ) / DDC(Display Data Channel) download (1) Extract a Zip file * Caution - 4.1.2. Use the proper signal cable for EDID Writing - 17 - S/W program download (1) Connect the download jig to LCD Module, especially be opened. 4.1.3. Never connect...
Service Manual
Page 18
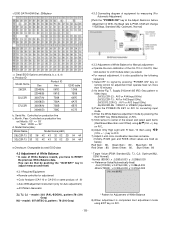
...(216 Gray) MJ - Model Name(Hex) : Model Name Model Name(HEX) 26LC2R-TJ 32 36 4C 43 32 52 2D 54 4A 32LC2R-TJ 33 32 4C ...No: Controlled on production line: ex) Montly: '03' => '03' Year: '2005' => '0F' d. < EDID DATA HDMI Set : 256bytes> 4.3.2 Connecting diagram of equipment for measuring (For Automatic Adjustment) [Push the "POWER ON" key at the Adjust ...* Pattern for Adjustment of White Balance 8) When adjustment is also possible by the following sequence 1) Select RF no signal by pressing "POWER ON" key on remote control for adjustment then operate heat run more than 15 minutes. 2)...
...(216 Gray) MJ - Model Name(Hex) : Model Name Model Name(HEX) 26LC2R-TJ 32 36 4C 43 32 52 2D 54 4A 32LC2R-TJ 33 32 4C ...No: Controlled on production line: ex) Montly: '03' => '03' Year: '2005' => '0F' d. < EDID DATA HDMI Set : 256bytes> 4.3.2 Connecting diagram of equipment for measuring (For Automatic Adjustment) [Push the "POWER ON" key at the Adjust ...* Pattern for Adjustment of White Balance 8) When adjustment is also possible by the following sequence 1) Select RF no signal by pressing "POWER ON" key on remote control for adjustment then operate heat run more than 15 minutes. 2)...


