
Owners Manual
Page 2
... code provides guidelines for compliance could void the CAUTION: Do not attempt to _dify this product in any way without written authorization from LG Electronics Unauthorized modification could void the users authority to operate this equipment does cause harmfu_ interference to radio or television recep#on, _ich can radiate radio frequency energy a_qd, if not installed and used...
... code provides guidelines for compliance could void the CAUTION: Do not attempt to _dify this product in any way without written authorization from LG Electronics Unauthorized modification could void the users authority to operate this equipment does cause harmfu_ interference to radio or television recep#on, _ich can radiate radio frequency energy a_qd, if not installed and used...
Owners Manual
Page 5
... Setup Digital Audio Ou_ut PC Setup 27 27 27 27 28 29 29 30 31 31 32 33 33~34 35 36 36 37 38 38 39 40 40 Turning on the TV 'volume Adjustment Channel Selection On Screen Menus Language Selection On Screen Menus Selection and Adjustment EZ Scan (Channel Search) Manual Scan Channei Edit DTV Signal Strength Input Source Input Label Auto Picture Control(EZ Picture) Color Temperature Control XD Advanced-Cinema 3:2 Mode Black Level Video Reset Audio Language Auto Sound Control(EZ Sound) Manual Sound Control...
... Setup Digital Audio Ou_ut PC Setup 27 27 27 27 28 29 29 30 31 31 32 33 33~34 35 36 36 37 38 38 39 40 40 Turning on the TV 'volume Adjustment Channel Selection On Screen Menus Language Selection On Screen Menus Selection and Adjustment EZ Scan (Channel Search) Manual Scan Channei Edit DTV Signal Strength Input Source Input Label Auto Picture Control(EZ Picture) Color Temperature Control XD Advanced-Cinema 3:2 Mode Black Level Video Reset Audio Language Auto Sound Control(EZ Sound) Manual Sound Control...
Owners Manual
Page 8
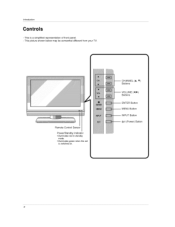
VOLUME (_i,!_) Buttons -- This picture shown below may be somewhat different from your TV, Remote Control Sensor Power/Standby Indicator t illuminates red in standby mode. • illuminates green when _e set is a simplified representation of front panel - CHANNEL (A, T) Buttons -- Introduction - This is switched on. ENTER Button MENU Button INPUT Button Oil (Power) Button 8
VOLUME (_i,!_) Buttons -- This picture shown below may be somewhat different from your TV, Remote Control Sensor Power/Standby Indicator t illuminates red in standby mode. • illuminates green when _e set is a simplified representation of front panel - CHANNEL (A, T) Buttons -- Introduction - This is switched on. ENTER Button MENU Button INPUT Button Oil (Power) Button 8
Owners Manual
Page 9
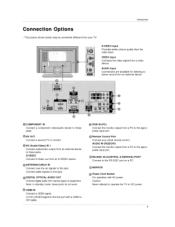
... picture quality than the video, input, VIDEO Input Connects the video signai from an external device. @COMPONENT IN Connect a component jacks. AUDIO IN (RGB/DVI) Connect the monitor output from an external device to stereo sound from a video device. Or DVl (VIDEO)signal to the this jack @ DIGITAL OPTICAL AUDIO OUT Connect dig_ai audio from an S-VIDEO device, @ANTENNA/CABLE IN Connect over-the air signals to this jack, Connect cable signals to this port with a HDMI to DVI cable. @ RGB IN (PC) Connect the monitor outputfrom a PC to operate the TV on a PC, @ Power Cord...
... picture quality than the video, input, VIDEO Input Connects the video signai from an external device. @COMPONENT IN Connect a component jacks. AUDIO IN (RGB/DVI) Connect the monitor output from an external device to stereo sound from a video device. Or DVl (VIDEO)signal to the this jack @ DIGITAL OPTICAL AUDIO OUT Connect dig_ai audio from an S-VIDEO device, @ANTENNA/CABLE IN Connect over-the air signals to this jack, Connect cable signals to this port with a HDMI to DVI cable. @ RGB IN (PC) Connect the monitor outputfrom a PC to operate the TV on a PC, @ Power Cord...
Owners Manual
Page 10
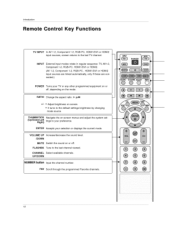
... NUMBER button Input the channet number, r Ft,N Scroll through the programmed Favorite channels. 1o by changing THUMBSTICK Navigate the onoscreen menus and adjust the system set- (Up/Down/Left Right) tings to the last TV channel. VOLUME UP Incre_eidecrease /DOWN the sound level. MUTE Switch the sound on or off , depending on the mode, RATIO Change the aspect ratio, _ pA4 +/- ENTER Accepts your TV or any other programmed equipment on screen. INPUT External input modes...
... NUMBER button Input the channet number, r Ft,N Scroll through the programmed Favorite channels. 1o by changing THUMBSTICK Navigate the onoscreen menus and adjust the system set- (Up/Down/Left Right) tings to the last TV channel. VOLUME UP Incre_eidecrease /DOWN the sound level. MUTE Switch the sound on or off , depending on the mode, RATIO Change the aspect ratio, _ pA4 +/- ENTER Accepts your TV or any other programmed equipment on screen. INPUT External input modes...
Owners Manual
Page 11
...,p.45 Disptays the main menu. _#Analog mode: Selects MTS sound(Mono, Stereo, and a SAP) ® DTV mode: Change the audio language. Introduction T% DVD, VCR Selects the remote operating mode: TV, VCR, DVD. HDMI Directly, select HDMI1iDVl input. select RGB input_ EZ PIC EZ SOUND ADJUST INFO Adjust the factory preset picture depend on -screen disptays and return to operate extemat devices. Select the amount of the screen (blue) VCRiDVD Control video cassette recorders or DVD players. COMP1 Directly; Select a closed caption (*in PC mode.(yellow) _ p.26 Disptay information...
...,p.45 Disptays the main menu. _#Analog mode: Selects MTS sound(Mono, Stereo, and a SAP) ® DTV mode: Change the audio language. Introduction T% DVD, VCR Selects the remote operating mode: TV, VCR, DVD. HDMI Directly, select HDMI1iDVl input. select RGB input_ EZ PIC EZ SOUND ADJUST INFO Adjust the factory preset picture depend on -screen disptays and return to operate extemat devices. Select the amount of the screen (blue) VCRiDVD Control video cassette recorders or DVD players. COMP1 Directly; Select a closed caption (*in PC mode.(yellow) _ p.26 Disptay information...
Owners Manual
Page 15
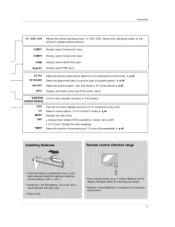
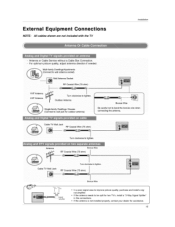
Externa I Eq uipment Connect ons NOTE: All cables shown are not included with the TV lnsL_flation Turn cE_kw!se to _gh_n . £ BIroRze Wite _i I_._ _ sig#a amplifier * In a poor signa_ area to improve picture quality, purchase and install a signat amplifier. • ff the antenna needs to be split for assistance. 15 If the antenna is not installed properly, contact your dea_er for two TV_s, install a '_2_Way Signat Splitter" in the connections -
Externa I Eq uipment Connect ons NOTE: All cables shown are not included with the TV lnsL_flation Turn cE_kw!se to _gh_n . £ BIroRze Wite _i I_._ _ sig#a amplifier * In a poor signa_ area to improve picture quality, purchase and install a signat amplifier. • ff the antenna needs to be split for assistance. 15 If the antenna is not installed properly, contact your dea_er for two TV_s, install a '_2_Way Signat Splitter" in the connections -
Owners Manual
Page 16
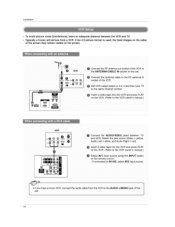
... VCR. If the 4:3 picture format is used; select AV2 input source, 16 Match the jack colet_ (Video = yellow. o If connected to the VCR owner's manuaL; the fixed images on the sides of the screen may remain visible on the remote controL. Typically a frozen still picture from a VCR. Insert a video Lape into the VCR and press PLAY on the VCR, (Refer to AV IN2. VCR [] O Connect the AUDIO/VIDEO lacks between the VCR and TV. - Audio LeR = white, and Audio Right = red; Installation...
... VCR. If the 4:3 picture format is used; select AV2 input source, 16 Match the jack colet_ (Video = yellow. o If connected to the VCR owner's manuaL; the fixed images on the sides of the screen may remain visible on the remote controL. Typically a frozen still picture from a VCR. Insert a video Lape into the VCR and press PLAY on the VCR, (Refer to AV IN2. VCR [] O Connect the AUDIO/VIDEO lacks between the VCR and TV. - Audio LeR = white, and Audio Right = red; Installation...
Owners Manual
Page 19
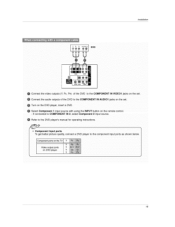
... DVD player's manual for operating instructions. - Refer to COMPONENT IN 2. lnsL_flation DVO [] O Connect the video outputs (Y, P_, P£) of the DVD to the component input peas as shown below, vi oooutput on DVD player Y Pb _t, ¥ !BE Y _b Y ;:PB 19 O Connect the audio outputs of the DVD to the COMPONENT IN VIDEO1 jacks on the remote control - Component Input ports To get better picture quality, connect a DVD p}ayer to the COMPONENT IN AUDIO1 jacks on the set O Turn on the DVD player, m_ert a DVD Select...
... DVD player's manual for operating instructions. - Refer to COMPONENT IN 2. lnsL_flation DVO [] O Connect the video outputs (Y, P_, P£) of the DVD to the component input peas as shown below, vi oooutput on DVD player Y Pb _t, ¥ !BE Y _b Y ;:PB 19 O Connect the audio outputs of the DVD to the COMPONENT IN VIDEO1 jacks on the remote control - Component Input ports To get better picture quality, connect a DVD p}ayer to the COMPONENT IN AUDIO1 jacks on the set O Turn on the DVD player, m_ert a DVD Select...
Owners Manual
Page 20
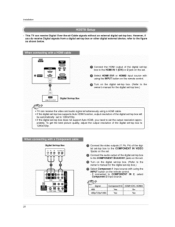
..., Connect the HDMI output of the digital set4op box to the HDMI IN 1 (gVl) or 2 jack on the remote control. Installation This TV can receive the video and audio signal simultaneously using the INPUT button on the set, ®_ Select HDMI1iDVI or HDMI2 input source with using a HDMI cable. • If the digital set-top box supports Auto HDMI function output resolution of the digi_ to the owner's manual for the digita! Turn on the digital set4op box. (Refer to the COMPONENT IN AUDIO1 jacks on the set...
..., Connect the HDMI output of the digital set4op box to the HDMI IN 1 (gVl) or 2 jack on the remote control. Installation This TV can receive the video and audio signal simultaneously using the INPUT button on the set, ®_ Select HDMI1iDVI or HDMI2 input source with using a HDMI cable. • If the digital set-top box supports Auto HDMI function output resolution of the digi_ to the owner's manual for the digita! Turn on the digital set4op box. (Refer to the COMPONENT IN AUDIO1 jacks on the set...
Owners Manual
Page 21
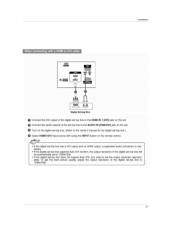
... the owner's manual for the digital set -top box has a DV[ output and no HDMI output, a separated audio connection [s nec- essary. i If the digitai set -top boxJ Select HDMI1iDVI input source with using the INPUT button on the set. i if the digital set=top box supports Auto DV_ function, the output resolution of the digital set=top box will be automatically set to 1280x720p, • if the digital set=top box does not support Auto DVI, you need to set -top box to the HDMI IN I (DVI) jack on the remote control...
... the owner's manual for the digital set -top box has a DV[ output and no HDMI output, a separated audio connection [s nec- essary. i If the digitai set -top boxJ Select HDMI1iDVI input source with using the INPUT button on the set. i if the digital set=top box supports Auto DV_ function, the output resolution of the digital set=top box will be automatically set to 1280x720p, • if the digital set=top box does not support Auto DVI, you need to set -top box to the HDMI IN I (DVI) jack on the remote control...

Owners Manual
Page 25
... in use. 2. When Source Devices connected with HDMt/DVl Input, output PC Resolution (VGA, SVGA, XGA, WXGA), Position and Size may not fit to Screen.Press the ADJUST button to the Manual of = HDMI/DVl Source Devices or contact your service center. 4. tf not, refer to adjust the screen Position of the PC graphic card. 6 Avoid keeping a fixed image on your TV. There may not work if a HDMI to...
... in use. 2. When Source Devices connected with HDMt/DVl Input, output PC Resolution (VGA, SVGA, XGA, WXGA), Position and Size may not fit to Screen.Press the ADJUST button to the Manual of = HDMI/DVl Source Devices or contact your service center. 4. tf not, refer to adjust the screen Position of the PC graphic card. 6 Avoid keeping a fixed image on your TV. There may not work if a HDMI to...

Owners Manual
Page 27
... cancel this moment, the TV switches to standby mode. 1. Operatio_ Basic operation 1. In standby mode to switch the sound off, press the MUTE button, 3. If you want to turn TV on, press the _/I, INPUT, CH A / f button on the TV or press the POWER, TV INPUT, INPUT, CH A / 'V, Number (0 ~ 9) button on the remote control. press the POWER button on the remote control. 2. Press the CH A I f button to select a channel number. - Press the VOL ,i I V or NUMBER buttons to adjust the volume 2.
... cancel this moment, the TV switches to standby mode. 1. Operatio_ Basic operation 1. In standby mode to switch the sound off, press the MUTE button, 3. If you want to turn TV on, press the _/I, INPUT, CH A / f button on the TV or press the POWER, TV INPUT, INPUT, CH A / 'V, Number (0 ~ 9) button on the remote control. press the POWER button on the remote control. 2. Press the CH A I f button to select a channel number. - Press the VOL ,i I V or NUMBER buttons to adjust the volume 2.

Owners Manual
Page 33
... factory and are preset for the best picture appearance. Select the preset value in the EZ Picture menu based on the program catego_ DayIJght, MormaL Night Time seb tings are not adjustable. - Choose one of three automatic color adjustments Set to warm to enhance hotter colors such as shown below: Daylight, Normal Night Time_ User i and User 2 (your own settings) • You can also use ,I , and User 2 modes only, user can directly adjust...
... factory and are preset for the best picture appearance. Select the preset value in the EZ Picture menu based on the program catego_ DayIJght, MormaL Night Time seb tings are not adjustable. - Choose one of three automatic color adjustments Set to warm to enhance hotter colors such as shown below: Daylight, Normal Night Time_ User i and User 2 (your own settings) • You can also use ,I , and User 2 modes only, user can directly adjust...

Owners Manual
Page 41
..., Atlantic. The factory default value of the Auto Clock is OH, because a clock information sent each broadcasting station is set the year_ date, and time options, 4 Press EXIT button to return to TV viewing or press MENU button to return to select Auto, Off On, depending on whether or not your viewing area time zone. . The current time will be set automaticalty from a digital channel signal provided by...
..., Atlantic. The factory default value of the Auto Clock is OH, because a clock information sent each broadcasting station is set the year_ date, and time options, 4 Press EXIT button to return to TV viewing or press MENU button to return to select Auto, Off On, depending on whether or not your viewing area time zone. . The current time will be set automaticalty from a digital channel signal provided by...

Owners Manual
Page 45
... Antenna/Cable. -This TV is used for both digital and analog channels on the program, Caption may not be available depends if the service is not pro vided by the broadcaster, would be dis= 1 use the CC button repeatedly to select Caption Oft, CCI, CC2, CC3, CC4, Textl, Te_, Text& orText4, 2 Press EXIT button to save and return to , when you turn the power off. button to select...
... Antenna/Cable. -This TV is used for both digital and analog channels on the program, Caption may not be available depends if the service is not pro vided by the broadcaster, would be dis= 1 use the CC button repeatedly to select Caption Oft, CCI, CC2, CC3, CC4, Textl, Te_, Text& orText4, 2 Press EXIT button to save and return to , when you turn the power off. button to select...
Owners Manual
Page 47
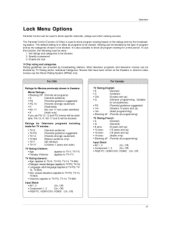
... Operation Lock Menu Options Parental Control can be used to block specific channels, ratings and other viewing sources_ The Parental Control Function (V-Chip) is used to TV-G, TV-PG, TV-14, TV-MA} ° DiaJogue- Ratings for Television made-for a time ...lock V-Chip rating and cat_ories Rating guidelines are provided by TV Rating an_or Individuai Categories. To use the Movie Rating System (MPAA) only. Most blocked by broadcasting stations. The default setting is to allow all programming) input Block • AV 1_2 • Component 1,2 - Off) TV Rating-English...
... Operation Lock Menu Options Parental Control can be used to block specific channels, ratings and other viewing sources_ The Parental Control Function (V-Chip) is used to TV-G, TV-PG, TV-14, TV-MA} ° DiaJogue- Ratings for Television made-for a time ...lock V-Chip rating and cat_ories Rating guidelines are provided by TV Rating an_or Individuai Categories. To use the Movie Rating System (MPAA) only. Most blocked by broadcasting stations. The default setting is to allow all programming) input Block • AV 1_2 • Component 1,2 - Off) TV Rating-English...

Owners Manual
Page 48
... is selected, change the settings to choose from the exter- Operation - Selecting canadian English 3 Press EXIT button to return to TV viewing or press MENU button to return to this menu ff the Lock System is turned on the ratings, blocks certain TV programs that you wish to block. ° Input block: Enables you have hooked up blocking schemes to block from the following Lock Menu options. A password is...
... is selected, change the settings to choose from the exter- Operation - Selecting canadian English 3 Press EXIT button to return to TV viewing or press MENU button to return to this menu ff the Lock System is turned on the ratings, blocks certain TV programs that you wish to block. ° Input block: Enables you have hooked up blocking schemes to block from the following Lock Menu options. A password is...
Owners Manual
Page 59
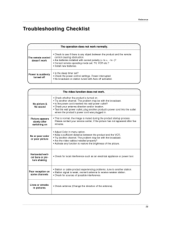
... product's power cord was plugged in pictures * Check antenna (Change the direction of the picture. Horizontal/vertical bars or pic- No picture & No sound Picture appears slowly after five minute& No or poor color or poor picture • Adjust Color in menu option. • Keep a sufficient distance between the product and the remote control causing obstruction, • Are batteries installed with the broadcast. • Are the video cab, tes installed properly...
... product's power cord was plugged in pictures * Check antenna (Change the direction of the picture. Horizontal/vertical bars or pic- No picture & No sound Picture appears slowly after five minute& No or poor color or poor picture • Adjust Color in menu option. • Keep a sufficient distance between the product and the remote control causing obstruction, • Are batteries installed with the broadcast. • Are the video cab, tes installed properly...

Owners Manual
Page 60
...; Are the audio cables installed properly? ground & Horizontal Noise & Incorrect position • Work the Auto configure or adiust ciock, phase, or H/V position. (Option) Screen color is out of range. ° Adjust resolution, horizontal frequency, or vertical frequency, • Check the input source. No output from one ° Adjust Batance in menu option, of the speakers Unusual sound from inside the product ° A change in ambient humidity...
...; Are the audio cables installed properly? ground & Horizontal Noise & Incorrect position • Work the Auto configure or adiust ciock, phase, or H/V position. (Option) Screen color is out of range. ° Adjust resolution, horizontal frequency, or vertical frequency, • Check the input source. No output from one ° Adjust Batance in menu option, of the speakers Unusual sound from inside the product ° A change in ambient humidity...

