
Owner's Manual
Page 6
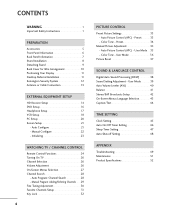
...Auto On/Off Timer Setting 46 Sleep Timer Setting 47 Auto Shut-off Setting 48 APPENDIX Troubleshooting 49 Maintenance 51 Product Specifications 52 Auto Program: Channel Search 28 Manual Program: Adding/Deleting Channels . . . . . 29 Fine Tuning Adjustment 30 Favorite Channels Setup 31 Key Lock 32 4 PICTURE CONTROL Preset Picture Settings 33 - Auto Picture Control (APC) - Auto Picture Control (APC) - User Mode 36 Picture Reset 37 SOUND & LANGUAGE CONTROL Digital Auto Sound Processing (DASP 38 Sound Setting Adjustment - CONTENTS WARNING 1 Important Safety Instructions...
...Auto On/Off Timer Setting 46 Sleep Timer Setting 47 Auto Shut-off Setting 48 APPENDIX Troubleshooting 49 Maintenance 51 Product Specifications 52 Auto Program: Channel Search 28 Manual Program: Adding/Deleting Channels . . . . . 29 Fine Tuning Adjustment 30 Favorite Channels Setup 31 Key Lock 32 4 PICTURE CONTROL Preset Picture Settings 33 - Auto Picture Control (APC) - Auto Picture Control (APC) - User Mode 36 Picture Reset 37 SOUND & LANGUAGE CONTROL Digital Auto Sound Processing (DASP 38 Sound Setting Adjustment - CONTENTS WARNING 1 Important Safety Instructions...
Owner's Manual
Page 8
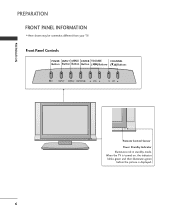
When the TV is turned on, the indicator blinks green and then illuminates green before the picture is displayed. 6 Front Panel Controls POWER INPUT MENU ENTER VOLUME CHANNEL Button Button Button Button (F,G)Buttons (E,D)Buttons /I Here shown may be somewhat different from your TV. PREPARATION PREPARATION FRONT PANEL INFORMATION I INPUT MENU ENTER VOL CH Remote Control Sensor Power Standby Indicator Illuminates red in standby mode.
When the TV is turned on, the indicator blinks green and then illuminates green before the picture is displayed. 6 Front Panel Controls POWER INPUT MENU ENTER VOLUME CHANNEL Button Button Button Button (F,G)Buttons (E,D)Buttons /I Here shown may be somewhat different from your TV. PREPARATION PREPARATION FRONT PANEL INFORMATION I INPUT MENU ENTER VOL CH Remote Control Sensor Power Standby Indicator Illuminates red in standby mode.
Owner's Manual
Page 16
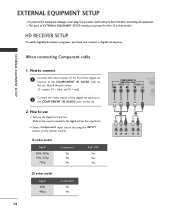
... Select Component input source by using the INPUT button on the set -top box. HD RECEIVER SETUP To watch digitally broadcast programs, purchase and connect a digital set . Connect the audio output of EXTERNAL EQUIPMENT SETUP mainly use I To prevent the equipment damage, never plug in any power cords until you have finished connecting all equipment. EXTERNAL EQUIPMENT SETUP When connecting Component cable 1. Match the jack colors (Y = green, PB = blue, and PR = red). EXTERNAL EQUIPMENT SETUP I Turn on the digital set-top box. (Refer to the COMPONENT IN VIDEO jacks on the set...
... Select Component input source by using the INPUT button on the set -top box. HD RECEIVER SETUP To watch digitally broadcast programs, purchase and connect a digital set . Connect the audio output of EXTERNAL EQUIPMENT SETUP mainly use I To prevent the equipment damage, never plug in any power cords until you have finished connecting all equipment. EXTERNAL EQUIPMENT SETUP When connecting Component cable 1. Match the jack colors (Y = green, PB = blue, and PR = red). EXTERNAL EQUIPMENT SETUP I Turn on the digital set-top box. (Refer to the COMPONENT IN VIDEO jacks on the set...
Owner's Manual
Page 17
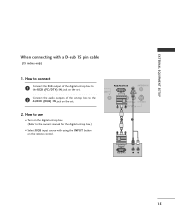
... OUTPUT L R 15 EXTERNAL EQUIPMENT SETUP When connecting with using the INPUT button on the set . 2. How to connect Connect the RGB output of the set-top box to the 2 AUDIO (RGB) IN jack on the set . How to use I Turn on the digital set-top box. (Refer to 1 the RGB (PC/DTV) IN jack on the remote control. Connect the audio outputs of the digital set-top box to the owner's manual for the digital set-top box.) I Select R G B input source with a D-sub 15 pin cable (15 inches only...
... OUTPUT L R 15 EXTERNAL EQUIPMENT SETUP When connecting with using the INPUT button on the set . 2. How to connect Connect the RGB output of the set-top box to the 2 AUDIO (RGB) IN jack on the set . How to use I Turn on the digital set-top box. (Refer to 1 the RGB (PC/DTV) IN jack on the remote control. Connect the audio outputs of the digital set-top box to the owner's manual for the digital set-top box.) I Select R G B input source with a D-sub 15 pin cable (15 inches only...
Owner's Manual
Page 18
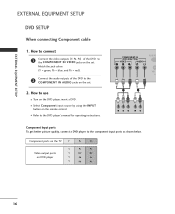
... Turn on the DVD player, insert a DVD. Match the jack colors (Y = green, PB = blue, and PR = red). Connect the audio outputs of the DVD to the COMPONENT IN VIDEO jacks on the set . How to the 2 COMPONENT IN AUDIO jacks on the set . 2. COMPONENT IN (480i/480p/720p) VIDEO AUDIO RGB (PC VID 1 2 Y PB PR L R Component Input ports To get better picture quality, connect a DVD player to the DVD player's manual for operating instructions. Component ports on the TV Y Y Video output ports Y on the remote control. EXTERNAL EQUIPMENT SETUP EXTERNAL EQUIPMENT SETUP DVD...
... Turn on the DVD player, insert a DVD. Match the jack colors (Y = green, PB = blue, and PR = red). Connect the audio outputs of the DVD to the COMPONENT IN VIDEO jacks on the set . How to the 2 COMPONENT IN AUDIO jacks on the set . 2. COMPONENT IN (480i/480p/720p) VIDEO AUDIO RGB (PC VID 1 2 Y PB PR L R Component Input ports To get better picture quality, connect a DVD player to the DVD player's manual for operating instructions. Component ports on the TV Y Y Video output ports Y on the remote control. EXTERNAL EQUIPMENT SETUP EXTERNAL EQUIPMENT SETUP DVD...
Owner's Manual
Page 19
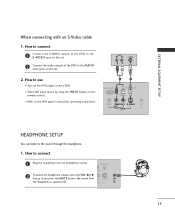
...the AUDIO input jacks on the set . I Turn on the remote control. ANTENNA IN DIO B) IN 2 To adjust the headphone volume, press the VOL F or G button. How to connect 1 Connect the S-VIDEO output of the DVD to the S -VIDEO input on the set . 2 Connect the audio outputs of the DVD to connect 1 Plug the headphone into the headphone socket. AUDIO L R S-VIDEO 2. How to the sound through the headphone. 1. I Refer to the DVD player's manual for operating instructions. 2 1 RGB (PC/DTV) IN ANTENNA IN AUDIO (RGB) IN VIDEO AUDIO S-VIDEO H/P (MONO) AV IN HEADPHONE SETUP...
...the AUDIO input jacks on the set . I Turn on the remote control. ANTENNA IN DIO B) IN 2 To adjust the headphone volume, press the VOL F or G button. How to connect 1 Connect the S-VIDEO output of the DVD to the S -VIDEO input on the set . 2 Connect the audio outputs of the DVD to connect 1 Plug the headphone into the headphone socket. AUDIO L R S-VIDEO 2. How to the sound through the headphone. 1. I Refer to the DVD player's manual for operating instructions. 2 1 RGB (PC/DTV) IN ANTENNA IN AUDIO (RGB) IN VIDEO AUDIO S-VIDEO H/P (MONO) AV IN HEADPHONE SETUP...

Owner's Manual
Page 20
... product bearing this phenomenon. I Insert a video tape into the VCR and press PLAY on the sides of the VCR. 2. This phenomenon is used; How to use I To avoid picture noise (interference), leave an adequate distance between the VCR and TV. the fixed images on the VCR. (Refer to the VCR owner's manual.) 18 EXTERNAL EQUIPMENT SETUP EXTERNAL EQUIPMENT SETUP VCR SETUP I Set VCR output switch to 3 or 4 and then tune TV to the same channel number.
... product bearing this phenomenon. I Insert a video tape into the VCR and press PLAY on the sides of the VCR. 2. This phenomenon is used; How to use I To avoid picture noise (interference), leave an adequate distance between the VCR and TV. the fixed images on the VCR. (Refer to the VCR owner's manual.) 18 EXTERNAL EQUIPMENT SETUP EXTERNAL EQUIPMENT SETUP VCR SETUP I Set VCR output switch to 3 or 4 and then tune TV to the same channel number.
Owner's Manual
Page 21
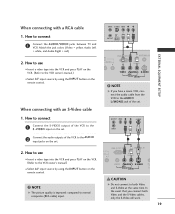
... VCR owner's manual.) I Select A V input source by using the INPUT button on the remote control. CAUTION G Do not connect to the VCR owner's manual.) I Select A V input source by using the INPUT button on the remote control. How to use I Insert a video tape into the VCR and press PLAY on the VCR. (Refer to both Video and the S-Video cables, only the S-Video will work. 19 NOTE G The picture quality is improved: compared to connect 1 Connect the AUDIO/VIDEO jacks between TV and VCR. How to normal composite (RCA cable) input...
... VCR owner's manual.) I Select A V input source by using the INPUT button on the remote control. CAUTION G Do not connect to the VCR owner's manual.) I Select A V input source by using the INPUT button on the remote control. How to use I Insert a video tape into the VCR and press PLAY on the VCR. (Refer to both Video and the S-Video cables, only the S-Video will work. 19 NOTE G The picture quality is improved: compared to connect 1 Connect the AUDIO/VIDEO jacks between TV and VCR. How to normal composite (RCA cable) input...
Owner's Manual
Page 22
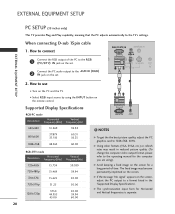
... a format listed in reduced picture quality. (To change the computer video output format, please refer to the operating manual for the computer you are using the INPUT button on the screen, adjust the PC output to the AUDIO (R G B) 2 I Turn on the set . 2. The fixed image may result in the 'Supported Display Specifications'. NOTES G To get the the best picture quality, adjust the PC graphics card to the TV's settings. EXTERNAL EQUIPMENT SETUP PC SETUP (15 inches only) This TV provides Plug and Play...
... a format listed in reduced picture quality. (To change the computer video output format, please refer to the operating manual for the computer you are using the INPUT button on the screen, adjust the PC output to the AUDIO (R G B) 2 I Turn on the set . 2. The fixed image may result in the 'Supported Display Specifications'. NOTES G To get the the best picture quality, adjust the PC graphics card to the TV's settings. EXTERNAL EQUIPMENT SETUP PC SETUP (15 inches only) This TV provides Plug and Play...
Owner's Manual
Page 26
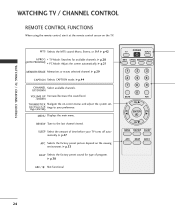
... CAPTION Selects CAPTION mode. SLEEP Select the amount of program. MTS Selects the MTS sound: Mono, Stereo, or SAP. G p.28 (AUTO PROGRAM) PC Mode: Adjust the screen automatically. G p.38 * ARC/ Not functional POWER TV INPUT MTS A.PROG MEMORY/ERASE CAPTION 1 2 3 4 56 7 8 9 0 MUTE FCR CH VOL ENTER VOL CH MENU REVIEW SLEEP APC DASP ARC/* 24 G p.21 MEMORY/ERASE Memorizes or erases selected channel. G p.33 DASP Selects the factory preset sound for available channels. UP/DOWN VOLUME UP Increase/decrease the sound...
... CAPTION Selects CAPTION mode. SLEEP Select the amount of program. MTS Selects the MTS sound: Mono, Stereo, or SAP. G p.28 (AUTO PROGRAM) PC Mode: Adjust the screen automatically. G p.38 * ARC/ Not functional POWER TV INPUT MTS A.PROG MEMORY/ERASE CAPTION 1 2 3 4 56 7 8 9 0 MUTE FCR CH VOL ENTER VOL CH MENU REVIEW SLEEP APC DASP ARC/* 24 G p.21 MEMORY/ERASE Memorizes or erases selected channel. G p.33 DASP Selects the factory preset sound for available channels. UP/DOWN VOLUME UP Increase/decrease the sound...
Owner's Manual
Page 28
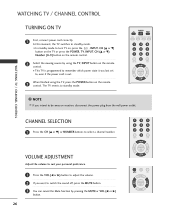
..., INPUT, CH (D or E), Number (0~9) button on vacation, disconnect the power plug from the wall power outlet. VOLUME ADJUSTMENT Adjust the volume to suit your personal preference. 1 Press the VOL (F or G) button to adjust the volume. 2 If you intend to standby mode. WATCHING TV / CHANNEL CONTROL CHANNEL SELECTION 1 Press the CH (D or E) or NUMBER buttons to standby mode. At this moment, the TV switches to select a channel number. The TV reverts to be away on the remote control. 2 Select the viewing...
..., INPUT, CH (D or E), Number (0~9) button on vacation, disconnect the power plug from the wall power outlet. VOLUME ADJUSTMENT Adjust the volume to suit your personal preference. 1 Press the VOL (F or G) button to adjust the volume. 2 If you intend to standby mode. WATCHING TV / CHANNEL CONTROL CHANNEL SELECTION 1 Press the CH (D or E) or NUMBER buttons to standby mode. At this moment, the TV switches to select a channel number. The TV reverts to be away on the remote control. 2 Select the viewing...

Owner's Manual
Page 29
... lock Caption/Text DE F G MENU Timer Timer Clock Off timer On timer Auto off DE F G MENU 27 Channel Channel Auto program Manual program Favorite channel DE F G MENU Picture Picture APC ACC Reset DE F G MENU Sound Sound DASP AVL Balance 0 DE F G MENU Screen (*15 inches only) Screen Auto config. Manual config. WATCHING TV / CHANNEL CONTROL ON-SCREEN MENUS SELECTION Your TV's OSD (On Screen Display) may differ slightly from what is shown in this manual. 1 Press the MENU button and then use D or E button to select the each menu. 2 Press the G button and then use...
... lock Caption/Text DE F G MENU Timer Timer Clock Off timer On timer Auto off DE F G MENU 27 Channel Channel Auto program Manual program Favorite channel DE F G MENU Picture Picture APC ACC Reset DE F G MENU Sound Sound DASP AVL Balance 0 DE F G MENU Screen (*15 inches only) Screen Auto config. Manual config. WATCHING TV / CHANNEL CONTROL ON-SCREEN MENUS SELECTION Your TV's OSD (On Screen Display) may differ slightly from what is shown in this manual. 1 Press the MENU button and then use D or E button to select the each menu. 2 Press the G button and then use...
Owner's Manual
Page 33
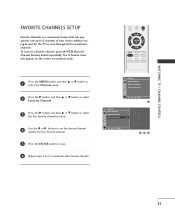
... order. 0 MUTE FCR CH VOL ENTER VOL CH MENU REVIEW SLEEP APC DASP ARC/* Press the M E N U button and then D or E button to 1 select the Channel menu. 2 Press the G button and then D or E button to select Favorite Channel. 3 Press the G button and then D or E button to select the first favorite channel position. 4 Use the F or G button to set the desired channel number for the TV to memorize other favorite channels. Channel Auto program Manual program Favorite channel DE F G MENU 1 Channel Auto program Manual program Favorite channel DE F G MENU...
... order. 0 MUTE FCR CH VOL ENTER VOL CH MENU REVIEW SLEEP APC DASP ARC/* Press the M E N U button and then D or E button to 1 select the Channel menu. 2 Press the G button and then D or E button to select Favorite Channel. 3 Press the G button and then D or E button to select the first favorite channel position. 4 Use the F or G button to set the desired channel number for the TV to memorize other favorite channels. Channel Auto program Manual program Favorite channel DE F G MENU 1 Channel Auto program Manual program Favorite channel DE F G MENU...

Owner's Manual
Page 35
... CH MENU REVIEW SLEEP APC DASP ARC/* 33 In the User mode only, you can also use the Picture menu to save. I You can directly adjust the contrast, brightness, color, sharpness, tint. 1 Press the A P C button repeatedly to select the picture appearance setup option as below : Clear, Optimum, Soft, and User (your own settings). 2 Press the ENTER button to adjust A P C. Clear, Optimum, Soft Settings are preset for the best picture appearance. Preset APC adjusts the...
... CH MENU REVIEW SLEEP APC DASP ARC/* 33 In the User mode only, you can also use the Picture menu to save. I You can directly adjust the contrast, brightness, color, sharpness, tint. 1 Press the A P C button repeatedly to select the picture appearance setup option as below : Clear, Optimum, Soft, and User (your own settings). 2 Press the ENTER button to adjust A P C. Clear, Optimum, Soft Settings are preset for the best picture appearance. Preset APC adjusts the...

Owner's Manual
Page 36
... F G MENU 1 Picture APC ACC G Reset DE F G MENU Cool Normal Warm User 23 34 PICTURE CONTROL PICTURE CONTROL Color Tone - Set to warm to enhance hotter colors such as red, or set to cool to see less intense colors with more blue. 0 MUTE FCR CH VOL ENTER VOL CH MENU REVIEW SLEEP APC DASP ARC/* 1 Press the M E N U button and then D or E button to select the Picture menu. 2 Press the G button and then D or E button to select A C C. 3 Press the G button...
... F G MENU 1 Picture APC ACC G Reset DE F G MENU Cool Normal Warm User 23 34 PICTURE CONTROL PICTURE CONTROL Color Tone - Set to warm to enhance hotter colors such as red, or set to cool to see less intense colors with more blue. 0 MUTE FCR CH VOL ENTER VOL CH MENU REVIEW SLEEP APC DASP ARC/* 1 Press the M E N U button and then D or E button to select the Picture menu. 2 Press the G button and then D or E button to select A C C. 3 Press the G button...

Owner's Manual
Page 37
... Reset Picture APC ACC Reset DE F G MENU 1 Clear Optimum Soft User G DE F G MENU 23 User Contrast Brightness Color Sharpness Tint 100 G 50 60 50 0 DE F G MENU 4 Contrast 85 F G E 5 35 User Mode Adjust the picture appearance to suit your preference and viewing situations. 0 MUTE FCR CH VOL ENTER VOL CH MENU REVIEW SLEEP APC DASP ARC/* 1 Press the M E N U button and then D or E button to select the Picture menu. 2 Press the G button and then D or E button to select...
... Reset Picture APC ACC Reset DE F G MENU 1 Clear Optimum Soft User G DE F G MENU 23 User Contrast Brightness Color Sharpness Tint 100 G 50 60 50 0 DE F G MENU 4 Contrast 85 F G E 5 35 User Mode Adjust the picture appearance to suit your preference and viewing situations. 0 MUTE FCR CH VOL ENTER VOL CH MENU REVIEW SLEEP APC DASP ARC/* 1 Press the M E N U button and then D or E button to select the Picture menu. 2 Press the G button and then D or E button to select...

Owner's Manual
Page 38
... G button and then D or E button to select A C C. 3 Press the G button and then D or E button to select U s e r. 4 Press the G button and then D or E button to select R e d, Green, or B l u e. 5 Press the G button and then F or G button to save. 0 MUTE FCR CH VOL ENTER VOL CH MENU REVIEW SLEEP APC DASP ARC/* Picture APC ACC Reset Picture APC ACC Reset User Red Green Blue DE F G MENU 1 Cool Normal Warm User G DE F G MENU 23 0 G 0 0 DE F G MENU 4 Red 0 F G E 5 36 PICTURE CONTROL PICTURE CONTROL Color Tone - I The adjustment...
... G button and then D or E button to select A C C. 3 Press the G button and then D or E button to select U s e r. 4 Press the G button and then D or E button to select R e d, Green, or B l u e. 5 Press the G button and then F or G button to save. 0 MUTE FCR CH VOL ENTER VOL CH MENU REVIEW SLEEP APC DASP ARC/* Picture APC ACC Reset Picture APC ACC Reset User Red Green Blue DE F G MENU 1 Cool Normal Warm User G DE F G MENU 23 0 G 0 0 DE F G MENU 4 Red 0 F G E 5 36 PICTURE CONTROL PICTURE CONTROL Color Tone - I The adjustment...

Owner's Manual
Page 39
Press the G button and then D or E button to select 2 Reset. 3 Press the G button to select the Picture menu. PICTURE CONTROL PICTURE RESET Use to quickly reset all the Picture menu options to their original factory preset values. 1 Press the M E N U button and then D or E button to initialize the adjusted value. 0 MUTE FCR CH VOL ENTER VOL CH MENU REVIEW SLEEP APC DASP ARC/* Picture APC ACC Reset Picture APC ACC Reset DE F G MENU 1 G To set DE F G MENU 23 37
Press the G button and then D or E button to select 2 Reset. 3 Press the G button to select the Picture menu. PICTURE CONTROL PICTURE RESET Use to quickly reset all the Picture menu options to their original factory preset values. 1 Press the M E N U button and then D or E button to initialize the adjusted value. 0 MUTE FCR CH VOL ENTER VOL CH MENU REVIEW SLEEP APC DASP ARC/* Picture APC ACC Reset Picture APC ACC Reset DE F G MENU 1 G To set DE F G MENU 23 37
Owner's Manual
Page 46
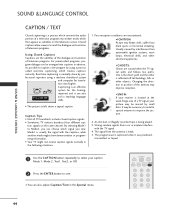
... is the direct path and the other is being played. 3. POWER TV INPUT MTS A.PROG MEMORY/ERASE CAPTION 1 2 3 4 56 7 8 9 0 MUTE FCR 44 tion into written words which then appear as subtitles on the same channel. By selecting Mode1 to read the dialogue and narration of television programs. Using Closed Captions Captions are caused when the TV signal splits and follows two paths. Real-time captioning is located...
... is the direct path and the other is being played. 3. POWER TV INPUT MTS A.PROG MEMORY/ERASE CAPTION 1 2 3 4 56 7 8 9 0 MUTE FCR 44 tion into written words which then appear as subtitles on the same channel. By selecting Mode1 to read the dialogue and narration of television programs. Using Closed Captions Captions are caused when the TV signal splits and follows two paths. Real-time captioning is located...
Owner's Manual
Page 51
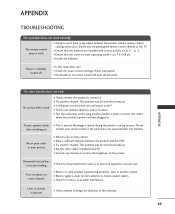
... after switching on . Power is weak, reorient antenna to another product's power cord into wall power outlet? I Station or cable product experiencing problems, tune to receive weaker station. I Station signal is suddenly turned off activated. to +, - The remote control doesn't work I Is the sleep timer set : TV, VCR etc. The problem may be with correct polarity (+ to -). Lines or streaks in pictures I Adjust Color in . No or poor color or poor picture I Check antenna (Change the direction...
... after switching on . Power is weak, reorient antenna to another product's power cord into wall power outlet? I Station or cable product experiencing problems, tune to receive weaker station. I Station signal is suddenly turned off activated. to +, - The remote control doesn't work I Is the sleep timer set : TV, VCR etc. The problem may be with correct polarity (+ to -). Lines or streaks in pictures I Adjust Color in . No or poor color or poor picture I Check antenna (Change the direction...

