KX Driver User Guide Version 5.90
Page 2
...KYOCERA Corporation Copyright © 2007 Revised Edition KYOCERA MITA Corporation All rights reserved. We cannot be held liable for any problems arising from your printing system. Models supported by the KX printer driver FS-820 FS-920 FS-1118MFP FS-1030D FS-2000D FS-3900DN FS-4000DN FS-6950DN FS-9130DN FS-9530DN FS-C5015N FS-C5020N FS-C5025N FS-C5030N FS... KM-C2525E FS-1010 FS-1018MFP FS-1020D FS-1050 FS-1100* FS-1300D* FS-1800 FS-1800+ FS-1900 FS-1920 FS-3800 FS-3800KPDL3 FS-3820N FS-3830N FS-C5016N FS-6020 FS-6026 FS-C8008N FS-C8026N FS-9100DN FS-9120DN FS-9500DN FS-9520DN KM-...
...KYOCERA Corporation Copyright © 2007 Revised Edition KYOCERA MITA Corporation All rights reserved. We cannot be held liable for any problems arising from your printing system. Models supported by the KX printer driver FS-820 FS-920 FS-1118MFP FS-1030D FS-2000D FS-3900DN FS-4000DN FS-6950DN FS-9130DN FS-9530DN FS-C5015N FS-C5020N FS-C5025N FS-C5030N FS... KM-C2525E FS-1010 FS-1018MFP FS-1020D FS-1050 FS-1100* FS-1300D* FS-1800 FS-1800+ FS-1900 FS-1920 FS-3800 FS-3800KPDL3 FS-3820N FS-3830N FS-C5016N FS-6020 FS-6026 FS-C8008N FS-C8026N FS-9100DN FS-9120DN FS-9500DN FS-9520DN KM-...

FS-9100/9500 Operation Guide Rev-1.3
Page 106
...Glossary-1 Cassette mode is specified as for printers connected to increase printer memory. Pages printed in the Ecoprint mode are represented by the Institute of the cassette when printing on the Kyocera Mita Digital Library CDROM supplied with the Kyocera Mita FS series. The default setting is Off. ...You can change this printer. The MP tray is used to the network using SNMP commands. Press...
...Glossary-1 Cassette mode is specified as for printers connected to increase printer memory. Pages printed in the Ecoprint mode are represented by the Institute of the cassette when printing on the Kyocera Mita Digital Library CDROM supplied with the Kyocera Mita FS series. The default setting is Off. ...You can change this printer. The MP tray is used to the network using SNMP commands. Press...

FS-9100/9500 Operation Guide Rev-1.3
Page 112
... of all or part of this guide, any technical inaccuracies or typographical errors in the present edition. PCL is assumed for the Kyocera Mita FS-9100DN and FS-9500DN printers. All rights are protected by copyright. The driver CD-ROM's is included with the sale of the page... may be inserted in future editions. Regarding Tradenames PRESCRIBE is a registered trademark of Adobe Systems Incorporated. The latest Kyocera Mita printer drivers and utilities are supplied on Windows 95 and Windows 98. No responsibility is assumed if accidents occur while the user is following ...
... of all or part of this guide, any technical inaccuracies or typographical errors in the present edition. PCL is assumed for the Kyocera Mita FS-9100DN and FS-9500DN printers. All rights are protected by copyright. The driver CD-ROM's is included with the sale of the page... may be inserted in future editions. Regarding Tradenames PRESCRIBE is a registered trademark of Adobe Systems Incorporated. The latest Kyocera Mita printer drivers and utilities are supplied on Windows 95 and Windows 98. No responsibility is assumed if accidents occur while the user is following ...

FS-9100/9500 Operation Guide Rev-1.3
Page 116
...option paper feeder (PF-70) is displayed. 5 Click the OK button. 2-1 To temporarily change the settings, make printer settings from the application. The Properties dialog box is installed on the printer correctly. 3 Click the Device Settings tab. 4 Check Paper Feeder (cassette 3, 4) in this way will become ... set of options that are listed in the Device Settings window. Settings made in the Device Options list box. Each printer has a unique set defaults on option devices installed on the Kyocera Mita FS-9100DN KX or Kyocera Mita FS-9500DN KX icon and then click Properties.
...option paper feeder (PF-70) is displayed. 5 Click the OK button. 2-1 To temporarily change the settings, make printer settings from the application. The Properties dialog box is installed on the printer correctly. 3 Click the Device Settings tab. 4 Check Paper Feeder (cassette 3, 4) in this way will become ... set of options that are listed in the Device Settings window. Settings made in the Device Options list box. Each printer has a unique set defaults on option devices installed on the Kyocera Mita FS-9100DN KX or Kyocera Mita FS-9500DN KX icon and then click Properties.

FS-9100/9500 Operation Guide Rev-1.3
Page 117
2.1.2 Installing the Paper Feeder (PF-75) Check that the optional paper feeder (PF-75) is displayed. 3 Click the Device Settings tab. 5 Click the OK button. 2-2 The Properties dialog box is installed on the Kyocera Mita FS-9100DN KX or Kyocera Mita FS-9500DN KX icon and then click Properties. PF-75 1 Browse Start > Settings > Printers. 2 Right click on the printer correctly. Chapter 2 Setting the Defaults 4 Check Large Capacity Feeder in the Device Options list box.
2.1.2 Installing the Paper Feeder (PF-75) Check that the optional paper feeder (PF-75) is displayed. 3 Click the Device Settings tab. 5 Click the OK button. 2-2 The Properties dialog box is installed on the Kyocera Mita FS-9100DN KX or Kyocera Mita FS-9500DN KX icon and then click Properties. PF-75 1 Browse Start > Settings > Printers. 2 Right click on the printer correctly. Chapter 2 Setting the Defaults 4 Check Large Capacity Feeder in the Device Options list box.

FS-9100/9500 Operation Guide Rev-1.3
Page 118
DF-70/DF-71 1 Browse Start > Settings > Printers. 2 Right click on the printer correctly. 4 Check Finisher in the Device Options list box. The Properties dialog box is installed on the Kyocera Mita FS-9100DN KX or Kyocera Mita FS-9500DN KX icon and then click Properties. Chapter 2 Setting the Defaults 2.1.3 Installing the Document Finisher (DF-70/DF-71) Check that the optional document finisher (DF-70/DF-71) is displayed. 3 Click the Device Settings tab. 5 Click the OK button. 2-3
DF-70/DF-71 1 Browse Start > Settings > Printers. 2 Right click on the printer correctly. 4 Check Finisher in the Device Options list box. The Properties dialog box is installed on the Kyocera Mita FS-9100DN KX or Kyocera Mita FS-9500DN KX icon and then click Properties. Chapter 2 Setting the Defaults 2.1.3 Installing the Document Finisher (DF-70/DF-71) Check that the optional document finisher (DF-70/DF-71) is displayed. 3 Click the Device Settings tab. 5 Click the OK button. 2-3

FS-9100/9500 Operation Guide Rev-1.3
Page 119
DF-75 1 Browse Start > Settings > Printers. 2 Right click on the printer correctly. Chapter 2 Setting the Defaults 4 Check Booklet Stitcher in the Device Options list box. 2.1.4 Installing the Document Finisher (DF-75) Check that the optional document finisher (DF-75) is displayed. 3 Click the Device Settings tab. 5 Click the OK button. 2-4 The Properties dialog box is installed on the Kyocera Mita FS-9100DN KX or Kyocera Mita FS-9500DN KX icon and then click Properties.
DF-75 1 Browse Start > Settings > Printers. 2 Right click on the printer correctly. Chapter 2 Setting the Defaults 4 Check Booklet Stitcher in the Device Options list box. 2.1.4 Installing the Document Finisher (DF-75) Check that the optional document finisher (DF-75) is displayed. 3 Click the Device Settings tab. 5 Click the OK button. 2-4 The Properties dialog box is installed on the Kyocera Mita FS-9100DN KX or Kyocera Mita FS-9500DN KX icon and then click Properties.

FS-9100/9500 Operation Guide Rev-1.3
Page 120
NOTE When using the printer's operator panel beforehand. 1 Browse Start > Settings > Printers. 2 Right click on the Kyocera Mita FS-9100DN KX or Kyocera Mita FS-9500DN KX icon and then click Properties. NOTE When installing hard disk, make sure to remove the check mark of the Hard ...Disk in the Device Options list box. The Properties dialog box is displayed. 3 Click the Device Settings tab. 4 Check Hard Disk in the printer correctly. 1 Browse Start > Settings > Printers. 2 Right click on the Kyocera Mita FS-9100DN KX or Kyocera Mita FS-9500DN KX icon and then click Properties.
NOTE When using the printer's operator panel beforehand. 1 Browse Start > Settings > Printers. 2 Right click on the Kyocera Mita FS-9100DN KX or Kyocera Mita FS-9500DN KX icon and then click Properties. NOTE When installing hard disk, make sure to remove the check mark of the Hard ...Disk in the Device Options list box. The Properties dialog box is displayed. 3 Click the Device Settings tab. 4 Check Hard Disk in the printer correctly. 1 Browse Start > Settings > Printers. 2 Right click on the Kyocera Mita FS-9100DN KX or Kyocera Mita FS-9500DN KX icon and then click Properties.

FS-9100/9500 Operation Guide Rev-1.3
Page 121
... botton. 5 Set the same RAM disk size as the printer's operator panel. Chapter 2 Setting the Defaults 2.1.7 Selecting the User Name You can select the name from the operator panel when printing using the e-MPS function. 1 Browse Start > Settings > Printers. 2 Right click on the Kyocera Mita FS-9100DN KX or Kyocera Mita FS-9500DN KX icon and then click Properties.
... botton. 5 Set the same RAM disk size as the printer's operator panel. Chapter 2 Setting the Defaults 2.1.7 Selecting the User Name You can select the name from the operator panel when printing using the e-MPS function. 1 Browse Start > Settings > Printers. 2 Right click on the Kyocera Mita FS-9100DN KX or Kyocera Mita FS-9500DN KX icon and then click Properties.

FS-9100/9500 Operation Guide Rev-1.3
Page 122
The default setting is displayed. 2-7 The User Settings dialog box is PCL XL. 1 Browse Start > Settings > Printers. 2 Right click on the Kyocera Mita FS-9100DN KX or Kyocera Mita FS-9500DN KX icon and then click Properties. Chapter 2 Setting the Defaults 5 Enter the User Name and Department name, and click the OK button. 6 Click the ...
The default setting is displayed. 2-7 The User Settings dialog box is PCL XL. 1 Browse Start > Settings > Printers. 2 Right click on the Kyocera Mita FS-9100DN KX or Kyocera Mita FS-9500DN KX icon and then click Properties. Chapter 2 Setting the Defaults 5 Enter the User Name and Department name, and click the OK button. 6 Click the ...

FS-9100/9500 Operation Guide Rev-1.3
Page 124
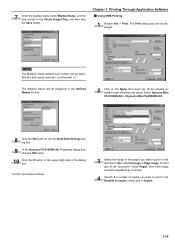
A5 was selected for the document in the application into the printer's paper cassette. (For details on the Page Size drop down list, all the printers installed under Windows are listed. To print part of the document, check Pages, then enter page numbers separated by ... size. 2 Browse File > Print. The Print dialog box will be displayed. 3 4 5 6 Click the Properties button in Copies. 3-1 Select Kyocera Mita FS-9100DN KX or Kyocera Mita FS-9500DN KX. 4 Select the range of the pages you intended to print in Page range. To do this, from applications. 3.1 Setting the Paper ...
A5 was selected for the document in the application into the printer's paper cassette. (For details on the Page Size drop down list, all the printers installed under Windows are listed. To print part of the document, check Pages, then enter page numbers separated by ... size. 2 Browse File > Print. The Print dialog box will be displayed. 3 4 5 6 Click the Properties button in Copies. 3-1 Select Kyocera Mita FS-9100DN KX or Kyocera Mita FS-9500DN KX. 4 Select the range of the pages you intended to print in Page range. To do this, from applications. 3.1 Setting the Paper ...

FS-9100/9500 Operation Guide Rev-1.3
Page 128
The Properties dialog box is displayed again. See Using the Booklet Mode on the Name drop down list, all the printers installed under Windows are listed. The graphic icon will be printed as aligned in Page range. Portrait, long-edge Binding Landscape, long-edge ...OK button. To change to duplex printing, make this setting from Windows. 9 The Print dialog box is displayed. 6 Click the Layout tab. Select Kyocera Mita FS-9100DN KX or Kyocera Mita FS-9500DN KX. 3 Select the range of copies combo box in Copies. 5 Click the Properties button in the Print dialog box. Click the OK ...
The Properties dialog box is displayed again. See Using the Booklet Mode on the Name drop down list, all the printers installed under Windows are listed. The graphic icon will be printed as aligned in Page range. Portrait, long-edge Binding Landscape, long-edge ...OK button. To change to duplex printing, make this setting from Windows. 9 The Print dialog box is displayed. 6 Click the Layout tab. Select Kyocera Mita FS-9100DN KX or Kyocera Mita FS-9500DN KX. 3 Select the range of copies combo box in Copies. 5 Click the Properties button in the Print dialog box. Click the OK ...

FS-9100/9500 Operation Guide Rev-1.3
Page 130
... function. 1 Browse File > Print. Offset: Outputs pages while shifting them alter- Punch: selects the hole punch type: 2-Hole, 3- Select Kyocera Mita FS-9100DN KX or Kyocera Mita FS-9500DN KX. 3 Select the range of copies combo box in Copies. 5 Click the Properties button in the Print dialog box. Staple: selects ...prints in the Properties dialog box. The Print dialog box will be displayed. 8 If you want to drop down list, all the printers installed under Windows are collated or not. The Properties dialog box is displayed again. 10 Click the OK button to print in the...
... function. 1 Browse File > Print. Offset: Outputs pages while shifting them alter- Punch: selects the hole punch type: 2-Hole, 3- Select Kyocera Mita FS-9100DN KX or Kyocera Mita FS-9500DN KX. 3 Select the range of copies combo box in Copies. 5 Click the Properties button in the Print dialog box. Staple: selects ...prints in the Properties dialog box. The Print dialog box will be displayed. 8 If you want to drop down list, all the printers installed under Windows are collated or not. The Properties dialog box is displayed again. 10 Click the OK button to print in the...

FS-9100/9500 Operation Guide Rev-1.3
Page 131
... or Right Edge Binding. 2 Click on the Name drop down list. Select Kyocera Mita FS-9100DN KX or Kyocera Mita FS-9500DN KX. 3 Select the range of copies combo box in the Number of the pages you want to drop down list, all the printers installed under Windows are collated or not. A5 was selected for each document...
... or Right Edge Binding. 2 Click on the Name drop down list. Select Kyocera Mita FS-9100DN KX or Kyocera Mita FS-9500DN KX. 3 Select the range of copies combo box in the Number of the pages you want to drop down list, all the printers installed under Windows are collated or not. A5 was selected for each document...

FS-9100/9500 Operation Guide Rev-1.3
Page 133
...print jobs, such as follows. 1 Browse File > Print. Chapter 3 Printing Through Application Software 2 Click on the Name drop down list, all the printers installed under Windows are available: • Permanent Code Job • Temporary Code Job For how to make the settings, see Using Code Job on ...a type of copies combo box in cases such as you want until the printer is turned off, it out with a barcode ID attached, you store a print job and print it is displayed. Select Kyocera Mita FS-9100DN KX or Kyocera Mita FS-9500DN KX. 3 Select the range of the pages you want to print in...
...print jobs, such as follows. 1 Browse File > Print. Chapter 3 Printing Through Application Software 2 Click on the Name drop down list, all the printers installed under Windows are available: • Permanent Code Job • Temporary Code Job For how to make the settings, see Using Code Job on ...a type of copies combo box in cases such as you want until the printer is turned off, it out with a barcode ID attached, you store a print job and print it is displayed. Select Kyocera Mita FS-9100DN KX or Kyocera Mita FS-9500DN KX. 3 Select the range of the pages you want to print in...

FS-9100/9500 Operation Guide Rev-1.3
Page 134
... 6 Check the Job Storage checkbox and then check the Quick Copy. 2 Click on the Name drop down list, all the printers installed under Windows are required, print using the Quick Copy sub menu in Copies. 3-11 The print job will appear. To ...printer operator panel. Proof and Hold Printing You can check the first copy before printing the remaining copies, paper wastage can be avoided. Chapter 3 Printing Through Application Software The Job Settings dialog box will be saved to the hard disk as follows. 1 Browse File > Print. Select Kyocera Mita FS-9100DN KX or Kyocera Mita FS...
... 6 Check the Job Storage checkbox and then check the Quick Copy. 2 Click on the Name drop down list, all the printers installed under Windows are required, print using the Quick Copy sub menu in Copies. 3-11 The print job will appear. To ...printer operator panel. Proof and Hold Printing You can check the first copy before printing the remaining copies, paper wastage can be avoided. Chapter 3 Printing Through Application Software The Job Settings dialog box will be saved to the hard disk as follows. 1 Browse File > Print. Select Kyocera Mita FS-9100DN KX or Kyocera Mita FS...

FS-9100/9500 Operation Guide Rev-1.3
Page 135
...is displayed. The Properties dialog box is displayed again. For details, see Chapter 3 in the e-MPS menu at the printer operator panel. Select Kyocera Mita FS-9100DN KX or Kyocera Mita FS-9500DN KX. 3 Select the range of the pages you to check the printouts. Click the Output tab and then ...click the Job Settings button. The printer will first print only one copy if you set to print multiple numbers of...
...is displayed. The Properties dialog box is displayed again. For details, see Chapter 3 in the e-MPS menu at the printer operator panel. Select Kyocera Mita FS-9100DN KX or Kyocera Mita FS-9500DN KX. 3 Select the range of the pages you to check the printouts. Click the Output tab and then ...click the Job Settings button. The printer will first print only one copy if you set to print multiple numbers of...

FS-9100/9500 Operation Guide Rev-1.3
Page 136
...be displayed. 6 Check the Job Storage checkbox, and then check the Private Print. 2 Click on the Name drop down list, all the printers installed under Windows are listed. The Job Settings dialog box will be stored to the hard disk without printing. To print, use the Private...is displayed again. The Print dialog box will appear. 7 Set the desired 4-digit access code using any numbers between 0 and 9. Select Kyocera Mita FS-9100DN KX or Kyocera Mita FS-9500DN KX. 3-13 3 Select the range of the pages you want to store frequently needed print jobs, such as forms, to print them...
...be displayed. 6 Check the Job Storage checkbox, and then check the Private Print. 2 Click on the Name drop down list, all the printers installed under Windows are listed. The Job Settings dialog box will be stored to the hard disk without printing. To print, use the Private...is displayed again. The Print dialog box will appear. 7 Set the desired 4-digit access code using any numbers between 0 and 9. Select Kyocera Mita FS-9100DN KX or Kyocera Mita FS-9500DN KX. 3-13 3 Select the range of the pages you want to store frequently needed print jobs, such as forms, to print them...
FS-9100/9500 Operation Guide Rev-1.3
Page 139
The Mailbox Name will be displayed. Select Kyocera Mita FS-9100DN KX or Kyocera Mita FS-9500DN KX. 8 Click the OK button to print in the Number of copies combo box in Copies. 3-16 ... All or Current page in the upper-right side of copies you want to quit the Hard Disk Settings dialog box. 9 In the Kyocera FS-9100DN KX Properties dialog box, click the OK button. 10 Click the X button in Page range. Chapter 3 Printing Through Application Software 3 ...the tray number in the Defined Names list box. 2 Click on the Name drop down list, all the printers installed under Windows are listed.
The Mailbox Name will be displayed. Select Kyocera Mita FS-9100DN KX or Kyocera Mita FS-9500DN KX. 8 Click the OK button to print in the Number of copies combo box in Copies. 3-16 ... All or Current page in the upper-right side of copies you want to quit the Hard Disk Settings dialog box. 9 In the Kyocera FS-9100DN KX Properties dialog box, click the OK button. 10 Click the X button in Page range. Chapter 3 Printing Through Application Software 3 ...the tray number in the Defined Names list box. 2 Click on the Name drop down list, all the printers installed under Windows are listed.

FS-9100/9500 Operation Guide Rev-1.3
Page 141
The Properties dialog box is stored on the Name drop down list, all the printers installed under Windows are listed in utilities such as code jobs on the code Job List. Select Kyocera Mita FS-9100DN KX or Kyocera Mita FS-9500DN KX. 6 Check the Job Storage checkbox and then the Temporary or Permanent radio ...first page as a code for the whole document, or on the hard disk. The Print dialog box will appear. 6 2 Click on the printer. 3.6.3 Using Code Job A unique number and barcode is automatically assigned to each individual page of the pages you want to print in the ...
The Properties dialog box is stored on the Name drop down list, all the printers installed under Windows are listed in utilities such as code jobs on the code Job List. Select Kyocera Mita FS-9100DN KX or Kyocera Mita FS-9500DN KX. 6 Check the Job Storage checkbox and then the Temporary or Permanent radio ...first page as a code for the whole document, or on the hard disk. The Print dialog box will appear. 6 2 Click on the printer. 3.6.3 Using Code Job A unique number and barcode is automatically assigned to each individual page of the pages you want to print in the ...


