Networking Setup Guide
Page 2
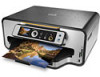
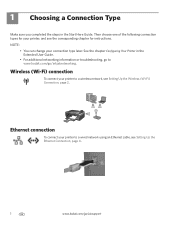
... Wireless (Wi-Fi) Connection, page 2. Rotate Back Home MS SD/HC MMC Ethernet connection To connect your printer to a wireless network, see Setting Up the Ethernet Connection, page 4. 1 www.kodak.com/go /inkjetnetworking. Then choose one of the following connection types for your connection type later. 1 Choosing a Connection Type Make sure you completed...
... Wireless (Wi-Fi) Connection, page 2. Rotate Back Home MS SD/HC MMC Ethernet connection To connect your printer to a wireless network, see Setting Up the Ethernet Connection, page 4. 1 www.kodak.com/go /inkjetnetworking. Then choose one of the following connection types for your connection type later. 1 Choosing a Connection Type Make sure you completed...
Networking Setup Guide
Page 3
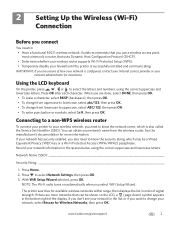
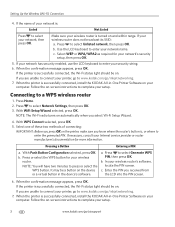
...service provider or your network administrator for more networks than can obtain your firewall until the printer is also called the Service Set Identifier (SSID). With WiFi Setup Wizard selected, press OK. www.kodak.com/go/aiosupport 2 2 Setting Up the Wireless (Wi-Fi) Connection Before you connect... Protected Setup (WPS). • Temporarily disable your network name from lowercase to select Network Settings, then press OK. 3. The printer searches for Wireless Networks, then press OK. Kodak recommends that you are unsure of the display. Network Name (SSID Security String 1.
...service provider or your network administrator for more networks than can obtain your firewall until the printer is also called the Service Set Identifier (SSID). With WiFi Setup Wizard selected, press OK. www.kodak.com/go/aiosupport 2 2 Setting Up the Wireless (Wi-Fi) Connection Before you connect... Protected Setup (WPS). • Temporarily disable your network name from lowercase to select Network Settings, then press OK. 3. The printer searches for Wireless Networks, then press OK. Kodak recommends that you are unsure of the display. Network Name (SSID Security String 1.
Networking Setup Guide
Page 4
... the WPS button for more information. NOTE: You will have two minutes to a WPS wireless router 1. When the printer is successfully connected, install the KODAK All-in-One Printer Software on -screen instructions to enter your wireless router's software, locate the PIN screen. When the confirmation message appears,... press or select the WPS button. Press to www.kodak.com/go to select Generate WPS PIN, then press OK. Enter the PIN you know where the router's button is turned on the device or a virtual button in -One Printer Software on . b. b. Setting Up the Wireless (Wi...
... the WPS button for more information. NOTE: You will have two minutes to a WPS wireless router 1. When the printer is successfully connected, install the KODAK All-in-One Printer Software on -screen instructions to enter your wireless router's software, locate the PIN screen. When the confirmation message appears,... press or select the WPS button. Press to www.kodak.com/go to select Generate WPS PIN, then press OK. Enter the PIN you know where the router's button is turned on the device or a virtual button in -One Printer Software on . b. b. Setting Up the Wireless (Wi...
Networking Setup Guide
Page 5
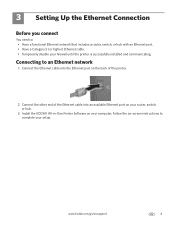
Install the KODAK All-in-One Printer Software on -screen instructions to complete your computer. www.kodak.com/go/aiosupport 4 Follow the on your setup. Connect the other end of the Ethernet cable into the Ethernet port on your firewall until the printer is successfully installed and communicating. 3 Setting Up the Ethernet Connection Before you connect... higher) Ethernet cable. • Temporarily disable your router, switch, or hub. 3. Connect the Ethernet cable into an available Ethernet port on the back of the printer. 2. Connecting to an Ethernet network 1.
Install the KODAK All-in-One Printer Software on -screen instructions to complete your computer. www.kodak.com/go/aiosupport 4 Follow the on your setup. Connect the other end of the Ethernet cable into the Ethernet port on your firewall until the printer is successfully installed and communicating. 3 Setting Up the Ethernet Connection Before you connect... higher) Ethernet cable. • Temporarily disable your router, switch, or hub. 3. Connect the Ethernet cable into an available Ethernet port on the back of the printer. 2. Connecting to an Ethernet network 1.

User guide
Page 2
2 KODAK ESP 7200 Series All-in-One Printer Your KODAK All-in-One Printer combines ease-of-use and affordable inks to www.kodak.com/go /aiosupport, and select your printer model for technical support. Go to provide high-quality pictures and documents. If you prefer, you can chat online, send us an e-mail, or call for : • Frequently Asked Questions (FAQs) • software or firmware upgrades • Extended User Guide • and more! Go to www.kodak.com/go /contact. Resources Support is available!
2 KODAK ESP 7200 Series All-in-One Printer Your KODAK All-in-One Printer combines ease-of-use and affordable inks to www.kodak.com/go /aiosupport, and select your printer model for technical support. Go to provide high-quality pictures and documents. If you prefer, you can chat online, send us an e-mail, or call for : • Frequently Asked Questions (FAQs) • software or firmware upgrades • Extended User Guide • and more! Go to www.kodak.com/go /contact. Resources Support is available!
User guide
Page 3
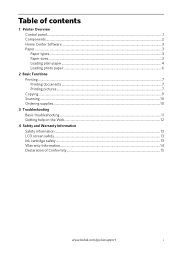
Table of contents 1 Printer Overview Control panel...1 Components...2 Home Center Software ...3 Paper ...3 Paper types...3 Paper sizes...3 Loading plain paper...4 Loading photo paper ...6 2 Basic Functions Printing ...7 Printing documents ...7 Printing pictures...7 Copying ...9 Scanning ...10 Ordering supplies...10 3 Troubleshooting Basic troubleshooting ...11 Getting help on the Web...12 4 Safety and Warranty Information Safety information ...13 LCD screen safety...13 Ink cartridge safety...13 Warranty Information...14 Declaration of Conformity...15 www.kodak.com/go/aiosupport i
Table of contents 1 Printer Overview Control panel...1 Components...2 Home Center Software ...3 Paper ...3 Paper types...3 Paper sizes...3 Loading plain paper...4 Loading photo paper ...6 2 Basic Functions Printing ...7 Printing documents ...7 Printing pictures...7 Copying ...9 Scanning ...10 Ordering supplies...10 3 Troubleshooting Basic troubleshooting ...11 Getting help on the Web...12 4 Safety and Warranty Information Safety information ...13 LCD screen safety...13 Ink cartridge safety...13 Warranty Information...14 Declaration of Conformity...15 www.kodak.com/go/aiosupport i
User guide
Page 4
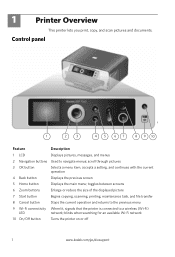
1 Printer Overview This printer lets you print, copy, and scan pictures and documents. scroll through pictures 3 OK button Selects a menu item, accepts a setting, and continues with the current operation 4 ... returns to the previous menu 9 Wi-Fi connectivity When lit, signals that the printer is connected to navigate menus; blinks when searching for an available Wi-Fi network 10 On/Off button Turns the printer on or off 1 www.kodak.com/go/aiosupport Control panel 1 2 3 4 5 67 8 9 10 Feature Description 1 LCD Displays pictures, messages...
1 Printer Overview This printer lets you print, copy, and scan pictures and documents. scroll through pictures 3 OK button Selects a menu item, accepts a setting, and continues with the current operation 4 ... returns to the previous menu 9 Wi-Fi connectivity When lit, signals that the printer is connected to navigate menus; blinks when searching for an available Wi-Fi network 10 On/Off button Turns the printer on or off 1 www.kodak.com/go/aiosupport Control panel 1 2 3 4 5 67 8 9 10 Feature Description 1 LCD Displays pictures, messages...
User guide
Page 5
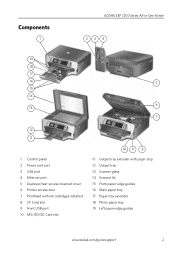
Components 1 KODAK ESP 7200 Series All-in-One Printer 23 4 19 18 17 16 5 15 14 6 13 7 12 11 1 Control panel 2 Power cord port 3 USB port 4 Ethernet port 5 Duplexer/rear-access cleanout cover 6 Printer access door 7 Printhead with ink cartridges installed 8 CF Card slot 9 Front USB port 10 MS/XD/SD Card slot 10 9 8 11 Output tray extender with paper stop 12 Output tray 13 Scanner glass 14 Scanner lid 15 Front paper-edge guides 16 Main paper tray 17 Paper tray extender 18 Photo paper tray 19 Left paper-edge guides www.kodak.com/go/aiosupport 2
Components 1 KODAK ESP 7200 Series All-in-One Printer 23 4 19 18 17 16 5 15 14 6 13 7 12 11 1 Control panel 2 Power cord port 3 USB port 4 Ethernet port 5 Duplexer/rear-access cleanout cover 6 Printer access door 7 Printhead with ink cartridges installed 8 CF Card slot 9 Front USB port 10 MS/XD/SD Card slot 10 9 8 11 Output tray extender with paper stop 12 Output tray 13 Scanner glass 14 Scanner lid 15 Front paper-edge guides 16 Main paper tray 17 Paper tray extender 18 Photo paper tray 19 Left paper-edge guides www.kodak.com/go/aiosupport 2
User guide
Page 6
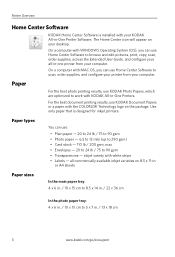
... Papers, which are optimized to work with WINDOWS Operating System (OS), you can use Home Center Software to scan, order supplies, and configure your printer from your KODAK All-in . or A4 sheets Paper sizes In the main paper tray: 4 x 6 in. / 10 x 15 cm to 8.5 x 14 in. / 22 x 36 cm In the... paper - 6.5 to 12 mils (up to 290 gsm) • Card stock - 110 lb / 200 gsm, max • Envelopes - 20 to 24 lb / 75 to 5 x 7 in -One Printers. all -in-one printer from your desktop. The Home Center icon will appear on 8.5 x 11-in...
... Papers, which are optimized to work with WINDOWS Operating System (OS), you can use Home Center Software to scan, order supplies, and configure your printer from your KODAK All-in . or A4 sheets Paper sizes In the main paper tray: 4 x 6 in. / 10 x 15 cm to 8.5 x 14 in. / 22 x 36 cm In the... paper - 6.5 to 12 mils (up to 290 gsm) • Card stock - 110 lb / 200 gsm, max • Envelopes - 20 to 24 lb / 75 to 5 x 7 in -One Printers. all -in-one printer from your desktop. The Home Center icon will appear on 8.5 x 11-in...
User guide
Page 7
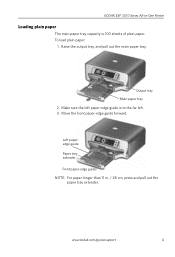
KODAK ESP 7200 Series All-in . / 28 cm, press and pull out the paper tray extender. Make sure the left . 3. Move the front paper-edge guide forward. Left paperedge guide Paper tray extender Front paper-edge guide NOTE: For paper longer than 11 in -One Printer Loading plain paper The main paper tray capacity is to the far left paper-edge guide is 100 sheets of plain paper. www.kodak.com/go/aiosupport 4 Output tray Main paper tray 2. To load plain paper: 1. Raise the output tray, and pull out the main paper tray.
KODAK ESP 7200 Series All-in . / 28 cm, press and pull out the paper tray extender. Make sure the left . 3. Move the front paper-edge guide forward. Left paperedge guide Paper tray extender Front paper-edge guide NOTE: For paper longer than 11 in -One Printer Loading plain paper The main paper tray capacity is to the far left paper-edge guide is 100 sheets of plain paper. www.kodak.com/go/aiosupport 4 Output tray Main paper tray 2. To load plain paper: 1. Raise the output tray, and pull out the main paper tray.
User guide
Page 8
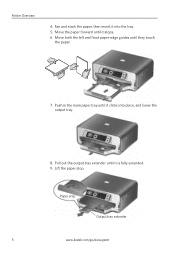
Fan and stack the paper, then insert it clicks into the tray. 5. Push in the main paper tray until it stops. 6. Paper stop . Printer Overview 4. Pull out the output tray extender until it into place, and lower the output tray. 8. Move both the left and front paper-edge guides until it is fully extended. 9. Lift the paper stop Output tray extender 5 www.kodak.com/go/aiosupport Move the paper forward until they touch the paper. 7.
Fan and stack the paper, then insert it clicks into the tray. 5. Push in the main paper tray until it stops. 6. Paper stop . Printer Overview 4. Pull out the output tray extender until it into place, and lower the output tray. 8. Move both the left and front paper-edge guides until it is fully extended. 9. Lift the paper stop Output tray extender 5 www.kodak.com/go/aiosupport Move the paper forward until they touch the paper. 7.
User guide
Page 9
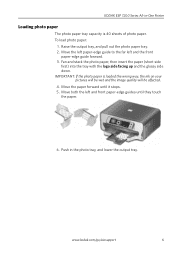
... side facing up and the glossy side down. www.kodak.com/go/aiosupport 6 Push in -One Printer Loading photo paper The photo paper tray capacity is loaded the wrong way, the ink on your pictures will be wet and the image quality will be affected. 4. KODAK ESP 7200 Series All-in the photo tray, and...
... side facing up and the glossy side down. www.kodak.com/go/aiosupport 6 Push in -One Printer Loading photo paper The photo paper tray capacity is loaded the wrong way, the ink on your pictures will be wet and the image quality will be affected. 4. KODAK ESP 7200 Series All-in the photo tray, and...
User guide
Page 10
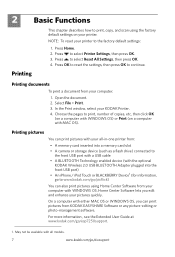
2 Basic Functions Printing This chapter describes how to print, copy, and scan using Home Center Software from your computer with all -in-one printer from: • A memory card inserted into a memory card slot • A camera or storage device (such as a flash drive) connected to the front ...USB port with a USB cable • A BLUETOOTH Technology enabled device (with the optional KODAK Wireless 2.0 USB BLUETOOTH Adapter plugged into the front USB port) • An iPhone / iPod Touch or BLACKBERRY Device1 (for information, go to www...
2 Basic Functions Printing This chapter describes how to print, copy, and scan using Home Center Software from your computer with all -in-one printer from: • A memory card inserted into a memory card slot • A camera or storage device (such as a flash drive) connected to the front ...USB port with a USB cable • A BLUETOOTH Technology enabled device (with the optional KODAK Wireless 2.0 USB BLUETOOTH Adapter plugged into the front USB port) • An iPhone / iPod Touch or BLACKBERRY Device1 (for information, go to www...
User guide
Page 11
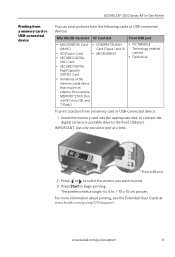
Insert the memory card into the appropriate slot, or connect the digital camera or portable drive to begin printing. The printer prints a single 4 x 6 in -One Printer Printing from a memory card or USB-connected device You can print pictures from the following cards or USB-connected devices:... about printing, see the Extended User Guide at a time. www.kodak.com/go /esp7250support. IMPORTANT: Use only one slot or port at www.kodak.com/go /aiosupport 8 Press or to select the picture you want to print. 3. Front USB port 2. KODAK ESP 7200 Series All-in . / 10 x 15 cm picture.
Insert the memory card into the appropriate slot, or connect the digital camera or portable drive to begin printing. The printer prints a single 4 x 6 in -One Printer Printing from a memory card or USB-connected device You can print pictures from the following cards or USB-connected devices:... about printing, see the Extended User Guide at a time. www.kodak.com/go /esp7250support. IMPORTANT: Use only one slot or port at www.kodak.com/go /aiosupport 8 Press or to select the picture you want to print. 3. Front USB port 2. KODAK ESP 7200 Series All-in . / 10 x 15 cm picture.

User guide
Page 12
... Photo. 5. Press Home. 4. Close the lid. 3. Basic Functions Printing from a BLUETOOTH Technology enabled device You can communicate. Insert the KODAK Wireless 2.0 USB BLUETOOTH Adapter into the front USB port. 2. "Pair" the printer and the device so they can print pictures from a BLUETOOTH Technology enabled device: 1. For instructions, see the user manual for...
... Photo. 5. Press Home. 4. Close the lid. 3. Basic Functions Printing from a BLUETOOTH Technology enabled device You can communicate. Insert the KODAK Wireless 2.0 USB BLUETOOTH Adapter into the front USB port. 2. "Pair" the printer and the device so they can print pictures from a BLUETOOTH Technology enabled device: 1. For instructions, see the user manual for...
User guide
Page 13
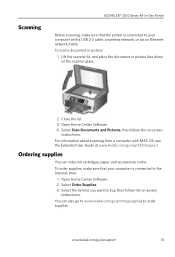
... the lid. 3. For information about scanning from a computer with a USB 2.0 cable, a wireless network, or via an Ethernet network/cable. Scanning KODAK ESP 7200 Series All-in-One Printer Before scanning, make sure that the printer is connected to your computer is connected to buy, then follow the on the scanner glass. 2. Open Home Center Software...
... the lid. 3. For information about scanning from a computer with a USB 2.0 cable, a wireless network, or via an Ethernet network/cable. Scanning KODAK ESP 7200 Series All-in-One Printer Before scanning, make sure that the printer is connected to your computer is connected to buy, then follow the on the scanner glass. 2. Open Home Center Software...
User guide
Page 14
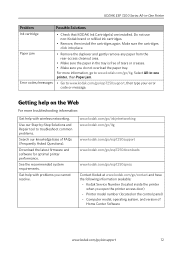
... connectivity For wireless connectivity issues, go to www.kodak.com/go /itg, select All-in and turned on Printer not detected • Make sure you are using a USB cable, make sure that: - the USB cable is plugged in -one printer, then Print Quality (missing colors, blank prints..., etc). 11 www.kodak.com/go /inkjetnetworking. the firewall (excluding WINDOWS Firewall) is loaded correctly (see page 4). • For more information, go to both your printer and your computer. • If you...
... connectivity For wireless connectivity issues, go to www.kodak.com/go /itg, select All-in and turned on Printer not detected • Make sure you are using a USB cable, make sure that: - the USB cable is plugged in -one printer, then Print Quality (missing colors, blank prints..., etc). 11 www.kodak.com/go /inkjetnetworking. the firewall (excluding WINDOWS Firewall) is loaded correctly (see page 4). • For more information, go to both your printer and your computer. • If you...
User guide
Page 15
... or refilled ink cartridges. • Remove, then install the cartridges again. Getting help with wireless networking. Kodak Service Number (located inside the printer when you do not overload the paper tray. KODAK ESP 7200 Series All-in -one printer, then Paper jam. Make sure the cartridges click into place. Paper jam • Remove the duplexer and...
... or refilled ink cartridges. • Remove, then install the cartridges again. Getting help with wireless networking. Kodak Service Number (located inside the printer when you do not overload the paper tray. KODAK ESP 7200 Series All-in -one printer, then Paper jam. Make sure the cartridges click into place. Paper jam • Remove the duplexer and...

User guide
Page 17
... implied warranty is communicated to the purchaser in writing by a Kodak company, no warranty or liability exists beyond Kodak's control. Unless a specific Kodak warranty is ineffective under this warranty. Retain the original dated sales receipt. KODAK ESP 7200 Series All-in-One Printer Warranty Information Limited Warranty Kodak warrants Kodak consumer electronic products and accessories ("Products"), excluding batteries, to...
... implied warranty is communicated to the purchaser in writing by a Kodak company, no warranty or liability exists beyond Kodak's control. Unless a specific Kodak warranty is ineffective under this warranty. Retain the original dated sales receipt. KODAK ESP 7200 Series All-in-One Printer Warranty Information Limited Warranty Kodak warrants Kodak consumer electronic products and accessories ("Products"), excluding batteries, to...
User guide
Page 18
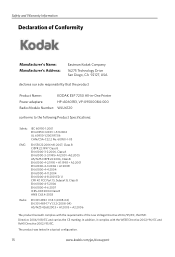
The product was tested in -One Printer Power adapters: HP-A0601R3, VP-09500084-000 Radio Module Number: WLU6120 conforms to the following Product Specifications: Safety: IEC 60950-1:2001 EN 60950-1:2001 + A11:..., the EMC Directive 2004/108/EC and carries the CE marking. In addition, it complies with the requirements of Conformity Manufacturer's Name: Manufacturer's Address: Eastman Kodak Company 16275 Technology Drive San Diego, CA 92127, USA declares our sole responsibility that the product Product Name: KODAK ESP 7250 All-in a typical configuration. 15 www...
The product was tested in -One Printer Power adapters: HP-A0601R3, VP-09500084-000 Radio Module Number: WLU6120 conforms to the following Product Specifications: Safety: IEC 60950-1:2001 EN 60950-1:2001 + A11:..., the EMC Directive 2004/108/EC and carries the CE marking. In addition, it complies with the requirements of Conformity Manufacturer's Name: Manufacturer's Address: Eastman Kodak Company 16275 Technology Drive San Diego, CA 92127, USA declares our sole responsibility that the product Product Name: KODAK ESP 7250 All-in a typical configuration. 15 www...


