User guide
Page 3
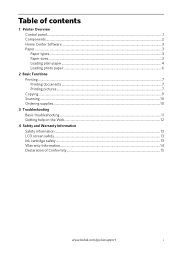
Table of contents 1 Printer Overview Control panel...1 Components...2 Home Center Software ...3 Paper ...3 Paper types...3 Paper sizes...3 Loading plain paper...4 Loading photo paper ...6 2 Basic Functions Printing ...7 Printing documents ...7 Printing pictures...7 Copying ...9 Scanning ...10 Ordering supplies...10 3 Troubleshooting Basic troubleshooting ...11 Getting help on the Web...12 4 Safety and Warranty Information Safety information ...13 LCD screen safety...13 Ink cartridge safety...13 Warranty Information...14 Declaration of Conformity...15 www.kodak.com/go/aiosupport i
Table of contents 1 Printer Overview Control panel...1 Components...2 Home Center Software ...3 Paper ...3 Paper types...3 Paper sizes...3 Loading plain paper...4 Loading photo paper ...6 2 Basic Functions Printing ...7 Printing documents ...7 Printing pictures...7 Copying ...9 Scanning ...10 Ordering supplies...10 3 Troubleshooting Basic troubleshooting ...11 Getting help on the Web...12 4 Safety and Warranty Information Safety information ...13 LCD screen safety...13 Ink cartridge safety...13 Warranty Information...14 Declaration of Conformity...15 www.kodak.com/go/aiosupport i
User guide
Page 4
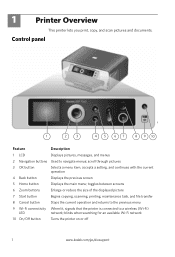
... picture 7 Start button Begins copying, scanning, printing, maintenance task, and file transfer 8 Cancel button Stops the current operation and returns to the previous menu 9 Wi-Fi connectivity When lit, signals that the printer is connected to navigate menus; blinks when searching...the printer on or off 1 www.kodak.com/go/aiosupport scroll through pictures 3 OK button Selects a menu item, accepts a setting, and continues with the current operation 4 Back button Displays the previous screen 5 Home button Displays the main menu; 1 Printer Overview This printer lets you print, ...
... picture 7 Start button Begins copying, scanning, printing, maintenance task, and file transfer 8 Cancel button Stops the current operation and returns to the previous menu 9 Wi-Fi connectivity When lit, signals that the printer is connected to navigate menus; blinks when searching...the printer on or off 1 www.kodak.com/go/aiosupport scroll through pictures 3 OK button Selects a menu item, accepts a setting, and continues with the current operation 4 Back button Displays the previous screen 5 Home button Displays the main menu; 1 Printer Overview This printer lets you print, ...
User guide
Page 6
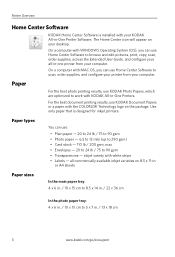
... to browse and edit pictures, print, copy, scan, order supplies, access the Extended User Guide, and configure your all commercially available inkjet varieties on your computer. all -in -One Printer Software. On a computer with WINDOWS Operating System (OS), you can use KODAK Photo Papers, which are optimized to 5 x 7 in -One Printers. The Home Center icon will...
... to browse and edit pictures, print, copy, scan, order supplies, access the Extended User Guide, and configure your all commercially available inkjet varieties on your computer. all -in -One Printer Software. On a computer with WINDOWS Operating System (OS), you can use KODAK Photo Papers, which are optimized to 5 x 7 in -One Printers. The Home Center icon will...
User guide
Page 10
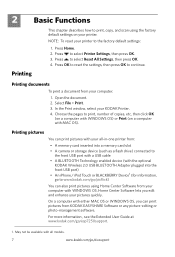
... with WINDOWS OS. May not be available with all -in-one printer from your all models. 7 www.kodak.com/go/aiosupport Press Home. 2. Press to www.kodak.com/go/picflick) You can print pictures from your KODAK Printer. 4. Open the document. 2. 2 Basic Functions Printing This chapter describes how to print, number of copies, etc, then click OK (on a computer...
... with WINDOWS OS. May not be available with all -in-one printer from your all models. 7 www.kodak.com/go/aiosupport Press Home. 2. Press to www.kodak.com/go/picflick) You can print pictures from your KODAK Printer. 4. Open the document. 2. 2 Basic Functions Printing This chapter describes how to print, number of copies, etc, then click OK (on a computer...
User guide
Page 11
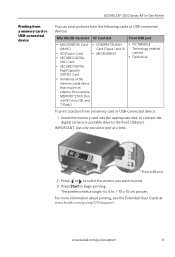
...connect the digital camera or portable drive to print. 3. Press or to select the picture you want to the front USB port. The printer prints a single 4 x 6 in -One Printer Printing from a memory card or USB-connected device You can print pictures from the following cards or USB-connected..., and T-Flash) • PICTBRIDGE Technology enabled camera • Flash drive To print a picture from a memory card or USB-connected device: 1. IMPORTANT: Use only one slot or port at www.kodak.com/go /aiosupport 8 KODAK ESP 7200 Series All-in . / 10 x 15 cm picture. For more information ...
...connect the digital camera or portable drive to print. 3. Press or to select the picture you want to the front USB port. The printer prints a single 4 x 6 in -One Printer Printing from a memory card or USB-connected device You can print pictures from the following cards or USB-connected..., and T-Flash) • PICTBRIDGE Technology enabled camera • Flash drive To print a picture from a memory card or USB-connected device: 1. IMPORTANT: Use only one slot or port at www.kodak.com/go /aiosupport 8 KODAK ESP 7200 Series All-in . / 10 x 15 cm picture. For more information ...

User guide
Page 12
... a BLUETOOTH Technology enabled device You can communicate. Insert the KODAK Wireless 2.0 USB BLUETOOTH Adapter into the front USB port. 2. Press Start to begin copying. The printer prints a single 4 x 6 in. / 10 x 15 cm picture. "Pair" the printer and the device so they can print pictures from your device's interface. For instructions, see the user manual for...
... a BLUETOOTH Technology enabled device You can communicate. Insert the KODAK Wireless 2.0 USB BLUETOOTH Adapter into the front USB port. 2. Press Start to begin copying. The printer prints a single 4 x 6 in. / 10 x 15 cm picture. "Pair" the printer and the device so they can print pictures from your device's interface. For instructions, see the user manual for...
User guide
Page 14
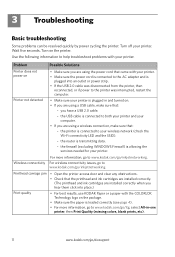
... or a paper with the COLORLOK Technology logo on the package. • Make sure the paper is plugged in -one printer, then Print Quality (missing colors, blank prints, etc). 11 www.kodak.com/go /itg, select All-in and turned on. • If you are using a USB cable, make sure that: - 3 ...Troubleshooting Basic troubleshooting Some problems can be resolved quickly by power cycling the printer: Turn off your wireless network (check the ...
... or a paper with the COLORLOK Technology logo on the package. • Make sure the paper is plugged in -one printer, then Print Quality (missing colors, blank prints, etc). 11 www.kodak.com/go /itg, select All-in and turned on. • If you are using a USB cable, make sure that: - 3 ...Troubleshooting Basic troubleshooting Some problems can be resolved quickly by power cycling the printer: Turn off your wireless network (check the ...
Extended user guide
Page 3
... network using the WiFi Setup Wizard 5 Setting up an IP address...9 Verifying the network configuration...10 Printing the network configuration ...10 Installing your printer on additional computers on the network 10 Connecting to another KODAK All-in-One Printer 10 Adding a network connection to a USB-connected computer 11 Changing from USB to wireless connection ...11...
... network using the WiFi Setup Wizard 5 Setting up an IP address...9 Verifying the network configuration...10 Printing the network configuration ...10 Installing your printer on additional computers on the network 10 Connecting to another KODAK All-in-One Printer 10 Adding a network connection to a USB-connected computer 11 Changing from USB to wireless connection ...11...
Extended user guide
Page 4
...printer performance ...64 Checking ink levels...64 Resetting factory defaults ...65 8 Troubleshooting Basic troubleshooting ...66 Getting help on the Web ...68 Status lights...69 Power status light...69 Wi-Fi status light ...69 9 Product and Safety Specifications Features and Specifications ...70 Print performance ...70 Photo printing... features ...70 Copy document features ...71 Copy photo features ...71 Scanning features ...71 Bottom input paper tray ...72 Top input paper tray ...72 ii www.kodak.com/go/aiosupport
...printer performance ...64 Checking ink levels...64 Resetting factory defaults ...65 8 Troubleshooting Basic troubleshooting ...66 Getting help on the Web ...68 Status lights...69 Power status light...69 Wi-Fi status light ...69 9 Product and Safety Specifications Features and Specifications ...70 Print performance ...70 Photo printing... features ...70 Copy document features ...71 Copy photo features ...71 Scanning features ...71 Bottom input paper tray ...72 Top input paper tray ...72 ii www.kodak.com/go/aiosupport
Extended user guide
Page 7
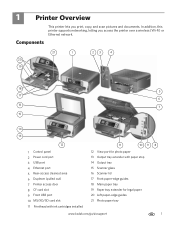
In addition, this printer supports networking, letting you print, copy, and scan pictures and documents. Components 21 1 23 4 20 19 18 5 17 6 16 7 15 14 13 12 11 10 9 8 1 Control panel 2 Power cord port 3 USB port 4 Ethernet port 5 Rear-access cleanout area 6 Duplexer (pulled out) 7 Printer access door 8 CF card slot 9 Front...-edge guides 18 Main paper tray 19 Paper tray extender for legal paper 20 Left paper-edge guides 21 Photo paper tray www.kodak.com/go/aiosupport 1 1 Printer Overview This printer lets you access the printer over a wireless (Wi-Fi) or Ethernet network.
In addition, this printer supports networking, letting you print, copy, and scan pictures and documents. Components 21 1 23 4 20 19 18 5 17 6 16 7 15 14 13 12 11 10 9 8 1 Control panel 2 Power cord port 3 USB port 4 Ethernet port 5 Rear-access cleanout area 6 Duplexer (pulled out) 7 Printer access door 8 CF card slot 9 Front...-edge guides 18 Main paper tray 19 Paper tray extender for legal paper 20 Left paper-edge guides 21 Photo paper tray www.kodak.com/go/aiosupport 1 1 Printer Overview This printer lets you access the printer over a wireless (Wi-Fi) or Ethernet network.

Extended user guide
Page 8
...printing, maintenance task, and file transfer 8 Cancel button Stops the current operation and returns to navigate menus; blinks when searching for an available Wi-Fi network or reconnecting to a wireless (Wi-Fi) LED network; displays the next higher menu 9 Wi-Fi connectivity When lit, signals that the printer... is connected to an already configured network 10 On/Off button Turns the printer on or off 2 www.kodak.com/go/aiosupport scroll through pictures 3 OK button Selects a menu item, ...
...printing, maintenance task, and file transfer 8 Cancel button Stops the current operation and returns to navigate menus; blinks when searching for an available Wi-Fi network or reconnecting to a wireless (Wi-Fi) LED network; displays the next higher menu 9 Wi-Fi connectivity When lit, signals that the printer... is connected to an already configured network 10 On/Off button Turns the printer on or off 2 www.kodak.com/go/aiosupport scroll through pictures 3 OK button Selects a menu item, ...

Extended user guide
Page 9
...Home Center icon is installed as part of the software installation on your configuration, to the Start menu. KODAK ESP 7200 Series All-in-One Printer Home Center Software KODAK Home Center Software is added to your desktop and, depending on your computer. Use this Extended User ...Software to scan, order supplies, configure your printer • order supplies • access the KODAK Tips and Projects Center • access this icon to : • browse, crop, enhance, and edit pictures • print and scan • upgrade your printer with the latest software and firmware •...
...Home Center icon is installed as part of the software installation on your configuration, to the Start menu. KODAK ESP 7200 Series All-in-One Printer Home Center Software KODAK Home Center Software is added to your desktop and, depending on your computer. Use this Extended User ...Software to scan, order supplies, configure your printer • order supplies • access the KODAK Tips and Projects Center • access this icon to : • browse, crop, enhance, and edit pictures • print and scan • upgrade your printer with the latest software and firmware •...
Extended user guide
Page 10
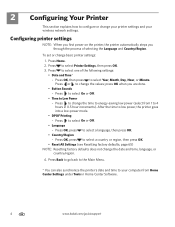
...Language - Press to select one of selecting the Language and Country/Region. Press Home. 2. Press or to low power, the printer goes into a low-power mode. • DPOF Printing - After the time to change the values; 2 Configuring Your Printer This section explains how to select Printer Settings, then press OK....Minute. Press OK, press to 4 hours in Home Center Software. 4 www.kodak.com/go back to the Main Menu. * You can also synchronize the printer's date and time to Low Power - Press to change basic printer settings: 1. Press to select On or Off. • Time to your...
...Language - Press to select one of selecting the Language and Country/Region. Press Home. 2. Press or to low power, the printer goes into a low-power mode. • DPOF Printing - After the time to change the values; 2 Configuring Your Printer This section explains how to select Printer Settings, then press OK....Minute. Press OK, press to 4 hours in Home Center Software. 4 www.kodak.com/go back to the Main Menu. * You can also synchronize the printer's date and time to Low Power - Press to change basic printer settings: 1. Press to select On or Off. • Time to your...
Extended user guide
Page 16
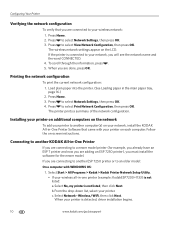
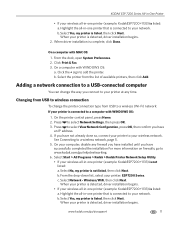
...list, select your printer. When your printer is not listed: a. The printer prints a summary of the network configuration. Press to select View Network Configuration, then press OK. Connecting to another KODAK All-in -one printer (example: KodakESP7200+...print the current network configuration: 1. Installing your printer on additional computers on the network To add your printer to another computer(s) on your network, install the KODAK All-in the main paper tray, page 16.) 2. The wireless network settings appear on -screen instructions. When you are adding an ESP 7250 printer...
...list, select your printer. When your printer is not listed: a. The printer prints a summary of the network configuration. Press to select View Network Configuration, then press OK. Connecting to another KODAK All-in -one printer (example: KodakESP7200+...print the current network configuration: 1. Installing your printer on additional computers on the network To add your printer to another computer(s) on your network, install the KODAK All-in the main paper tray, page 16.) 2. The wireless network settings appear on -screen instructions. When you are adding an ESP 7250 printer...
Extended user guide
Page 17
... select Network Settings, then press OK. 3. On the printer control panel, press Home. 2. KODAK ESP 7200 Series All-in-One Printer • If your wireless all-in-one printer (example: KodakESP7200+1133) is detected, driver installation begins. 2. When your printer is listed: a. Click Print & Fax. 3. Select the printer from USB to your printer is complete, click Done. If you have an...
... select Network Settings, then press OK. 3. On the printer control panel, press Home. 2. KODAK ESP 7200 Series All-in-One Printer • If your wireless all-in-one printer (example: KodakESP7200+1133) is detected, driver installation begins. 2. When your printer is listed: a. Click Print & Fax. 3. Select the printer from USB to your printer is complete, click Done. If you have an...

Extended user guide
Page 35
...while leaving the adapter in -One Printer Printing from a memory card or USB-connected device You can print pictures from a memory card or USB-connected device using the default settings: 1. www.kodak.com/go/aiosupport 29 KODAK ESP 7200 Series All-in the printer. Insert the memory card into... the appropriate slot, or connect the digital camera or portable drive to print a picture To print a picture from the following cards or USB...
...while leaving the adapter in -One Printer Printing from a memory card or USB-connected device You can print pictures from a memory card or USB-connected device using the default settings: 1. www.kodak.com/go/aiosupport 29 KODAK ESP 7200 Series All-in the printer. Insert the memory card into... the appropriate slot, or connect the digital camera or portable drive to print a picture To print a picture from the following cards or USB...
Extended user guide
Page 36
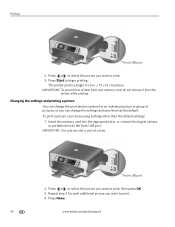
IMPORTANT: To prevent loss of pictures, or you want to print. 4. Press or to select the picture you want to print. 3. Press Start to the front USB port. The printer prints a single 4 x 6 in. / 10 x 15 cm picture. IMPORTANT: Use only one slot or port at a time. Repeat step 2 for an ... print photos options for each additional picture you can change the settings and save them as the default. Press or to select the picture you want to print, then press OK. 3. To print a picture or pictures using settings other than the default settings: 1. Press Home. 30 www.kodak....
IMPORTANT: To prevent loss of pictures, or you want to print. 4. Press or to select the picture you want to print. 3. Press Start to the front USB port. The printer prints a single 4 x 6 in. / 10 x 15 cm picture. IMPORTANT: Use only one slot or port at a time. Repeat step 2 for an ... print photos options for each additional picture you can change the settings and save them as the default. Press or to select the picture you want to print, then press OK. 3. To print a picture or pictures using settings other than the default settings: 1. Press Home. 30 www.kodak....

Extended user guide
Page 39
... want to select Bottom Tray. 6. Press to select 4 x 12. 7. Press to select Print Size, then press to select View and Print Photos, then press OK. 5. IMPORTANT: Use only one slot or port at a time. KODAK ESP 7200 Series All-in-One Printer Printing panoramic pictures To print a panoramic picture, load 4 x 12 in. / 101 x 305 mm paper, or US letter...
... want to select Bottom Tray. 6. Press to select 4 x 12. 7. Press to select Print Size, then press to select View and Print Photos, then press OK. 5. IMPORTANT: Use only one slot or port at a time. KODAK ESP 7200 Series All-in-One Printer Printing panoramic pictures To print a panoramic picture, load 4 x 12 in. / 101 x 305 mm paper, or US letter...
Extended user guide
Page 41
... your Documents To Go software included with MAC OS 2.2 or later) and iPod Touch (2nd generation). The printer prints a single 4 x 6 in -One Printer Printing from a BLUETOOTH Technology enabled device You can print pictures from an iPhone or iPod Touch Device* at the touch of a button. You can communicate. For more... user manual for your device for more information. NOTE: See the user guide for more information. www.kodak.com/go /picflick for your device. 3. KODAK ESP 7200 Series All-in . / 10 x 15 cm picture. Download the KODAK Pic Flick App from the App Store, or go to www...
... your Documents To Go software included with MAC OS 2.2 or later) and iPod Touch (2nd generation). The printer prints a single 4 x 6 in -One Printer Printing from a BLUETOOTH Technology enabled device You can print pictures from an iPhone or iPod Touch Device* at the touch of a button. You can communicate. For more... user manual for your device for more information. NOTE: See the user guide for more information. www.kodak.com/go /picflick for your device. 3. KODAK ESP 7200 Series All-in . / 10 x 15 cm picture. Download the KODAK Pic Flick App from the App Store, or go to www...
Extended user guide
Page 76
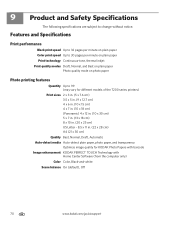
... Up to change without notice. 9 Product and Safety Specifications The following specifications are subject to 99 (may vary for different models of the 7200 series printers) Print sizes 2 x 3 in. (5 x 7.6 cm) 3.5 x 5 in. (9 x 12.7 cm) 4 x 6 in. (10 x 15 cm) 4 x 7 in. (10 x 18 cm) (Panoramic) 4 x 12 in. (10 x 30 ...Draft, Automatic Auto-detect media Auto-detect plain paper, photo paper, and transparency Optimize image quality for KODAK Photo Papers with barcode Image enhancement KODAK PERFECT TOUCH Technology with Home Center Software (from the computer only) Color Color, Black-and-white Scene ...
... Up to change without notice. 9 Product and Safety Specifications The following specifications are subject to 99 (may vary for different models of the 7200 series printers) Print sizes 2 x 3 in. (5 x 7.6 cm) 3.5 x 5 in. (9 x 12.7 cm) 4 x 6 in. (10 x 15 cm) 4 x 7 in. (10 x 18 cm) (Panoramic) 4 x 12 in. (10 x 30 ...Draft, Automatic Auto-detect media Auto-detect plain paper, photo paper, and transparency Optimize image quality for KODAK Photo Papers with barcode Image enhancement KODAK PERFECT TOUCH Technology with Home Center Software (from the computer only) Color Color, Black-and-white Scene ...


