Networking Setup Guide
Page 2
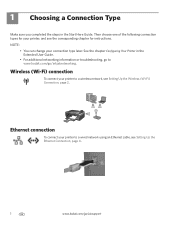
... Ethernet cable, see Setting Up the Ethernet Connection, page 4. 1 www.kodak.com/go /inkjetnetworking. See the chapter Configuring Your Printer in the Start Here Guide. Rotate Back Home MS SD/HC MMC Ethernet connection To connect your connection type later. Then choose one of the following connection types for your printer to a wireless network, see the corresponding chapter for instructions. Wireless...
... Ethernet cable, see Setting Up the Ethernet Connection, page 4. 1 www.kodak.com/go /inkjetnetworking. See the chapter Configuring Your Printer in the Start Here Guide. Rotate Back Home MS SD/HC MMC Ethernet connection To connect your connection type later. Then choose one of the following connection types for your printer to a wireless network, see the corresponding chapter for instructions. Wireless...
Networking Setup Guide
Page 3
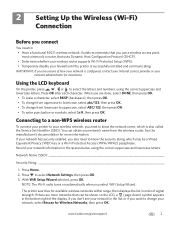
... is also called the Service Set Identifier (SSID). Connecting to a non-WPS wireless router To connect your printer to your network information in the spaces below, using the correct uppercase and lowercase letters. Record your wireless network, you need to select the letters and numbers, ... know the network name, which may be shown on automatically when you select WiFi Setup Wizard. The printer searches for assistance. www.kodak.com/go/aiosupport 2 With WiFi Setup Wizard selected, press OK. 2 Setting Up the Wireless (Wi-Fi) Connection Before you connect You need to...
... is also called the Service Set Identifier (SSID). Connecting to a non-WPS wireless router To connect your printer to your network information in the spaces below, using the correct uppercase and lowercase letters. Record your wireless network, you need to select the letters and numbers, ... know the network name, which may be shown on automatically when you select WiFi Setup Wizard. The printer searches for assistance. www.kodak.com/go/aiosupport 2 With WiFi Setup Wizard selected, press OK. 2 Setting Up the Wireless (Wi-Fi) Connection Before you connect You need to...
Networking Setup Guide
Page 4
... light should be a button on -screen instructions to www.kodak.com/go /aiosupport c. Press Home. 2. It may be on the printer, make sure you select Wi-Fi Setup Wizard. 4. Press to select Network Settings, then press OK. 3. If the printer is successfully connected, install the KODAK All-in -One Printer Software on your setup. NOTE: The Wi-Fi radio...
... light should be a button on -screen instructions to www.kodak.com/go /aiosupport c. Press Home. 2. It may be on the printer, make sure you select Wi-Fi Setup Wizard. 4. Press to select Network Settings, then press OK. 3. If the printer is successfully connected, install the KODAK All-in -One Printer Software on your setup. NOTE: The Wi-Fi radio...
User guide
Page 4
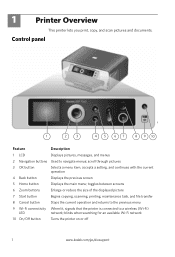
... connectivity When lit, signals that the printer is connected to navigate menus; scroll through pictures 3 OK button Selects a menu item, accepts a setting, and continues with the current operation 4 Back button Displays the previous screen 5 Home button Displays the main menu; 1 Printer Overview This printer ...lets you print, copy, and scan pictures and documents. blinks when searching for an available Wi-Fi network 10 On/Off button Turns the printer on or off 1 www.kodak.com/go/aiosupport
... connectivity When lit, signals that the printer is connected to navigate menus; scroll through pictures 3 OK button Selects a menu item, accepts a setting, and continues with the current operation 4 Back button Displays the previous screen 5 Home button Displays the main menu; 1 Printer Overview This printer ...lets you print, copy, and scan pictures and documents. blinks when searching for an available Wi-Fi network 10 On/Off button Turns the printer on or off 1 www.kodak.com/go/aiosupport
User guide
Page 13
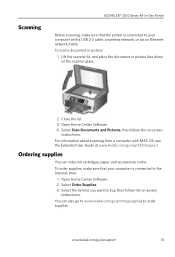
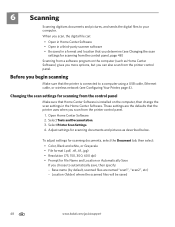
... to order supplies. Select Order Supplies. 3. Open Home Center Software. 2. www.kodak.com/go /esp7250support. Scanning KODAK ESP 7200 Series All-in-One Printer Before scanning, make sure that the printer is connected to the Internet, then: 1. For information about scanning from a computer with a USB 2.0 cable, a wireless network, or via an Ethernet network/cable. You can order ink cartridges, paper...
... to order supplies. Select Order Supplies. 3. Open Home Center Software. 2. www.kodak.com/go /esp7250support. Scanning KODAK ESP 7200 Series All-in-One Printer Before scanning, make sure that the printer is connected to the Internet, then: 1. For information about scanning from a computer with a USB 2.0 cable, a wireless network, or via an Ethernet network/cable. You can order ink cartridges, paper...
Extended user guide
Page 3
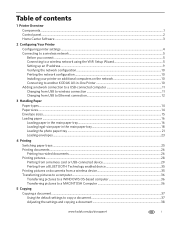
......1 Control panel...2 Home Center Software ...3 2 Configuring Your Printer Configuring printer settings ...4 Connecting to a wireless network ...5 Before you connect ...5 Connecting to a wireless network using the WiFi Setup Wizard 5 Setting up an IP address...9 Verifying the network configuration...10 Printing the network configuration ...10 Installing your printer on additional computers on the network 10 Connecting to another KODAK All-in-One Printer 10 Adding a network connection to a USB-connected computer 11...
......1 Control panel...2 Home Center Software ...3 2 Configuring Your Printer Configuring printer settings ...4 Connecting to a wireless network ...5 Before you connect ...5 Connecting to a wireless network using the WiFi Setup Wizard 5 Setting up an IP address...9 Verifying the network configuration...10 Printing the network configuration ...10 Installing your printer on additional computers on the network 10 Connecting to another KODAK All-in-One Printer 10 Adding a network connection to a USB-connected computer 11...

Extended user guide
Page 8
... lit, signals that the printer is connected to an already configured network 10 On/Off button Turns the printer on or off 2 www.kodak.com/go/aiosupport scroll through pictures 3 OK button Selects a menu item, accepts a setting, and continues with the current operation 4 Back button Displays the next higher menu 5 Home button Displays the main menu...
... lit, signals that the printer is connected to an already configured network 10 On/Off button Turns the printer on or off 2 www.kodak.com/go/aiosupport scroll through pictures 3 OK button Selects a menu item, accepts a setting, and continues with the current operation 4 Back button Displays the next higher menu 5 Home button Displays the main menu...

Extended user guide
Page 11
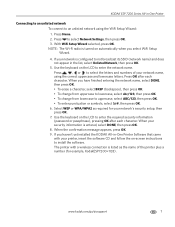
... is turned on the printer to connect to select Network Settings, then press OK. 3. Press Home. 2. www.kodak.com/go/aiosupport 5 Service Set Identifier). To connect to the following procedures and use the one that uses Dynamic Host Configuration Protocol (DHCP). • Your network name (SSID - KODAK ESP 7200 Series All-in-One Printer Connecting to a wireless network To connect your printer to an 802.11...
... is turned on the printer to connect to select Network Settings, then press OK. 3. Press Home. 2. www.kodak.com/go/aiosupport 5 Service Set Identifier). To connect to the following procedures and use the one that uses Dynamic Host Configuration Protocol (DHCP). • Your network name (SSID - KODAK ESP 7200 Series All-in-One Printer Connecting to a wireless network To connect your printer to an 802.11...
Extended user guide
Page 13
... not appear in the list, select Unlisted Network, then press OK. 5. When the confirmation message appears, press OK. 9. KODAK ESP 7200 Series All-in -One Printer Software that came with a wireless connection is turned on the LCD to install the software. Press Home. 2. Press to enter the network name. If your network's security setup, then press OK. 7. Use the...
... not appear in the list, select Unlisted Network, then press OK. 5. When the confirmation message appears, press OK. 9. KODAK ESP 7200 Series All-in -One Printer Software that came with a wireless connection is turned on the LCD to install the software. Press Home. 2. Press to enter the network name. If your network's security setup, then press OK. 7. Use the...

Extended user guide
Page 14
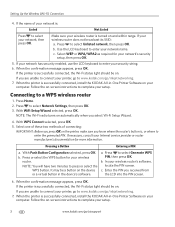
... a virtual button in -One Printer Software that came with a wireless connection is , or where to enter the generated PIN. Go to your printer for a wireless network by pressing buttons or entering a PIN. With Push Button Configuration selected, press OK. c. Press Home. 2. Press to select Network Settings, then press OK. 3. To connect to select WPS Connect, then press OK. 5. WPS...
... a virtual button in -One Printer Software that came with a wireless connection is , or where to enter the generated PIN. Go to your printer for a wireless network by pressing buttons or entering a PIN. With Push Button Configuration selected, press OK. c. Press Home. 2. Press to select Network Settings, then press OK. 3. To connect to select WPS Connect, then press OK. 5. WPS...
Extended user guide
Page 15
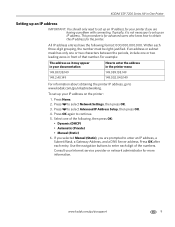
... 4. www.kodak.com/go/aiosupport 9 Press to continue. 5. To set up an IP address for your printer if you are having a problem with connecting. Typically,...printer IP address, go to set up your Internet service provider or network administrator for the printer. All IP address entries have the following , then press OK: • Dynamic (DHCP) • Automatic (Private) • Manual (Static) 6. Press Home... must be right-justified. KODAK ESP 7200 Series All-in-One Printer Setting up an IP address IMPORTANT: You should only need to www.kodak.com/go/inkjetnetworking. This ...
... 4. www.kodak.com/go/aiosupport 9 Press to continue. 5. To set up an IP address for your printer if you are having a problem with connecting. Typically,...printer IP address, go to set up your Internet service provider or network administrator for the printer. All IP address entries have the following , then press OK: • Dynamic (DHCP) • Automatic (Private) • Manual (Static) 6. Press Home... must be right-justified. KODAK ESP 7200 Series All-in-One Printer Setting up an IP address IMPORTANT: You should only need to www.kodak.com/go/inkjetnetworking. This ...
Extended user guide
Page 16
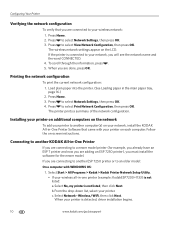
... current network configuration: 1. Connecting to another KODAK All-in-One Printer If you are connecting to a newer model printer (for example, you already have an ESP 7 printer and now you are connecting to another computer(s) on each computer. c. If you are adding an ESP 7250 printer), you are done, press OK. If the printer is not listed: a. Wireless/WiFi, then click Next. Press Home. 2. Press...
... current network configuration: 1. Connecting to another KODAK All-in-One Printer If you are connecting to a newer model printer (for example, you already have an ESP 7 printer and now you are connecting to another computer(s) on each computer. c. If you are adding an ESP 7250 printer), you are done, press OK. If the printer is not listed: a. Wireless/WiFi, then click Next. Press Home. 2. Press...
Extended user guide
Page 17
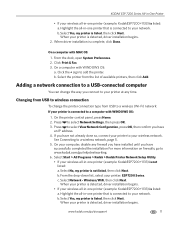
...) network: If your printer is listed: a. c. www.kodak.com/go /inkjetnetworking. 6. KODAK ESP 7200 Series All-in-One Printer • If your wireless all-in-one printer that is connected to your network. Highlight the all -in -one printer (example: KodakESP7200+1133) is detected, driver installation begins. When driver installation is listed, then click Next. b. Adding a network connection to a USB-connected computer You can change the printer connection...
...) network: If your printer is listed: a. c. www.kodak.com/go /inkjetnetworking. 6. KODAK ESP 7200 Series All-in-One Printer • If your wireless all-in-one printer that is connected to your network. Highlight the all -in -one printer (example: KodakESP7200+1133) is detected, driver installation begins. When driver installation is listed, then click Next. b. Adding a network connection to a USB-connected computer You can change the printer connection...
Extended user guide
Page 18
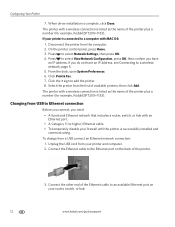
.... 2. When driver installation is connected to select Network Settings, then press OK. 4. The printer with an Ethernet port. • A Category 5 (or higher) Ethernet cable. • To temporarily disable your printer is complete, click Done. Select the printer from your router, switch, or hub. 12 www.kodak.com/go/aiosupport On the printer control panel, press Home. 3. Configuring Your...
.... 2. When driver installation is connected to select Network Settings, then press OK. 4. The printer with an Ethernet port. • A Category 5 (or higher) Ethernet cable. • To temporarily disable your printer is complete, click Done. Select the printer from your router, switch, or hub. 12 www.kodak.com/go/aiosupport On the printer control panel, press Home. 3. Configuring Your...

Extended user guide
Page 42
... Photos, then press OK. 4. Press Start. 6. Press to a WINDOWS OS-based computer 1. Press Back. 3. If your computer is connected to a wireless network and with a USB cable and KODAK Home Center software must be installed on the printer. 2. Press to select Transfer All to PC, then press OK. 5. Press to select Transfer All to PC, then...
... Photos, then press OK. 4. Press Start. 6. Press to a WINDOWS OS-based computer 1. Press Back. 3. If your computer is connected to a wireless network and with a USB cable and KODAK Home Center software must be installed on the printer. 2. Press to select Transfer All to PC, then press OK. 5. Press to select Transfer All to PC, then...
Extended user guide
Page 54
... Software is connected to a computer using a USB cable, Ethernet cable, or wireless network (see Changing the scan settings for File Name and Location or Automatically Save If you choose to your computer. Open Home Center Software 2. Location (folder) where the scanned files will be saved 48 www.kodak.com/go/aiosupport Select Printer Scan Settings...
... Software is connected to a computer using a USB cable, Ethernet cable, or wireless network (see Changing the scan settings for File Name and Location or Automatically Save If you choose to your computer. Open Home Center Software 2. Location (folder) where the scanned files will be saved 48 www.kodak.com/go/aiosupport Select Printer Scan Settings...
Extended user guide
Page 57
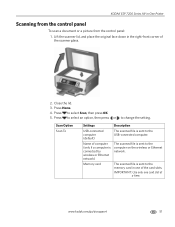
...one card slot at a time. KODAK ESP 7200 Series All-in the right-front corner of computer (only if a computer is connected by wireless or Ethernet network) The scanned file is sent to the computer on the wireless or Ethernet network. Lift the scanner lid, and place the original face down in -One Printer... press or to select Scan, then press OK. 5. IMPORTANT: Use only one of the card slots. Press to change the setting. www.kodak.com/go/aiosupport 51 Press Home. 4. Scan Option Scan To Settings Description USB-connected computer (default) The scanned file is sent to the USB...
...one card slot at a time. KODAK ESP 7200 Series All-in the right-front corner of computer (only if a computer is connected by wireless or Ethernet network) The scanned file is sent to the computer on the wireless or Ethernet network. Lift the scanner lid, and place the original face down in -One Printer... press or to select Scan, then press OK. 5. IMPORTANT: Use only one of the card slots. Press to change the setting. www.kodak.com/go/aiosupport 51 Press Home. 4. Scan Option Scan To Settings Description USB-connected computer (default) The scanned file is sent to the USB...
Extended user guide
Page 90
...printer connected to computer with WINDOWS OS, 13 Ethernet port, location, 1 F Features connectivity, 72 copy document, 71 copy photo, 71 photo printing, 70 scanning, 71 Firewall, disabling, 5 Front paper-edge guides, location, 1 G Glass, scanner, 1 cleaning, 54 H Home button, 2 Home...cartridges, replacing, 56 Ink levels, 56 Installing printer on additional computers on LCD, using, 6 KODAK Home Center Software. See Home Center Software L Label sizes, 75 Language, ...transfers, 75 K Keypad on network, 10 IP Address, format for legal paper, location, 1 switching from one to the other, 25 Paper ...
...printer connected to computer with WINDOWS OS, 13 Ethernet port, location, 1 F Features connectivity, 72 copy document, 71 copy photo, 71 photo printing, 70 scanning, 71 Firewall, disabling, 5 Front paper-edge guides, location, 1 G Glass, scanner, 1 cleaning, 54 H Home button, 2 Home...cartridges, replacing, 56 Ink levels, 56 Installing printer on additional computers on LCD, using, 6 KODAK Home Center Software. See Home Center Software L Label sizes, 75 Language, ...transfers, 75 K Keypad on network, 10 IP Address, format for legal paper, location, 1 switching from one to the other, 25 Paper ...


