Networking Setup Guide
Page 2
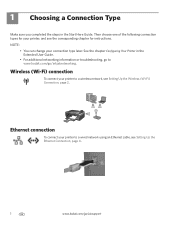
... the Wireless (Wi-Fi) Connection, page 2. See the chapter Configuring Your Printer in the Start Here Guide. Wireless (Wi-Fi) connection To connect your connection type later. NOTE: • You can change your printer to a wireless network, see the corresponding chapter for instructions. Then choose one of the following connection types for your printer to www.kodak.com...
... the Wireless (Wi-Fi) Connection, page 2. See the chapter Configuring Your Printer in the Start Here Guide. Wireless (Wi-Fi) connection To connect your connection type later. NOTE: • You can change your printer to a wireless network, see the corresponding chapter for instructions. Then choose one of the following connection types for your printer to www.kodak.com...
Networking Setup Guide
Page 3
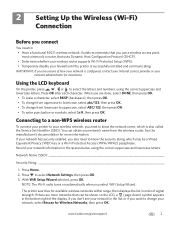
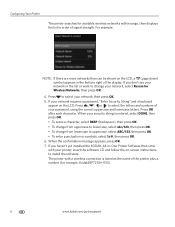
... enter punctuation or symbols, select !@#, then press OK. The printer searches for assistance. Using the LCD keyboard On the printer, press , , or to select Network Settings, then press OK. 3. When you use a wireless access point, most commonly a router, that you are more information. Kodak recommends that uses Dynamic Host Configuration Protocol (DHCP). • Determine...
... enter punctuation or symbols, select !@#, then press OK. The printer searches for assistance. Using the LCD keyboard On the printer, press , , or to select Network Settings, then press OK. 3. When you use a wireless access point, most commonly a router, that you are more information. Kodak recommends that uses Dynamic Host Configuration Protocol (DHCP). • Determine...
Networking Setup Guide
Page 4
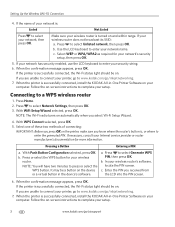
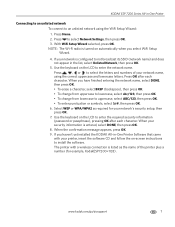
... virtual button in the device's software. b. In your wireless router is turned on -screen instructions to connect your computer. If the printer is successfully connected, install the KODAK All-in -One Printer Software on the printer, make sure you select Wi-Fi Setup Wizard. 4. ...Setting Up the Wireless (Wi-Fi) Connection 4. Make sure your wireless router's software, locate the PIN screen...
... virtual button in the device's software. b. In your wireless router is turned on -screen instructions to connect your computer. If the printer is successfully connected, install the KODAK All-in -One Printer Software on the printer, make sure you select Wi-Fi Setup Wizard. 4. ...Setting Up the Wireless (Wi-Fi) Connection 4. Make sure your wireless router's software, locate the PIN screen...
User guide
Page 4
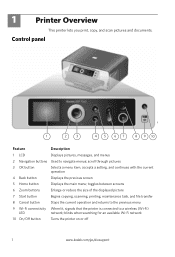
... connected to navigate menus; blinks when searching for an available Wi-Fi network 10 On/Off button Turns the printer on or off 1 www.kodak.com/go/aiosupport 1 Printer Overview This printer lets you print, copy, and scan pictures and documents. scroll through pictures 3 OK button Selects a menu item, accepts a setting, and continues with... the previous screen 5 Home button Displays the main menu; Control panel 1 2 3 4 5 67 8 9 10 Feature Description 1 LCD Displays pictures, messages, and menus 2 Navigation buttons Used to a wireless (Wi-Fi) LED network;
... connected to navigate menus; blinks when searching for an available Wi-Fi network 10 On/Off button Turns the printer on or off 1 www.kodak.com/go/aiosupport 1 Printer Overview This printer lets you print, copy, and scan pictures and documents. scroll through pictures 3 OK button Selects a menu item, accepts a setting, and continues with... the previous screen 5 Home button Displays the main menu; Control panel 1 2 3 4 5 67 8 9 10 Feature Description 1 LCD Displays pictures, messages, and menus 2 Navigation buttons Used to a wireless (Wi-Fi) LED network;
User guide
Page 10
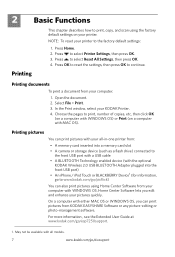
... or WINDOWS OS, you edit and enhance your all models. 7 www.kodak.com/go /esp7250support. 1. Printing documents To print a document from your KODAK Printer. 4. Open the document. 2. May not be available with all -in-one printer from: • A memory card inserted into the front USB port).... Press Home. 2. Home Center Software lets you can also print pictures using the factory default settings on a computer with the optional KODAK Wireless 2.0 USB BLUETOOTH Adapter plugged into a memory card slot • A camera or storage device (such as a flash drive) connected ...
... or WINDOWS OS, you edit and enhance your all models. 7 www.kodak.com/go /esp7250support. 1. Printing documents To print a document from your KODAK Printer. 4. Open the document. 2. May not be available with all -in-one printer from: • A memory card inserted into the front USB port).... Press Home. 2. Home Center Software lets you can also print pictures using the factory default settings on a computer with the optional KODAK Wireless 2.0 USB BLUETOOTH Adapter plugged into a memory card slot • A camera or storage device (such as a flash drive) connected ...

User guide
Page 12
... printing. To print a picture from your device's interface. The printer prints a single 4 x 6 in. / 10 x 15 cm picture. Simply place the original on the scanner glass. 2. Press Start to begin copying. Insert the KODAK Wireless 2.0 USB BLUETOOTH Adapter into the front USB port. 2. For ...select Copy Document or Copy Photo. 5. "Pair" the printer and the device so they can print pictures from wireless devices, such as mobile phones, digital cameras, and Personal Digital Assistants (PDAs) using the optional KODAK Wireless 2.0 USB BLUETOOTH Adapter. Press or to Copy Document. NOTE...
... printing. To print a picture from your device's interface. The printer prints a single 4 x 6 in. / 10 x 15 cm picture. Simply place the original on the scanner glass. 2. Press Start to begin copying. Insert the KODAK Wireless 2.0 USB BLUETOOTH Adapter into the front USB port. 2. For ...select Copy Document or Copy Photo. 5. "Pair" the printer and the device so they can print pictures from wireless devices, such as mobile phones, digital cameras, and Personal Digital Assistants (PDAs) using the optional KODAK Wireless 2.0 USB BLUETOOTH Adapter. Press or to Copy Document. NOTE...
User guide
Page 13
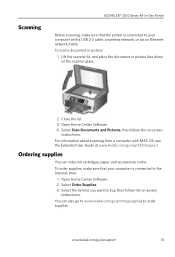
...KODAK ESP 7200 Series All-in-One Printer Before scanning, make sure that the printer is connected to your computer is connected to the Internet, then: 1. To order supplies, make sure that your computer with MAC OS, see the Extended User Guide at www.kodak....com/go/esp7250support. You can order ink cartridges, paper, and accessories online. Ordering supplies You can also go to www.kodak....kodak....
...KODAK ESP 7200 Series All-in-One Printer Before scanning, make sure that the printer is connected to your computer is connected to the Internet, then: 1. To order supplies, make sure that your computer with MAC OS, see the Extended User Guide at www.kodak....com/go/esp7250support. You can order ink cartridges, paper, and accessories online. Ordering supplies You can also go to www.kodak....kodak....
User guide
Page 14
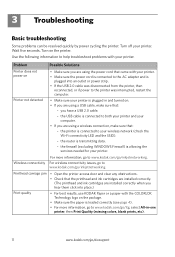
... COLORLOK Technology logo on the package. • Make sure the paper is plugged in -one printer, then Print Quality (missing colors, blank prints, etc). 11 www.kodak.com/go /inkjetnetworking. the router is allowing the services needed for your wireless network (check the Wi-Fi connectivity LED and the SSID). - Turn on . • If...
... COLORLOK Technology logo on the package. • Make sure the paper is plugged in -one printer, then Print Quality (missing colors, blank prints, etc). 11 www.kodak.com/go /inkjetnetworking. the router is allowing the services needed for your wireless network (check the Wi-Fi connectivity LED and the SSID). - Turn on . • If...
User guide
Page 15
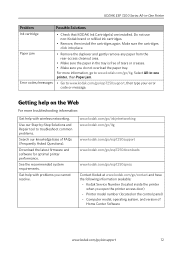
... with wireless networking. Select All-in -One Printer Problem Possible Solutions Ink cartridge • Check that KODAK Ink Cartridge(s) are installed. www.kodak.com/go/inkjetnetworking www.kodak.com/go/itg www.kodak.com/go/esp7250support www.kodak.com/go/esp7250downloads www.kodak.com/go/esp7250specs Contact Kodak at www.kodak.com/go /aiosupport 12 Kodak Service Number (located inside the printer when...
... with wireless networking. Select All-in -One Printer Problem Possible Solutions Ink cartridge • Check that KODAK Ink Cartridge(s) are installed. www.kodak.com/go/inkjetnetworking www.kodak.com/go/itg www.kodak.com/go/esp7250support www.kodak.com/go/esp7250downloads www.kodak.com/go/esp7250specs Contact Kodak at www.kodak.com/go /aiosupport 12 Kodak Service Number (located inside the printer when...
Extended user guide
Page 3
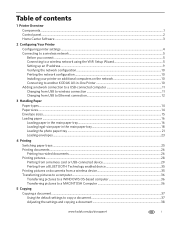
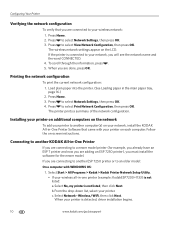
... address...9 Verifying the network configuration...10 Printing the network configuration ...10 Installing your printer on additional computers on the network 10 Connecting to another KODAK All-in-One Printer 10 Adding a network connection to a USB-connected computer 11 Changing from USB to wireless connection ...11 Changing from USB to Ethernet connection...12 3 Handling Paper Paper...
... address...9 Verifying the network configuration...10 Printing the network configuration ...10 Installing your printer on additional computers on the network 10 Connecting to another KODAK All-in-One Printer 10 Adding a network connection to a USB-connected computer 11 Changing from USB to wireless connection ...11 Changing from USB to Ethernet connection...12 3 Handling Paper Paper...
Extended user guide
Page 7
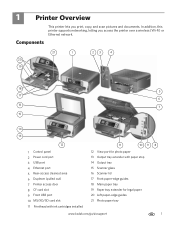
... networking, letting you print, copy, and scan pictures and documents. 1 Printer Overview This printer lets you access the printer over a wireless (Wi-Fi) or Ethernet network. Components 21 1 23 4 20 19 18 5 17 6 16 7 15 14 13 12 11 10 9 8 1 Control panel 2 Power cord port 3 USB ... Front paper-edge guides 18 Main paper tray 19 Paper tray extender for legal paper 20 Left paper-edge guides 21 Photo paper tray www.kodak.com/go/aiosupport 1
... networking, letting you print, copy, and scan pictures and documents. 1 Printer Overview This printer lets you access the printer over a wireless (Wi-Fi) or Ethernet network. Components 21 1 23 4 20 19 18 5 17 6 16 7 15 14 13 12 11 10 9 8 1 Control panel 2 Power cord port 3 USB ... Front paper-edge guides 18 Main paper tray 19 Paper tray extender for legal paper 20 Left paper-edge guides 21 Photo paper tray www.kodak.com/go/aiosupport 1

Extended user guide
Page 8
blinks when searching for an available Wi-Fi network or reconnecting to a wireless (Wi-Fi) LED network; scroll through pictures 3 OK button Selects a menu item, accepts a setting, and continues with the current operation 4 Back button Displays the next ... the main menu; displays the next higher menu 9 Wi-Fi connectivity When lit, signals that the printer is connected to an already configured network 10 On/Off button Turns the printer on or off 2 www.kodak.com/go/aiosupport toggles between screens 6 Zoom buttons Enlarge or reduce the size of the displayed picture...
blinks when searching for an available Wi-Fi network or reconnecting to a wireless (Wi-Fi) LED network; scroll through pictures 3 OK button Selects a menu item, accepts a setting, and continues with the current operation 4 Back button Displays the next ... the main menu; displays the next higher menu 9 Wi-Fi connectivity When lit, signals that the printer is connected to an already configured network 10 On/Off button Turns the printer on or off 2 www.kodak.com/go/aiosupport toggles between screens 6 Zoom buttons Enlarge or reduce the size of the displayed picture...
Extended user guide
Page 10
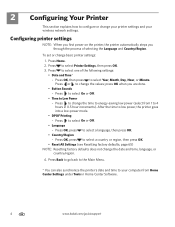
... and your computer from 1 to 4 hours in Home Center Software. 4 www.kodak.com/go back to the Main Menu. * You can also synchronize the printer's date and time to your wireless network settings. Press to select On or Off. • Time to select Year, Month, Day, Hour, or..., then press to Low Power - Press OK, press to select one of selecting the Language and Country/Region. Press Back to select On or Off. • Language - Configuring printer settings NOTE: When you first power on the printer, the printer automatically steps you are done. • Button Sounds - Press to...
... and your computer from 1 to 4 hours in Home Center Software. 4 www.kodak.com/go back to the Main Menu. * You can also synchronize the printer's date and time to your wireless network settings. Press to select On or Off. • Time to select Year, Month, Day, Hour, or..., then press to Low Power - Press OK, press to select one of selecting the Language and Country/Region. Press Back to select On or Off. • Language - Configuring printer settings NOTE: When you first power on the printer, the printer automatically steps you are done. • Button Sounds - Press to...

Extended user guide
Page 11
...with a network interface card or wireless networking support. • A working 802.11 wireless network. To connect to select Network Settings, then press OK. 3. KODAK ESP 7200 Series All-in-One Printer Connecting to a wireless network To connect your printer to an 802.11 wireless (Wi-Fi) network, refer ...to the following procedures and use the one that is appropriate for more information. • ...
...with a network interface card or wireless networking support. • A working 802.11 wireless network. To connect to select Network Settings, then press OK. 3. KODAK ESP 7200 Series All-in-One Printer Connecting to a wireless network To connect your printer to an 802.11 wireless (Wi-Fi) network, refer ...to the following procedures and use the one that is appropriate for more information. • ...
Extended user guide
Page 12
...network requires a password, "Enter Security String" and a keyboard appear on the LCD, a (page down) symbol appears in -One Printer Software that came with a wireless connection is entered, select DONE, then press OK. • To erase a character, select BKSP (backspace), then press OK.... OK. 6. Configuring Your Printer The printer searches for example, KodakESP7200+1133). 6 www.kodak.com/go/aiosupport The printer with your network, then press OK. 5. If you haven't yet installed the KODAK All-in the bottom right of your network, select Rescan for Wireless Networks, then press OK...
...network requires a password, "Enter Security String" and a keyboard appear on the LCD, a (page down) symbol appears in -One Printer Software that came with a wireless connection is entered, select DONE, then press OK. • To erase a character, select BKSP (backspace), then press OK.... OK. 6. Configuring Your Printer The printer searches for example, KodakESP7200+1133). 6 www.kodak.com/go/aiosupport The printer with your network, then press OK. 5. If you haven't yet installed the KODAK All-in the bottom right of your network, select Rescan for Wireless Networks, then press OK...
Extended user guide
Page 13
... each character. If you haven't yet installed the KODAK All-in-One Printer Software that came with a wireless connection is turned on the LCD to select Network Settings, then press OK. 3. Press , , or to select the letters and numbers of the printer plus a number (for your network's security setup,... the software CD and follow the on the LCD to enter the network name. The printer with your network is entered, select DONE, then press OK. 8. KODAK ESP 7200 Series All-in-One Printer Connecting to an unlisted network To connect to an unlisted network using the correct uppercase and ...
... each character. If you haven't yet installed the KODAK All-in-One Printer Software that came with a wireless connection is turned on the LCD to select Network Settings, then press OK. 3. Press , , or to select the letters and numbers of the printer plus a number (for your network's security setup,... the software CD and follow the on the LCD to enter the network name. The printer with your network is entered, select DONE, then press OK. 8. KODAK ESP 7200 Series All-in-One Printer Connecting to an unlisted network To connect to an unlisted network using the correct uppercase and ...

Extended user guide
Page 14
... example, KodakESP7200+1133). 8 www.kodak.com/go/aiosupport c. Press Home. 2. With WiFi Setup Wizard selected, press OK. b. You will have two minutes to push the WPS button on your router (this may either be a physical button on the router or a virtual button in -One Printer Software that came with a wireless connection is turned on...
... example, KodakESP7200+1133). 8 www.kodak.com/go/aiosupport c. Press Home. 2. With WiFi Setup Wizard selected, press OK. b. You will have two minutes to push the WPS button on your router (this may either be a physical button on the router or a virtual button in -One Printer Software that came with a wireless connection is turned on...
Extended user guide
Page 16
... Loading paper in -one printer (example: KodakESP7200+1133) is not listed, then click Next. Press Home. 3. If you are adding an ESP 7250 printer), you are connected to another KODAK All-in -One Printer Software that you will see the network name and the word CONNECTED. 4. From the drop-down list, select your wireless network: 1. Wireless/WiFi, then click Next...
... Loading paper in -one printer (example: KodakESP7200+1133) is not listed, then click Next. Press Home. 3. If you are adding an ESP 7250 printer), you are connected to another KODAK All-in -One Printer Software that you will see the network name and the word CONNECTED. 4. From the drop-down list, select your wireless network: 1. Wireless/WiFi, then click Next...
Extended user guide
Page 17
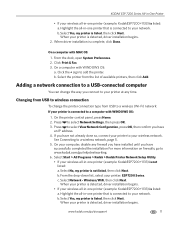
.... Press to your network. b. KODAK ESP 7200 Series All-in-One Printer • If your wireless all-in-one printer (example: KodakESP7200+1133) is listed: a. Highlight the all -in -one printer (example: KodakESP7200+1133) is listed: a. Click the + sign to www.kodak.com/go /aiosupport 11 b. Select the printer from USB to a wireless (Wi-Fi) network: If your printer is connected to your...
.... Press to your network. b. KODAK ESP 7200 Series All-in-One Printer • If your wireless all-in-one printer (example: KodakESP7200+1133) is listed: a. Highlight the all -in -one printer (example: KodakESP7200+1133) is listed: a. Click the + sign to www.kodak.com/go /aiosupport 11 b. Select the printer from USB to a wireless (Wi-Fi) network: If your printer is connected to your...
Extended user guide
Page 18
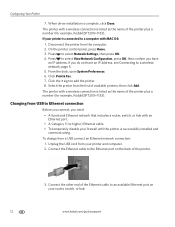
... cable. • To temporarily disable your printer is listed as the name of available printers, then click Add. If you need: • A functional Ethernet network that includes a router, switch, or hub with a wireless connection is connected to select Network Settings,...printer control panel, press Home. 3. From the dock, open System Preferences. 6. Select the printer from the computer. 2. When driver installation is successfully installed and communicating. Connect the Ethernet cable to add the printer. 8. Unplug the USB cord from your router, switch, or hub. 12 www.kodak...
... cable. • To temporarily disable your printer is listed as the name of available printers, then click Add. If you need: • A functional Ethernet network that includes a router, switch, or hub with a wireless connection is connected to select Network Settings,...printer control panel, press Home. 3. From the dock, open System Preferences. 6. Select the printer from the computer. 2. When driver installation is successfully installed and communicating. Connect the Ethernet cable to add the printer. 8. Unplug the USB cord from your router, switch, or hub. 12 www.kodak...


