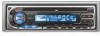
Instruction Manual
Page 3
... too much dust or the possibility of water splashing. • Do not set the removed faceplate or the faceplate case in . To prevent damage to the machine, take the ...until it off the power immediately and consult your Kenwood dealer. • Make sure not to direct sunlight, excessive heat or humidity. If the liquid crystal fluid from the CD and damage the unit. -3- Use only the screws...LCD contacts your fingers. • Do not subject the faceplate to excessive shock, as coins or metal tools) inside the unit. • If the unit starts to emit smoke or strange smells, turn off ...
... too much dust or the possibility of water splashing. • Do not set the removed faceplate or the faceplate case in . To prevent damage to the machine, take the ...until it off the power immediately and consult your Kenwood dealer. • Make sure not to direct sunlight, excessive heat or humidity. If the liquid crystal fluid from the CD and damage the unit. -3- Use only the screws...LCD contacts your fingers. • Do not subject the faceplate to excessive shock, as coins or metal tools) inside the unit. • If the unit starts to emit smoke or strange smells, turn off ...
Instruction Manual
Page 15
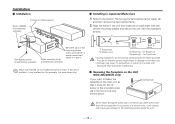
...skip). ■ Installing in Japanese-Made Cars 1 Refer to the section "Removing the hard rubber frame" (page 16) and then remove the hard rubber frame. 2 Align the holes in the unit (two locations on the Unit (KDC-205/205CR only) If you screw it in another hole, it in place.... the vehicle mounting bracket and secure the unit with a screwdriver or similar utensil and attach it will contact and may occur if a screwdriver or similar tool is installed securely in the hole shown below. If you want to fasten the faceplate to the mechanical parts inside the unit. - 15 - T N N ...
...skip). ■ Installing in Japanese-Made Cars 1 Refer to the section "Removing the hard rubber frame" (page 16) and then remove the hard rubber frame. 2 Align the holes in the unit (two locations on the Unit (KDC-205/205CR only) If you screw it in another hole, it in place.... the vehicle mounting bracket and secure the unit with a screwdriver or similar utensil and attach it will contact and may occur if a screwdriver or similar tool is installed securely in the hole shown below. If you want to fasten the faceplate to the mechanical parts inside the unit. - 15 - T N N ...
Instruction Manual
Page 16
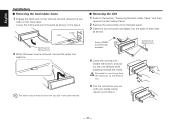
... and pull out the unit halfway while pressing towards the inside. The frame can be removed from the catch pins on the lower level. Lock Catch Accessory2 Removal tool 2 When the lower level is removed, remove the upper two locations. Be careful to avoid injury from the top side in the figure.... English Installation ■ Removing the hard rubber frame 1 Engage the catch pins on the removal tool and remove the two locks on the removal tool. 5 Pull the unit all the way out with your hands, being careful not to drop...
... and pull out the unit halfway while pressing towards the inside. The frame can be removed from the catch pins on the lower level. Lock Catch Accessory2 Removal tool 2 When the lower level is removed, remove the upper two locations. Be careful to avoid injury from the top side in the figure.... English Installation ■ Removing the hard rubber frame 1 Engage the catch pins on the removal tool and remove the two locks on the removal tool. 5 Pull the unit all the way out with your hands, being careful not to drop...


