Operation Manual
Page 1
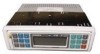
... 3 Balance 3 Fader 3 Bass Boost 3 Set the Clock 3 Optional Remote Control ..... 4 WeatherBand and Radio Operation 5 Select a Weather Band ........ 5 Select a Radio Band 5 Select a Radio Station ......... 5 Preset Stations 6 Automatically Store Stations 6 Preset Scan 6 CD Player Operation ........ 7 Insert and Eject CD 7 Skip Tracks 7 Fast Forward and Fast Reverse 7 Repeat the same ...include the receipt with the operation of these instructions before you how to install your Jensen stereo to work right, it . ® Operation How to Enjoy Your MCD 9424JA Marine AM/FM Stereo...
... 3 Balance 3 Fader 3 Bass Boost 3 Set the Clock 3 Optional Remote Control ..... 4 WeatherBand and Radio Operation 5 Select a Weather Band ........ 5 Select a Radio Band 5 Select a Radio Station ......... 5 Preset Stations 6 Automatically Store Stations 6 Preset Scan 6 CD Player Operation ........ 7 Insert and Eject CD 7 Skip Tracks 7 Fast Forward and Fast Reverse 7 Repeat the same ...include the receipt with the operation of these instructions before you how to install your Jensen stereo to work right, it . ® Operation How to Enjoy Your MCD 9424JA Marine AM/FM Stereo...
Operation Manual
Page 4
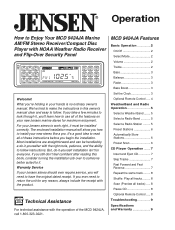
The remote requires a standard 2 1/8" gauge hole cutout. 4 The MWR-20 looks like a standard dash gauge and is designed to the most common functions on the MCD 9424JA such as Volume, Tune/Track selection, Power on/off, AM/FM bands, Weather Band and Play/Pause for CD Mode. The remote control allows access to be controlled through an optional wired remote control, MWR-20. ® Optional Remote Control MCD 9424JA The MCD 9424JA can be installed in the dash panel of your vessel.
The remote requires a standard 2 1/8" gauge hole cutout. 4 The MWR-20 looks like a standard dash gauge and is designed to the most common functions on the MCD 9424JA such as Volume, Tune/Track selection, Power on/off, AM/FM bands, Weather Band and Play/Pause for CD Mode. The remote control allows access to be controlled through an optional wired remote control, MWR-20. ® Optional Remote Control MCD 9424JA The MCD 9424JA can be installed in the dash panel of your vessel.
Operation Manual
Page 12
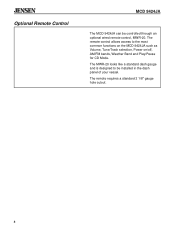
... wire? Wiring Color Codes Function LF+ Speaker LF- Speaker RR+ Speaker RR- Speaker Remote-Amp turn on a matching connector and attach: • Yellow wire-Fuse marked MAIN, BAT or PWR • Red wire-Fuse marked ACCY (accessory), or RADIO Disconnect Battery Before you begin, always disconnect the battery negative terminal. - + Connect Wires...
... wire? Wiring Color Codes Function LF+ Speaker LF- Speaker RR+ Speaker RR- Speaker Remote-Amp turn on a matching connector and attach: • Yellow wire-Fuse marked MAIN, BAT or PWR • Red wire-Fuse marked ACCY (accessory), or RADIO Disconnect Battery Before you begin, always disconnect the battery negative terminal. - + Connect Wires...
Operation Manual
Page 13
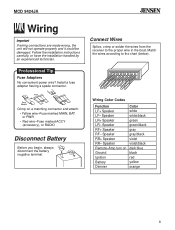
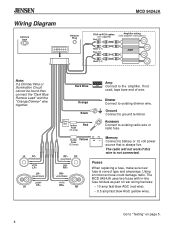
...the amplifier. green/black green LR+ LR Dark Blue Amp AMP Connect to "Testing" on page 5. 4 Orange Dimmer Connect to existing radio wire or radio fuse. The radio will not work if this wire is always live. Fuses When replacing a fuse, make sure new fuse is correct type and amperage....Note: If a Dimmer Wire or Illumination Circuit cannot be found then connect the "Dark Blue Remote Lead" and the "Orange Dimmer" wire together. violet/black violet RR+ RR +- ® Wiring Diagram Antenna Jack Remote Plug MCD 9424JA RCA-to ground terminal. If not used, tape bare end of rear ...
...the amplifier. green/black green LR+ LR Dark Blue Amp AMP Connect to "Testing" on page 5. 4 Orange Dimmer Connect to existing radio wire or radio fuse. The radio will not work if this wire is always live. Fuses When replacing a fuse, make sure new fuse is correct type and amperage....Note: If a Dimmer Wire or Illumination Circuit cannot be found then connect the "Dark Blue Remote Lead" and the "Orange Dimmer" wire together. violet/black violet RR+ RR +- ® Wiring Diagram Antenna Jack Remote Plug MCD 9424JA RCA-to ground terminal. If not used, tape bare end of rear ...


