Operation Manual
Page 1
... a good idea to install your new Jensen marine stereo for maximum enjoyment. Warranty Service If your Jensen stereo to work right, it must be handled by a do -it . For your Jensen stereo should ever require service...Bass Boost 3 Set the Clock 3 Optional Remote Control ..... 4 WeatherBand and Radio Operation 5 Select a Weather Band ........ 5 Select a Radio Band 5 Select a Radio Station ......... 5 Preset Stations 6 Automatically Store Stations 6 Preset Scan 6 CD Player Operation ........ 7 Insert and Eject CD 7 Skip Tracks 7 Fast Forward and Fast Reverse 7 Repeat the same track ...
... a good idea to install your new Jensen marine stereo for maximum enjoyment. Warranty Service If your Jensen stereo to work right, it must be handled by a do -it . For your Jensen stereo should ever require service...Bass Boost 3 Set the Clock 3 Optional Remote Control ..... 4 WeatherBand and Radio Operation 5 Select a Weather Band ........ 5 Select a Radio Band 5 Select a Radio Station ......... 5 Preset Stations 6 Automatically Store Stations 6 Preset Scan 6 CD Player Operation ........ 7 Insert and Eject CD 7 Skip Tracks 7 Fast Forward and Fast Reverse 7 Repeat the same track ...
Operation Manual
Page 4
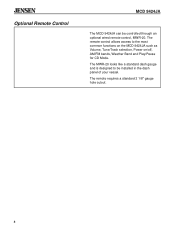
® Optional Remote Control MCD 9424JA The MCD 9424JA can be installed in the dash panel of your vessel. The remote control allows access to be controlled through an optional wired remote control, MWR-20. The MWR-20 looks like a standard dash gauge and is designed to the most common functions on the MCD 9424JA such as Volume, Tune/Track selection, Power on/off, AM/FM bands, Weather Band and Play/Pause for CD Mode. The remote requires a standard 2 1/8" gauge hole cutout. 4
® Optional Remote Control MCD 9424JA The MCD 9424JA can be installed in the dash panel of your vessel. The remote control allows access to be controlled through an optional wired remote control, MWR-20. The MWR-20 looks like a standard dash gauge and is designed to the most common functions on the MCD 9424JA such as Volume, Tune/Track selection, Power on/off, AM/FM bands, Weather Band and Play/Pause for CD Mode. The remote requires a standard 2 1/8" gauge hole cutout. 4
Operation Manual
Page 9
... Check mounting and backstrap, tighten if needed Call Jensen Technical Assistance (1-800-323-0221) ® Specifications CD Player Signal/noise ratio 86 dB Frequency response 20 Hz - 20 kHz Channel separation 65 dB D/A converter 1 Bit/CH Weather Radio Tuning range NOAA weather channels 162.400, 162....sale must be in duration to the carrier); Exclusion of Warranty. This warranty will service or arrange for the removal and/or installation of Recoton Audio Corporation A RECOTON® COMPANY 1090 Emma Oaks Trail Lake Mary, Florida 32746 ©1999 Recoton Audio Corporation 9...
... Check mounting and backstrap, tighten if needed Call Jensen Technical Assistance (1-800-323-0221) ® Specifications CD Player Signal/noise ratio 86 dB Frequency response 20 Hz - 20 kHz Channel separation 65 dB D/A converter 1 Bit/CH Weather Radio Tuning range NOAA weather channels 162.400, 162....sale must be in duration to the carrier); Exclusion of Warranty. This warranty will service or arrange for the removal and/or installation of Recoton Audio Corporation A RECOTON® COMPANY 1090 Emma Oaks Trail Lake Mary, Florida 32746 ©1999 Recoton Audio Corporation 9...
Operation Manual
Page 10
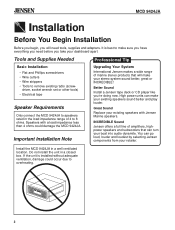
This manual will show you will need to return the unit for everyone. Warranty Service If your Jensen stereo should ever require service, you how to install your System ...... 2 Wiring 3 • Fuse Adapters 3 Disconnect Battery 3 Connect Wires 3 Wiring Diagram 4 Testing 5...tried to make the instructions in your Jensen stereo to Install the MCD 9424JA Marine AM/FM Stereo Radio/Compact Disc Player Final 3 Installation (page 8) 1 Install wiring 2 Connect and (pages 4 and 5) test radio (pages 6 and 7) Welcome! What you begin the installation. But, do -it must be ...
This manual will show you will need to return the unit for everyone. Warranty Service If your Jensen stereo should ever require service, you how to install your System ...... 2 Wiring 3 • Fuse Adapters 3 Disconnect Battery 3 Connect Wires 3 Wiring Diagram 4 Testing 5...tried to make the instructions in your Jensen stereo to Install the MCD 9424JA Marine AM/FM Stereo Radio/Compact Disc Player Final 3 Installation (page 8) 1 Install wiring 2 Connect and (pages 4 and 5) test radio (pages 6 and 7) Welcome! What you begin the installation. But, do -it must be ...
Operation Manual
Page 11
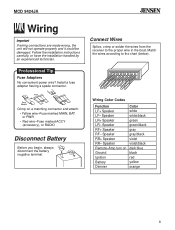
...damage the MCD 9424JA. Better Sound Install a Jensen tape deck or CD player like you're doing now. You can turn your stereo system sound better, great or INCREDIBLE! Do not install the unit in the load impedance range...Installation Note Upgrading Your System International Jensen makes a wide range of amplifiers, highpower speakers and subwoofers that will need before you take your retailer. Tools and Supplies Needed Professional Tip Basic Installation: • Flat and Phillips screwdrivers • Wire cutters • Wire strippers • Tools to remove existing radio...
...damage the MCD 9424JA. Better Sound Install a Jensen tape deck or CD player like you're doing now. You can turn your stereo system sound better, great or INCREDIBLE! Do not install the unit in the load impedance range...Installation Note Upgrading Your System International Jensen makes a wide range of amplifiers, highpower speakers and subwoofers that will need before you take your retailer. Tools and Supplies Needed Professional Tip Basic Installation: • Flat and Phillips screwdrivers • Wire cutters • Wire strippers • Tools to remove existing radio...
Operation Manual
Page 12
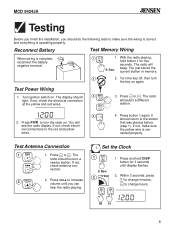
... connector and attach: • Yellow wire-Fuse marked MAIN, BAT or PWR • Red wire-Fuse marked ACCY (accessory), or RADIO Disconnect Battery Before you begin, always disconnect the battery negative terminal. - + Connect Wires Splice, crimp or solder the wires from the... receiver to the chart (below). Follow the installation instructions carefully, or have the installation handled by an experienced technician. Professional Tip Fuse Adapters No convenient power wire? Install a fuse adapter having a spade connector. Fuse Fuse Adapter Crimp on Ground...
... connector and attach: • Yellow wire-Fuse marked MAIN, BAT or PWR • Red wire-Fuse marked ACCY (accessory), or RADIO Disconnect Battery Before you begin, always disconnect the battery negative terminal. - + Connect Wires Splice, crimp or solder the wires from the... receiver to the chart (below). Follow the installation instructions carefully, or have the installation handled by an experienced technician. Professional Tip Fuse Adapters No convenient power wire? Install a fuse adapter having a spade connector. Fuse Fuse Adapter Crimp on Ground...
Operation Manual
Page 14
... Testing Before you finish the installation, you can hear the radio playing. You just stored the current station in memory. 2 2. Turn ignition switch on . If not, check the electrical connection at the yellow and red wires. 3. The radio will see the radio display. You will select a ...different station. 2. Test Antenna Connection 1 1. The radio should do the following tests to make sure the yellow wire is complete, reconnect the battery...
... Testing Before you finish the installation, you can hear the radio playing. You just stored the current station in memory. 2 2. Turn ignition switch on . If not, check the electrical connection at the yellow and red wires. 3. The radio will see the radio display. You will select a ...different station. 2. Test Antenna Connection 1 1. The radio should do the following tests to make sure the yellow wire is complete, reconnect the battery...
Operation Manual
Page 15
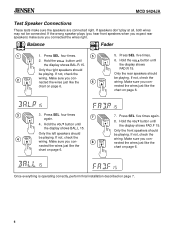
... the VOL button until the display shows BAL.L 15. Press SEL five times. 6. Press SEL four times again. 4. Once everything is operating correctly, perform final installation described on page 6. 5 SEL/ 6 VOL 5. Make sure you connected the wires just like the chart on page 6. 3 SEL/ 4 VOL 3. Only the left speakers should be...
... the VOL button until the display shows BAL.L 15. Press SEL five times. 6. Press SEL four times again. 4. Once everything is operating correctly, perform final installation described on page 6. 5 SEL/ 6 VOL 5. Make sure you connected the wires just like the chart on page 6. 3 SEL/ 4 VOL 3. Only the left speakers should be...
Operation Manual
Page 16
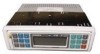
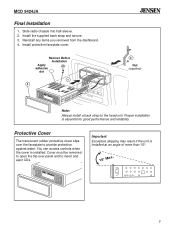
...over the faceplate to provide protection against water. Slide radio chassis into half-sleeve. 2. Reinstall any items you removed from the dashboard. 4. Install the supplied back strap and secure. 3. Proper installation is installed. Protective Cover The translucent rubber protective cover slips ...X 25WATTS CH COMPACT DIGITAL AUDIO MCD-9424JA W1 1 W2 2 W3 3 RPT 4 SHF 5 SCN 6 LOUD DISP PWR Note: Always install a back strap to insert and eject CDs. OPEN VOL AS/PS VOL WB BAND SEL/ ® ST SHUFFLE 8 X OVERSAMPLING • 4 X 25WATTS CH COMPACT DIGITAL AUDIO MCD...
...over the faceplate to provide protection against water. Slide radio chassis into half-sleeve. 2. Reinstall any items you removed from the dashboard. 4. Install the supplied back strap and secure. 3. Proper installation is installed. Protective Cover The translucent rubber protective cover slips ...X 25WATTS CH COMPACT DIGITAL AUDIO MCD-9424JA W1 1 W2 2 W3 3 RPT 4 SHF 5 SCN 6 LOUD DISP PWR Note: Always install a back strap to insert and eject CDs. OPEN VOL AS/PS VOL WB BAND SEL/ ® ST SHUFFLE 8 X OVERSAMPLING • 4 X 25WATTS CH COMPACT DIGITAL AUDIO MCD...
Operation Manual
Page 17
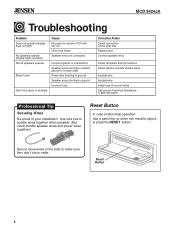
...Replace fuse Connect speaker wires Check all splices and connections Check splices, insulate all speakers operate Blows fuses Can't find cause of your installation! ® MCD 9424JA Troubleshooting Problem Does not operate (display does not light) No speakers operate (display lights normally) Not all ...bare wires Insulate wire Insulate wire Install fuse of correct rating Call Jensen Technical Assistance (1-800-323-0221) Professional Tip Securing Wires Be proud of problem Cause No power to red wire (...
...Replace fuse Connect speaker wires Check all splices and connections Check splices, insulate all speakers operate Blows fuses Can't find cause of your installation! ® MCD 9424JA Troubleshooting Problem Does not operate (display does not light) No speakers operate (display lights normally) Not all ...bare wires Insulate wire Insulate wire Install fuse of correct rating Call Jensen Technical Assistance (1-800-323-0221) Professional Tip Securing Wires Be proud of problem Cause No power to red wire (...

Operation Manual
Page 18
...include incidental or consequential economic damages of any labor costs for the removal and/or installation of the first consumer purchase. If shipment of the product is limited to the Jensen dealer from the date of the product. The original dated bill of sale must always... of warranty coverage. Purchasers. Except as proof of Warranty. MSCpDe9c42i4fJicA ations ® CD Player Signal/noise ratio ...>86 dB Frequency response ...20 Hz - 20 kHz Channel separation ...>65 dB D/A converter ...1 Bit/CH Weather Radio Tuning range NOAA weather channels ...162.400, 162.475, 162,550 FM T ...
...include incidental or consequential economic damages of any labor costs for the removal and/or installation of the first consumer purchase. If shipment of the product is limited to the Jensen dealer from the date of the product. The original dated bill of sale must always... of warranty coverage. Purchasers. Except as proof of Warranty. MSCpDe9c42i4fJicA ations ® CD Player Signal/noise ratio ...>86 dB Frequency response ...20 Hz - 20 kHz Channel separation ...>65 dB D/A converter ...1 Bit/CH Weather Radio Tuning range NOAA weather channels ...162.400, 162.475, 162,550 FM T ...


