Instructions
Page 12
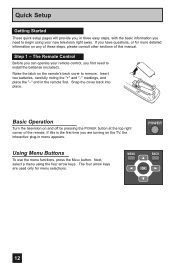
... television on the TV, the interactive plug-in menu appears. The Remote Control Before you can operate your remote control, you first need to begin using the four arrow keys. Insert two batteries, carefully noting the "+" and "-" markings, and place the "-" end in the remote first. If this manual. Next, select a menu...
... television on the TV, the interactive plug-in menu appears. The Remote Control Before you can operate your remote control, you first need to begin using the four arrow keys. Insert two batteries, carefully noting the "+" and "-" markings, and place the "-" end in the remote first. If this manual. Next, select a menu...
Instructions
Page 13
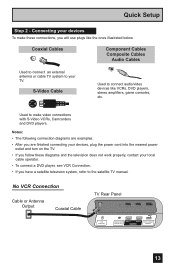
... VCRs, Camcorders and DVD players. Used to the satellite TV manual. Notes: • The following connection diagrams are examples. • After you are finished connecting your devices, plug the power cord into the nearest power outlet and turn on the TV. • If you have a satellite television system, ... to connect audio/video devices like the ones illustrated below. Quick Setup Step 2 - No VCR Connection Cable or Antenna Output Coaxial Cable TV Rear Panel 75 Ω (VHF/UHF) DIGITAL AUDIO INPUT 1 OPTICAL OUT INPUT 2 PHOTO VIEWER / SERVICE 13 S-Video Cable Used to your ...
... VCRs, Camcorders and DVD players. Used to the satellite TV manual. Notes: • The following connection diagrams are examples. • After you are finished connecting your devices, plug the power cord into the nearest power outlet and turn on the TV. • If you have a satellite television system, ... to connect audio/video devices like the ones illustrated below. Quick Setup Step 2 - No VCR Connection Cable or Antenna Output Coaxial Cable TV Rear Panel 75 Ω (VHF/UHF) DIGITAL AUDIO INPUT 1 OPTICAL OUT INPUT 2 PHOTO VIEWER / SERVICE 13 S-Video Cable Used to your ...
Instructions
Page 14
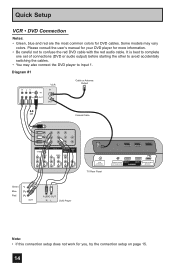
... AUDIO AUDIO AUDIO COMPONENT AUDIO COMPONENT INPUT 3 S-VIDEO Y VIDEO PB L PR R INPUT 4 Y VIDEO INPUT 5 / INPUT 1 AUDIO AUDIO OUT VIDEO PB L L L PR R R R 75 Ω (VHF/UHF) TV Rear Panel DIGITAL AUDIO INPUT 1 OPTICAL OUT INPUT 2 PHOTO VIEWER / SERVICE Green Blue Red Y PB PR OUT AUDIO OUT R L DVD Player Note: • If this... vary colors. Some models may also connect the DVD player to confuse the red DVD cable with the red audio cable. Please consult the user's manual for your DVD player for more information. • Be careful not to Input 1.
... AUDIO AUDIO AUDIO COMPONENT AUDIO COMPONENT INPUT 3 S-VIDEO Y VIDEO PB L PR R INPUT 4 Y VIDEO INPUT 5 / INPUT 1 AUDIO AUDIO OUT VIDEO PB L L L PR R R R 75 Ω (VHF/UHF) TV Rear Panel DIGITAL AUDIO INPUT 1 OPTICAL OUT INPUT 2 PHOTO VIEWER / SERVICE Green Blue Red Y PB PR OUT AUDIO OUT R L DVD Player Note: • If this... vary colors. Some models may also connect the DVD player to confuse the red DVD cable with the red audio cable. Please consult the user's manual for your DVD player for more information. • Be careful not to Input 1.
Instructions
Page 17
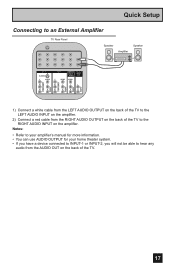
...Refer to your amplifier's manual for more information. • You can use AUDIO OUTPUT for your home theater system. • If you have a device connected to INPUT-1 or INPUT-2, you will not be able to hear any audio from the AUDIO OUT on the back of the TV to the LEFT AUDIO... on the amplifier. 2) Connect a red cable from the LEFT AUDIO OUTPUT on the back of the TV to the RIGHT AUDIO INPUT on the back of the TV. 17 Quick Setup Connecting to an External Amplifier TV Rear Panel Speaker Amplifier Speaker INPUT 3 S-VIDEO Y VIDEO PB L PR R INPUT 4 Y VIDEO INPUT 5 / INPUT 1 ...
...Refer to your amplifier's manual for more information. • You can use AUDIO OUTPUT for your home theater system. • If you have a device connected to INPUT-1 or INPUT-2, you will not be able to hear any audio from the AUDIO OUT on the back of the TV to the LEFT AUDIO... on the amplifier. 2) Connect a red cable from the LEFT AUDIO OUTPUT on the back of the TV to the RIGHT AUDIO INPUT on the back of the TV. 17 Quick Setup Connecting to an External Amplifier TV Rear Panel Speaker Amplifier Speaker INPUT 3 S-VIDEO Y VIDEO PB L PR R INPUT 4 Y VIDEO INPUT 5 / INPUT 1 ...

Instructions
Page 20
See page 50. • Refer to an amplifier using your optical output You can connect an amplifier that is from your owners manual on Optical Out in the Sound Adjust Menu. Quick Setup Connecting to your HDMI device. 20 Notes: • This terminal can be PCM or ...DOLBY DIGITAL. Amplifier 75 Ω (VHF/UHF) DIGITAL AUDIO INPUT 1 OPTICAL OUT INPUT 2 PHOTO VIEWER / SERVICE TV Rear Panel 1) Connect the optical cable from underneath the television to use the optical output connection, select PCM or DOLBY DIGITAL on using an optical...
See page 50. • Refer to an amplifier using your optical output You can connect an amplifier that is from your owners manual on Optical Out in the Sound Adjust Menu. Quick Setup Connecting to your HDMI device. 20 Notes: • This terminal can be PCM or ...DOLBY DIGITAL. Amplifier 75 Ω (VHF/UHF) DIGITAL AUDIO INPUT 1 OPTICAL OUT INPUT 2 PHOTO VIEWER / SERVICE TV Rear Panel 1) Connect the optical cable from underneath the television to use the optical output connection, select PCM or DOLBY DIGITAL on using an optical...
Instructions
Page 21
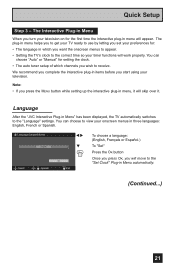
Language After the "JVC Interactive Plug-in menu will work properly. Note: • If you will skip ... plug-in items before you turn your timer functions will appear. Quick Setup Step 3 - You can choose "Auto" or "Manual" for : • The language in Menu When you start using your onscreen menus in Menu automatically. (Continued...) 21 You can... The Interactive Plug-in which channels you want the onscreen menus to appear. • Setting the TV's clock to the correct time so your television on for the first time the interactive plug-in Menu" has been displayed...
Language After the "JVC Interactive Plug-in menu will work properly. Note: • If you will skip ... plug-in items before you turn your timer functions will appear. Quick Setup Step 3 - You can choose "Auto" or "Manual" for : • The language in Menu When you start using your onscreen menus in Menu automatically. (Continued...) 21 You can... The Interactive Plug-in which channels you want the onscreen menus to appear. • Setting the TV's clock to the correct time so your television on for the first time the interactive plug-in Menu" has been displayed...
Instructions
Page 22
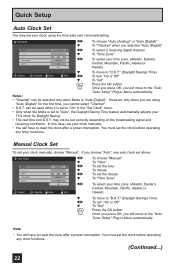
... Channel Time Time Zone D.S.T. Set Clock Mode Channel Time Time Zone D.S.T. You must set the clock before operating any timer functions. (Continued...) 22 Manual - - 10 : 30 AM Atlantic On Set Select BACK Operate Back MENU Exit √® † √® † √® ...Digital)" To select a receiving digital channel To "Time Zone" To select your TV's clock for the first time, you choose "Auto", see auto clock set above. may set your clock manually, choose "Manual". Quick Setup Auto Clock Set You may not be set correctly depending on the...
... Channel Time Time Zone D.S.T. Set Clock Mode Channel Time Time Zone D.S.T. You must set the clock before operating any timer functions. (Continued...) 22 Manual - - 10 : 30 AM Atlantic On Set Select BACK Operate Back MENU Exit √® † √® † √® ...Digital)" To select a receiving digital channel To "Time Zone" To select your TV's clock for the first time, you choose "Auto", see auto clock set above. may set your clock manually, choose "Manual". Quick Setup Auto Clock Set You may not be set correctly depending on the...
Instructions
Page 36
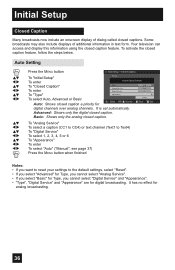
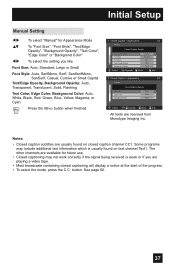
... select a caption (CC1 to CC4) or text channel (Text1 to Text4) To "Digital Service" To select 1, 2, 3, 4, 5 or 6 To "Appearance" To enter To select "Auto" ("Manual", see page 37) Press the MENU button when finished Notes: • If you want to reset your settings to the default settings, select "Reset". • If you...
... select a caption (CC1 to CC4) or text channel (Text1 to Text4) To "Digital Service" To select 1, 2, 3, 4, 5 or 6 To "Appearance" To enter To select "Auto" ("Manual", see page 37) Press the MENU button when finished Notes: • If you want to reset your settings to the default settings, select "Reset". • If you...
Instructions
Page 37
... playing a video tape. • Most broadcasts containing closed caption channel CC1. button. See page 60. 37 Initial Setup Manual Setting √® To select "Manual" for future use. • Closed captioning may include additional text information which is weak or if you like...Caption > Appearance 1/2 Preview Closed Caption Sample Appearance Mode Font Size Font Style Text / Edge Opacity Background Opacity Select Operate Manual Standard Auto Solid Solid BACK Back MENU Exit Closed Caption > Appearance 2/2 Preview Closed Caption Sample Text Color Edge Color ...
... playing a video tape. • Most broadcasts containing closed caption channel CC1. button. See page 60. 37 Initial Setup Manual Setting √® To select "Manual" for future use. • Closed captioning may include additional text information which is weak or if you like...Caption > Appearance 1/2 Preview Closed Caption Sample Appearance Mode Font Size Font Style Text / Edge Opacity Background Opacity Select Operate Manual Standard Auto Solid Solid BACK Back MENU Exit Closed Caption > Appearance 2/2 Preview Closed Caption Sample Text Color Edge Color ...

Instructions
Page 44
...picture signal is capable of analog audio and digital video, choose "Analog". • Refer to your DVI or HDMI component is being input to your TV. π† √® π† √® Press the MENU button To "External Input" To enter To "Video-1 Audio" To...When you select "Auto", the television will select "Analog" or "Digital" automatically, depending on the screen. If your DVI or HDMI component's instruction manual for HDMI. There are two types of HDMI 480p picture signals: 640x480 and 720x480. When you select "Auto", the television will select "Size1" ...
...picture signal is capable of analog audio and digital video, choose "Analog". • Refer to your DVI or HDMI component is being input to your TV. π† √® π† √® Press the MENU button To "External Input" To enter To "Video-1 Audio" To...When you select "Auto", the television will select "Analog" or "Digital" automatically, depending on the screen. If your DVI or HDMI component's instruction manual for HDMI. There are two types of HDMI 480p picture signals: 640x480 and 720x480. When you select "Auto", the television will select "Size1" ...

Instructions
Page 52
... √® † To "D.S.T." (daylight savings time) To turn D.S.T. In this case, set your TV's clock for US and Canada when it is set to minutes To set the clock manually, choose "Manual" by pressing the √ or ® arrows. π† √® π† &#...8730;® To "Channel" when you !" You must set the clock automatically, or manually. may not be displayed. Press the MENU button when finished Notes: • "Channel" can choose to Auto, the Daylight Saving Time feature automatically ...
... √® † To "D.S.T." (daylight savings time) To turn D.S.T. In this case, set your TV's clock for US and Canada when it is set to minutes To set the clock manually, choose "Manual" by pressing the √ or ® arrows. π† √® π† &#...8730;® To "Channel" when you !" You must set the clock automatically, or manually. may not be displayed. Press the MENU button when finished Notes: • "Channel" can choose to Auto, the Daylight Saving Time feature automatically ...

Instructions
Page 53
...; √® π† √® π† To "On Time" To set the hour (AM/PM) you want the TV to set the clock. 53 will appear on /off timer to work, the clock must be set. • After a power interruption, the ...timer settings must be set to "Off Time" (the time the TV will turn on or off. Clock/Timers On/Off Timer The on/off timer lets you program your clock is not set, ... move to locked or guarded channels. • In order for the on the screen. Please see Manual Set Clock on page 52 to turn off).
...; √® π† √® π† To "On Time" To set the hour (AM/PM) you want the TV to set the clock. 53 will appear on /off timer to work, the clock must be set. • After a power interruption, the ...timer settings must be set to "Off Time" (the time the TV will turn on or off. Clock/Timers On/Off Timer The on/off timer lets you program your clock is not set, ... move to locked or guarded channels. • In order for the on the screen. Please see Manual Set Clock on page 52 to turn off).
Instructions
Page 56
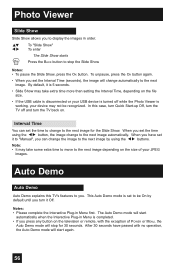
... • If the USB cable is disconnected or your USB device is turned off and turn the TV off while the Photo Viewer is working, your JPEG images. Auto Demo Auto Demo Auto Demo explains this... case, turn Quick Start-up Off, turn the TV back on. To unpause, press the OK button again. • When you have passed with the exception... Show Notes: • To pause the Slide Show, press the OK button. By default, it to "Manual", you press any button on the television or remote, with no operation, the Auto Demo mode will change ...
... • If the USB cable is disconnected or your USB device is turned off and turn the TV off while the Photo Viewer is working, your JPEG images. Auto Demo Auto Demo Auto Demo explains this... case, turn Quick Start-up Off, turn the TV back on. To unpause, press the OK button again. • When you have passed with the exception... Show Notes: • To pause the Slide Show, press the OK button. By default, it to "Manual", you press any button on the television or remote, with no operation, the Auto Demo mode will change ...


