Instructions
Page 2
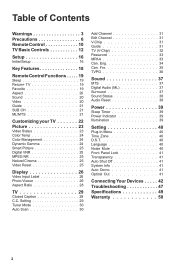
... Favorite 19 Aspect 20 Sound 20 Video 20 Guide 21 SUB CH 21 ML/MTS 21 Customizing your TV 22 Picture 23 Video Status 23 Color Temp 24 Color Management 24 Dynamic Gamma 24 Smart Picture 25 Digital ...VNR 25 MPEG NR 25 Natural Cinema 25 Video Reset 25 Display 26 Video Input Label 26 Photo Viewer 26 Aspect Ratio 28 TV 29 Closed Caption 29 C.C. Eng 34 Can. Fre 35 TVPG 36 Sound 37 MTS 37 Digital Audio (ML 37 Surround 37... 50 2 Setting 29 Tuner Mode 30 Auto Scan 30 Add Channel 31 Edit Channel 31 V-Chip 31 Guide 31 TV (V-Chip 32 Password 33 MPAA 33 Can.
... Favorite 19 Aspect 20 Sound 20 Video 20 Guide 21 SUB CH 21 ML/MTS 21 Customizing your TV 22 Picture 23 Video Status 23 Color Temp 24 Color Management 24 Dynamic Gamma 24 Smart Picture 25 Digital ...VNR 25 MPEG NR 25 Natural Cinema 25 Video Reset 25 Display 26 Video Input Label 26 Photo Viewer 26 Aspect Ratio 28 TV 29 Closed Caption 29 C.C. Eng 34 Can. Fre 35 TVPG 36 Sound 37 MTS 37 Digital Audio (ML 37 Surround 37... 50 2 Setting 29 Tuner Mode 30 Auto Scan 30 Add Channel 31 Edit Channel 31 V-Chip 31 Guide 31 TV (V-Chip 32 Password 33 MPAA 33 Can.
Instructions
Page 3
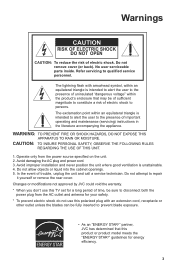
... voltage" within the product's enclosure that may be fully inserted to prevent blade exposure. • As an "ENERGY STAR®" partner, JVC has determined that this polarized plug with arrowhead symbol, within an equilateral triangle is unattainable. 4. Avoid improper installation and never position the unit ... 2. Do not remove cover (or back). Avoid damaging the AC plug and power cord. 3. Changes or modifications not approved by JVC could void the warranty. * When you don't use this TV set for energy efficiency. 3 Refer servicing to repair it yourself or remove the rear cover.
... voltage" within the product's enclosure that may be fully inserted to prevent blade exposure. • As an "ENERGY STAR®" partner, JVC has determined that this polarized plug with arrowhead symbol, within an equilateral triangle is unattainable. 4. Avoid improper installation and never position the unit ... 2. Do not remove cover (or back). Avoid damaging the AC plug and power cord. 3. Changes or modifications not approved by JVC could void the warranty. * When you don't use this TV set for energy efficiency. 3 Refer servicing to repair it yourself or remove the rear cover.
Instructions
Page 5
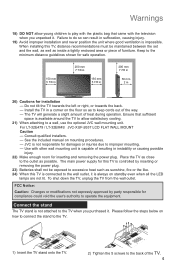
...available around the TV to allow satisfactory cooling. 21) When attaching to a wall, use the optional JVC wall mounting unit....JVC is always on how to connect the stand to the TV. 1) Insert the TV stand onto the TV. 2) Tighten the 5 screws to the back of heat during operation. Install the TV in a corner on mounting procedures. - The TV will generate a slight amount of the TV. 5 Place the TV...furniture. Connect the stand The TV stand is impossible. When installing this TV is controlled by party responsible for...not attached to the TV when you unpacked it is not responsible for damages ...
...available around the TV to allow satisfactory cooling. 21) When attaching to a wall, use the optional JVC wall mounting unit....JVC is always on how to connect the stand to the TV. 1) Insert the TV stand onto the TV. 2) Tighten the 5 screws to the back of heat during operation. Install the TV in a corner on mounting procedures. - The TV will generate a slight amount of the TV. 5 Place the TV...furniture. Connect the stand The TV stand is impossible. When installing this TV is controlled by party responsible for...not attached to the TV when you unpacked it is not responsible for damages ...
Instructions
Page 6
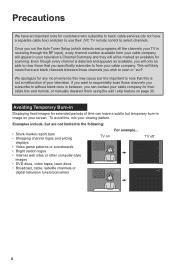
... malfunction of time can leave a subtle but temporary burn-in Displaying fixed images for extended periods of your cable company for their JVC TV remote control to the following: • Stock-market report bars • Shopping channel logos and pricing displays • Video game patterns ... images • DVD discs, video tapes, laser discs • Broadcast, cable, satellite channels or digital television tuners/converters For example... TV on page 30. Once you specifically subscribe to scan or "surf". We apologize for any inconvenience this , mix your cable company...
... malfunction of time can leave a subtle but temporary burn-in Displaying fixed images for extended periods of your cable company for their JVC TV remote control to the following: • Stock-market report bars • Shopping channel logos and pricing displays • Video game patterns ... images • DVD discs, video tapes, laser discs • Broadcast, cable, satellite channels or digital television tuners/converters For example... TV on page 30. Once you specifically subscribe to scan or "surf". We apologize for any inconvenience this , mix your cable company...
Instructions
Page 7
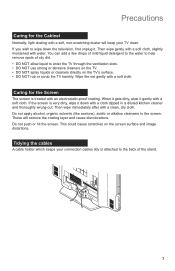
...and image distortions. Precautions Caring for the Screen The screen is treated with water. Tidying the cables A cable holder which keeps your TV clean. Wipe the set gently with a soft, non-scratching duster will remove the coating layer and cause discolorations. This could cause scratches ...on the TV's surface. • DO NOT rub or scrub the TV harshly. Then wipe gently with a soft cloth, slightly moistened with an electrostatic-proof coating. If you wish to the...
...and image distortions. Precautions Caring for the Screen The screen is treated with water. Tidying the cables A cable holder which keeps your TV clean. Wipe the set gently with a soft, non-scratching duster will remove the coating layer and cause discolorations. This could cause scratches ...on the TV's surface. • DO NOT rub or scrub the TV harshly. Then wipe gently with a soft cloth, slightly moistened with an electrostatic-proof coating. If you wish to the...
Instructions
Page 8
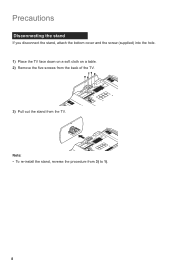
Precautions Disconnecting the stand If you disconnect the stand, attach the bottom cover and the screw (supplied) into the hole. 1) Place the TV face down on a soft cloth on a table. 2) Remove the five screws from the back of the TV. 3) Pull out the stand from 3) to 1). 8 Note: • To re-install the stand, reverse the procedure from the TV.
Precautions Disconnecting the stand If you disconnect the stand, attach the bottom cover and the screw (supplied) into the hole. 1) Place the TV face down on a soft cloth on a table. 2) Remove the five screws from the back of the TV. 3) Pull out the stand from 3) to 1). 8 Note: • To re-install the stand, reverse the procedure from the TV.
Instructions
Page 9
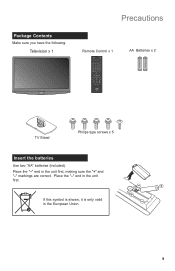
If this symbol is shown, it is only valid in the unit first. Place the "-" end in the European Union 9 Place the "-" end in the unit first, making sure the "+" and "-" markings are correct. Television x 1 Precautions Remote Control x 1 AA Batteries x 2 + AA Alkaline - + AA Alkaline - Package Contents Make sure you have the following. TV Stand Philips type screws x 5 Insert the batteries Use two "AA" batteries (included).
If this symbol is shown, it is only valid in the unit first. Place the "-" end in the European Union 9 Place the "-" end in the unit first, making sure the "+" and "-" markings are correct. Television x 1 Precautions Remote Control x 1 AA Batteries x 2 + AA Alkaline - + AA Alkaline - Package Contents Make sure you have the following. TV Stand Philips type screws x 5 Insert the batteries Use two "AA" batteries (included).
Instructions
Page 10
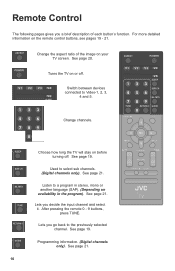
... 19. Used to the previously selected channel. See page 19. See page 21. Lets you a brief description of the image on your TV screen. Programming information. (Digital channels only). See page 21. For more detailed information on or off . Switch between devices connected to ...a program in the program). Listen to Video-1, 2, 3, 4 and 5. Choose how long the TV will stay on availability in stereo, mono or another language (SAP). (Depending on before turning off . Change channels. Remote Control The following pages ...
... 19. Used to the previously selected channel. See page 19. See page 21. Lets you a brief description of the image on your TV screen. Programming information. (Digital channels only). See page 21. For more detailed information on or off . Switch between devices connected to ...a program in the program). Listen to Video-1, 2, 3, 4 and 5. Choose how long the TV will stay on availability in stereo, mono or another language (SAP). (Depending on before turning off . Change channels. Remote Control The following pages ...
Instructions
Page 11
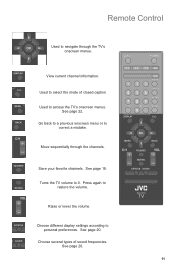
... closed caption Used to restore the volume. See page 19. Go back to a previous onscreen menu or to personal preferences. Press again to access the TV's onscreen menus. Raise or lower the volume. See page 20. 11 See page 20. Used to select the mode of sound frequencies. Save your favorite...
... closed caption Used to restore the volume. See page 19. Go back to a previous onscreen menu or to personal preferences. Press again to access the TV's onscreen menus. Raise or lower the volume. See page 20. 11 See page 20. Used to select the mode of sound frequencies. Save your favorite...
Instructions
Page 12
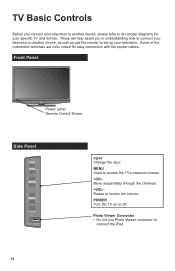
... Control Sensor Side Panel INPUT MENU CHANNEL OK VOLUME BACK POWER PHOTO VIEWER Input Change the input MENU Used to connect the iPod 12 TV Basic Controls Before you in understanding how to connect your television to another device, please refer to the proper diagrams for easy connection with...8226; Do not use the remote to set up your television. Raises or lowers the volume. These will help assist you connect your specific TV and remote. Some of the connection terminals are color coded for your television to another device, as well as use Photo Viewer connector to access...
... Control Sensor Side Panel INPUT MENU CHANNEL OK VOLUME BACK POWER PHOTO VIEWER Input Change the input MENU Used to connect the iPod 12 TV Basic Controls Before you in understanding how to connect your television to another device, please refer to the proper diagrams for easy connection with...8226; Do not use the remote to set up your television. Raises or lowers the volume. These will help assist you connect your specific TV and remote. Some of the connection terminals are color coded for your television to another device, as well as use Photo Viewer connector to access...
Instructions
Page 14
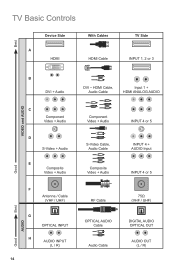
HDMI Cable, Audio Cable Input 1 + HDMI ANALOG AUDIO VIDEO and AUDIO C Component Video + Audio D S-Video + Audio E Composite Video + Audio Component Video + Audio S-Video Cable, Audio Cable Composite Video + Audio INPUT 4 or 5 INPUT 4 + AUDIO Input INPUT 4 or 5 Good Good Best AUDIO F Antenna / Cable (VHF / UHF) G OPTICAL INPUT H AUDIO INPUT (L / R) 14 RF Cable OPTICAL AUDIO Cable Audio Cable 75Ω (VHF / UHF) DIGITAL AUDIO OPTICAL OUT AUDIO OUT (L / R) TV Basic Controls Best Device Side A HDMI With Cables HDMI Cable TV Side INPUT 1, 2 or 3 B DVI + Audio DVI -
HDMI Cable, Audio Cable Input 1 + HDMI ANALOG AUDIO VIDEO and AUDIO C Component Video + Audio D S-Video + Audio E Composite Video + Audio Component Video + Audio S-Video Cable, Audio Cable Composite Video + Audio INPUT 4 or 5 INPUT 4 + AUDIO Input INPUT 4 or 5 Good Good Best AUDIO F Antenna / Cable (VHF / UHF) G OPTICAL INPUT H AUDIO INPUT (L / R) 14 RF Cable OPTICAL AUDIO Cable Audio Cable 75Ω (VHF / UHF) DIGITAL AUDIO OPTICAL OUT AUDIO OUT (L / R) TV Basic Controls Best Device Side A HDMI With Cables HDMI Cable TV Side INPUT 1, 2 or 3 B DVI + Audio DVI -
Instructions
Page 16
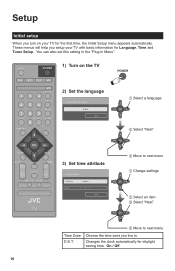
... Off 16 You can also set this setting in the "Plug in . Choose the time zone you setup your TV for daylight saving time. Setup Initial setup When you turn on the TV 2) Set the language Set Language/Langue/Idioma English Next 1 Select a language 2 Select "Next" 3) Set time ... Changes the clock automatically for the first time, the Initial Setup menu appears automatically. These menus will help you live in Menu". 1) Turn on your TV with basic information for Language, Time and Tuner Setup. Atlantic ON Next 3 Move to next menu 1 Change settings 2 Select an item 3 Select "...
... Off 16 You can also set this setting in the "Plug in . Choose the time zone you setup your TV for daylight saving time. Setup Initial setup When you turn on the TV 2) Set the language Set Language/Langue/Idioma English Next 1 Select a language 2 Select "Next" 3) Set time ... Changes the clock automatically for the first time, the Initial Setup menu appears automatically. These menus will help you live in Menu". 1) Turn on your TV with basic information for Language, Time and Tuner Setup. Atlantic ON Next 3 Move to next menu 1 Change settings 2 Select an item 3 Select "...
Instructions
Page 17
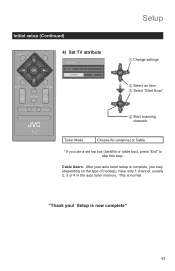
Setup is normal. "Thank you may, (depending on the type of hookup), have only 1 channel, usually 2, 3 or 4 in the auto tuner memory. Cable Users: After your auto tuner setup is complete, you ! Initial setup (Continued) 4) Set TV attribute Set TV Attribute Tuner Mode Air Start Scan Exit Setup 1 Change settings 2 Select an item 3 Select "Start Scan" 4 Start scanning channels Tuner Mode Choose Air (antenna) or Cable * If you use a set top box (satellite or cable box), press "Exit" to skip this step. This is now complete" 17
Setup is normal. "Thank you may, (depending on the type of hookup), have only 1 channel, usually 2, 3 or 4 in the auto tuner memory. Cable Users: After your auto tuner setup is complete, you ! Initial setup (Continued) 4) Set TV attribute Set TV Attribute Tuner Mode Air Start Scan Exit Setup 1 Change settings 2 Select an item 3 Select "Start Scan" 4 Start scanning channels Tuner Mode Choose Air (antenna) or Cable * If you use a set top box (satellite or cable box), press "Exit" to skip this step. This is now complete" 17
Instructions
Page 18
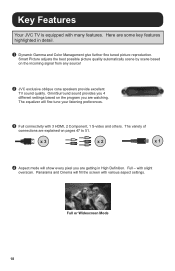
... will fill the screen with many features. Here are explained on pages 47 to 51. Full - Full or Widescreen Mode 18 Key Features Your JVC TV is equipped with various aspect settings. x 3 x 2 x 1 4 Aspect mode will fine tune your listening preferences. 3 Full connectivity with slight overscan. OmniSurround sound provides you are...finition. with 3 HDMI, 2 Component, 1 S-video and others. The equalizer will show every pixel you 4 different settings based on the incoming signal from any source! 2 JVC exclusive oblique cone speakers provide excellent...
... will fill the screen with many features. Here are explained on pages 47 to 51. Full - Full or Widescreen Mode 18 Key Features Your JVC TV is equipped with various aspect settings. x 3 x 2 x 1 4 Aspect mode will fine tune your listening preferences. 3 Full connectivity with slight overscan. OmniSurround sound provides you are...finition. with 3 HDMI, 2 Component, 1 S-video and others. The equalizer will show every pixel you 4 different settings based on the incoming signal from any source! 2 JVC exclusive oblique cone speakers provide excellent...
Instructions
Page 19
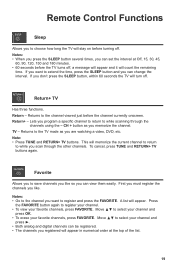
... channels, press FAVORITE. Move π† to while scanning through the other channels. If you don't press the SLEEP button, within 60 seconds the TV will turn off . Return - Returns to register your channel. • To view your channel and press ®. • Both analog and digital ... it will count the remaining time. CH + button as you are watching a video, DVD, etc. Press the FAVORITE button again to the TV mode as you want to the channel viewed just before the channel currently onscreen. Move π† to select your favorite channels, press FAVORITE....
... channels, press FAVORITE. Move π† to while scanning through the other channels. If you don't press the SLEEP button, within 60 seconds the TV will turn off . Return - Returns to register your channel. • To view your channel and press ®. • Both analog and digital ... it will count the remaining time. CH + button as you are watching a video, DVD, etc. Press the FAVORITE button again to the TV mode as you want to the channel viewed just before the channel currently onscreen. Move π† to select your favorite channels, press FAVORITE....
Instructions
Page 20
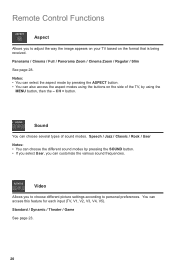
...; You can choose the different sound modes by pressing the SOUND button. • If you select User, you can access this feature for each input (TV, V1, V2, V3, V4, V5). You can customize the various sound frequencies. Notes: • You can select the aspect mode by using the ... you to personal preferences. Video Allows you to choose different picture settings according to adjust the way the image appears on your TV based on the side of the TV, by pressing the ASPECT button. • You can choose several types of sound modes. CH + button. Panorama / Cinema / Full / Panorama Zoom...
...; You can choose the different sound modes by pressing the SOUND button. • If you select User, you can access this feature for each input (TV, V1, V2, V3, V4, V5). You can customize the various sound frequencies. Notes: • You can select the aspect mode by using the ... you to personal preferences. Video Allows you to choose different picture settings according to adjust the way the image appears on your TV based on the side of the TV, by pressing the ASPECT button. • You can choose several types of sound modes. CH + button. Panorama / Cinema / Full / Panorama Zoom...
Instructions
Page 21
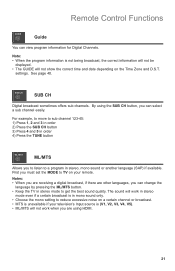
... not work in stereo mode even if a certain broadcast is in mono sound only. • Choose the mono setting to a program in stereo mode to TV on your television's Input source is not being broadcast, the correct information will not be displayed. • The GUIDE will not show the correct time... 3) Press 4 and 5 in order 4) Press the TUNE button ML/MTS Allows you can change the language by pressing the ML/MTS button. • Keep the TV in stereo, mono sound or another language (SAP) if available. Note: • When the program information is (V1, V2, V3, V4, V5). • ML/MTS...
... not work in stereo mode even if a certain broadcast is in mono sound only. • Choose the mono setting to a program in stereo mode to TV on your television's Input source is not being broadcast, the correct information will not be displayed. • The GUIDE will not show the correct time... 3) Press 4 and 5 in order 4) Press the TUNE button ML/MTS Allows you can change the language by pressing the ML/MTS button. • Keep the TV in stereo, mono sound or another language (SAP) if available. Note: • When the program information is (V1, V2, V3, V4, V5). • ML/MTS...
Instructions
Page 22
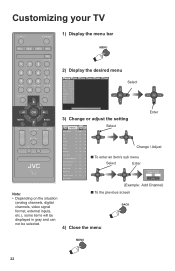
... the menu bar 2) Display the desired menu Picture Display TV Video Status Game Tint 0 - 50 - 100 Color 0 - 25 - 100 Picture 0 - 50 - 100 Bright 0 - 43 - 100 Detail 0 - 94 - 100 Backlight 0 - 50 - 100 Color Temp Cool Color ...
... the menu bar 2) Display the desired menu Picture Display TV Video Status Game Tint 0 - 50 - 100 Color 0 - 25 - 100 Picture 0 - 50 - 100 Bright 0 - 43 - 100 Detail 0 - 94 - 100 Backlight 0 - 50 - 100 Color Temp Cool Color ...
Instructions
Page 23
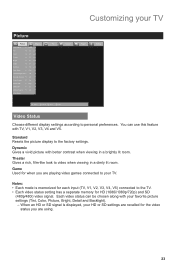
..., V2, V3, V4, V5) connected to personal preferences. Each video status can use this feature with your TV Picture Picture Display TV Video Status Game Tint 0 - 50 - 100 Color 0 - 25 - 100 Picture 0 - 50 - 100 Bright 0 - 43 - 100 Detail 0 - 94 - 100 Backlight 0 - 50 - 100 Color ... OK:Operate BACK :Back MENU:Exit Video Status Choose different display settings according to the TV. • Each video status setting has a separate memory for when you are playing video games connected to your TV. When an HD or SD signal is memorized for the video status you are using...
..., V2, V3, V4, V5) connected to personal preferences. Each video status can use this feature with your TV Picture Picture Display TV Video Status Game Tint 0 - 50 - 100 Color 0 - 25 - 100 Picture 0 - 50 - 100 Bright 0 - 43 - 100 Detail 0 - 94 - 100 Backlight 0 - 50 - 100 Color ... OK:Operate BACK :Back MENU:Exit Video Status Choose different display settings according to the TV. • Each video status setting has a separate memory for when you are playing video games connected to your TV. When an HD or SD signal is memorized for the video status you are using...
Instructions
Page 24
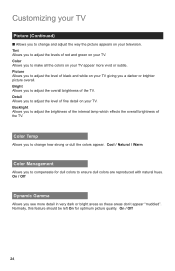
... areas don't appear "muddied". On / Off 24 Picture Allows you to adjust the level of fine detail on your TV. Color Temp Allows you to adjust the levels of the TV. Cool / Natural / Warm Color Management Allows you to change how strong or dull the colors appear. Tint Allows you... to adjust the brightness of the internal lamp which effects the overall brightness of the TV. Bright Allows you to compensate for optimum picture quality. On / Off Dynamic Gamma Allows you to adjust the overall brightness of red and ...
... areas don't appear "muddied". On / Off 24 Picture Allows you to adjust the level of fine detail on your TV. Color Temp Allows you to adjust the levels of the TV. Cool / Natural / Warm Color Management Allows you to change how strong or dull the colors appear. Tint Allows you... to adjust the brightness of the internal lamp which effects the overall brightness of the TV. Bright Allows you to compensate for optimum picture quality. On / Off Dynamic Gamma Allows you to adjust the overall brightness of red and ...


