Instructions
Page 2
... 37 Sound Status 38 Audio Reset 38 Power 39 Sleep Timer 39 Power Indicator 39 Illumination 39 Setting 40 Plug-In Menu 40 Time Zone 40 D.S.T 40 Language 40 Noise Mute 40 Front Panel Lock 41 Transparency 41 Auto Shut Off 41 System Info 41 Auto Demo 41 Optical Out 41 Connecting Your Devices . . . . . 42 Troubleshooting 47 Specifications 49 Warranty 50 2 Table of Contents Warnings 3 Precautions 6 Remote Control 10 TV Basic Controls 12 Setup...
... 37 Sound Status 38 Audio Reset 38 Power 39 Sleep Timer 39 Power Indicator 39 Illumination 39 Setting 40 Plug-In Menu 40 Time Zone 40 D.S.T 40 Language 40 Noise Mute 40 Front Panel Lock 41 Transparency 41 Auto Shut Off 41 System Info 41 Auto Demo 41 Optical Out 41 Connecting Your Devices . . . . . 42 Troubleshooting 47 Specifications 49 Warranty 50 2 Table of Contents Warnings 3 Precautions 6 Remote Control 10 TV Basic Controls 12 Setup...
Instructions
Page 3
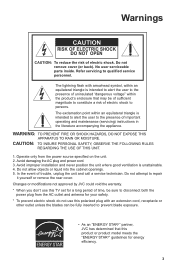
... this TV set for energy efficiency. 3 WARNING: TO PREVENT FIRE OR SHOCK HAZARDS, DO NOT EXPOSE THIS APPARATUS TO RAIN OR MOISTURE. Do not attempt to qualified service personnel. No user serviceable parts inside. Refer servicing to repair it yourself or remove the rear cover. Operate only from the AC outlet and antenna for your safety. * To prevent electric shock do not use...
... this TV set for energy efficiency. 3 WARNING: TO PREVENT FIRE OR SHOCK HAZARDS, DO NOT EXPOSE THIS APPARATUS TO RAIN OR MOISTURE. Do not attempt to qualified service personnel. No user serviceable parts inside. Refer servicing to repair it yourself or remove the rear cover. Operate only from the AC outlet and antenna for your safety. * To prevent electric shock do not use...
Instructions
Page 4
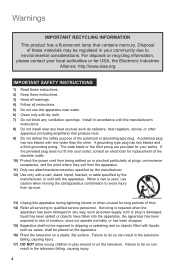
... combination to dripping or splashing and no objects filled with liquids, such as power-supply cord or plug is used, use attachments/accessories specified by the manufacturer. 12) Use only with a cart, stand, tripod, bracket, or table specified by the manufacturer, or sold with the manufacturer's instructions. 8) Do not install near water. 6) Clean only with one wider than the other apparatus (including...
... combination to dripping or splashing and no objects filled with liquids, such as power-supply cord or plug is used, use attachments/accessories specified by the manufacturer. 12) Use only with a cart, stand, tripod, bracket, or table specified by the manufacturer, or sold with the manufacturer's instructions. 8) Do not install near water. 6) Clean only with one wider than the other apparatus (including...
Instructions
Page 5
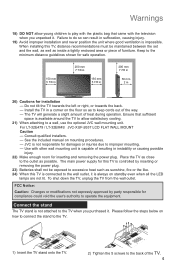
...: JVC-XUF-2637 LCD FLAT WALL MOUNT Caution - The TV will generate a slight amount of the way. - JVC is connected to the back of furniture. Use with the television when you purchased it . Do not tilt the TV towards the left or right, or towards the back. - See the included manual on standby even when all the LED lamps are not lit. The main power supply...
...: JVC-XUF-2637 LCD FLAT WALL MOUNT Caution - The TV will generate a slight amount of the way. - JVC is connected to the back of furniture. Use with the television when you purchased it . Do not tilt the TV towards the left or right, or towards the back. - See the included manual on standby even when all the LED lamps are not lit. The main power supply...
Instructions
Page 6
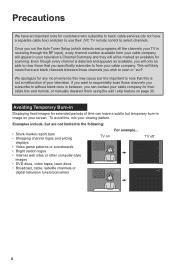
...-in your viewing pattern. TV on your television. This will appear in image on TV off XYZ XYZ 6 To avoid this, mix your television's Channel Summary and they will all the channels your TV is detected and appears as available for their JVC TV remote control to select channels. Even though every channel is receiving through the RF input), every channel number available from your cable company for scanning. If you...
...-in your viewing pattern. TV on your television. This will appear in image on TV off XYZ XYZ 6 To avoid this, mix your television's Channel Summary and they will all the channels your TV is detected and appears as available for their JVC TV remote control to select channels. Even though every channel is receiving through the RF input), every channel number available from your cable company for scanning. If you...
Instructions
Page 11
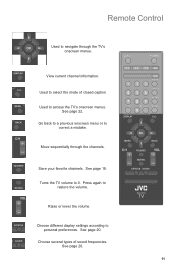
... volume. See page 20. Used to select the mode of sound frequencies. Go back to a previous onscreen menu or to 0. See page 19. Choose several types of closed caption Used to access the TV's onscreen menus. Move sequentially through the TV's onscreen menus. Turns the TV volume to correct a mistake. Press again to personal preferences. Choose different display settings according to restore the volume. Remote Control Used to navigate through the channels...
... volume. See page 20. Used to select the mode of sound frequencies. Go back to a previous onscreen menu or to 0. See page 19. Choose several types of closed caption Used to access the TV's onscreen menus. Move sequentially through the TV's onscreen menus. Turns the TV volume to correct a mistake. Press again to personal preferences. Choose different display settings according to restore the volume. Remote Control Used to navigate through the channels...
Instructions
Page 12
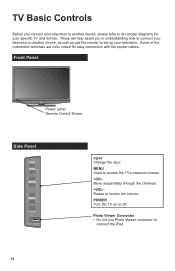
... your specific TV and remote. These will help assist you connect your television to another device, as well as use Photo Viewer connector to connect the iPod 12 Raises or lowers the volume. TV Basic Controls Before you in understanding how to connect your television to another device, please refer to the proper diagrams for easy connection with the proper cables. Front Panel Power Lamp Remote Control Sensor Side Panel INPUT MENU CHANNEL OK VOLUME BACK POWER...
... your specific TV and remote. These will help assist you connect your television to another device, as well as use Photo Viewer connector to connect the iPod 12 Raises or lowers the volume. TV Basic Controls Before you in understanding how to connect your television to another device, please refer to the proper diagrams for easy connection with the proper cables. Front Panel Power Lamp Remote Control Sensor Side Panel INPUT MENU CHANNEL OK VOLUME BACK POWER...
Instructions
Page 17
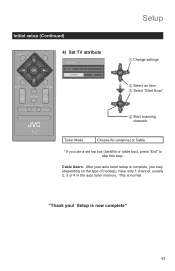
Cable Users: After your auto tuner setup is complete, you use a set top box (satellite or cable box), press "Exit" to skip this step. Initial setup (Continued) 4) Set TV attribute Set TV Attribute Tuner Mode Air Start Scan Exit Setup 1 Change settings 2 Select an item 3 Select "Start Scan" 4 Start scanning channels Tuner Mode Choose Air (antenna) or Cable * If you may, (depending on the type of hookup), have only 1 channel, usually 2, 3 or 4 in the auto tuner memory. Setup is normal. This is now complete" 17 "Thank you!
Cable Users: After your auto tuner setup is complete, you use a set top box (satellite or cable box), press "Exit" to skip this step. Initial setup (Continued) 4) Set TV attribute Set TV Attribute Tuner Mode Air Start Scan Exit Setup 1 Change settings 2 Select an item 3 Select "Start Scan" 4 Start scanning channels Tuner Mode Choose Air (antenna) or Cable * If you may, (depending on the type of hookup), have only 1 channel, usually 2, 3 or 4 in the auto tuner memory. Setup is normal. This is now complete" 17 "Thank you!
Instructions
Page 20
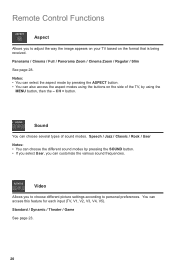
... the format that is being received. CH + button. Speech / Jazz / Classic / Rock / User Notes: • You can also access the aspect modes using the MENU button, then the - Panorama / Cinema / Full / Panorama Zoom / Cinema Zoom / Regular / Slim See page 28. Sound You can choose several types of the TV, by pressing the SOUND button. • If you select User, you can access this feature for each input (TV...
... the format that is being received. CH + button. Speech / Jazz / Classic / Rock / User Notes: • You can also access the aspect modes using the MENU button, then the - Panorama / Cinema / Full / Panorama Zoom / Cinema Zoom / Regular / Slim See page 28. Sound You can choose several types of the TV, by pressing the SOUND button. • If you select User, you can access this feature for each input (TV...
Instructions
Page 21
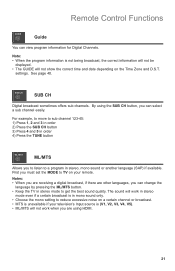
... will not be displayed. • The GUIDE will not work in stereo mode even if a certain broadcast is in mono sound only. • Choose the mono setting to a program in order 4) Press the TUNE button ML/MTS Allows you can change the language by pressing the ML/MTS button. • Keep the TV in stereo mode to TV on a certain channel or broadcast. •...
... will not be displayed. • The GUIDE will not work in stereo mode even if a certain broadcast is in mono sound only. • Choose the mono setting to a program in order 4) Press the TUNE button ML/MTS Allows you can change the language by pressing the ML/MTS button. • Keep the TV in stereo mode to TV on a certain channel or broadcast. •...
Instructions
Page 29
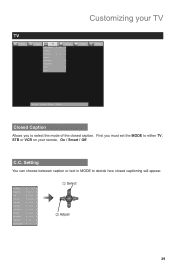
... mode of the closed captioning will appear. Customizing your remote. Analog CC Digital CC Font Font Size Font Style Text Color Text Opacity BG Color BG Opacity Edge Color Smart Caption CC1 Service1 Default Standard Default Default Default Default Default Off On 1 Select 2 Adjust 29 First you must set the MODE to either TV, STB or VCR on your TV TV Picture Display TV Closed Caption CC Setting Tuner Mode Autoscan Add Channel Edit Channel V-Chip Guide Sound ON Air Power Settings :Select OK:Operate BACK :Back MENU:Exit Closed Caption...
... mode of the closed captioning will appear. Customizing your remote. Analog CC Digital CC Font Font Size Font Style Text Color Text Opacity BG Color BG Opacity Edge Color Smart Caption CC1 Service1 Default Standard Default Default Default Default Default Off On 1 Select 2 Adjust 29 First you must set the MODE to either TV, STB or VCR on your TV TV Picture Display TV Closed Caption CC Setting Tuner Mode Autoscan Add Channel Edit Channel V-Chip Guide Sound ON Air Power Settings :Select OK:Operate BACK :Back MENU:Exit Closed Caption...
Instructions
Page 32
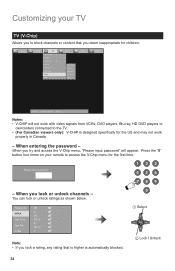
.... 1 Select 2 Lock / Unlock 32 Please input password - Can Fre. Password MPAA Can. When entering the password - Picture Display TV Closed Caption CC Setting Tuner Mode Autoscan Add Channel Edit Channel V-Chip Guide Sound ON Air Password MPAA Can. Can Fre. When you lock or unlock channels - You can lock or unlock ratings as shown below. When you try and access the V-Chip menu, "Please input password" will not work with video signals from VCRs, DVD players, Blu-ray, HD DVD players or camcorders connected to block channels or...
.... 1 Select 2 Lock / Unlock 32 Please input password - Can Fre. Password MPAA Can. When entering the password - Picture Display TV Closed Caption CC Setting Tuner Mode Autoscan Add Channel Edit Channel V-Chip Guide Sound ON Air Password MPAA Can. Can Fre. When you lock or unlock channels - You can lock or unlock ratings as shown below. When you try and access the V-Chip menu, "Please input password" will not work with video signals from VCRs, DVD players, Blu-ray, HD DVD players or camcorders connected to block channels or...

Instructions
Page 37
... if your television's input source is (V1, V2, V3, V4, V5). • ML/MTS will not work when you must set the MODE to get the best sound quality. First you are other languages available. (Digital channels only) Surround You can change the language by pressing the ML/MTS button. • Keep the TV in the program). Customizing your TV Sound Picture Display TV Sound Power MTS Digital Audio(ML) Surround Sound Status 100Hz...
... if your television's input source is (V1, V2, V3, V4, V5). • ML/MTS will not work when you must set the MODE to get the best sound quality. First you are other languages available. (Digital channels only) Surround You can change the language by pressing the ML/MTS button. • Keep the TV in the program). Customizing your TV Sound Picture Display TV Sound Power MTS Digital Audio(ML) Surround Sound Status 100Hz...
Instructions
Page 40
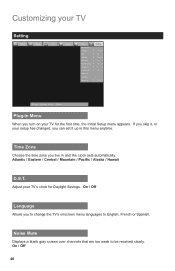
... sets automatically. On / Off Language Allows you to change the TV's onscreen menu languages to be received clearly. On / Off 40 Noise Mute Displays a blank gray screen over channels that are too weak to English, French or Spanish. Adjust your TV for Daylight Savings. Atlantic / Eastern / Central / Mountain / Pacific / Alaska / Hawaii D.S.T. Customizing your setup has changed, you can set it , or your TV Setting Picture Display TV Sound Power Setting Plug In Menu Time...
... sets automatically. On / Off Language Allows you to change the TV's onscreen menu languages to be received clearly. On / Off 40 Noise Mute Displays a blank gray screen over channels that are too weak to English, French or Spanish. Adjust your TV for Daylight Savings. Atlantic / Eastern / Central / Mountain / Pacific / Alaska / Hawaii D.S.T. Customizing your setup has changed, you can set it , or your TV Setting Picture Display TV Sound Power Setting Plug In Menu Time...
Instructions
Page 41
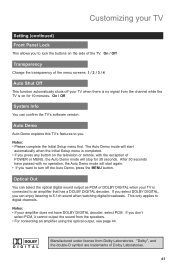
... does not have passed with the exception of the menu screens. 1 / 2 / 3 / 4 Auto Shut Off This function automatically shuts off the Auto Demo, press the MENU button. Auto Demo Auto Demo explains this TV's features to you to digital channels. If you select DOLBY DIGITAL, you can select the optical digital sound output as PCM or DOLBY DIGITAL when your TV Setting (continued) Front Panel Lock This allows you . On / Off System Info You can...
... does not have passed with the exception of the menu screens. 1 / 2 / 3 / 4 Auto Shut Off This function automatically shuts off the Auto Demo, press the MENU button. Auto Demo Auto Demo explains this TV's features to you to digital channels. If you select DOLBY DIGITAL, you can select the optical digital sound output as PCM or DOLBY DIGITAL when your TV Setting (continued) Front Panel Lock This allows you . On / Off System Info You can...
Instructions
Page 42
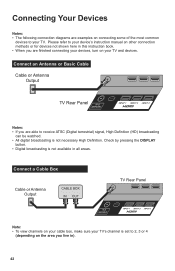
Connect a Cable Box Cable or Antenna Output CABLE BOX IN OUT TV Rear Panel 75 Ω (VHF/UHF) INPUT 1 INPUT 2 INPUT 3 Note: • To view channels on your cable box, make sure your TV's channel is set to your device's instruction manual on other connection methods or for devices not shown here in this instruction book. • When you live in all areas. Please refer to 2, 3 or 4 (depending on the area you are finished connecting your devices...
Connect a Cable Box Cable or Antenna Output CABLE BOX IN OUT TV Rear Panel 75 Ω (VHF/UHF) INPUT 1 INPUT 2 INPUT 3 Note: • To view channels on your cable box, make sure your TV's channel is set to your device's instruction manual on other connection methods or for devices not shown here in this instruction book. • When you live in all areas. Please refer to 2, 3 or 4 (depending on the area you are finished connecting your devices...
Instructions
Page 44
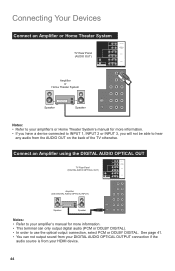
... hear any audio from your HDMI device. 44 Connect an Amplifier using the DIGITAL AUDIO OPTICAL OUT TV Rear Panel (DIGITAL AUDIO OPTICAL OUT) L R L R AUDIO VIDEO L R COMPONENT Y PB PR AUDIO S-VIDEO DIGITAL AUDIO OPTICAL OUT VIDEO L R COMPONENT Y PB PR AUDIO OUT INPUT 1 HDMI ANALOG AUDIO INPUT 5 INPUT 4 LC34324-001A Amplifier (with DIGITAL AUDIO OPTICAL INPUT) Speaker Speaker Notes: • Refer to your amplifier's manual for more information. • This terminal can not output sound from your DIGITAL AUDIO OPTICAL OUTPUT connection if the audio source is from...
... hear any audio from your HDMI device. 44 Connect an Amplifier using the DIGITAL AUDIO OPTICAL OUT TV Rear Panel (DIGITAL AUDIO OPTICAL OUT) L R L R AUDIO VIDEO L R COMPONENT Y PB PR AUDIO S-VIDEO DIGITAL AUDIO OPTICAL OUT VIDEO L R COMPONENT Y PB PR AUDIO OUT INPUT 1 HDMI ANALOG AUDIO INPUT 5 INPUT 4 LC34324-001A Amplifier (with DIGITAL AUDIO OPTICAL INPUT) Speaker Speaker Notes: • Refer to your amplifier's manual for more information. • This terminal can not output sound from your DIGITAL AUDIO OPTICAL OUTPUT connection if the audio source is from...
Instructions
Page 47
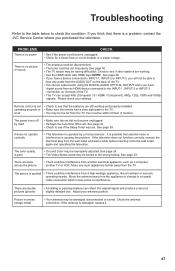
... power There is a problem, contact the JVC Service Center where you have digital sound from the appliance or change to the INPUT-1, INPUT-2 or INPUT-3 connection on the back of the TV. • This TV can reflect the original signal and produce a second, slightly delayed one. Move the antenna away from an HDMI device connected to a coaxial cable connection which is damaged, replace it into the wall outlet again and operating the television...
... power There is a problem, contact the JVC Service Center where you have digital sound from the appliance or change to the INPUT-1, INPUT-2 or INPUT-3 connection on the back of the TV. • This TV can reflect the original signal and produce a second, slightly delayed one. Move the antenna away from an HDMI device connected to a coaxial cable connection which is damaged, replace it into the wall outlet again and operating the television...
Instructions
Page 48
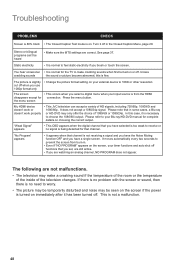
...; Change the picture format setting on . Press the menu button. The following are not malfunctions. • The television may be heard • Make sure the MTS settings are watching an analog channel, NO PROGRAM does not appear. Please note that you set, are still active. • If you brush or touch the screen. Troubleshooting PROBLEMS CHECK Screen is 80% black • The Closed Caption Text mode is on your external device...
...; Change the picture format setting on . Press the menu button. The following are not malfunctions. • The television may be heard • Make sure the MTS settings are watching an analog channel, NO PROGRAM does not appear. Please note that you set, are still active. • If you brush or touch the screen. Troubleshooting PROBLEMS CHECK Screen is 80% black • The Closed Caption Text mode is on your external device...

Instructions
Page 49
...64257;cations Model Type Reception Format Reception Range Power Source Power Consumption Screen Size Audio Output Speakers Antenna Terminal (VHF/UHF, ATSC/DIGITAL CABLE IN) Input 4, 5 Terminal Input 4, 5 Terminal (Component Terminal) Input 1, 2, 3 Terminal (HDMI Input Terminal) Audio Output Jacks (FIX) Optical Output Digital Audio Dimensions (inch/mm) W X H X D Weight (lbs / kg) LT-32E479 LT-32EM49 LCD Flat Television NTSC, BTSC System (Multi-Channel Sound) ATSC Terrestrial, Digital Cable VHF 2 to 13, UHF 14 to 69 at ATSC, CATV 135 Sub, Mid, Super, Hyper and Ultra bands at Digital Cable VHF...
...64257;cations Model Type Reception Format Reception Range Power Source Power Consumption Screen Size Audio Output Speakers Antenna Terminal (VHF/UHF, ATSC/DIGITAL CABLE IN) Input 4, 5 Terminal Input 4, 5 Terminal (Component Terminal) Input 1, 2, 3 Terminal (HDMI Input Terminal) Audio Output Jacks (FIX) Optical Output Digital Audio Dimensions (inch/mm) W X H X D Weight (lbs / kg) LT-32E479 LT-32EM49 LCD Flat Television NTSC, BTSC System (Multi-Channel Sound) ATSC Terrestrial, Digital Cable VHF 2 to 13, UHF 14 to 69 at ATSC, CATV 135 Sub, Mid, Super, Hyper and Ultra bands at Digital Cable VHF...


