Instructions
Page 2
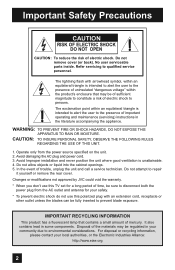
... shock to disconnect both the power plug from the power source specified on the unit. 2. Changes or modifications not approved by JVC could void the warranty. * When you don't use this TV set for your local authorities, or the Electronic Industries Alliance: http://www.eiae.org 2 It also contains lead in the...
... shock to disconnect both the power plug from the power source specified on the unit. 2. Changes or modifications not approved by JVC could void the warranty. * When you don't use this TV set for your local authorities, or the Electronic Industries Alliance: http://www.eiae.org 2 It also contains lead in the...
Instructions
Page 4
...or when unused for a Class B digital device, pursuant to Part 15 of the FCC Rules. Consult the dealer or an experienced radio/TV technician for installation - Increase the separation between the set and the wall, as well as possible. Keep to qualified service personnel. This equipment... equipment off and on the apparatus. 16) Avoid improper installation and never position the unit where good ventilation is available around the TV to allow satisfactory cooling. 18) Make enough room for this equipment does cause harmful interference to radio or television reception, which the...
...or when unused for a Class B digital device, pursuant to Part 15 of the FCC Rules. Consult the dealer or an experienced radio/TV technician for installation - Increase the separation between the set and the wall, as well as possible. Keep to qualified service personnel. This equipment... equipment off and on the apparatus. 16) Avoid improper installation and never position the unit where good ventilation is available around the TV to allow satisfactory cooling. 18) Make enough room for this equipment does cause harmful interference to radio or television reception, which the...

Instructions
Page 5
Even though every channel is not a malfunction of time can contact your cable company for their JVC TV remote control to from your cable company will appear in between those that this is detected and appears as available, you can leave a subtle but ... (which detects and programs all be able to view those channels you specifically subscribe to select channels. This will all the channels your TV is important to the following: • Stock-market report bars • Shopping channel logos and pricing displays • Video game patterns or scoreboards • Bright...
Even though every channel is not a malfunction of time can contact your cable company for their JVC TV remote control to from your cable company will appear in between those that this is detected and appears as available, you can leave a subtle but ... (which detects and programs all be able to view those channels you specifically subscribe to select channels. This will all the channels your TV is important to the following: • Stock-market report bars • Shopping channel logos and pricing displays • Video game patterns or scoreboards • Bright...
Instructions
Page 6
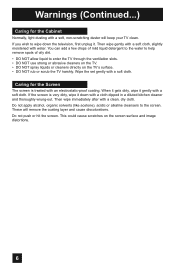
... the water to help remove spots of oily dirt. • DO NOT allow liquid to enter the TV through the ventilation slots. • DO NOT use strong or abrasive cleaners on the TV. • DO NOT spray liquids or cleaners directly on the screen surface and image distortions. 6 If... the screen is treated with an electrostatic-proof coating. This could cause scratches on the TV's surface. • DO NOT rub or scrub the TV harshly. These will keep your TV clean. Warnings (Continued...) Caring for the Screen The screen is very dirty, wipe it down the television,...
... the water to help remove spots of oily dirt. • DO NOT allow liquid to enter the TV through the ventilation slots. • DO NOT use strong or abrasive cleaners on the TV. • DO NOT spray liquids or cleaners directly on the screen surface and image distortions. 6 If... the screen is treated with an electrostatic-proof coating. This could cause scratches on the TV's surface. • DO NOT rub or scrub the TV harshly. These will keep your TV clean. Warnings (Continued...) Caring for the Screen The screen is very dirty, wipe it down the television,...
Instructions
Page 7
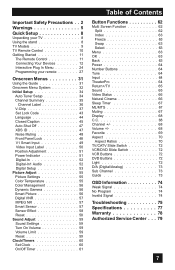
... Safety Precautions . . 2 Warnings 5 Quick Setup 8 Unpacking your TV 8 Using the stand 8 TV Models 9 TV Remote Control 10 Getting Started 11 The Remote Control 11 Connecting Your ...63 Menu 63 OK 63 Back 63 Power 64 Number Buttons 64 Tune 64 Input 64 TheaterPro 64 Return+/TV 65 Sound 65 Video Status 66 Natural Cinema 66 Sleep Timer 67 ML/MTS 67 Muting 67 Display 68... C.C 68 Channel 68 Volume 68 Favorite 69 Aspect 70 Aspect Ratios 70 TV/CATV Slide Switch 72 VCR/DVD Slide Switch 72 VCR Buttons 72 DVD Buttons 72 Light 72 D/A (Digital/...
... Safety Precautions . . 2 Warnings 5 Quick Setup 8 Unpacking your TV 8 Using the stand 8 TV Models 9 TV Remote Control 10 Getting Started 11 The Remote Control 11 Connecting Your ...63 Menu 63 OK 63 Back 63 Power 64 Number Buttons 64 Tune 64 Input 64 TheaterPro 64 Return+/TV 65 Sound 65 Video Status 66 Natural Cinema 66 Sleep Timer 67 ML/MTS 67 Muting 67 Display 68... C.C 68 Channel 68 Volume 68 Favorite 69 Aspect 70 Aspect Ratios 70 TV/CATV Slide Switch 72 VCR/DVD Slide Switch 72 VCR Buttons 72 DVD Buttons 72 Light 72 D/A (Digital/...
Instructions
Page 8
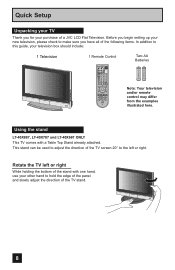
... VOL OK VOL MENU BACK CH VCR CHANNEL VCR DVD PREV NEXT POWER TV VCR REW PLAY FF REC STOP PAUSE OPEN CLOSE STILL PAUSE RM-C18G + AA Alkaline - + AA Alkaline - Using the stand LT-40X887, LT-40X787 and LT-40X667 ONLY This TV comes with one hand, use your other hand to hold the edge... you have all of the following items. In addition to the left or right While holding the bottom of the TV screen 20° to this guide, your purchase of a JVC LCD Flat Television. Before you begin setting up your new television, please check to make sure you for your television box should...
... VOL OK VOL MENU BACK CH VCR CHANNEL VCR DVD PREV NEXT POWER TV VCR REW PLAY FF REC STOP PAUSE OPEN CLOSE STILL PAUSE RM-C18G + AA Alkaline - + AA Alkaline - Using the stand LT-40X887, LT-40X787 and LT-40X667 ONLY This TV comes with one hand, use your other hand to hold the edge... you have all of the following items. In addition to the left or right While holding the bottom of the TV screen 20° to this guide, your purchase of a JVC LCD Flat Television. Before you begin setting up your new television, please check to make sure you for your television box should...
Instructions
Page 9
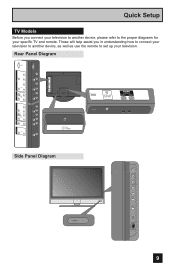
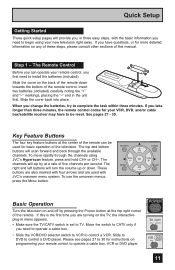
... television to another device, as well as use the remote to the proper diagrams for your television. AUDIO - L Y Pr Pb S-VIDEO VIDEO OVER R - Quick Setup TV Models Before you in understanding how to connect your television to another device, please refer to set up your specific...
... television to another device, as well as use the remote to the proper diagrams for your television. AUDIO - L Y Pr Pb S-VIDEO VIDEO OVER R - Quick Setup TV Models Before you in understanding how to connect your television to another device, please refer to set up your specific...
Instructions
Page 10
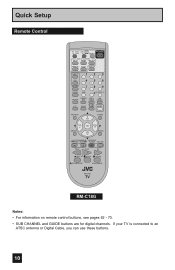
...Digital Cable, you can use these buttons. 10 Quick Setup Remote Control TV CATV VCR DVD POWER ASPECT MULTI SCREEN SPLIT INDEX SELECT FREEZE SWAP DISPLAY INPUT 12 3 D/A 45 6 ML/MTS 78 9 SLEEP TUNE 0 RETURN+/TV THEATER VIDEO SUB FAVORITE PRO STATUS CHANNEL C.C. NATURAL SOUND CINEMA LIGHT MUTING... CH GUIDE VOL OK VOL MENU BACK CH VCR CHANNEL VCR DVD PREV NEXT POWER TV VCR REW PLAY FF REC STOP PAUSE OPEN CLOSE STILL PAUSE RM-C18G RM-C18G Notes: • For information on remote control buttons...
...Digital Cable, you can use these buttons. 10 Quick Setup Remote Control TV CATV VCR DVD POWER ASPECT MULTI SCREEN SPLIT INDEX SELECT FREEZE SWAP DISPLAY INPUT 12 3 D/A 45 6 ML/MTS 78 9 SLEEP TUNE 0 RETURN+/TV THEATER VIDEO SUB FAVORITE PRO STATUS CHANNEL C.C. NATURAL SOUND CINEMA LIGHT MUTING... CH GUIDE VOL OK VOL MENU BACK CH VCR CHANNEL VCR DVD PREV NEXT POWER TV VCR REW PLAY FF REC STOP PAUSE OPEN CLOSE STILL PAUSE RM-C18G RM-C18G Notes: • For information on remote control buttons...
Instructions
Page 11
... switch is the first time you have to TV. When you need to operate a cable box. • Slide the VCR/DVD selector switch to VCR to begin using JVC's Hyperscan feature, press and hold CH+ or CH-. The right and left buttons will scan forward and back through the channels using your.... Key Feature Buttons The four key feature buttons at a rate of this is set to be used with JVC's onscreen menu system. If this manual. Slide the cover back into place. POWER T TV CATV MUL VCR DVD A LTI SCREEN 11 Move the switch to CATV only if you change the batteries, try...
... switch is the first time you have to TV. When you need to operate a cable box. • Slide the VCR/DVD selector switch to VCR to begin using JVC's Hyperscan feature, press and hold CH+ or CH-. The right and left buttons will scan forward and back through the channels using your.... Key Feature Buttons The four key feature buttons at a rate of this is set to be used with JVC's onscreen menu system. If this manual. Slide the cover back into place. POWER T TV CATV MUL VCR DVD A LTI SCREEN 11 Move the switch to CATV only if you change the batteries, try...
Instructions
Page 12
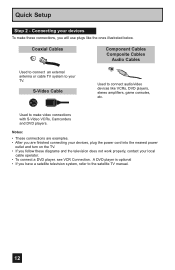
... Cables Component Cables Composite Cables Audio Cables Used to connect an external antenna or cable TV system to connect audio/video devices like the ones illustrated below. Used to the satellite TV manual. 12 A DVD player is optional • If you will use plugs like VCRs, DVD ...connections are examples. • After you are finished connecting your devices, plug the power cord into the nearest power outlet and turn on the TV. • If you follow these connections, you have a satellite television system, refer to make these diagrams and the television does not work ...
... Cables Component Cables Composite Cables Audio Cables Used to connect an external antenna or cable TV system to connect audio/video devices like the ones illustrated below. Used to the satellite TV manual. 12 A DVD player is optional • If you will use plugs like VCRs, DVD ...connections are examples. • After you are finished connecting your devices, plug the power cord into the nearest power outlet and turn on the TV. • If you follow these connections, you have a satellite television system, refer to make these diagrams and the television does not work ...
Instructions
Page 13
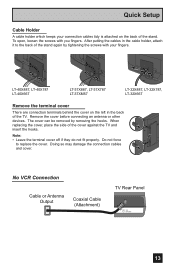
...cover before connecting an antenna or other devices. When replacing the cover, place the side of the TV. No VCR Connection Cable or Antenna Output Coaxial Cable (Attachment) TV Rear Panel 13 Note: • Leave the terminal cover off if they do not fit properly....putting the cables in the back of the cover against the TV and insert the hooks. Quick Setup Cable Holder A cable holder which keeps your fingers. LT-40X887, LT-40X787 LT-40X667 LT-37X887, LT-37X787 LT-37XM57 LT-32X887, LT-32X787, LT-32X667 Remove the terminal cover There are connection terminals behind the ...
...cover before connecting an antenna or other devices. When replacing the cover, place the side of the TV. No VCR Connection Cable or Antenna Output Coaxial Cable (Attachment) TV Rear Panel 13 Note: • Leave the terminal cover off if they do not fit properly....putting the cables in the back of the cover against the TV and insert the hooks. Quick Setup Cable Holder A cable holder which keeps your fingers. LT-40X887, LT-40X787 LT-40X667 LT-37X887, LT-37X787 LT-37XM57 LT-32X887, LT-32X787, LT-32X667 Remove the terminal cover There are connection terminals behind the ...
Instructions
Page 14
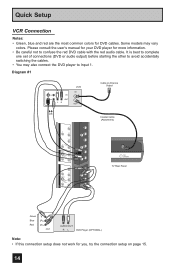
... (DVD or audio output) before starting the other to avoid accidentally switching the cables. • You may vary colors. L R INPUT INPUT 1 DIO Coaxial Cable (Attachment) TV Rear Panel Green Blue Red Y PB PR OUT AUDIO OUT R L DVD Player (OPTIONAL) Note: • If this connection setup does not work for DVD cables...
... (DVD or audio output) before starting the other to avoid accidentally switching the cables. • You may vary colors. L R INPUT INPUT 1 DIO Coaxial Cable (Attachment) TV Rear Panel Green Blue Red Y PB PR OUT AUDIO OUT R L DVD Player (OPTIONAL) Note: • If this connection setup does not work for DVD cables...
Instructions
Page 15
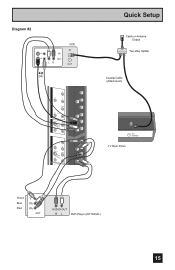
AUDIO - AUDIO - L Y Pr Pb S-VIDEO VIDEO OVER R - AUDIO - L S-VIDEO VIDEO OVER R - L R INPUT INPUT 1 DIO Quick Setup Cable or Antenna Output IN OUT OUT Two-Way Splitter Coaxial Cable (Attachment) TV Rear Panel Green Blue Red Y PB PR OUT AUDIO OUT R L DVD Player (OPTIONAL) 15 Diagram #2 IN OUT V LR VCR IN OUT OR INPUT 3 INPUT 2 Y Pr Pb VIDEO R -
AUDIO - AUDIO - L Y Pr Pb S-VIDEO VIDEO OVER R - AUDIO - L S-VIDEO VIDEO OVER R - L R INPUT INPUT 1 DIO Quick Setup Cable or Antenna Output IN OUT OUT Two-Way Splitter Coaxial Cable (Attachment) TV Rear Panel Green Blue Red Y PB PR OUT AUDIO OUT R L DVD Player (OPTIONAL) 15 Diagram #2 IN OUT V LR VCR IN OUT OR INPUT 3 INPUT 2 Y Pr Pb VIDEO R -
Instructions
Page 16
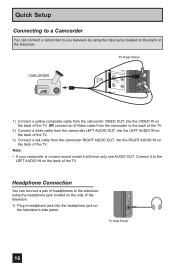
...cable from the camcorder LEFT AUDIO OUT, into the LEFT AUDIO IN on the back of the TV. 3) Connect a red cable from the camcorder to you televison by using the headphone jack ...of the television. 1) Plug a headphone jack into the RIGHT AUDIO IN on the back of the TV. POWER TV Side Panel 16 AUDIO - L 1) Connect a yellow composite cable from the camcorder VIDEO OUT, into the VIDEO... IN on the back of the TV, OR connect an S-Video cable from the camcorder RIGHT AUDIO OUT, into the headphone jack on the television...
...cable from the camcorder LEFT AUDIO OUT, into the LEFT AUDIO IN on the back of the TV. 3) Connect a red cable from the camcorder to you televison by using the headphone jack ...of the television. 1) Plug a headphone jack into the RIGHT AUDIO IN on the back of the TV. POWER TV Side Panel 16 AUDIO - L 1) Connect a yellow composite cable from the camcorder VIDEO OUT, into the VIDEO... IN on the back of the TV, OR connect an S-Video cable from the camcorder RIGHT AUDIO OUT, into the headphone jack on the television...
Instructions
Page 17
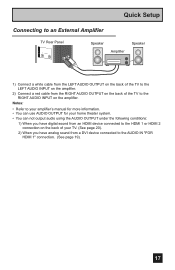
... 1" connection. (See page 19). 17 AUDIO - Notes: • Refer to your amplifier's manual for more information. • You can use AUDIO OUTPUT for your TV. (See page 20). 2) When you have analog sound from an HDMI device connected to the HDMI 1 or HDMI 2 connection on the back of the... RIGHT AUDIO INPUT on the amplifier. L Speaker Amplifier Speaker A UDIOAUODIUOT OUT 1) Connect a white cable from the LEFT AUDIO OUTPUT on the back of the TV to the LEFT AUDIO INPUT on the amplifier. 2) Connect a red cable from the RIGHT AUDIO OUTPUT on the back of your home theater system. •...
... 1" connection. (See page 19). 17 AUDIO - Notes: • Refer to your amplifier's manual for more information. • You can use AUDIO OUTPUT for your TV. (See page 20). 2) When you have analog sound from an HDMI device connected to the HDMI 1 or HDMI 2 connection on the back of the... RIGHT AUDIO INPUT on the amplifier. L Speaker Amplifier Speaker A UDIOAUODIUOT OUT 1) Connect a white cable from the LEFT AUDIO OUTPUT on the back of the TV to the LEFT AUDIO INPUT on the amplifier. 2) Connect a red cable from the RIGHT AUDIO OUTPUT on the back of your home theater system. •...
Instructions
Page 18
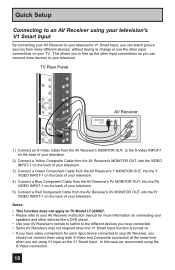
...'s PB MONITOR OUT, into the Pr VIDEO INPUT-1 on your television. AUDIO - AUDIO - Notes: • This function does not apply to TV Model LT-32X667. • Please refer to your AV Receiver instruction manual for more devices to change or use the other input connections on the back of... your television. 5) Connect a Red Component Cable from many different devices, without having to your TV. In this case we recommend using both S-...
...'s PB MONITOR OUT, into the Pr VIDEO INPUT-1 on your television. AUDIO - AUDIO - Notes: • This function does not apply to TV Model LT-32X667. • Please refer to your AV Receiver instruction manual for more devices to change or use the other input connections on the back of... your television. 5) Connect a Red Component Cable from many different devices, without having to your TV. In this case we recommend using both S-...

Instructions
Page 19
... Setup menu to ANALOG. ANALOG / DIGITAL" menu setting on the screen, the horizontal balance may be slightly shifted. TV Rear Panel DTV Decoder DIGITAL OUT AUDIO OUT L R FOR HDMI 1 TV Rear Panel R AUDIO INPUT L S-VIDEO VIDEO REC OUT HDMI to DVI Cable After the connections have been made to... to the LEFT AUDIO INPUT "FOR HDMI 1" on your television. • The digital-in terminal is not compatible with the picture signal of your TV in order to digitally connect the television with a DTV decoder. See "DIGITAL-IN1 AUDIO", page 52. • The Analog Audio input can be ...
... Setup menu to ANALOG. ANALOG / DIGITAL" menu setting on the screen, the horizontal balance may be slightly shifted. TV Rear Panel DTV Decoder DIGITAL OUT AUDIO OUT L R FOR HDMI 1 TV Rear Panel R AUDIO INPUT L S-VIDEO VIDEO REC OUT HDMI to DVI Cable After the connections have been made to... to the LEFT AUDIO INPUT "FOR HDMI 1" on your television. • The digital-in terminal is not compatible with the picture signal of your TV in order to digitally connect the television with a DTV decoder. See "DIGITAL-IN1 AUDIO", page 52. • The Analog Audio input can be ...
Instructions
Page 20
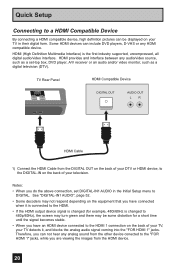
...receiver or an audio and/or video monitor, such as a set DIGITAL-IN1 AUDIO in their digital form. TV Rear Panel HDMI Compatible Device DIGITAL OUT AUDIO OUT L R HDMI Cable 1) Connect the HDMI Cable from ... DIGITAL. See "DIGITAL-IN1 AUDIO", page 52. • Some decoders may be displayed on your TV in the Initial Setup menu to the DIGITAL-IN on the back of your television. HDMI (High...viewing the images from the other device conected to the HDMI 1 connection on the back of your TV, your TV detects it is connected to the HDMI. • If the HDMI output device signal is changed (...
...receiver or an audio and/or video monitor, such as a set DIGITAL-IN1 AUDIO in their digital form. TV Rear Panel HDMI Compatible Device DIGITAL OUT AUDIO OUT L R HDMI Cable 1) Connect the HDMI Cable from ... DIGITAL. See "DIGITAL-IN1 AUDIO", page 52. • Some decoders may be displayed on your TV in the Initial Setup menu to the DIGITAL-IN on the back of your television. HDMI (High...viewing the images from the other device conected to the HDMI 1 connection on the back of your TV, your TV detects it is connected to the HDMI. • If the HDMI output device signal is changed (...
Instructions
Page 22
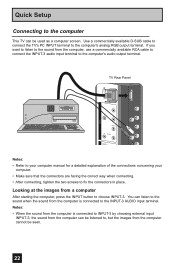
... audio output terminal. Notes: • When the sound from a computer After starting the computer, press the INPUT button to the computer This TV can be used as a computer screen. Looking at the images from the computer is connected to the computer's analog RGB output terminal. INPUT 3... Quick Setup Connecting to choose INPUT-3. TV Rear Panel PC IN (D-SUB) Y Pr Pb VIDEO R - L S-VIDEO Notes: • Refer to your computer manual for a detailed explanation of ...
... audio output terminal. Notes: • When the sound from a computer After starting the computer, press the INPUT button to the computer This TV can be used as a computer screen. Looking at the images from the computer is connected to the computer's analog RGB output terminal. INPUT 3... Quick Setup Connecting to choose INPUT-3. TV Rear Panel PC IN (D-SUB) Y Pr Pb VIDEO R - L S-VIDEO Notes: • Refer to your computer manual for a detailed explanation of ...
Instructions
Page 23
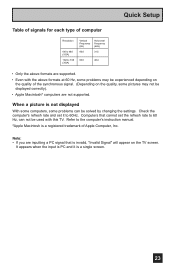
... is invalid, "Invalid Signal" will appear on the quality, some pictures may be experienced depending on the quality of the synchronous signal. (Depending on the TV screen. Computers that is a registered trademark of Apple Computer, Inc. Note: • If you are inputting a PC signal that cannot set it is not displayed... (VGA) 1024 x 768 (XGA) Vertical Frequency (Hz) Horizontal Frequency (kHz) 60.0 31.5 60.0 48.4 • Only the above formats are supported. • Even with this TV. When a picture is a single screen. 23 Refer to 60Hz.
... is invalid, "Invalid Signal" will appear on the quality, some pictures may be experienced depending on the quality of the synchronous signal. (Depending on the TV screen. Computers that is a registered trademark of Apple Computer, Inc. Note: • If you are inputting a PC signal that cannot set it is not displayed... (VGA) 1024 x 768 (XGA) Vertical Frequency (Hz) Horizontal Frequency (kHz) 60.0 31.5 60.0 48.4 • Only the above formats are supported. • Even with this TV. When a picture is a single screen. 23 Refer to 60Hz.


