

Instructions
Page 2
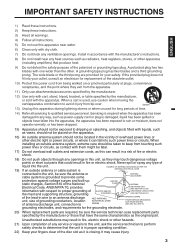
... with local, state or federal laws. Staple your television (located at the rear of the television cabinet). REFER SERVICING TO QUALIFIED SERVICE PERSONNEL. If this guide. DO NOT STARE INTO THE BEAM. Keep this product contain mercury. These limits are on , the user is connected. - Increase the separation between the equipment and receiver. - Serial number Model number 2 The exclamation point within an equilateral triangle...
... with local, state or federal laws. Staple your television (located at the rear of the television cabinet). REFER SERVICING TO QUALIFIED SERVICE PERSONNEL. If this guide. DO NOT STARE INTO THE BEAM. Keep this product contain mercury. These limits are on , the user is connected. - Increase the separation between the equipment and receiver. - Serial number Model number 2 The exclamation point within an equilateral triangle...
Instructions
Page 3
..., connection to NEC-NATIONAL ELECTRICAL CODE S2898A GROUND CLAMPS POWER SERVICE GROUNDING ELECTRODE SYSTEM (NEC ART 250, PART H) grounding electrodes, and requirements for the grounding electrode. 20) When replacement parts are required, be sure the service technician uses replacement parts specified by the manufacturer or those that have the same characteristics as they may cause injury. 3 When installing an outside antenna or cable system...
..., connection to NEC-NATIONAL ELECTRICAL CODE S2898A GROUND CLAMPS POWER SERVICE GROUNDING ELECTRODE SYSTEM (NEC ART 250, PART H) grounding electrodes, and requirements for the grounding electrode. 20) When replacement parts are required, be sure the service technician uses replacement parts specified by the manufacturer or those that have the same characteristics as they may cause injury. 3 When installing an outside antenna or cable system...
Instructions
Page 4
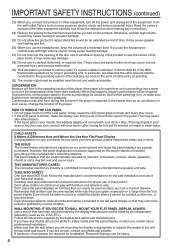
... press hard or jolt the LCD panel. TUNE INTO SAFETY One size does NOT fit all instructions supplied by the display and wall mount manufacturers. If you are mounting the display is exposed to the minimum level before switching it cannot be impaired. If you have any connections. 24) Reduce the volume to the breeze from the wall outlet. If you are unsure, contact a professional installer...
... press hard or jolt the LCD panel. TUNE INTO SAFETY One size does NOT fit all instructions supplied by the display and wall mount manufacturers. If you are mounting the display is exposed to the minimum level before switching it cannot be impaired. If you have any connections. 24) Reduce the volume to the breeze from the wall outlet. If you are unsure, contact a professional installer...
Instructions
Page 5
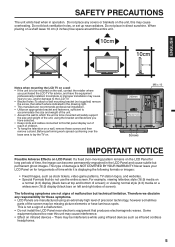
... a wall mounting bracket (not supplied) remove the screw, then attach where indicated in operation. This is not a sign of a malfunction. • Do not install the LCD Panel near radiators. Do not place any responsibility for long periods of time, the image can become permanently engrained in direct sunshine. For example, viewing letterbox style (16:9) media on a normal (4:3) display (black bars at top and bottom of screen...
... a wall mounting bracket (not supplied) remove the screw, then attach where indicated in operation. This is not a sign of a malfunction. • Do not install the LCD Panel near radiators. Do not place any responsibility for long periods of time, the image can become permanently engrained in direct sunshine. For example, viewing letterbox style (16:9) media on a normal (4:3) display (black bars at top and bottom of screen...
Instructions
Page 7
... screen during playback. Parental Control - The On-Screen display allows precise remote control adjustment of DVD discs recorded in a movie theater or a concert hall. • Surround standard is the same size as an audio CD disc. V-chip will not be output from the remote control, the TV can change the angles during playback. The picture quality is already in use in memory and recall the marked scenes. This format...
... screen during playback. Parental Control - The On-Screen display allows precise remote control adjustment of DVD discs recorded in a movie theater or a concert hall. • Surround standard is the same size as an audio CD disc. V-chip will not be output from the remote control, the TV can change the angles during playback. The picture quality is already in use in memory and recall the marked scenes. This format...
Instructions
Page 9
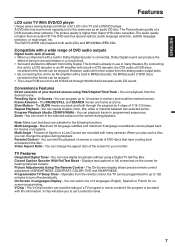
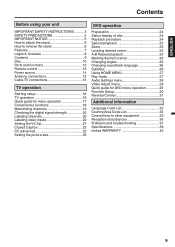
... attach the stand 6 How to remove the stand 6 Features 7 Logos & Licenses 8 Contents 9 Disc 10 Parts and functions 12 Remote control 13 Power source 14 Antenna connections 15 Cable TV connections 15 TV operation Starting setup 16 TV operation 16 Quick guide for menu operation 17 Convenience functions 18 Memorizing channels 19 Checking the digital signal strength 20 Labeling channels 20 Labeling video inputs 20 Setting the V-Chip 21 Closed Caption 22 CC advanced 22 Setting the picture size 23 DVD operation Preparation 24...
... attach the stand 6 How to remove the stand 6 Features 7 Logos & Licenses 8 Contents 9 Disc 10 Parts and functions 12 Remote control 13 Power source 14 Antenna connections 15 Cable TV connections 15 TV operation Starting setup 16 TV operation 16 Quick guide for menu operation 17 Convenience functions 18 Memorizing channels 19 Checking the digital signal strength 20 Labeling channels 20 Labeling video inputs 20 Setting the V-Chip 21 Closed Caption 22 CC advanced 22 Setting the picture size 23 DVD operation Preparation 24...
Instructions
Page 12
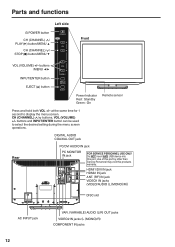
... (L (MONO)/R) COMPONENT IN jacks buttons and INPUT/ENTER button can be used to display the menu screen. DIGITAL AUDIO COAXIAL OUT jack Rear PC/DVI AUDIO IN jack PC MONITOR IN jack FOR SERVICE PERSONNEL USE ONLY Do NOT insert ANY USB device into this products warranty. CH (CHANNEL) / buttons, VOL (VOLUME) +/- Parts and functions Left side POWER button CH (CHANNEL) / PLAY ( ) button/MENU ▲ CH (CHANNEL) / STOP ( ) button/MENU ▼ Front VOL (VOLUME) +/- Use of this port by other than Service Personnel may...
... (L (MONO)/R) COMPONENT IN jacks buttons and INPUT/ENTER button can be used to display the menu screen. DIGITAL AUDIO COAXIAL OUT jack Rear PC/DVI AUDIO IN jack PC MONITOR IN jack FOR SERVICE PERSONNEL USE ONLY Do NOT insert ANY USB device into this products warranty. CH (CHANNEL) / buttons, VOL (VOLUME) +/- Parts and functions Left side POWER button CH (CHANNEL) / PLAY ( ) button/MENU ▲ CH (CHANNEL) / STOP ( ) button/MENU ▼ Front VOL (VOLUME) +/- Use of this port by other than Service Personnel may...
Instructions
Page 13
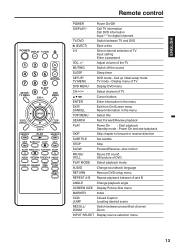
... setup menu REPEAT A-B Repeat playback between A and B ANGLE Change playback angle SCREEN SIZE Display Picture Size menu MARKER Index CCD/ JUMP Closed Caption Locating desired scene RECALL/ ZOOM Switch between TV and DVD (EJECT) Eject a disc 0-9 Direct channel selection of TV Input setting Enter a password VOL +/- Call up initial setup mode TV mode - Display menu of TV DVD MENU Display DVD menu CH / Select channel of the TV MUTING Switch off the sound SLEEP Sleep timer SETUP/ TV MENU DVD mode - Adjust volume of TV ▲▼◀▶ Cursor buttons...
... setup menu REPEAT A-B Repeat playback between A and B ANGLE Change playback angle SCREEN SIZE Display Picture Size menu MARKER Index CCD/ JUMP Closed Caption Locating desired scene RECALL/ ZOOM Switch between TV and DVD (EJECT) Eject a disc 0-9 Direct channel selection of TV Input setting Enter a password VOL +/- Call up initial setup mode TV mode - Display menu of TV DVD MENU Display DVD menu CH / Select channel of the TV MUTING Switch off the sound SLEEP Sleep timer SETUP/ TV MENU DVD mode - Adjust volume of TV ▲▼◀▶ Cursor buttons...
Instructions
Page 15
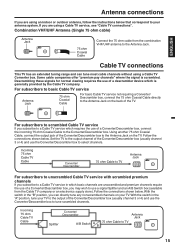
... Antenna Jack. Descrambling these signals for normal viewing requires the use of a descrambler device which requires the use of a Converter/Descrambler box, connect the incoming 75 ohm Coaxial Cable to your TV to the output of the Converter/Descrambler box (usually channel 3 or 4) and use the Converter/Descrambler box to the Antenna Jack on your TV. For subscribers to select channels. Set the TV to the output channel...
... Antenna Jack. Descrambling these signals for normal viewing requires the use of a descrambler device which requires the use of a Converter/Descrambler box, connect the incoming 75 ohm Coaxial Cable to your TV to the output of the Converter/Descrambler box (usually channel 3 or 4) and use the Converter/Descrambler box to the Antenna Jack on your TV. For subscribers to select channels. Set the TV to the output channel...
Instructions
Page 16
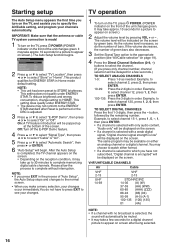
... antenna or cable TV system connection is adjusted. 3 Press ▲ or ▼ to select "E-POP Demo", then press ◀ or ▶ to specify the Air/Cable setting, and program your changes occur immediately. This setting does qualify under ENERGY STAR. Starting setup TV operation The Auto Setup menu appears the first time you turn on the front of the unit changes green. This product qualifies for a picture to appear on screen...
... antenna or cable TV system connection is adjusted. 3 Press ▲ or ▼ to select "E-POP Demo", then press ◀ or ▶ to specify the Air/Cable setting, and program your changes occur immediately. This setting does qualify under ENERGY STAR. Starting setup TV operation The Auto Setup menu appears the first time you turn on the front of the unit changes green. This product qualifies for a picture to appear on screen...
Instructions
Page 17
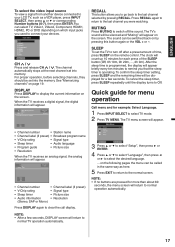
... (if preset) • Signal type • Picture size • Resolution Press DISPLAY again to clear the call display. The sound can select TV, Video1, Video2, Component, HDMI1, HDMI2, PC or DVD depending on by pressing RECALL. Quick guide for menu operation Call menu and for each press of time, press SLEEP on page 19. You can be set into the memory. See "Memorizing channels" on the remote control. Press RECALL again to return...
... (if preset) • Signal type • Picture size • Resolution Press DISPLAY again to clear the call display. The sound can select TV, Video1, Video2, Component, HDMI1, HDMI2, PC or DVD depending on by pressing RECALL. Quick guide for menu operation Call menu and for each press of time, press SLEEP on page 19. You can be set into the memory. See "Memorizing channels" on the remote control. Press RECALL again to return...
Instructions
Page 18
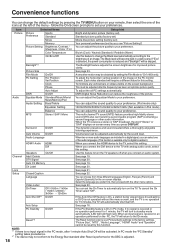
... menu screen, and the TV is received or no operation for improved picture clarity. PC Standby On/Off If the PC Standby feature is adjusted. 18 Reset*2 The Reset function returns your remote, then select the one of the menu - "Picture Size", "MTS" , "Audio Language", "HDMI1 Audio" and "Speakers" cannot be reset by you can be obtained by pressing the TV MENU button on your Picture/Audio settings to standby mode automatically (LED light will be adjusted after Reset...
... menu screen, and the TV is received or no operation for improved picture clarity. PC Standby On/Off If the PC Standby feature is adjusted. 18 Reset*2 The Reset function returns your remote, then select the one of the menu - "Picture Size", "MTS" , "Audio Language", "HDMI1 Audio" and "Speakers" cannot be reset by you can be obtained by pressing the TV MENU button on your Picture/Audio settings to standby mode automatically (LED light will be adjusted after Reset...

Instructions
Page 19
..." or "Cable". ENGLISH Memorizing channels This TV is equipped with an antenna, set into memory, skipping over unwanted channels. To use this menu option is in the new channel. 2 Select "Channel", then press ▶ or ENTER. 3 Press ▲ or ▼ to receive a list based on the reception condition, a bar display may be patient. CH Auto Ch Memory Signal Type Automatic Search Cable Stop Analog Channel Found : 0 Digital Channel Found : 0 Programming Now :Select...
..." or "Cable". ENGLISH Memorizing channels This TV is equipped with an antenna, set into memory, skipping over unwanted channels. To use this menu option is in the new channel. 2 Select "Channel", then press ▶ or ENTER. 3 Press ▲ or ▼ to receive a list based on the reception condition, a bar display may be patient. CH Auto Ch Memory Signal Type Automatic Search Cable Stop Analog Channel Found : 0 Digital Channel Found : 0 Programming Now :Select...
Instructions
Page 21
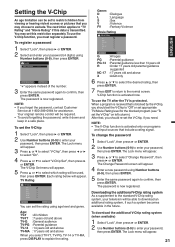
.... 2 Use Number buttons (0-9) to download an additional rating system, if such a system becomes available in a safe place. Lock New Password * * *_ [0-9] :Enter Code ENTER :Set " " appears instead of the number. 3 Enter the same password again to explain the rating. Your original remote control will appear. 21 ENGLISH Age: TV-Y : All children TV-Y7 : 7 years old and above TV-G : General audience TV-PG : Parental guidance...
.... 2 Use Number buttons (0-9) to download an additional rating system, if such a system becomes available in a safe place. Lock New Password * * *_ [0-9] :Enter Code ENTER :Set " " appears instead of the number. 3 Enter the same password again to explain the rating. Your original remote control will appear. 21 ENGLISH Age: TV-Y : All children TV-Y7 : 7 years old and above TV-G : General audience TV-PG : Parental guidance...
Instructions
Page 24
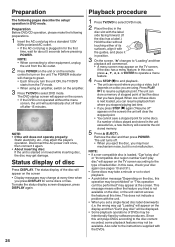
... that you are using an amplifier, switch on the screen • Display messages may affect the player's operation. NOTE: • If the unit does not operate properly: Static electricity, etc., may change to the type of disc Press DISPLAY. The POWER indicator will change at the screen. NOTE: • If a non-compatible disc is loaded, "Can't play disc" or "Incompatible disc region number Can't play disc" will...
... that you are using an amplifier, switch on the screen • Display messages may affect the player's operation. NOTE: • If the unit does not operate properly: Static electricity, etc., may change to the type of disc Press DISPLAY. The POWER indicator will change at the screen. NOTE: • If a non-compatible disc is loaded, "Can't play disc" or "Incompatible disc region number Can't play disc" will...
Instructions
Page 28
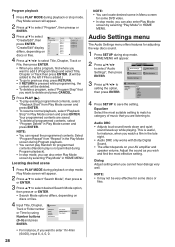
...; Adjusts loud sound levels down and quiet sound levels up while playing. Adjust the sound as you want to delete and press CANCEL. 5 Press PLAY ( ). • To play is not permitted during playback or stop mode. Play Mode A-B Repeat Repeat Random Program Search Mode Title Search Chapter Search Time Search Input Chapter 0 0 1 NOTE: • You can locate desired scene in HOME MENU. Audio Settings menu The Audio Settings menu offers features for some DVD video...
...; Adjusts loud sound levels down and quiet sound levels up while playing. Adjust the sound as you want to delete and press CANCEL. 5 Press PLAY ( ). • To play is not permitted during playback or stop mode. Play Mode A-B Repeat Repeat Random Program Search Mode Title Search Chapter Search Time Search Input Chapter 0 0 1 NOTE: • You can locate desired scene in HOME MENU. Audio Settings menu The Audio Settings menu offers features for some DVD video...
Instructions
Page 31
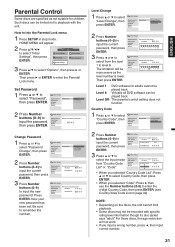
... MENU DVD Audio Settings Video Adjust Play Mode Disc Navigator Initial Settings 3 Press ▲/▼ to select "Initial Settings", then press ENTER. Be sure to input the password, then press ENTER. ENGLISH Parental Control Some discs are specified as the level number is lower. Initial Settings Digital Audio Out Video Output Language Display Options Parental Lock Password Level Change Country Code 2 Press Number buttons (0-9) to remember this number! Initial Settings Digital Audio Out Video Output Language Display Options Parental Lock Password Change Level...
... MENU DVD Audio Settings Video Adjust Play Mode Disc Navigator Initial Settings 3 Press ▲/▼ to select "Initial Settings", then press ENTER. Be sure to input the password, then press ENTER. ENGLISH Parental Control Some discs are specified as the level number is lower. Initial Settings Digital Audio Out Video Output Language Display Options Parental Lock Password Level Change Country Code 2 Press Number buttons (0-9) to remember this number! Initial Settings Digital Audio Out Video Output Language Display Options Parental Lock Password Change Level...
Instructions
Page 34
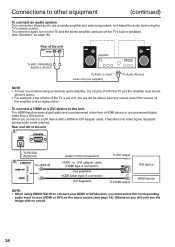
... stereo amplifier, and turn off the TV's built-in speakers (see "Speakers" on the menu screen (see the image with a HDMI-to-DVI adapter cable, it transfers only video signal. When you connect to a DVI device with no sound. 34 Rear of the unit Amplifier To VAR. (VARIABLE) AUDIO (L/R) OUT To Audio (L) Input Audio cord (not supplied) To Audio (R) Input NOTE: • To hear sound when using an external audio amplifier, the volume of both the...
... stereo amplifier, and turn off the TV's built-in speakers (see "Speakers" on the menu screen (see the image with a HDMI-to-DVI adapter cable, it transfers only video signal. When you connect to a DVI device with no sound. 34 Rear of the unit Amplifier To VAR. (VARIABLE) AUDIO (L/R) OUT To Audio (L) Input Audio cord (not supplied) To Audio (R) Input NOTE: • To hear sound when using an external audio amplifier, the volume of both the...

Instructions
Page 37
...; Aim at the remote control at the remote sensor. • Operate within approx. 15 feet or reduce the light in . SYMPTOMS POSSIBLE SOLUTIONS POWER • Make sure the power cord is off . • No broadcast on some channels. • Station or Cable TV experiencing problems, tune to another channel. • Check Cable TV connection or VHF/UHF antenna, reposition or rotate antenna. • Set Closed Caption in . Replace the batteries. •...
...; Aim at the remote control at the remote sensor. • Operate within approx. 15 feet or reduce the light in . SYMPTOMS POSSIBLE SOLUTIONS POWER • Make sure the power cord is off . • No broadcast on some channels. • Station or Cable TV experiencing problems, tune to another channel. • Check Cable TV connection or VHF/UHF antenna, reposition or rotate antenna. • Set Closed Caption in . Replace the batteries. •...
Instructions
Page 39
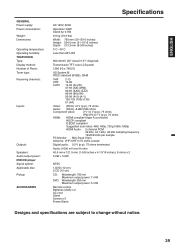
ENGLISH GENERAL Power supply: Power consumption: Weight: Dimensions: Operating temperature: Operating humidity: TELEVISION Type: Display method: Number of Pixels: Tuner type: Receiving channels: Inputs: Outputs: Speakers: Audio output power: DVD/CD player Signal system: Applicable disc: Pickup: ACCESSORIES Specifications AC 120V, 60Hz Operation: 94W Stand by: 0.3W 8.9 kg (19.6 lbs) Width: 760 mm (29-15/16 inches) Height: 554.5 mm (21-13/16 inches) Depth: 213.3 mm (8-3/8 inches) 5˚C - 40˚C Less than 80% RH 800.4mmV (32" class/31.51...
ENGLISH GENERAL Power supply: Power consumption: Weight: Dimensions: Operating temperature: Operating humidity: TELEVISION Type: Display method: Number of Pixels: Tuner type: Receiving channels: Inputs: Outputs: Speakers: Audio output power: DVD/CD player Signal system: Applicable disc: Pickup: ACCESSORIES Specifications AC 120V, 60Hz Operation: 94W Stand by: 0.3W 8.9 kg (19.6 lbs) Width: 760 mm (29-15/16 inches) Height: 554.5 mm (21-13/16 inches) Depth: 213.3 mm (8-3/8 inches) 5˚C - 40˚C Less than 80% RH 800.4mmV (32" class/31.51...


